 External, internal, and depth micrometers |
A micrometer is a widely used device in mechanical engineering for precisely measuring thickness of blocks, outer and inner diameters of shafts and depths of slots. Appearing frequently in metrology, the study of measurement, micrometers have several advantages over other types of measuring instruments like the Vernier caliper - they are easy to use and their readouts are consistent.
Types
The image shows three common types of micrometers, the names are based on their application:
- External micrometer
- Internal micrometer
- Depth micrometer
An external micrometer is typically used to measure wires, spheres, shafts and blocks. An internal micrometer is used to measure the opening of holes, and a depth micrometer typically measures depths of slots and steps.
The precision of a micrometer is achieved by a using a fine pitch screw mechanism.
An additional interesting feature of micrometers is the inclusion of a spring-loaded twisting handle. Normally, one could use the mechanical advantage of the screw to force the micrometer to squeeze the material, giving an inaccurate measurement. However, by attaching a handle that will ratchet at a certain torque, the micrometer will not continue to advance once sufficient resistance is encountered.
Reading an inch-system micrometer
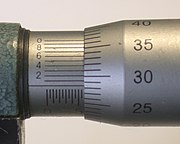
 Micrometer thimble showing 0.276 inch |
The spindle of an inch-system micrometer has 40 threads per inch, so that one turn moves the spindle axially 0.025 inch (1 ÷ 40 = 0.025), equal to the distance between two graduations on the frame. The 25 graduations on the thimble allow the 0.025 inch to be further divided, so that turning the thimble through one division moves the spindle axially 0.001 inch (0.025 ÷ 25 = 0.001). To read a micrometer, count the number of whole divisions that are visible on the scale of the frame, multiply this number by 25 (the number of thousandths of an inch that each division represents) and add to the product the number of that division on the thimble which coincides with the axial zero line on the frame. The result will be the diameter expressed in thousandths of an inch. As the numbers 1, 2, 3, etc., opposite every fourth sub-division on the frame, indicate hundreds of thousandths, the reading can easily be taken mentally.
Suppose the thimble were screwed out so that graduation 2, and three additional sub-divisions, were visible (as shown in the image), and that graduation 1 on the thimble coincided with the axial line on the frame. The reading then would be 0.200 +0.075 +0.010, or 0.276 inch.
Reading a metric micrometer
 Micrometer thimble reading 5.78mm |
The spindle of an ordinary metric micrometer has 2 threads per millimeter, and thus one complete revolution moves the spindle through a distance of 0.5 millimeter. The longitudinal line on the frame is graduated with 1 millimeter divisions and 0.5 millimeter subdivisions. The thimble has 50 graduations, each being 0.01 millimeter (one-hundredth of a millimeter). To read a metric micrometer, note the number of millimeter divisions visible on the scale of the sleeve, and add the total to the particular division on the thimble which coincides with the axial line on the sleeve.
Suppose that the thimble were screwed out so that graduation 5, and one additional 0.5 subdivision were visible (as shown in the image), and that graduation 28 on the thimble coincided with the axial line on the sleeve. The reading then would be 5.00 +0.5 +0.28 = 5.78 mm.
Reading a vernier micrometer

Micrometer sleeve (with vernier) reading 5.783mm
Some micrometers are provided with a vernier scale on the sleeve in addition to the regular graduations. These permit measurements within 0.001 millimeter to be made on metric micrometers, or 0.0001 inches on inch-system micrometers.
Metric micrometers of this type are read as follows: First determine the number of whole millimeters (if any) and the number of hundredths of a millimeter, as with an ordinary micrometer, and then find a line on the sleeve vernier scale which exactly coincides with one on the thimble. The number of this coinciding vernier line represents the number of thousandths of a millimeter to be added to the reading already obtained.
Thus, for example, a measurement of 5.783 millimeters would be obtained by reading 5.5 millimeters on the sleeve, and then adding 0.28 millimeter as determined by the thimble (as per the previous example). The vernier would then be used to read the 0.003 (as shown in the image).
Inch micrometers are read in a similar fashion.
Note: 0.01 millimeter = 0.000393 inch, and 0.002 millimeter = 0.000078 inch (78 millionths). Therefore, metric micrometers provide smaller measuring increments than comparable inch unit micrometers—the smallest graduation of an ordinary inch reading micrometer is 0.001 inch; the vernier type has graduations down to 0.0001 inch. When using either a metric or inch micrometer, without a vernier, smaller readings than those graduated may of course be obtained by visual interpolation between graduations.
History
The first ever micrometric screw was invented by William Gascoigne in the 17th century, as an enhancement of the Vernier; it was used in a telescope to measure angular distances between stars. Its adaptation for the measurement of the small dimension was made by Jean-Louis Palmer; this device is therefore often called palmer in France.