|
|
| Seven Style builds Westfields, Caterham, Dax Rush, Luego, Robin Hood, Tiger, Locust, MK, RAW, Quantum, you name it, you're building it, share it here. |

10th November 2023, 15:47
|
|
Senior Member
|
|
Join Date: Nov 2012
Posts: 845
|
|

This morning, as the rain lashed down, I performed some internet research regarding towing both a trailer and a car, in anticipation of delivering the project for welding activity. I learned that a trailer needed mudguards, as does a 'broken down car' so, either way, the skeleton would need its back body replacing. I dug it out of the GRP heap behind my front hedge and hosed it down. Before offering it up I decided to check for any loose remaining gubbins on the back end, and cable tied the offending disconnected brake lines/cables I found securely to the axle. Whilst it was half way out of the cave and eminently accessible in this afternoon's sunshine, I dug out my smallest cold chisel and with it lump hammered off the remains of the many body attachment pop rivets, knocking the bits left through their holes into the frame with a punch. There must have been at least 50 and the job was strangely satisfying  . I shall have the holes filled with weld. . I shall have the holes filled with weld.

At the moment I'm leaning towards towing it as a 'broken down car' with the back number plate in place and an ON TOW sign. I'll have its log book with me to prove its provenance should a zealous boy or girl in blue take an interest.
Regards, Mick

|
11th November 2023, 13:28
|
|
Senior Member
|
|
Join Date: Nov 2012
Posts: 845
|
|
 Butterfly brain, moi?
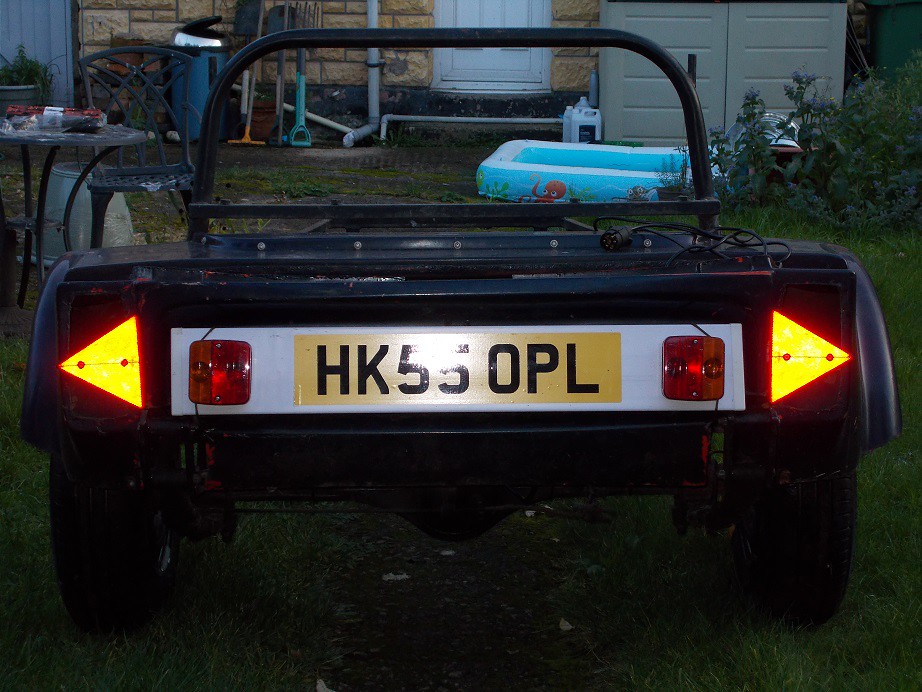
This morning I carried the rear body down to the cave and heaved it into position on the frame. I thought I'd make it look a bit more like a car by putting the back lights in. Digging them out of my shed and examining them revealed that they would need quite a bit of work in the location department, so I quickly abandoned the 'car' option and reverted to 'trailer'. Using a length of the ever handy paracord I tied the trailer board securely in the number plate recess of the body moulding, where it sat nicely. Threading the seven pin plug and its lead through to the frame's front, and admiring my handiwork, it dawned on me that reflective triangles would be needed  . .

I thought I could use tech screws into the newly cleared rivet holes to secure the moulding, but the holes were too big for the 5.5 mm items I had. A search revealed that 6.3mm ones were available, but in a minimum of 100, and as I would only need eight I decided to run a tap through the holes and screw it home that way pro-tem. I lashed out the almost four quid for the triangles and called it a day.
Regards, Mick
|
14th November 2023, 12:10
|
|
Senior Member
|
|
Join Date: Apr 2011
Posts: 282
|
|
Mick, I may be wrong but, if you are towing something you need the towing vehicle's reg on the trailer and the towed vehicle covered so that your untaxed " trailer" doesn't trigger the ANPR cameras and get you tickets for 2 vehicles.
It is coming on well.
|
14th November 2023, 15:58
|
|
Senior Member
|
|
Join Date: Nov 2012
Posts: 845
|
|
Hi Dpaz,
Thanks for that. My Jazz is kosher, so I don't think I'll be in any ANPR danger. I think the only circumstance in which I would fall foul of the persons in blue would be if I were pulled by a real jobsworth. When collecting my Mk1 Marlin Roadster on tow from Birmingham on a Sunday morning a good twenty years ago, we passed a jam sandwich plotted up on a roundabout. Despite its not having a windscreen, and being both open and unpainted, they scarcely gave it a glance. A pull would have been interesting, as my full harness belts were simply draped over my shoulders to give the illusion of safe Marlin piloting. Happy Days!
Regards, Mick
Last edited by Mick O'Malley; 2nd January 2024 at 05:51..
Reason: Typo.
|
17th November 2023, 11:16
|
|
Senior Member
|
|
Join Date: Nov 2012
Posts: 845
|
|
Tap tap tapping...
After what seemed an interminable fight with my camera, which would suddenly no longer communicate with my PC through its supplied cable, I uploaded my latest pictures using an SD card reader. Hooray!
Anyway, the day before yesterday, before my mentally exhausting camera battle (I'm no sort of techie, a telephone, to me, is made of Bakelite and sits on the hall stand) I wandered down to the cave, wheeled the partially clothed skeleton most of the way out of the cave and took off the rear body moulding. Offering up my 6mm tap to the old rivet holes revealed perfect compatibility, so I set to cutting the threads at all ten attachment points, the six side ones needing the wheels taking off. Thinking forward to the time when permanent attachment of the moulding would be necessary, and noticing the pristine 7mm tap in my set, which also has a 1mm pitch (the 6mm has seen a great deal of action over the years and looks due for replacement), I thought maybe I'd open the holes out further for greater peace of mind. A quick Ebay search revealed that 7mm screws and washers must be made (judging by the horrendous prices), not of the advertised stainless steel, but of Platinum plated Unobtanium, so that idea was swiftly abandoned.

Popping the rear body back on I then fitted the newly purchased reflective triangles, screwing them to bespoke lengths of batten though the rear lamp cluster holes. Approaching dusk decided the camera to employ flash, nicely demonstrating the efficacy of the rear end gubbins - not that I'll be towing at night!
Since then I've purchased a Spitfire centre rear deck filler cap, its fittings, and a short length of the necessary 2" pipe which will be welded into the top of the Cortina fuel tank, bridging the gap, the old filler being chopped off and a blanking plate welded in its place.
Regards, Mick
Last edited by Mick O'Malley; 17th November 2023 at 15:38..
|
18th November 2023, 15:44
|
|
Senior Member
|
|
Join Date: Nov 2012
Posts: 845
|
|
Today, looking at the dismal weather, I decided to not venture down to the cave, but then remembered that the bits I'd ordered for the modified filler position had arrived yesterday so I might as well do a little offering up. I retrieved the tank from my shed and slid it into the boot, where it will eventually live. However, the boot floor had been so comprehensively butchered for the previous giant tank I'd removed that it had nothing to sit on  . OK, what else could I do? I hit on cutting off the Ford filler stub, ready for the resulting hole to be blanked off at some future date. Because of its angle and proximity to the tank's flange, it didn't lend itself to an easy attack. Trying it with each in turn of the four sides of the flange trapped in my Workmate I managed to start the necessary hacksaw cut. I got about two thirds of the way through before the saw's frame started hitting either the flange or the tank's body, so I took out the blade, made a grip at one end of it with gaffer tape, and finished off the cut. Neither easy nor finger friendly! . OK, what else could I do? I hit on cutting off the Ford filler stub, ready for the resulting hole to be blanked off at some future date. Because of its angle and proximity to the tank's flange, it didn't lend itself to an easy attack. Trying it with each in turn of the four sides of the flange trapped in my Workmate I managed to start the necessary hacksaw cut. I got about two thirds of the way through before the saw's frame started hitting either the flange or the tank's body, so I took out the blade, made a grip at one end of it with gaffer tape, and finished off the cut. Neither easy nor finger friendly!

I gently filed clean the cut edge, gaffer taped over the hole, and called it a day, pleased that I'd at least done something .
Regards, Mick
|
18th November 2023, 20:59
|
|
Senior Member
|
|
Join Date: Oct 2013
Location: norfolk
Posts: 691
|
|
Quote:
Originally Posted by Mick O'Malley

I managed to start the necessary hacksaw cut. I got about two thirds of the way through before the saw's frame started hitting either the flange or the tank's body, so I took out the blade, made a grip at one end of it with gaffer tape, and finished off the cut. Neither easy nor finger friendly!
I gently filed clean the cut edge, gaffer taped over the hole, and called it a day, pleased that I'd at least done something .
Regards, Mick
|
Well done - I look forward to your updates....... an interesting rebuild.
If it makes you feel any more positive about the sawing today...... A couple of years ago I had to get a cistern off a customer's toilet. Some idiot (a so-called professional) had decided that the 2" x 1" wooden spacer between the cistern and tiles could be attached to both with "no nails". With a hacksaw blade between my fingers, it took 1.5 hours to cut through the adhesive that was holding the cistern to the wood. |
18th November 2023, 22:29
|
|
Senior Member
|
|
Join Date: Aug 2012
Posts: 2,143
|
|
Making some good progress there Mick, I wish I could say the same for my project. Your 7mm tap you were intending to use must be a rarity in itself. I've been in engineering for longer than I care to remember but I don't recall ever coming across a 7mm tap or screw / bolt come to that !
|
19th November 2023, 09:54
|
 |
Senior Member
Enthusiast
|
|
Join Date: Sep 2004
Posts: 1,892
|
|
Quote:
Originally Posted by Lucky@LeMans
Your 7mm tap you were intending to use must be a rarity in itself. I've been in engineering for longer than I care to remember but I don't recall ever coming across a 7mm tap or screw / bolt come to that !
|
Standard thread size on a Citroen 2CV. Relatively easy to obtain. Its the 9mm and 11mm that they also used that are tricky to find! |
19th November 2023, 14:38
|
|
Senior Member
|
|
Join Date: Aug 2012
Posts: 2,143
|
|
Nothing is a surprise on a French car ! Quirky for sure, 7mm threads are not a common size , in fact they would be considered a b****** size by anyone in engineering in most countries ! 9 and 11mm are not far behind either !
|
19th November 2023, 18:55
|
 |
Senior Member
Enthusiast
|
|
Join Date: Mar 2005
Posts: 3,078
|
|
And I'm afraid it's not just the French.............. 
My German designed BMW M52 engine has m7 exhaust manifold studs and nuts.
 Exhaust manifold Exhaust manifold by Sabrebuilder, on Flickr |
21st November 2023, 15:31
|
|
Senior Member
|
|
Join Date: Nov 2012
Posts: 845
|
|
Snip snip snipping...
Many thanks for input and interest guys, it's good to know .
Yesterday I decided to offer up the tank to its boot home and maybe make a start on cutting the relocated filler holes, one in the rear deck and the other in the top of the tank. Now, why won't the tank fit where TDW intended? D'Oh! Thinking back to '84 I remembered that I'd had to cut off the front and rear flanges as I clearly would have to do again. I briefly considered fetching the disc cutter to it but my modicum of enthusiasm had evaporated as it often does when such setbacks occur .
Anyway, today I wandered down to have another look and decided to have a go. My hands aren't the steadiest these days so I again dismissed disc cutter thoughts and resigned myself to an age of awkward hacksawing. Then I had a Damascene moment, wondering if my tin snips would be man enough for the job? On the contrary, my initial effort revealed that it was me who was lacking in the wrist tendon department . However, by slipping handy lengths of one inch box over the grips to multiply the leverage I was able to successfully tackle that part of the job

Offering up the slightly slimmer tank my efforts were rewarded, albeit with a bit of a struggle. The rounded corners of the tank matched exactly with the cut in the front of the boot floor, showing that its twin had once sat there.

I measured the gap between the tank's top and the underneath of the rear deck and, having had a play with the Spitfire filler and the length of tube which will bridge that gap, decided that it didn't need cutting as it will slide into the yet to be cut hole in the tank before TIGing. I marked the outline of the deck hole, drilled a couple of pilot holes for the padsaw and called it a day, well satisfied that another small hurdle had been cleared.
Regards, Mick
|
22nd November 2023, 13:09
|
|
Senior Member
|
|
Join Date: Nov 2012
Posts: 845
|
|
Today, time being at a premium, I was only able to address some of the filler relocation jobs. A first attempt at cutting through the rear deck with the padsaw proved both awkward and tedious, so I used the 'ring of holes' method with a 3mm bit, joining them with a short and super slim padsaw blade which I made by cutting down an old hacksaw blade with tin snips. Five minutes later - job done. I then dropped the 2" tube through the hole and, aligning it accurately, marked where the hole in the top of the tank would need to be cut.

I removed the tank and tidied up, the metal cutting being left for another day.
Regards, Mick
|
22nd November 2023, 21:02
|
|
Senior Member
|
|
Join Date: Aug 2012
Posts: 2,143
|
|
I can highly recommend this drill mounted drum sanding kit from your local Screwfix. You can effectively "mill" large amounts of GRP or finish off roughly cut bits very quickly and accurately. For the price you can't go wrong !
https://www.screwfix.com/p/rubber-dr...t-25-pcs/19906 |
25th November 2023, 13:30
|
|
Senior Member
|
|
Join Date: Nov 2012
Posts: 845
|
|
By about noon, the sun had illuminated the cave sufficiently for me to crunch down there over the grass. Ratchet strapping the tank to the workmate had it stable enough to commence my 'ring of holes' 3mm drilling. Punching the thin metal for the drill's starting points was tricky, especially on the angled webs, and I decided to do a quadrant at a time, using the slim home modified padsaw blade to join them.

Three repeats and the rather jagged and not amazingly circular centre was out. I thought of wandering down to Screwfix on Lucky's recommendation  but decided to have a burrow in the shed first, where I came across a box of flapwheels which I think I bought when I was building the A352. There were three grits, 40, 80, and 120. Popping the most aggressive in the drill I attacked the jagged hole a little at a time, repeatedly offering up the pipe to check progress. Eventually it could just be inserted with a little push and twist. It wasn't the interference fit I'd hoped for in my dream world, but the one or two millimetre gaps in places won't prove a problem for the TIGmeister . Happy with another small step I called it a day. but decided to have a burrow in the shed first, where I came across a box of flapwheels which I think I bought when I was building the A352. There were three grits, 40, 80, and 120. Popping the most aggressive in the drill I attacked the jagged hole a little at a time, repeatedly offering up the pipe to check progress. Eventually it could just be inserted with a little push and twist. It wasn't the interference fit I'd hoped for in my dream world, but the one or two millimetre gaps in places won't prove a problem for the TIGmeister . Happy with another small step I called it a day.

Regards, Mick
|
9th December 2023, 06:32
|
|
Senior Member
|
|
Join Date: Nov 2012
Posts: 845
|
|
Quick update.
Whilst I'm waiting for a suitable weather window to get all the frame welding jobs done, I decided to try and get the engine running. So far: I've hoisted it back onto the engine stand (old picture alert!) and bought oil and filter; points; condenser; cap and leads and CD150 overhaul kit. Plugs yet to buy. I've also bought an Imp Sport cylinder head which Imp Guru Mark Maynard tells me is the one to have, and is a straight swap. This will be post starting as I'll need to source suitable carb(s) and a sport cam.

I will of course devise a way to ensure that the engine stand is completely secure for the anticipated very short coolant-less run which will be preceded with a good plug-less spin with Redex in the bores to get the oil circulating.
Regards, Mick
p.s. I wish it would stop raining, I much preferred it bright and bitter!
|
17th December 2023, 19:24
|
 |
Senior Member
|
|
Join Date: Dec 2011
Location: Devon
Posts: 550
|
|
Just caught up on your posts Mick, good progress despite the weather and hours of darkness. Have a great Christmas and best wishes for the New Year.
|
18th December 2023, 06:58
|
|
Senior Member
|
|
Join Date: Nov 2012
Posts: 845
|
|
Quote:
Originally Posted by froggyman
Just caught up on your posts Mick, good progress despite the weather and hours of darkness. Have a great Christmas and best wishes for the New Year.
|
Many thanks froggyman, season's greetings to you also. I'm off to Nuneaton in a couple of hours to collect my cylinder head . Looking on the bright side, it starts getting lighter in a couple of days .
Regards, Mick |
21st December 2023, 10:50
|
|
Senior Member
|
|
Join Date: Nov 2012
Posts: 845
|
|
Happy Christmas to me :)
Nice easy pick up on Monday, went the quick way; returned down the relaxing Fosseway. Very pleased with my new acquisition: it's clearly been well stored. The seller knew his onions, good knowledgeable bloke to chat engines with .

Picture taken in its new home - my living room, as it awaits its distant installation...
Regards, Mick
|
13th January 2024, 12:50
|
|
Senior Member
|
|
Join Date: Nov 2012
Posts: 845
|
|
Progress Made :)
Once the festivities were over, I took the head to Imp Guru Mark Maynard who gave the casting the thumbs up, then stripped it down as I watched, persuading me of what needed replacing with new as he went. The considerable expense involved (supply and fit) will only need to be stumped up once my job gets to the end of the queue - not a problem as there's so much work for me to do on the project before firing up time eventually arrives.
I went and saw my MIG/TIGmeister on Monday and booked a 'foreigner' slot for Friday. The three intervening days were filled with much flap wheeling of the mating surfaces of metal and ensuring the rig, as shown below, was roadworthy.

The 12 mile morning trip to the workshop was uneventful, and work commenced with assembly of the engine mountings and the seat belt rear mountings frame. Once these were done attachment to the frame began. I popped the headlamp bowls on to draw the eye to their mounting stubs as seen below, together with the shiny new engine mountings. Some of the many many plug welded rivet holes are also visible.

This shows the 'virtual engine' sitting comfortably on them - a big relief that my measurements and design had been OK!

This last one shows that the seat belt mounting measurements were slightly generous , the upside down frame just snagging on the leaf springs. About a centimetre lopped off the errant outer ends will correct this.

Lots of flap-wheeling, de-greasing and painting of the frame are my next tasks.
Regards, Mick
Last edited by Mick O'Malley; 13th January 2024 at 12:54..
|
|
Currently Active Users Viewing This Thread: 1 (0 members and 1 guests)
|
|
|
 Posting Rules
|
You may not post new threads
You may not post replies
You may not post attachments
You may not edit your posts
HTML code is Off
|
|
|
All times are GMT +0. The time now is 19:14.
|


 Linear Mode

