|
|
| Vintage and Classic Roadster Kit Car Builds For Vintage and Classic era kit cars. Post your build reports, problems and progress here |

23rd January 2021, 16:55
|
|
Senior Member
|
|
Join Date: Aug 2012
Posts: 2,144
|
|
I've used Davids 182 primer on GRP and had no issues. For ali you really need an etch primer, they are cheap enough and readily available in aerosol form.
|
1st February 2021, 19:39
|
 |
Senior Member
Enthusiast
|
|
Join Date: Sep 2004
Posts: 1,895
|
|

The front suspension is now entirely off revealing some fairly horrible construction in places. Odd bolts, holes in the wrong place etc.
 without_front without_front by Robin Martin, on Flickr
And aso plenty of evidence of the use of a large hammer when the suspension was removed from the donor, plus the torsion bars are well and truly rusted into the suspension arms at one end and the adjuster at the other. Amazing it ever passed an MOT but then things were rather different 30 years ago! Good job I bought a spare set of front suspension components off Ebay - between the two lots should be able to make one decent set. And the chassis itself hasn't been butchered at all.
Just the rear to dismantle now. The rear axle case is very rusty, particularly arround the spring saddles one of which has a hole rusted right through it. It looks like some serious repairs may be needed. I am also currently trying to get some prices for new rear springs. The plan is to:
A. Have then slightly shorter at the rear to avoid the spring sticking out look that the Marlin suffers from.
B. Have them made flatter than standard to avoid using the 'orrible lowering blocks that the car currently has.
 rusty_axle rusty_axle by Robin Martin, on Flickr
And I learnt something today. I was suprised to find that the springs are assymetric in that the axle is positioned further forward than centre of the spring by some 4 inches. Curious as to why that was I did some Googling and it seems it's to reduce axle wind up (tramping) under heavy acceleration. And I always thought leaf springs were simple!
Cheers, Robin

|
4th February 2021, 16:31
|
|
Senior Member
Enthusiast
|
|
Join Date: Sep 2004
Posts: 1,895
|
|
The chassis is pretty now pretty much dismantled and ready to be moved up to the man shed for restoration and a couple of planned modifications. I'm surprised how heavy it is - I guess the box sections must be quite a heavy gauge.
 bare_chassis bare_chassis by Robin Martin, on Flickr
The rear axle, although being generally good, has rusted through spring plates and so I will have to do something about those. I think the only solution is to cut them off and fabricate some new ones and have them welded on. The position is fairly critical though. Apparently the diff flange needs to be 3 degrees off vertical otherwise the UJ's in the propshaft suffer.
 spring_plate1 spring_plate1 by Robin Martin, on Flickr
The rest of the spring mounting hardware seems to be OK other than the U-Bolts which I had to take the Dremel to. Even the rubber pads look servicable, although you can get new ones from SuperPro at a price that's not nice.
The large lump of rusty steel is a lowering block. It's 'orrible and doesn't feature in my rebuild plans!
 spring_mounting spring_mounting by Robin Martin, on Flickr
|
16th February 2021, 18:52
|
|
Senior Member
Enthusiast
|
|
Join Date: Sep 2004
Posts: 1,895
|
|
In my drive for a slightly more modern and safe car, and after some searching, I managed to find a rare Marina pedal box with servo and dual master cylinder (wow). Both were options would you believe...
 pedal_box pedal_box by Robin Martin, on Flickr
The servo looks pretty grotty and new ones are non existant. It's possible to get them rebuilt but apparently with this type (crimped construction) they have to saw them in half and then weld the two halves back together! I suspect that may be outside of my budget. But a bit of Googling has revealed that the Landrover Seies 3 servo has the same mounting points and looks very similar, and importantly is freely available. So I may take a punt and buy a new one of those. Can always sell it again on Ebay if it doesn't work out.
I am hoping to be able to rebuild the master cylinder. next job is to strip it to see what the bores are like. Can anyone idenity the model number? It's (obviously) Girling but do the long string of numbers mean anything? Unfortunately the Marina, even with the rare servo and dual master combo, used 4 different models so I can't identify it that way.
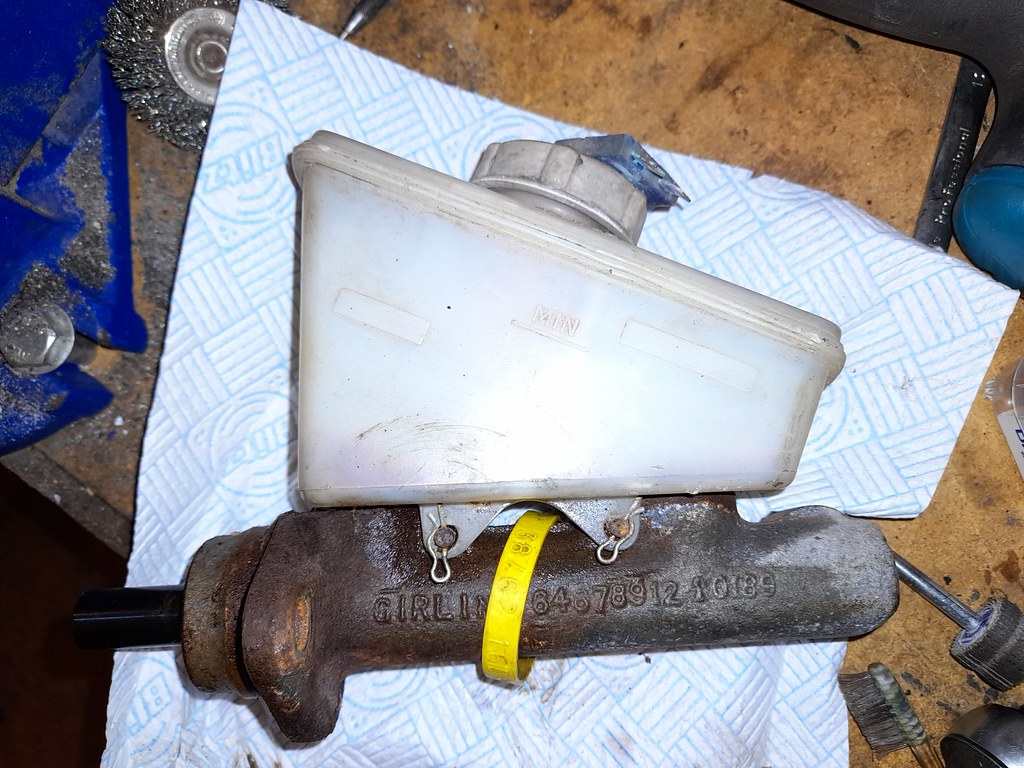 master_cylinder master_cylinder by Robin Martin, on Flickr
Cheers, Robin
|
16th February 2021, 19:50
|
|
Member
|
|
Join Date: Feb 2012
Posts: 38
|
|
I worked in the distant past for AP products {Lockheed, Borg and Beck] so not overly familiar with Girling . From what I remember the master cylinder number is only relevant for the first 8 digits ie 64678912. The Lockheed servo you could dismantle in that the two halfs locked together with a quarter turn, easy with the correct tools but possible with some ingenuity. I'm sure someone on the Owners club forum when looking for an alternative [similair problem] found a more modern set up that required little work to fit. Maybe off a Renault. Will see if I can find the details.
|
16th February 2021, 19:59
|
|
Member
|
|
Join Date: Feb 2012
Posts: 38
|
|
Seems Peugot 205 with an adaptor works well according to Marlin owners club post
|
16th February 2021, 20:13
|
|
Senior Member
|
|
Join Date: Oct 2013
Location: norfolk
Posts: 691
|
|
When I wanted a servo to replace one on my Rickman Ranger (Escort mk2), a Land Rover one was ideal. £60 brand new (Britpart) compared with the £300 a specialist wanted to try (not definite) to fix the escort one. just needed a small mod to the pushrod and in under 3 hrs (taken at leisure) I'd removed and replaced. If it ever needs replacing I'm confident it will be available in the future.
ETA, the master cylinder (from Land Rover) looks like it would also have been suitable (with a union change on one brake pipe), but I was able to use the Escort one, as it fitted perfectly.
Last edited by Mitchelkitman; 16th February 2021 at 20:16..
|
20th February 2021, 18:35
|
|
Senior Member
Enthusiast
|
|
Join Date: Sep 2004
Posts: 1,895
|
|
Good and bad today.
First the bad news....
I attempted to dissasemble the master cylinder and it's just one mass of rust. I don't think it's worth saving.
 master_cylinder_us master_cylinder_us by Robin Martin, on Flickr
So the hunt is on for an alternative. After a lot of Googling I found the GMC234 which is used on the TR6. It is designed to be mounted at an angle, and the bore is 20.3. A bit larger than the cylinder used on the Marina but probably not disastrously so.
 gmc234 gmc234 by Robin Martin, on Flickr
It also has the advantage that the servo it is used with (still available new) looks pretty much identical to that used on the Marina.
And the good news is, after much fretting, I decided to go for drilling out the old studs on the exhaust manifold and re-tapping it to fit new ones. All my other efforts at removing the old ones had failed miserably. But in the end it proved to be much easier than I thought.
 manifold manifold by Robin Martin, on Flickr
The observant might notice one of them is a bit on the p!ss. Well 5 out of 6 isn't bad and I don't suppose anyone will notice!
And this arrived in the post. The Alfa 8C was what the Marlin was loosely based on. You can see the family resemblance.
 alfa_model alfa_model by Robin Martin, on Flickr
Cheers, Robin
|
25th February 2021, 20:14
|
|
Senior Member
Enthusiast
|
|
Join Date: Sep 2004
Posts: 1,895
|
|
The TR6 servo and master cylinder arrived today. Pretty much a perfect fit other than the servo needed packing out about 6mm. Temporarily done with washers but I willl make a proper spacer. The angle of the reservoir on the master cylinder is identical to that of the standard Marina one so fluid levels should be good. I do like it when a plan comes together.
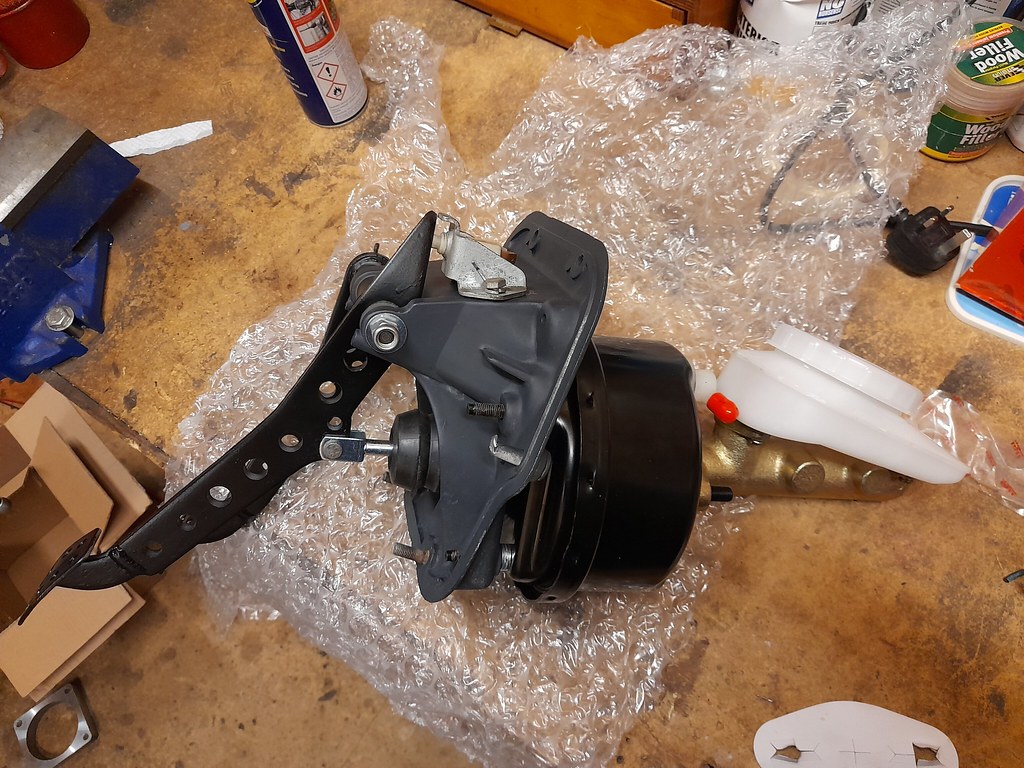 new_pedal_box new_pedal_box by Robin Martin, on Flickr
I should mention that the Marina pedals are shortened for use in the Marlin and someone has drilled go-faster holes in them...
Cheers, Robin |
25th February 2021, 22:22
|
 |
Senior Member
Enthusiast
|
|
Join Date: Mar 2005
Posts: 3,079
|
|
Looks like an excellent solution. It may be the camera angle but it looks like an unusually shallow reservoir, presumably to clear the tr6 bonnet?
|
26th February 2021, 07:53
|
|
Senior Member
Enthusiast
|
|
Join Date: Sep 2004
Posts: 1,895
|
|
Yes the reservoir is shallow but quite wide. I never thought about it before but you are probably right in that it is to clear the bonnet on the TR6.
It's interesting how all the bits from different marques fit one another. I guess there was a lot of plagiarism going on in those days. The servo also looks almost identical to the Metro one that the Sportster used - except the mounting studs are at different centres.
Cheers Robin
|
26th February 2021, 07:59
|
|
Senior Member
|
|
Join Date: Aug 2012
Posts: 2,144
|
|
Quote:
Originally Posted by MartinClan

Yes the reservoir is shallow but quite wide. I never thought about it before but you are probably right in that it is to clear the bonnet on the TR6.
It's interesting how all the bits from different marques fit one another. I guess there was a lot of plagiarism going on in those days. The servo also looks almost identical to the Metro one that the Sportster used - except the mounting studs are at different centres.
Cheers Robin
|
The car designers had a massive parts bin to chose from. Think how many marques fell under the "Leyland" banner in the end. |
5th March 2021, 08:51
|
|
Senior Member
Enthusiast
|
|
Join Date: Sep 2004
Posts: 1,895
|
|
Stage 1 complete
The chassis is now in the man-shed ready for the start of refurbishment and re-assembly! It fiited lengthways with only a few inches to spare but fortunately plenty of space widthwise. I had measured it up beforehand but you never know if there is going to be any unforseen issues.
The downside is that I promissed my wife the kitcen refurbishment would start once the chassis was in its new home so progress may slow down for a while....
The chassis is very sound but covered in a mixture of old paint and surface rust. Any suggestions how best to remove it greatfully received. I am trying to avoid mechanical (wire brush in drill) means as it makes such a mess.
 in_man-shed1 in_man-shed1 by Robin Martin, on Flickr
Cheers, Robin |
5th March 2021, 09:22
|
|
Senior Member
|
|
Join Date: Oct 2013
Location: norfolk
Posts: 691
|
|
There are 'rust removers' and 'rust converters', and in my experience both do a 'good job'. Maybe just a case of research and 'choose your poison'?
|
5th March 2021, 11:39
|
|
Senior Member
|
|
Join Date: Mar 2012
Posts: 1,152
|
|
You could take it back outside and give it a thorough jetwash (meanest setting) on a sunny day. Then back inside for some of the above.
I used this stuff on mine and found it very good -
https://www.ebay.co.uk/itm/AQUASTEEL...r/264680865517 |
5th March 2021, 14:19
|
|
Senior Member
|
|
Join Date: Oct 2013
Location: norfolk
Posts: 691
|
|
The rust converters work by using dilute phosphoric acid (sometimes tannin as well as/instead of?) to give a protectived iron phosphate coating - In my experience, they work well and are easy to use (wear eye protection).
The rust removers do exactly that - if it's a rough, pitted surface it will end up rough & pitted (minus rust) which can be good for paint adhesion. I used some 10 years ago on the outside of brake drums and with red oxide, undercoat, and satin paint there has been no return of rust (FLW's). Takes a lot of time/brushing and mess though (a jelly version is suitable for chassis or similar.). For small parts the fluid version is great, as you just leave the parts submerged for a day or more (which is very easy of course).
|
18th March 2021, 10:10
|
|
Senior Member
Enthusiast
|
|
Join Date: Sep 2004
Posts: 1,895
|
|
Quote:
Originally Posted by oxford1360
|
That's a good idea. In fact many years ago I used a sand blast attachment on my Karcher to good (if messy!) effect so I might do that. My lawn could do with some sand treatment anyway ;-)
Cheers, Robin |
18th March 2021, 12:06
|
|
Junior Member
|
|
Join Date: Feb 2012
Posts: 18
|
|
You could also consider these from Car Builder Solutions. Probably the smallest available. Think about the fixing method of the PIN. It will need some strengthening as the GRP rear tub will not give enough strength and will fracture over time.
https://www.carbuilder.com/uk/mini-b...ches-pair-75mm
 |
5th March 2021, 17:30
|
|
Senior Member
|
|
Join Date: Aug 2012
Posts: 2,144
|
|
Quote:
Originally Posted by MartinClan
The chassis is now in the man-shed ready for the start of refurbishment and re-assembly! It fiited lengthways with only a few inches to spare but fortunately plenty of space widthwise. I had measured it up beforehand but you never know if there is going to be any unforseen issues.
The downside is that I promissed my wife the kitcen refurbishment would start once the chassis was in its new home so progress may slow down for a while....
The chassis is very sound but covered in a mixture of old paint and surface rust. Any suggestions how best to remove it greatfully received. I am trying to avoid mechanical (wire brush in drill) means as it makes such a mess.
in_man-shed1 by Robin Martin, on Flickr
Cheers, Robin |
Have you considered powder coating the chassis ? Very cost effective and the finish will be like new. I recently had my Scimitar chassis done which is bigger and more complex, it only cost £250 including collection and delivery. |
5th March 2021, 18:53
|
|
Senior Member
Enthusiast
|
|
Join Date: Mar 2005
Posts: 3,079
|
|
Quote:
Originally Posted by MartinClan
The chassis is very sound but covered in a mixture of old paint and surface rust. Any suggestions how best to remove it greatfully received. I am trying to avoid mechanical (wire brush in drill) means as it makes such a mess.
Cheers, Robin
|
Well done getting that in your shed!!
I find Hammerite Rust Remover Gel works very well and you can get it in Halfords. Sometimes it needs a couple of goes and it may not get into every small corrosion pit so a rust converter is useful to kill what's left.
I think you may have recommended the Hammerite stuff to me some years ago  |
|
Currently Active Users Viewing This Thread: 222 (0 members and 222 guests)
|
|
|
 Posting Rules
|
You may not post new threads
You may not post replies
You may not post attachments
You may not edit your posts
HTML code is Off
|
|
|
All times are GMT +0. The time now is 00:48.
|


 Hybrid Mode
