|
|
| Sammio Builds and discussions Sammio bodied car builds and specials |

25th December 2018, 09:09
|
 |
Senior Member
|
|
Join Date: Jul 2011
Posts: 5,328
|
|
Well done for avoiding the crunch yesterday, that would've been a real pita!
Nice to see you using your car in winter, keep up the posts and Merry Christmas!
|
27th December 2018, 10:01
|
 |
Senior Member
|
|
Join Date: Feb 2012
Location: Wembley, London
Posts: 5,058
|
|
Thanks Gentlemen 
No more car news from me, but I thought you might like this time lapsed video of a different kit car build…
https://www.youtube.com/watch?v=5_0ZHyXjvFo
If I ever had the time/money/garage, I would love to build a Factory Five '33 Hot Rod.
Cheers, Paul. 
|
1st January 2019, 16:22
|
|
Senior Member
|
|
Join Date: Feb 2012
Location: Wembley, London
Posts: 5,058
|
|
Happy New Year!
Only had time for a quick hour in the car today, which was around 20 miles with stops.
Unfortunately, a little while after I started the dark clouds started to quickly gather.
With my spider senses tingling I decided to point the car towards the lighter sky…
But it was too late, I got drizzled on. 
Thankfully, it was still quite light at this stage, but the aero screens looked like this.

This was the view looking back when I took the photo above.

But I think the headlights make the sky look lighter than it was.
As this was taken from the driver's seat looking forward. 

I seemed to be driving right on the edge of the weather, wet one minute, dry the next.
But eventually I was in the dry for the rest of the journey home, so I stopped for more photos.


Until next time, take care, Paul.
|
12th January 2019, 16:37
|
|
Senior Member
|
|
Join Date: Feb 2012
Location: Wembley, London
Posts: 5,058
|
|

Saturday - Part 1
I will be dropping my car in to Enginuity on the 19th January to get my oil leak fixed. 
Which will finally allow me to make longer trips without fear of terminal engine failure.
In the mean time, I thought this would be a good excuse to do a few other jobs on my "To Do" list.
Last year I bought this cheap leather sewing kit from Ebay.

I also bought some plastic 'Fir Tree' fixings, which I now can't find to photograph. 
So spurred on my DaveCymru making his own Miglia headrest...

I will have a go at making my own.
It was a miserable morning earlier, so I just gave myself enough room to work in between the drizzle.


Most people make the head rest to match the hump contours like so.

But that seems to highlight the different sizes of the body shell lip on either side of the hump.
So I tried a more oval shape instead, which seems to works a bit better.

Note: See 'Part 2' for another style of headrest.
Previously, I had also gone back to take another look at Mister Towed's head rest…
Which is made up of two pieces of leather joined together, the face and the sides.
So that is what I will attempt to do.
Thankfully, I have a selection of left overs to play with.

I am currently toying with the idea of a using both foams, with the insulation foam at the back, but not as thick as it is now.
But before I do any of that I need something simple to practise my leather sewing on.
So that will either be a leather gaiter for my gear lever.

Or some leather covers for my headlight grills.

Excuse the poor photos as it was very dull out, but you get the idea.

Note: This would only be for parking, to avoid the sharp edge ripping the car cover.
End of Part 1...

|
12th January 2019, 16:38
|
|
Senior Member
|
|
Join Date: Feb 2012
Location: Wembley, London
Posts: 5,058
|
|
Saturday - Part 2
As I was typing up the post from this morning, I looked up how the original Spitfire planes did it.
( Again, I wouldn't want the headrest to be as deep as this. )

So I made two more templates and went back out in the afternoon to see what they would look like.


I think maybe the bigger of the two circles might the way to go.
Any thoughts?
Answers on a postcard to the usual address.
I then went to fill up with petrol and I got caught in another shower.
So I was a little damp by the time I got back home and quickly threw the covers on.

I have got a trip planned for tomorrow, but more about that next time.
Take care, Paul.
|
12th January 2019, 16:50
|
|
Senior Member
|
|
Join Date: Jun 2015
Posts: 1,401
|
|
Paul,
I think the oval will look best, however, if you choose the circle use the larger one.
Best!
|
12th January 2019, 17:09
|
|
Senior Member
|
|
Join Date: Feb 2012
Location: Wembley, London
Posts: 5,058
|
|
Cheers.
Looking at it again, I think I will try another oval shape that gives an even gap to the hump edges. |
12th January 2019, 17:56
|
 |
Senior Member
|
|
Join Date: May 2011
Location: Somerset
Posts: 1,671
|
|
I'm liking the Oval idea, it'll look that bit more unique!
So you bought your leather sewing kit to make make things 'just' for the car <cough><cough><nudge><nudge><nudge><wink><wink>
|
12th January 2019, 18:34
|
|
Senior Member
|
|
Join Date: Jun 2015
Posts: 300
|
|
Hi Paul,
I was catching up with your on the road blog, and I am pleased you did not end up hitting the cars when your car drifted recently.
As for the headrests, I like how the oval ones fit more than the round ones.
I enjoy reading your posts and thanks again for all your advice...
Cheers, Deni.
Last edited by deni; 12th January 2019 at 18:36..
Reason: clearer sentence
|
12th January 2019, 18:45
|
 |
Senior Member
Enthusiast
|
|
Join Date: Dec 2006
Posts: 1,130
|
|
I'm also for the oval, but the other way up and more of the "O" than the "val" !!  |
13th January 2019, 14:52
|
|
Senior Member
|
|
Join Date: Jul 2011
Posts: 5,328
|
|
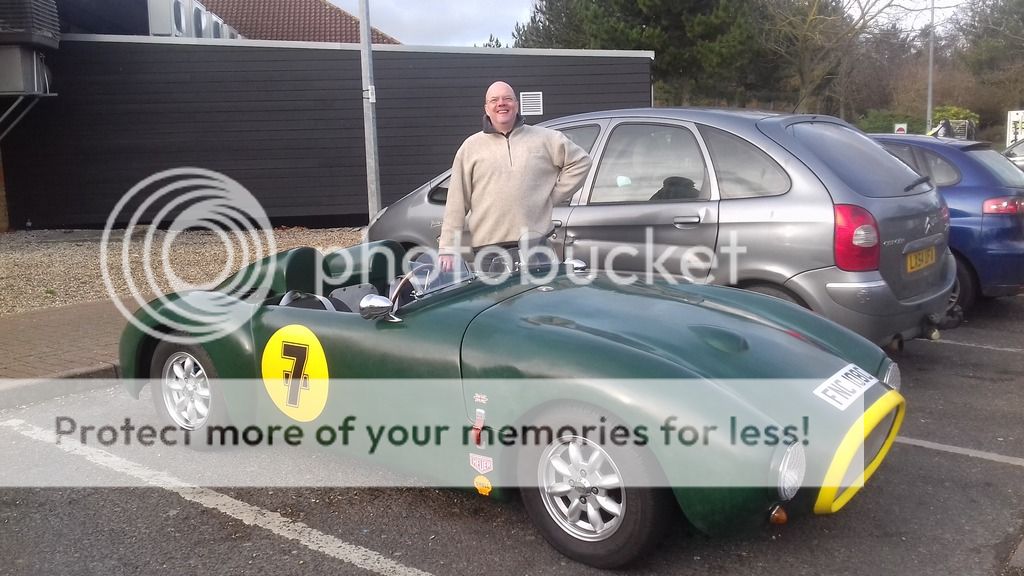
It was great to meet you too, Paul.
The trip out in your Swordfish, although somewhat chilly around the gills, has given me some motivation to get on with my Speedster build, so it looks like the apprentice has become the master.
We'll have to meet up this summer and visit somewhere more scenic than Birchanger Services.
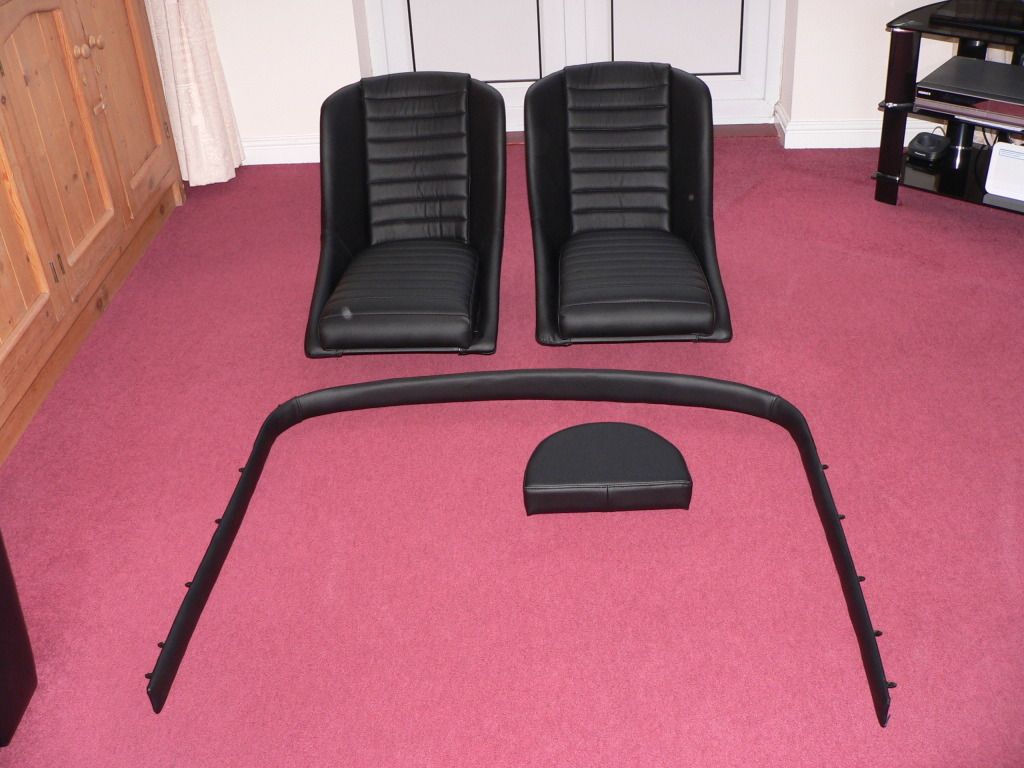
Anyway, thanks again for the footwells and here's a pic for your library -
|
13th January 2019, 17:44
|
|
Senior Member
|
|
Join Date: Feb 2012
Location: Wembley, London
Posts: 5,058
|
|
Quote:
Originally Posted by Mister Towed

… so it looks like the apprentice has become the master...
|
Well if you are Yoda, I am happy to be Luke Skywalker.  |
15th January 2019, 18:33
|
|
Senior Member
|
|
Join Date: Feb 2012
Location: Wembley, London
Posts: 5,058
|
|
Another Headrest Option
I started to have a go at making an oval shape that would fill the shape of the hump better.

Unfortunately, as soon as I started to use a ruler as a guide I knew this plan was doomed.
As the hump itself isn't horizontal to the ground, it is at an upward angle, so there isn't an obvious middle.
So although I could match the curve at the top edge, there was no way of getting a nice shape at the bottom.
However, as I started looking at D Types, Listers & DB1s for inspiration I had another idea…
Match the top curve, but have a straight line at the bottom that doesn't line up with the body shell lip.
Something like this, but excuse the poor photo.

I hope the section of uncovered hump below the headrest will draw the eye to the leather.
( Avoiding the differences in size of the body shell lip either side of the hump. )
At some point, I will stick the paper template on the hump itself to see what it looks like.
Cheers, Paul.
|
18th January 2019, 17:45
|
|
Senior Member
|
|
Join Date: Feb 2012
Location: Wembley, London
Posts: 5,058
|
|
Friday - Part 1
Finally had the chance to try out my 'cut down' head rest design this afternoon.
So I peeled back the covers.

I also made template for the passenger side with the same depth as the driver's side.
Unfortunately, this instantly highlighted the fact the passenger hump is smaller than the driver's. .

So back to the drawing board I went attempting to split the difference.
I extended the depth of the driver's side and reduced the depth of the passenger side, like so.

Hard to tell from the camera angle, but these are both about the same height from the body shell.
As luck would have it, these revised templates were a perfect match for my left over foam.

- - - - - - - - - - - - - - - - - - - - - - - - - - - - - - -
Then I covered up the rear of the car and went back to the front headlight.

Where I used a rubber band to hold a section of old material in place.


Which allowed me to mark the position of the grille and the 3 clips that hold it in place.

I then used the cloth template to cut out a section of leather.

I then chalked two sewing lines.

Before creating a matching set of double holes along the chalked lines.
(Sorry about the poor photo.)

End of Part 1…
|
18th January 2019, 17:46
|
|
Senior Member
|
|
Join Date: Feb 2012
Location: Wembley, London
Posts: 5,058
|
|
Friday - Part 2:
The holes were made using these two tools from my Ebay sewing kit.
The first provides an evenly spaced guide & the other forces the hole open.


Then it was time for the needle and thread.

I forgot to order some elastic that will allow the cover to 'grip' the headlight grille.
So for now I am using a piece of string, that I will eventually attach the string to and pull through.
The key is to ensure the inside stitching goes over the string like so.

Leaving a single running stitch on the other side.

I waited until I had completed the first 'single' stitch all the way around.


Before I started at one end and pulled all the tread tight, one stitch at a time.
Which pulled the leather tight around the string like so.


Then I went all the way around again to form 'double' stitches.


The good news is this was my first attempt at sewing leather and I've learnt a lot.
The bad news is that I don't think I made the cover wide enough to take account of the elastic pulling tight over the edge.
Obviously I can't really test it until I attempt to get some elastic tomorrow.
But even if I've messed this one up, I could do with some more practise before I attempt the headrests.
Until next time, take care, Paul.
|
18th January 2019, 19:41
|
|
Senior Member
|
|
Join Date: Jun 2015
Posts: 1,401
|
|
Bravo on the first attempt!
|
19th January 2019, 08:45
|
 |
Senior Member
|
|
Join Date: Apr 2016
Location: Camberley
Posts: 972
|
|
Paul, that is catwalk standard compared to my attempt at home produced moccasin slippers.��
|
19th January 2019, 12:08
|
|
Senior Member
|
|
Join Date: Feb 2012
Location: Wembley, London
Posts: 5,058
|
|
Molleur & Barber - Thanks gents.
As you will see from my next piece below, more practise is still required…
- - - - - - - - - - - - - - - - - - - - - - - - - - - - - - -
Sewing Circle Continued…
It is wet and miserable outside, so it was back to practising my sewing.
The photo of Mr T's headrest showed a single 'hump' piece with second 'band' piece added for the depth.
So I cut out a small corner section just to test how it might work.
I also cut out an edge strip used in the sofa as that already had holes in it.

After putting holes in the 'face' piece I ran a single stitch loosely through the two sections.

Note: You have to sew them together with the inside faces on the outside.
At first, I though the 'band' section looked messy on the inside because the stitches were loose.

However, pulling the stitches tighter didn't seem to make any difference.

As this whole thing only works when you pull it inside out.

 Lessons Learnt:
Using smaller stitches than the headlight cover was definitely the way to go.
But I will need to punch each hole through the two layers at the same time.
( As the original sofa holes were not an exact match for my hand made ones.  )
The thread needs to be pulled much tighter than I did with this test piece to avoid seeing the stitches.
( Although I will be using black tread on the real head rest. )
You really need to take your time if you don't want the final piece to look like Frankenstein's handiwork. 
Until next time, take care, Paul.
|
20th January 2019, 14:56
|
|
Senior Member
|
|
Join Date: Feb 2012
Location: Wembley, London
Posts: 5,058
|
|
Sunday
My car seriously hates starting in very cold weather.
But, thankfully, just before it sounds like the battery is going to die, it bursts into life.
Just a short trip to Greenford, where, as the old proverb says…
"In the land of the 4x4, the Swordfish is king."

As I figured this was the place for some elastic to hold the headlight covers in place.

On the way home, I took a detour amongst some of the new buildings in Wembley.
Unfortunately, I just couldn't seem to get the right angle for an interesting photo.
So this was the best I could do.

Then it was time to fit the elastic…
 Plan A
Sew the elastic to the string and pull it through.

Result = Fail
As I hadn't left a big enough gap for the extra width of both pieces.
Plan B
Use tape to form the elastic into a point and push it through one stitch at a time.

Result = Partial Fail
As this was a painfully slow process that looks like it would take me hours to do.
In fact, it would have been quicker to cut the stitches out and re-sew it.
Plan C
But before I did any of that, it finally dawned on me that I was supposed to check the fit.
Result = Fail.

As expected, I hadn't left enough room for the leather to stretch over the grill.
So I will make a new piece and stitch the elastic into place at the same time.
(My sewing could certainly use the practise.)
Last job of the day was to check the oil, ready for my trip to the garage tomorrow morning.

As it will be an early start, I've parked the car on the road.

Which will allow me to push it down the street away from my immediate neighbours before starting it.
Until next time, take care, Paul.
|
21st January 2019, 09:33
|
|
Senior Member
|
|
Join Date: Feb 2012
Location: Wembley, London
Posts: 5,058
|
|
Sunday Evening - Shower Cap
After cutting out and marking up another section of leather, I made the "Mark 2" version of the headlight cover.

Which, with the elastic pulled tight, now looks like a shower cap on the inside.

But there is a lot of material there, that should stretch over the headlight grille.
Hopefully, comparing the finished cover to the material I cut out for the other side gives you a better idea.

- - - - - - - - - - - - - - - - - - - - - - - - - - - - - - -
Monday Morning - Brrrrrr!
I think it was still zero degrees when I went out this morning to get the covers off.


So I think it is fair to say it was a rather chilly drive through heavy rush hour/school run traffic.
There are always interesting cars at Enginuity and I left my car outside flanked by 4 Stags and 2 Heralds.


Even though I was cold when I arrived, the garage owner had made the trip in on a motorcycle.
Which allowed us to exchange old biker war stories about just how cold it can get on two wheels.
Until next time, take care, Paul.
|
|
Currently Active Users Viewing This Thread: 1 (0 members and 1 guests)
|
|
|
 Posting Rules
|
You may not post new threads
You may not post replies
You may not post attachments
You may not edit your posts
HTML code is Off
|
|
|
All times are GMT +0. The time now is 00:39.
|


 Hybrid Mode
