|
|
| Vintage and Classic Roadster Kit Car Builds For Vintage and Classic era kit cars. Post your build reports, problems and progress here |

30th October 2022, 15:23
|
 |
Senior Member
Enthusiast
|
|
Join Date: Mar 2005
Posts: 3,077
|
|
I had quite a good productive time in my garage this week. Made good progress on the carpet fitting and some pieces now dropped off at a local trimmer to have some of the edges trimmed.
 Carpet fitting Carpet fitting by Sabrebuilder, on Flickr
 Carpet fitting Carpet fitting by Sabrebuilder, on Flickr
 Carpet fitting Carpet fitting by Sabrebuilder, on Flickr
Just got to do the passenger and drivers footwell panels.
Oh, and the boot, of course 
...peter |
26th November 2022, 18:31
|
|
Senior Member
Enthusiast
|
|
Join Date: Mar 2005
Posts: 3,077
|
|

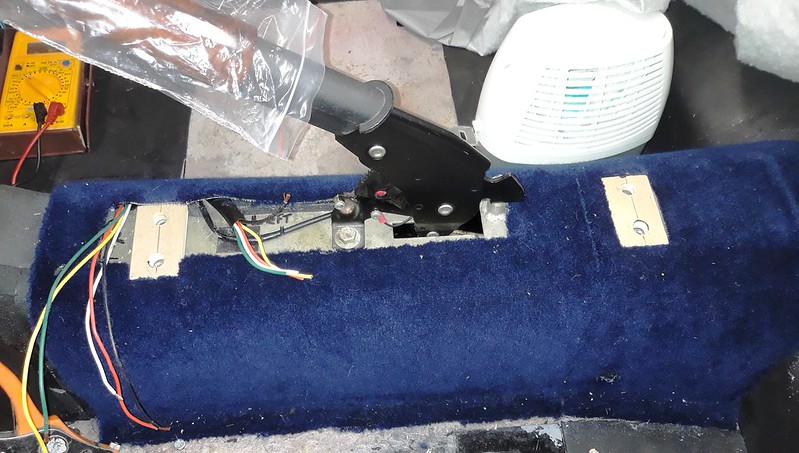
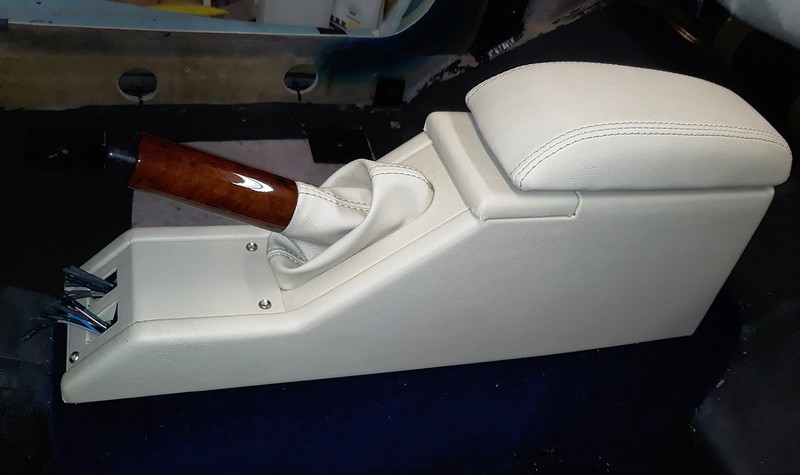
Time in the garage this month has been focussed on finishing the central armrest/handbrake cover.
Before finally fixing the arm rest/cubby box I made up some 9mm thick pads out of plywood for the frame to rest on.
 Central armrest fitting Central armrest fitting by Sabrebuilder, on Flickr
I had the arm rest professionally covered by a local trimmer. He did a great job and much much better than I could ever achieve.
 Central armrest fitting Central armrest fitting by Sabrebuilder, on Flickr
The handbrake handle cover was designed to fit a VW T5 Transporter.
I also had this gaiter professionally made by the same local trimmer. Excellent quality and very reasonable.
 Central armrest fitting Central armrest fitting by Sabrebuilder, on Flickr
I glued and stapled the gaiter to the back of the surround. Very pleased with the result.
 Central armrest fitting Central armrest fitting by Sabrebuilder, on Flickr
Handy storage space.
 Central armrest fitting Central armrest fitting by Sabrebuilder, on Flickr
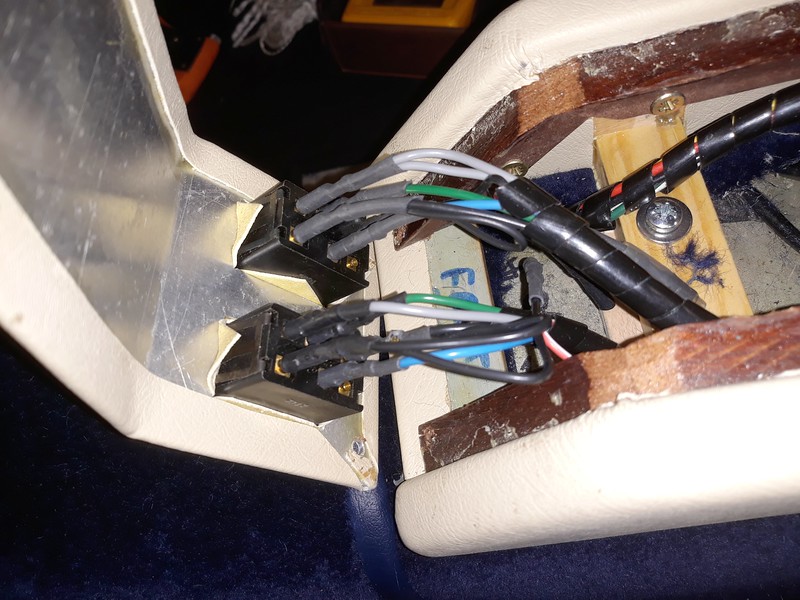
It wasn't until I came to connect the window switches that I realised the RMC loom is designed for illuminated Granada window switches but I had sourced and fitted Sierra switches. The pin-out is different so I had to spend a couple of hours with the Sierra Haynes manual and a magnifying glass to figure out the connections. I bench tested my homework before fitting the switches to the car.
 Window switch wiring connections Window switch wiring connections by Sabrebuilder, on Flickr
Window switches connected.
 Window switches connected Window switches connected by Sabrebuilder, on Flickr
 Window switches fitted Window switches fitted by Sabrebuilder, on Flickr
So that's it all finished and I'm very pleased with the result 
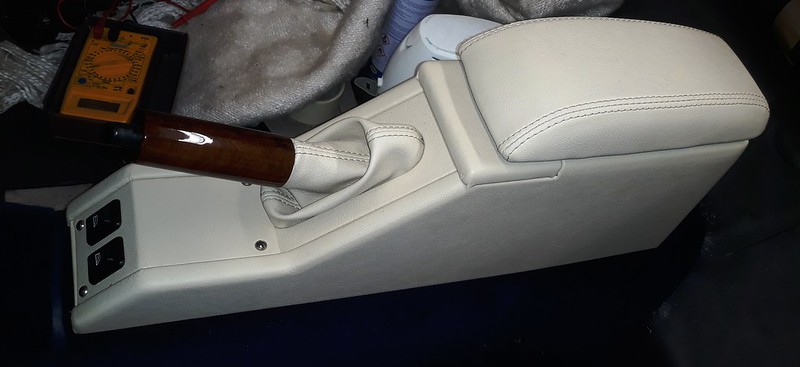 Central Armrest complete Central Armrest complete by Sabrebuilder, on Flickr
Next up I will be fitting the gear stick gaiter, so until next time.....
....peter

|
29th November 2022, 08:50
|
|
Member
|
|
Join Date: Jul 2014
Location: Ealing London
Posts: 54
|
|
As always, job done perfect.
|
29th November 2022, 16:32
|
|
Senior Member
Enthusiast
|
|
Join Date: Mar 2005
Posts: 3,077
|
|
Quote:
Originally Posted by Amir Manzoori

As always, job done perfect.
|
Thanks, it came out better than I had expected so I'm pretty pleased. |
20th December 2022, 19:26
|
|
Senior Member
Enthusiast
|
|
Join Date: Mar 2005
Posts: 3,077
|
|
The Christmas preparations and the sub-zero temperatures in my gargae caused progress to slow to zero over the last couple of weeks.
But a surprise break in the weather today allowed me to finish the carpeting of the gearbox tunnel.
 Gearbox tunnel carpeting Gearbox tunnel carpeting by Sabrebuilder, on Flickr
Including finishing the gearstick surround and new gear knob.
 Gearstick surround Gearstick surround by Sabrebuilder, on Flickr
That's probably the last update this year so I'll just wish everybody a Happy Christmas!
........peter |
21st December 2022, 08:46
|
|
Senior Member
|
|
Join Date: Nov 2017
Posts: 109
|
|
Nice work, Peter, that looks very tidy.
Happy Christmas to you too  |
21st December 2022, 11:47
|
|
Member
|
|
Join Date: Jul 2014
Location: Ealing London
Posts: 54
|
|
Dear Peter, I, like all readers who have been following your build so far, have enjoyed every post about your work and been envious of your capability. I believe we would enjoy it right up to the finish of the project. Well done, Wish you, family and those who read this post, a happy Christmas and may you be blessed with a new year filled with good health, happiness and joy.
|
31st December 2022, 22:03
|
|
Senior Member
Enthusiast
|
|
Join Date: Mar 2005
Posts: 3,077
|
|
Happy New Year!!
Just about time left for one more post of 2022......
But first thanks to Kon and Amir for your best wishes and a Happy New Year to you and all my readers,
I managed to find the time to re-fit the passenger door this week. (Only about 10 years after I removed it  )
Firstly, I fitted the door wiring loom grommet.
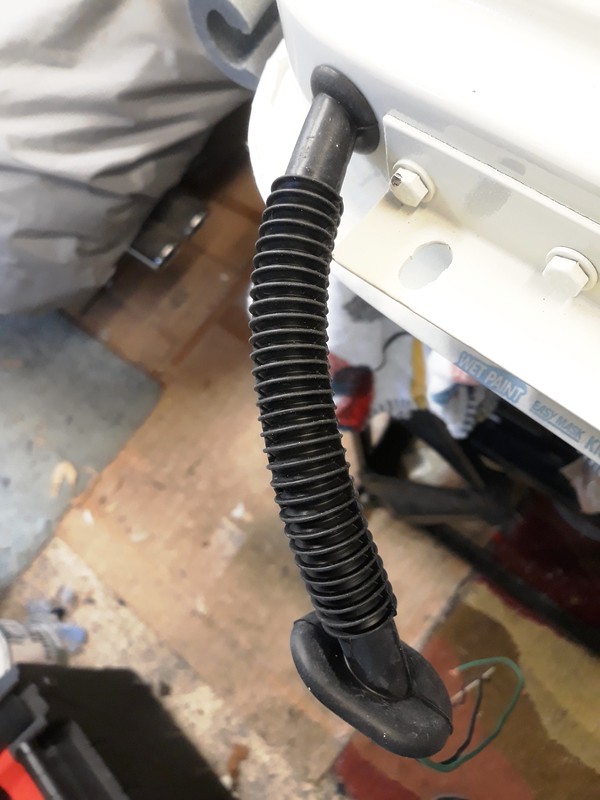 Passenger door fitting Passenger door fitting by Sabrebuilder, on Flickr
I then positioned the door which is surprisingly heavy with glass, winder mechanism and locks, etc. A couple of old scrap tyres and my workshop floor mat made just about the right height to slide it on to the hinges.
 Passenger door fitting Passenger door fitting by Sabrebuilder, on Flickr
And after fitting the four bolts and a bit of fettling the door was on and clicked closed on the door catch striker.
 Passenger door fitting Passenger door fitting by Sabrebuilder, on Flickr
 Passenger door fitting Passenger door fitting by Sabrebuilder, on Flickr
 Passenger door fitting Passenger door fitting by Sabrebuilder, on Flickr
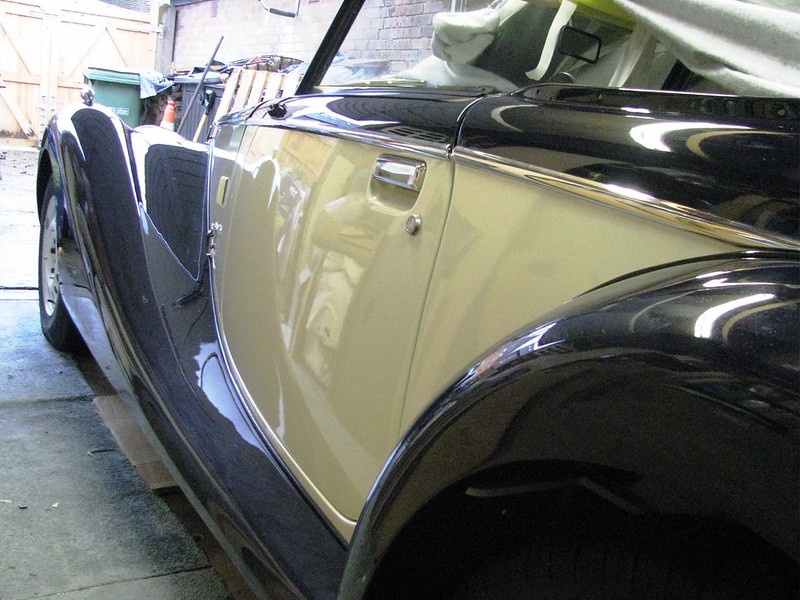
Now just showing off the beautiful lines of the Sabre.
 Passenger door fitting Passenger door fitting by Sabrebuilder, on Flickr
Here's to 2023
|
31st December 2022, 22:53
|
 |
Senior Member
|
|
Join Date: Dec 2011
Location: Devon
Posts: 550
|
|
Well I can't believe I have been following your build for over 10 years.!! Your attention to detail and tenacity is off the scale. Looking forward to future updates. Best wishes for the New Year.
|
2nd January 2023, 07:24
|
|
Senior Member
Enthusiast
|
|
Join Date: Jun 2015
Location: Reading, Berkshire
Posts: 688
|
|
Great updates. Thanks for sharing the techie details.
Lovely car too
Dave
|
6th January 2023, 10:08
|
|
Junior Member
|
|
Join Date: Mar 2018
Posts: 25
|
|
Thirded, it's going to be drop dead gorgeous this one!
|
12th January 2023, 18:59
|
|
Senior Member
Enthusiast
|
|
Join Date: Mar 2005
Posts: 3,077
|
|
New year - same car :-)
Thanks froggyman, DaveP and Biggles for your kind words of encouragement. 
--------------------------------------------------------------
My wife bought me this nice picnic set for Christmas so I better crack on and get this car finished for Summer 
 Picnic Basket Picnic Basket by Sabrebuilder, on Flickr
Firstly, I finished fitting the door wiring grommet, the restraining strap and the interior lighting switch. I then connected up the door wiring to the cars loom and tested the door window and door lock.
 Door fitting Door fitting by Sabrebuilder, on Flickr
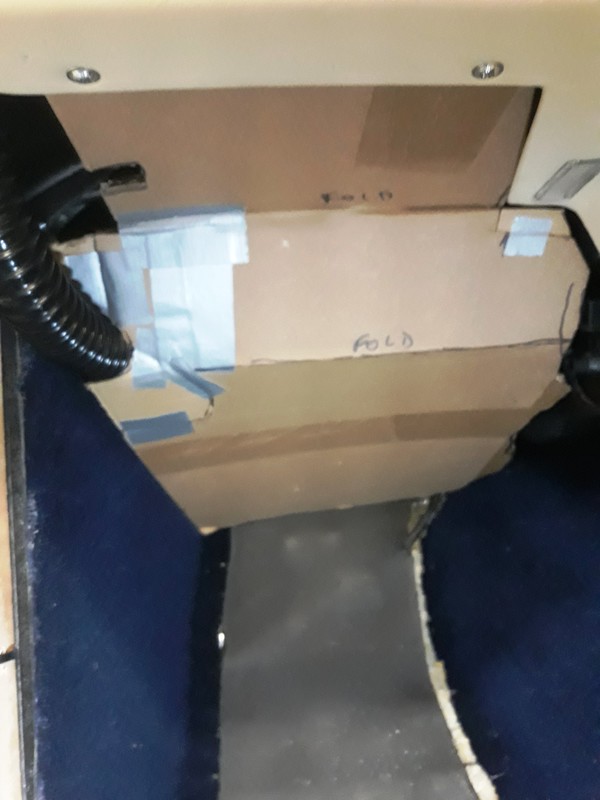
Then I could do some more interior trimming. I decided to make a panel that encloses the space above the passenger footwell. I started by templating the under dash cover on the passenger side.
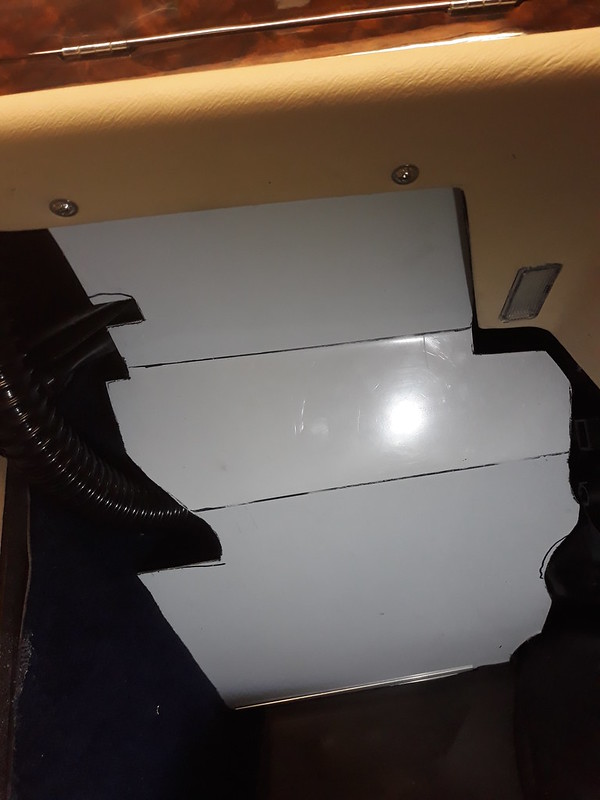
I then cut a sheet of aluminium to fit. It fits into a slot I made at the base by gluing a strip of angle ali to the bulkhead and is fixed to a bracket bolted to the underside of the dashboard.
I then covered the ali sheet with carpet and glued soundproof mat to the rear side to stop any chance of vibration.
 Carpeting Carpeting by Sabrebuilder, on Flickr
 Carpeting Carpeting by Sabrebuilder, on Flickr
 Carpeting Carpeting by Sabrebuilder, on Flickr
 Carpeting Carpeting by Sabrebuilder, on Flickr
I have also been recovering the rear quarter panels. These panels are made of GRP and were supplied as part of the kit. I first cleaned up the panels by removing the old glue. I then covered them in scrim foam using spray adhesive. And then covered them in some navy vinyl.
 Rear quarter panel Rear quarter panel by Sabrebuilder, on Flickr
 Rear quarter panel Rear quarter panel by Sabrebuilder, on Flickr
Hopefully, the weather will stay mild enough to carry on with the trimming....
....peter
Last edited by peterux; 12th January 2023 at 19:01..
Reason: typo
|
27th January 2023, 19:20
|
|
Senior Member
Enthusiast
|
|
Join Date: Mar 2005
Posts: 3,077
|
|
Quote:
Originally Posted by peterux
Hopefully, the weather will stay mild enough to carry on with the trimming....
|
Of course, the weather immediately plunged back below zero in my garage and combined with a nasty head cold has slowed my progress over the last two weeks. But I have managed to (almost) complete three more panels.
Firstly, the passenger side 'a' post cover had to be modified to fit because I mounted the ECU behind the side bar. I then covered it in a piece of carpet and fixed it to the 'a' post with some plywood packing pieces. (the cover is to the left in this photo)
 'A' post cover 'A' post cover by Sabrebuilder, on Flickr
Next I tackled the door sill panel. The original sill cover panels were made of thin plywood covered in carpet but these had rotted due to the years of damp storage conditions. So, I remade them out of 2mm thick aluminium and then covered them in scrim foam and navy vinyl.
 Sill cover Sill cover by Sabrebuilder, on Flickr
Then on to the passenger door card...
The door cards on the Sabre are brilliantly designed GRP mouldings. First I had to clean off the old adhesive and repaire a broken corner. I also found that I needed to trim about 5mm off the bottom edge of the card to clear the door seal.
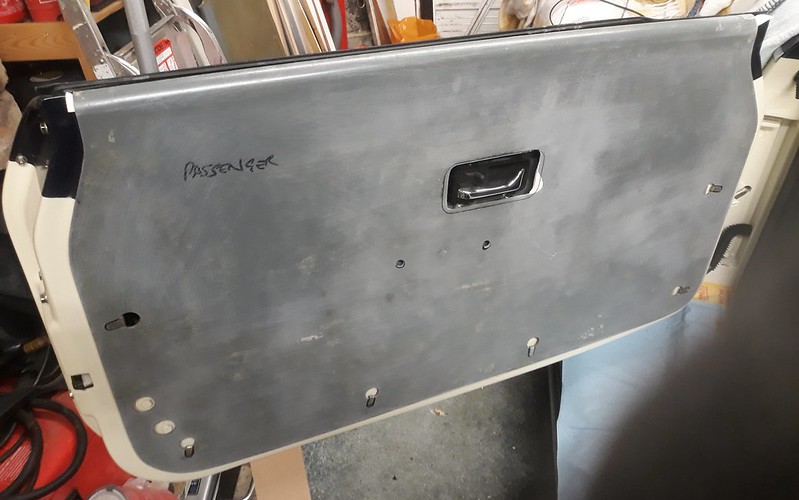 Passenger Door Card Passenger Door Card by Sabrebuilder, on Flickr
I then covered the card in scrim foam and cream vinyl. The inner window draught seal still to be fitted as I needed to order some tiny screws to fix it to the door card.
 Passenger Door Card Passenger Door Card by Sabrebuilder, on Flickr
A little plain atm but I plan to have some professionally trimmed door cards made post IVA and registration to match the seats.
More trimming next week........
..................peter
Last edited by peterux; 6th February 2023 at 20:17..
Reason: typo
|
28th January 2023, 08:57
|
|
Senior Member
|
|
Join Date: Nov 2012
Posts: 845
|
|
Wow!
Brilliant work!
Regards, Mick
|
30th January 2023, 08:23
|
|
Senior Member
|
|
Join Date: Nov 2017
Posts: 109
|
|
That looks ace, great work. I can only hope that mine will turn out half as nice... if I ever get there |
30th January 2023, 21:23
|
|
Senior Member
|
|
Join Date: Apr 2011
Posts: 282
|
|
Superb I wish I had your patience and skill!
|
3rd February 2023, 17:01
|
 |
Senior Member
Enthusiast
|
|
Join Date: Feb 2005
Location: Hampshire
Posts: 2,497
|
|
Very nice |
9th February 2023, 19:39
|
|
Senior Member
Enthusiast
|
|
Join Date: Mar 2005
Posts: 3,077
|
|
Pressing on with the trimming...
Thanks, Mick, Kon, Dpaz and Patrick for you words of encouragement
----------------------------------------------------------------------------
A quick update of progress of trimming out the interior of the last couple of weeks.
So the next step was to cover the rear panel that sits behind the seats. (For anyone not familiar with the sabre, the hood drops down behind this panel when in the fold down position.)
Having stripped of all the old trimming, I started by covering the top rail of the back panel with some navy vinyl which was glued on the front and stapled on the back. The back was also covered in sound absorbing foam.
 Rear Panel Rear Panel by Sabrebuilder, on Flickr
I then glued a piece of carpet to the lower section. (Photographed in bright sunshine)
 Rear panel Rear panel by Sabrebuilder, on Flickr
Before fitting the rear section of carpet I fitted the drivers side carpeting.
 Carpet Carpet by Sabrebuilder, on Flickr
After a lot of faffing about getting the seat belt mounting holes aligned with the chassis I could finally fit the rear panels in place. Before the final fitting I covered the rear body tub bulkhead in sound absorbing foam.
 Rear panels Rear panels by Sabrebuilder, on Flickr
These MG Roadster door seal finishers make a nice addition. They are not a perfect fit but close enough.
 Door seal finishers Door seal finishers by Sabrebuilder, on Flickr
 Door seal finishers Door seal finishers by Sabrebuilder, on Flickr
A couple more panels on the drivers side to make/trim/fit and then I can move on to fitting the seat belts and the drivers door.
Due to the width of my garage I need to move my car across the garage by about 12 inches. 
Next update in about 2 weeks....
..........peter
Last edited by peterux; 9th February 2023 at 19:42..
Reason: correction
|
26th February 2023, 20:33
|
|
Senior Member
Enthusiast
|
|
Join Date: Mar 2005
Posts: 3,077
|
|
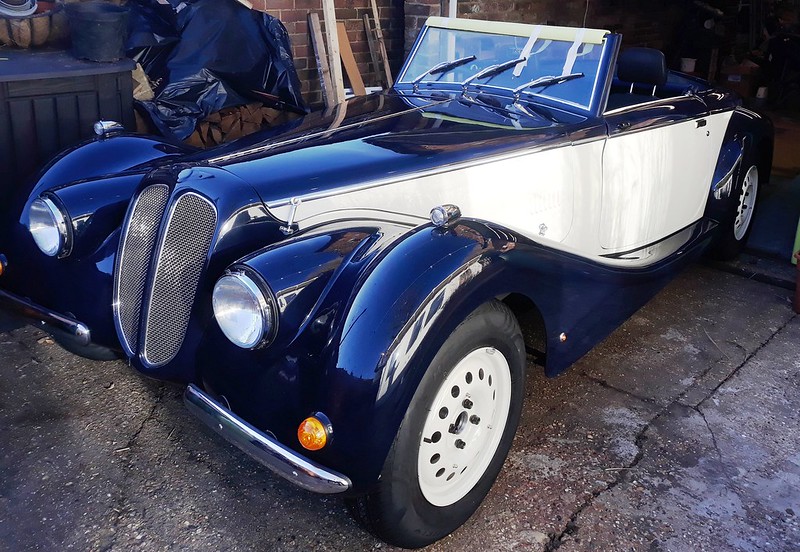
So as mentioned above I had to move the car across the garage by about 12" to give me space to fit the drivers door and I decided to retrieve the boot lid from the loft above while the car was out.. It was a nice sunny day so a good excuse to take another picture. It looks almost finished but of course at this stage it still had no driver's door or boot lid.
 Moving Moving by Sabrebuilder, on Flickr
The first job before fitting the driver's door was to add some protection to the wall of my garage so I don't damage the door when I open it. I used a cheap yoga mat off ebay.
 Door protection Door protection by Sabrebuilder, on Flickr
I then fitted the driver's door which looks exactly like the passenger door so no photo's. But I didn't photo the door stay before so.....
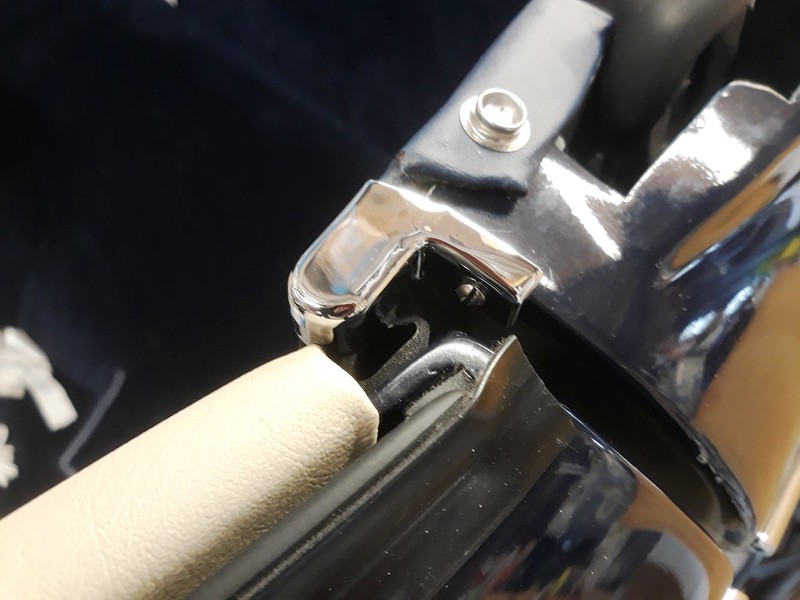
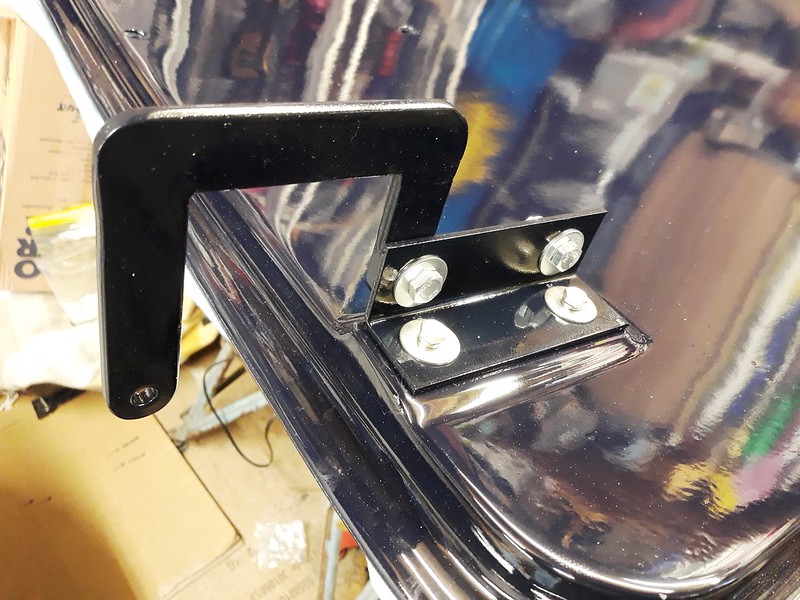
The door stay on the Sabre is a simple device that passes through a hole in the hinge plate to stop the door opening too far. The original plating had rusted on mine so I had them chrome plated.
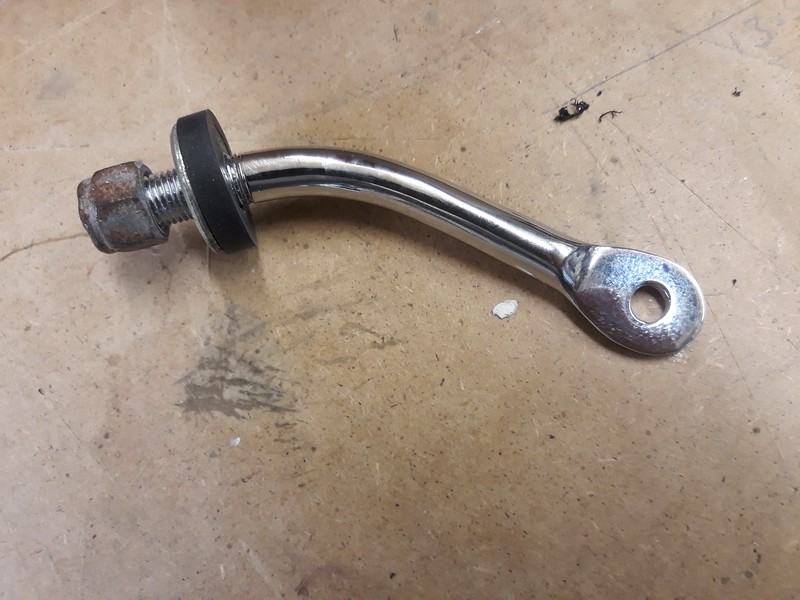 Door stay Door stay by Sabrebuilder, on Flickr
Here you can see the door stay being fitted. A 6mm nut and bolt hold it to the angle brackets on the door.
 Door stay Door stay by Sabrebuilder, on Flickr
I then moved on to fitting the boot lid. I prepared the boot lid by first cleaning off some old masking tape and then giving it a good polish. I trial fitted the hinges to make sure everything lined up. The boot lid is very well engineered, being a double skinned GRP structure with metal plates bonded inside to take the bolts of the hinges and boot stay.
 Boot lid preparation Boot lid preparation by Sabrebuilder, on Flickr
The Sabre boot lid catch is taken from a VW beetle engine cover and I picked up a new catch at the Donnington kitcar show many years ago. The original builder made a bit of a pigs ear out of cutting the hole but you don't notice it once the boot lid is fitted.
 Boot lid catch Boot lid catch by Sabrebuilder, on Flickr
I also fitted the chrome strip. (sorry about the bad photo)
 Boot lid preparation Boot lid preparation by Sabrebuilder, on Flickr
My son popped in on Saturday so I roped him in to help me fit the boot lid. I spent over an hour lining it up as the hinges are adjustable. Boot seal is not fitted yet nor the catch striker pin. I expect to have do some more adjustment once the seal is fitted.
 Boot lid fitted Boot lid fitted by Sabrebuilder, on Flickr
So that is the last major part of the bodywork fitted 
Lots of minor jobs to do but nearly there......
....peter
|
27th February 2023, 16:11
|
|
Senior Member
|
|
Join Date: Apr 2011
Posts: 282
|
|
Looking really beautiful, very envious!
|
|
Currently Active Users Viewing This Thread: 6 (0 members and 6 guests)
|
|
|
 Posting Rules
|
You may not post new threads
You may not post replies
You may not post attachments
You may not edit your posts
HTML code is Off
|
|
|
All times are GMT +0. The time now is 13:48.
|


 Linear Mode

