|
|
| Tribute Automotive Builds Discuss your Tribute kit build |

19th May 2016, 21:03
|
|
Senior Member
|
|
Join Date: Feb 2016
Posts: 272
|
|
OK, so photobucket seems to be the way to go, so here goes. Signed up for photobucket, and followed previous instructions - lets see what happens:

Last edited by 306craig; 19th May 2016 at 21:14..
|
19th May 2016, 21:15
|
|
Senior Member
|
|
Join Date: Feb 2016
Posts: 272
|
|
Nope! Still nothing, I am being a complete wally or something?
|
19th May 2016, 21:43
|
|
Senior Member
|
|
Join Date: Mar 2013
Location: Coventry and the Limousin
Posts: 549
|
|
Yep.
Start a reply.
Go to a pb page.
Here is a random one.
http://s1042.photobucket.com/user/th...zsbbb.jpg.html
Click the box next to IMG over on the right.
Paste in here
You are done!
[IMG]  [/IMG]
|
19th May 2016, 22:06
|
|
Senior Member
|
|
Join Date: Feb 2016
Posts: 272
|
|
It cant be that easy?
|
20th May 2016, 06:44
|
 |
Senior Member
|
|
Join Date: Apr 2016
Location: Camberley
Posts: 972
|
|
tinypic.com should work as well, it works on the footy forum I use.
You browse to your image, click upload (and enter the anti robot key) then one of the listed outputs is a forum address to copy and paste.
|
20th May 2016, 16:44
|
|
Junior Member
|
|
Join Date: Mar 2016
Posts: 26
|
|
Another vote for photobucket it really is as simple as cut and pasting the IMG code.
|
22nd May 2016, 18:47
|
|
Senior Member
|
|
Join Date: Feb 2016
Posts: 272
|
|
Hi guys. Got a problem I could do with some help on. Has anyone come up against the front end sitting too high on the slam panel?
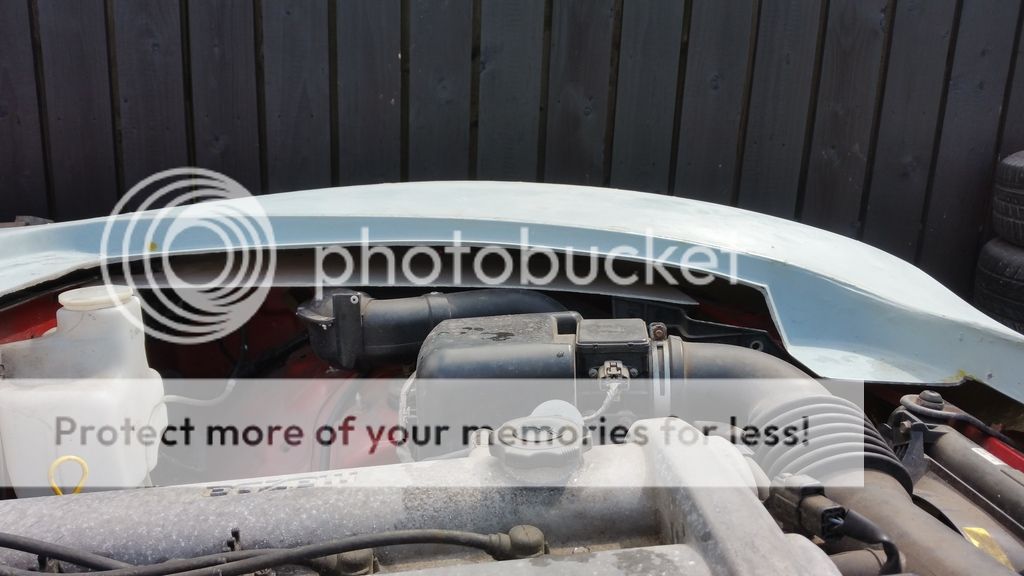
If so what is the best solution? To cut the slam panel or to cut the GRP in the front corners of the bonnet recess?
Last edited by 306craig; 5th June 2019 at 22:38..
|
22nd May 2016, 18:48
|
|
Senior Member
|
|
Join Date: Feb 2016
Posts: 272
|
|
At last I have got the picture thing sorted!!!!!!!!!! Thanks Landmann. Apparently I was being a complete and utter thicko!
|
22nd May 2016, 18:54
|
|
Senior Member
|
|
Join Date: Feb 2016
Posts: 272
|
|
I have also got another couple of questions for fellow MX250 builders:
Has anyone got any pointers for door / window seals. I have seen this: http://www.ebay.co.uk/itm/2722192363...%3AMEBIDX%3AIT. And I have also seen this one: http://www.ebay.co.uk/itm/2318435341...%3AMEBIDX%3AIT. However I am interested what other people have used.
Another question (I am full of 'em tonight), does anyone else have a problem with the boot trough filling with rainwater? And if so, is there a solution? |
22nd May 2016, 19:11
|
 |
Senior Member
|
|
Join Date: Jun 2011
Location: sheffield
Posts: 564
|
|
for memory the front end is riding high as it's sitting on the headlight frame work ,I took a hammer to mine and flatten them down you can not see them when the fronts on an finished. The door window reveals I bonded a frame in to make a step meaning you then dont need a massive rubber to fill the gap. have a look on my build thread or ask NED for a pic of his to give you a idea. the boot must be the rubber it should not get water in it mine never did . good luck
|
22nd May 2016, 19:35
|
|
Senior Member
|
|
Join Date: Feb 2016
Posts: 272
|
|
Quote:
Originally Posted by andysharrock

for memory the front end is riding high as it's sitting on the headlight frame work ,I took a hammer to mine and flatten them down you can not see them when the fronts on an finished. The door window reveals I bonded a frame in to make a step meaning you then dont need a massive rubber to fill the gap. have a look on my build thread or ask NED for a pic of his to give you a idea. the boot must be the rubber it should not get water in it mine never did . good luck
|
Thanks Andy. Will have a look at your thread now. I think the boot rubber is ok, the water is gathering between the rubber and the outer edge of the trough. It could be because my drive is on a slope I suppose? I will try and get a pic, it looks like rain again! |
22nd May 2016, 20:03
|
|
Senior Member
|
|
Join Date: Jan 2013
Posts: 429
|
|
I had the same problem with the front end and "trimmed" the fiber glass off the kit until it sat properly. I had to take quite a lot off.
The German guys also built theirs on MK2's and cut away the light mounts. I was advised against this but it's an option.
On the rain build up, have you put any drains in?
|
22nd May 2016, 20:13
|
|
Senior Member
|
|
Join Date: Feb 2016
Posts: 272
|
|
Quote:
Originally Posted by fatbloke
I had the same problem with the front end and "trimmed" the fiber glass off the kit until it sat properly. I had to take quite a lot off.
The German guys also built theirs on MK2's and cut away the light mounts. I was advised against this but it's an option.
On the rain build up, have you put any drains in?
|
If you trimmed out the corners, how did you secure the front end? I presume just the plate down the front of the radiator into the back of the slam panel?
No, not done any drain holes, I must admit I was looking at that as a possibility, but by my reckoning the holes would drain into the boot area?
Cheers for the help. |
22nd May 2016, 20:16
|
|
Senior Member
|
|
Join Date: Feb 2016
Posts: 272
|
|
Quote:
Originally Posted by andysharrock
for memory the front end is riding high as it's sitting on the headlight frame work ,I took a hammer to mine and flatten them down you can not see them when the fronts on an finished. The door window reveals I bonded a frame in to make a step meaning you then dont need a massive rubber to fill the gap. have a look on my build thread or ask NED for a pic of his to give you a idea. the boot must be the rubber it should not get water in it mine never did . good luck
|
Just been through both of your threads Andy, I can't see anything about your window seals? |
22nd May 2016, 20:38
|
|
Senior Member
|
|
Join Date: Jan 2013
Posts: 429
|
|
This is how much I ended up cutting away to make the front fit.
[IMG]  [/IMG]
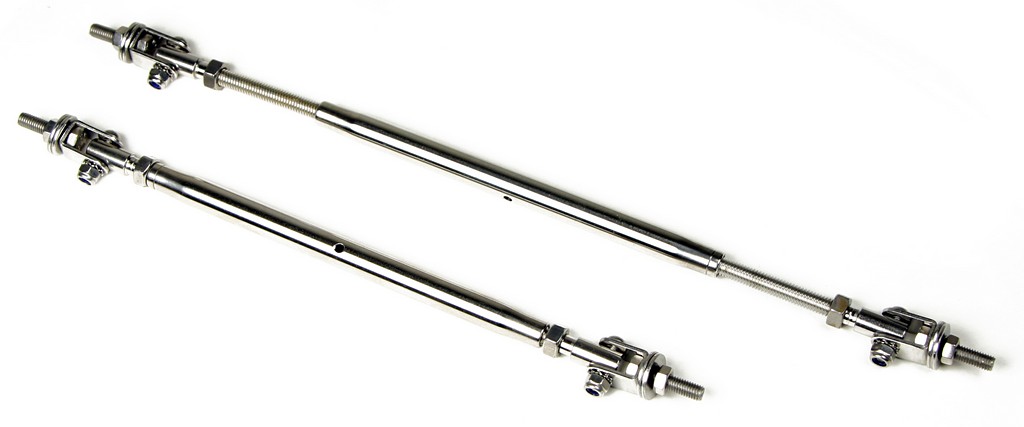
To make sure the front end didn't move I fitted these which fixed the bottom of the front to the chassis.
 |
22nd May 2016, 20:45
|
|
Senior Member
|
|
Join Date: Feb 2016
Posts: 272
|
|
Quote:
Originally Posted by fatbloke
This is how much I ended up cutting away to make the front fit.
[IMG] [/IMG]
To make sure the front end didn't move I fitted these which fixed the bottom of the front to the chassis.
|
Thanks mate - a picture paints......etc etc. You basically took all of the big corner bit out!!! I can see the benefit of leaving the headlight brackets in, gives you something to mount bonnet rubbers etc to.
I had always planned on some kind of strengthening from the bottom of the front end to the chassis, but DO like those adjustable rods, where you get them?
Cheers mate. |
22nd May 2016, 20:47
|
|
Senior Member
|
|
Join Date: Jan 2013
Posts: 429
|
|
Just search for front splitter support rods there's lots out there. Think I got mine off Flea Bay.
|
23rd May 2016, 04:17
|
|
Senior Member
|
|
Join Date: Jan 2015
Posts: 132
|
|
Hi Craig regards door seals check out Jones thread page 9 he did the same as me cutting back the lip and re glassing the lip back in,my rubber seal was from Pheonix trim supplies check out their website as they have profiles to scale on it. I think i used 10 ml . I will try to find some pics of the pipe etc i used for the drains in the boot trough
|
23rd May 2016, 04:27
|
|
Senior Member
|
|
Join Date: Jan 2015
Posts: 132
|
|
|
23rd May 2016, 15:14
|
|
Senior Member
|
|
Join Date: Feb 2016
Posts: 272
|
|
Quote:
Originally Posted by ned
|
Thanks Ned. Really appreciate it. Happy with what you did at the B pillar and around the top of the window........you wouldn't have a picture of how the top of the A pillar looks would you??? Sorry to be a pain in A***E but i have been pondering this for days. |
|
Currently Active Users Viewing This Thread: 1 (0 members and 1 guests)
|
|
|
 Posting Rules
|
You may not post new threads
You may not post replies
You may not post attachments
You may not edit your posts
HTML code is Off
|
|
|
All times are GMT +0. The time now is 05:18.
|


 Linear Mode

