|
|
| Marlin Sportster, Cabrio, Berlinetta and Roadster builds Enthused or Confused about your vintage Marlin build? Ask away here or show off your build. |

27th May 2007, 21:07
|
 |
Senior Member
Enthusiast
|
|
Join Date: Mar 2005
Posts: 3,079
|
|
Lot's of nice 'rainy day' jobs this weekend! It's been too wet for me and I just had to watch Lewis Hamilton this afternoon.
I like your use of stainless tap connectors.
I might be 'borrowing' that idea  |
27th May 2007, 21:16
|
 |
Senior Member
Enthusiast
|
|
Join Date: Feb 2005
Location: Hampshire
Posts: 2,497
|
|
he he thanks, saw them in homebase and though - hmm nicer than the shower pipe idea we were going to nick from some other builders
I do have wet feet now from them sticking out of the garage while working under the car 
Felt like take a huge step backwards having to pull the tub off again though! |
29th May 2007, 18:01
|
|
Member
Kit Car Dreamer
|
|
Join Date: Jan 2005
Location: Netherlands
Posts: 38
|
|
Patrick,
really great those lines instead of the shower hoses.
Am I correct understanding your english that these are lines that are used by plumbers to connect waterlines? That's how it looks to me.
I must say that this is such a thing that cost a bit but makes the car look far more expensive. Price compared to looks are on the good side of the scale. Nice work.
Me?
by your pictures I started fitting the rear tub last weekend with good confidence.
Problem is that by now I now for sure my doors are distorted...
Peter-Jan
|
29th May 2007, 20:54
|
|
Senior Member
Enthusiast
|
|
Join Date: Mar 2005
Posts: 3,079
|
|
Quote:
Originally Posted by PJC

Patrick,
Me?
by your pictures I started fitting the rear tub last weekend with good confidence.
Problem is that by now I now for sure my doors are distorted...
Peter-Jan
|
Peter-Jan,
don't panic about your doors. I thought mine were badly distorted. (They looked like bananas when placed together)
Having just fitted my second door today, i can assure you that they do fit.
Two tips:
1) first, put spacers behind the hinges until the door is level with the chassis, then
2) cut small pieces off the rear tub where it rests on the chassis (near the door striker pin) until the rear tub is parallel to door rear face
Don't forget to fit the rear bumpers first, because this sets the correct height for the rear tub.
You'll then find the doors fit fine.
Good luck |
29th May 2007, 21:16
|
|
Senior Member
Enthusiast
|
|
Join Date: Feb 2005
Location: Hampshire
Posts: 2,497
|
|
Quote:
Originally Posted by PJC
Patrick,
really great those lines instead of the shower hoses.
Am I correct understanding your english that these are lines that are used by plumbers to connect waterlines? That's how it looks to me.
I must say that this is such a thing that cost a bit but makes the car look far more expensive. Price compared to looks are on the good side of the scale. Nice work.
Me?
by your pictures I started fitting the rear tub last weekend with good confidence.
Problem is that by now I now for sure my doors are distorted...
Peter-Jan
|
Yes they are for connecting water lines 
My doors needed a bit of adjustment - they do need to be banana shape as Peter said.
A table edge and carefully putting your weight on either end was my solution! |
2nd June 2007, 22:13
|
|
Senior Member
Enthusiast
|
|
Join Date: Feb 2005
Location: Hampshire
Posts: 2,497
|
|
Ended up spending most of the day on sofa after having missed the opening times of metal supermarket and hampshire hose due to silly traffic on the M3.
Anyway spent a little time finishing off bolting the tub up to the suspension towers - stop things flapping about.
Also setup the up the front camber. No idea what to use so I've got 1.25 negative on both sides. The main thing is that they are now the same. Also made everything SVA friendly with those black tube things.
Last edited by Patrick; 4th June 2007 at 22:53..
Reason: respect
|
3rd June 2007, 16:57
|
|
Senior Member
Enthusiast
|
|
Join Date: Feb 2005
Location: Hampshire
Posts: 2,497
|
|

The bonnet now has all 40 bolts, cup washers, washers and nyloc's in place. Some need to come out again as they need a bit more work with the sinker tool.

Rubber is place round the rear wings - good tip for putting holes in the rubber. Use a socket piece that's the size hole you want to use. Place it on the rubber, put in a vice. Close it up quite tight and pull the rubber of the socket bit. Now you have a nice hole in the rubber!

Exhaust is now higher up and the reverse, fog and number plate lights are wired up and working!

And the first pictures to go into the interior gallery:
First custom piece on the interior taking shape

...can you guess what it is yet?

One finished indicator stalk!

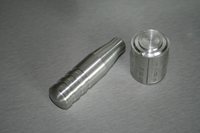
And now in the car:

The indicator stalk as been modified so that it sits further forward to clear the dash This was achieved by bend it straight then putting a new bend in further towards the end of the stalk. The original plastic piece would not fit, but this turn out much nicer than the original anyway!


|
3rd June 2007, 21:41
|
|
Senior Member
Enthusiast
|
|
Join Date: Mar 2005
Posts: 3,079
|
|
Patrick,
the car is looking great, things are really comming together nicely now.
What edging did you use on the outer edges of your rear wings and does it fit OK?
Peter
|
3rd June 2007, 21:50
|
|
Senior Member
Enthusiast
|
|
Join Date: Feb 2005
Location: Hampshire
Posts: 2,497
|
|
Thanks Peter I'm hoping to get the bonnet latches soon which will finish that off nicely!
As for the wings it's the edge trim (bottom right - for up to 4.5mm panels) http://www.nfauto.co.uk/download/trim_page.pdf from CBS It's a right pain to get on - I used a screw driver to open it up a bit and a body work hammer to get it on. On the plus side I hope its strong enough for SVA without need to glue it on!
Just need to do the rest of the car at some point. |
4th June 2007, 07:50
|
|
Senior Member
Enthusiast
|
|
Join Date: Feb 2005
Location: Hampshire
Posts: 2,497
|
|
I've updated the gear stick FAQ on the website:
http://www.msportster.co.uk/faq.asp?FAQ=2
Now includes part number for refurb and an example of the Z4 3.0ltr stick movement.
 |
7th June 2007, 20:53
|
|
Senior Member
Enthusiast
|
|
Join Date: Feb 2005
Location: Hampshire
Posts: 2,497
|
|
New dashboard? Not quite...

...nope the, the vinyl covered sponge for the dash is completely the wrong shape. It was the wrong shape before stretching the dash and after it was even further out.

The bolts as per the Marlin item are glued in the metal. We've used fibre glass filler, the bolt heads have extra cuts in them for the fibres to rest in. The original Marlin sponge glued on to the new metal.

The inside edge of the metal is now trimmed out to the shape of the sponge and mounted on the scuttle. The sponge now follows the shape of the scuttle nicely. Dash and trim now in place. As you can see the gauges got very close to the trim so we've made some recesses to match the placement of the gauges.

A side shot of everything in place. The dash itself needs a bit more trimming down. The metal piece backing the sponge has a rolled edge which should cover the dash nicely.
 |
7th June 2007, 22:02
|
|
Senior Member
Enthusiast
|
|
Join Date: Mar 2005
Posts: 3,079
|
|
Quote:
Originally Posted by Patrick
New dashboard? Not quite...
...nope the, the vinyl covered sponge for the dash is completely the wrong shape. It was the wrong shape before stretching the dash and after it was even further out. |
That's a shame, my combing was a reasonable fit after I stretched the scuttle a little bit? Surely they are all cut from a template?
Getting the holes in the right place is not so easy. I think the instuctions say to drill 10mm holes for 6mm screws! |
7th June 2007, 22:04
|
|
Senior Member
Enthusiast
|
|
Join Date: Feb 2005
Location: Hampshire
Posts: 2,497
|
|
No doubt they are "laser cut" pieces
Doesn't matter I've got a piece that's spot on now
The cuts in the original are not very accurate and look rushed which is where the variation might come in. |
7th June 2007, 22:13
|
|
Senior Member
Enthusiast
|
|
Join Date: Mar 2005
Posts: 3,079
|
|
Quote:
Originally Posted by Patrick
No doubt they are "laser cut" pieces
Doesn't matter I've got a piece that's spot on now
The cuts in the original are not very accurate and look rushed which is where the variation might come in. |
Ah yes, perhaps the laser was having a bad day
 |
8th June 2007, 12:03
|
 |
Senior Member
Enthusiast
|
|
Join Date: Sep 2004
Posts: 1,897
|
|
Quote:
Originally Posted by Patrick
The inside edge of the metal is now trimmed out to the shape of the sponge and mounted on the scuttle. The sponge now follows the shape of the scuttle nicely.
|
Good to see some pictures of this. Not having bought the trim kit - I wondered how Marlin made the curvy bit for the dash. Now I know...
Robin |
8th June 2007, 18:51
|
|
Senior Member
Enthusiast
|
|
Join Date: Feb 2005
Location: Hampshire
Posts: 2,497
|
|
This just keeps getting better. I thought a nice easy task this evening would be to add the sponge strips to the tops of the doors - nice and straight so nothing much to go wonky.
I was ooh so very wrong:

These are supposed to be the same length, the longer one is too big to fit properly

What happened during the construction is each end has a hard card board bit to keep the round shape. On one they are placed slightly over the backing metal, on the other at the ends.
There can not be any quality control at all at Marlin if this sort of thing gets shipped to customers.
I will also add that this is my second set as the first ones were the wrong colour. These also have a nice dimple that I thought would go away after a year in the loft due to bad packing. Its still there.
The quality of the trimming leaves a lot to be desired as well.
I won't be sending these back, I will fix myself.
It is just starting to irritate me the number of times during the building I've had to spend money / time / effort fixing things that should work / be correct out of the box!!
rant over
|
8th June 2007, 20:23
|
|
Senior Member
Enthusiast
|
|
Join Date: Mar 2005
Posts: 3,079
|
|
Mine aren't that bad, but not much better.
Just been and measured mine.
One is 64.5mm long and the other is 64.3mm.
The shorter one has that funny angle to the end.
I haven't checked, but I wonder if the doors are a diffrent size?
When I was mounting the lock striker plates, I noticed that the plates ended up on a different postion on the chassis. Each side of my chassis is certainly not identical? (and Patrick, your rear wings where diffrent lengths, weren't they?)
Perhaps Marlin has a plastic ruler and it depends on the weather on the day they make the bits?
As the website says........
"I am most impressed by the quality of the kit, as the manual says - 'if it does not go together easily, it is probably not assembled correctly' - so far Marlin have proved their point!"
Patrick, I think you should reject these and your wiggly bit and ask for a new complete set.
|
8th June 2007, 21:08
|
|
Senior Member
Enthusiast
|
|
Join Date: Feb 2005
Location: Hampshire
Posts: 2,497
|
|
Yeah one of the wings was a bit longer than the other. I've sanded it back though so it's a closer match.
The top of my doors seem to be the same length which is good.
You're right I should complain, but then I need to send these back (which costs) and any replacement is unlikely to be trimmed in better quality.
I'll sleep on it and decide what to do tomorrow. |
11th June 2007, 12:26
|
|
Senior Member
Enthusiast
|
|
Join Date: Sep 2004
Posts: 1,897
|
|
Quote:
Originally Posted by Patrick
These are supposed to be the same length, the longer one is too big to fit properly
|
They look awful.... I have done quite a bit of trimming myself on previous cars and it really isn't that difficult with the right materials and some patience. I hope you are able to get it sorted OK.
Regards
Robin |
11th June 2007, 12:39
|
|
Senior Member
Enthusiast
|
|
Join Date: Feb 2005
Location: Hampshire
Posts: 2,497
|
|
Ended up pulling the vinyl off, cutting back the sponge, glueing the cardboard end piece back on and then pulling the vinyl back over.
Doesn't look any better but they are now the right length.
What I am going to do is SVA the car with these and then in time do the job properly.
Didn't have time for anything else as we replaced all the suspension, front wishbones, track rods and tie rods on my brothers car. That soaked up all of Saturday and a bug caught up with me sunday so I spend most of the time in a sofa!
|
|
Currently Active Users Viewing This Thread: 1 (0 members and 1 guests)
|
|
|
 Posting Rules
|
You may not post new threads
You may not post replies
You may not post attachments
You may not edit your posts
HTML code is Off
|
|
|
All times are GMT +0. The time now is 15:50.
|


 Linear Mode

