|
|
| Tribute Automotive Builds Discuss your Tribute kit build |

10th October 2016, 07:53
|
 |
Senior Member
|
|
Join Date: Apr 2016
Location: Camberley
Posts: 972
|
|
Regarding lighting. Is there a simple guide to what is required for the Z3? The gov stuff is incomprehensible to me.
At the rear,
Compulsory - Position (/side?), indicator, stop?
Optional - Fog, reversing
What are the positioning requirements?
At the side,
Compulsory - Wing indicators - positioning?
At the front,
Compulsory - Position (/side?) lights, full beam, dipped beam, indicators
Optional - fog lamps
Again, positioning?
|
10th October 2016, 08:23
|
|
Senior Member
|
|
Join Date: Apr 2014
Location: Midlands
Posts: 405
|
|
The only one I can say for certain is Barber you must have a rear fog light fitted due to the year of manufacture of your car. It must be fitted either on centre or offside of the vehicle. The switch for the fog lights must also illuminate.
|
10th October 2016, 08:24
|
 |
Senior Member
|
|
Join Date: Jan 2014
Location: Egham, Surrey
Posts: 1,780
|
|
The only optional lights from that list are the spot and reversing lights. Reversing a car with no reversing lights at night is horrible, you don't realise how much of a difference they make. Spot lights are optional but do finish off "The Face" of the car.
There are rules (that I can't remember offhand) about the positioning off the rear foglight, however so long as it works I can't see an MOT tester failing it.
|
10th October 2016, 08:29
|
|
Senior Member
|
|
Join Date: Apr 2016
Location: Camberley
Posts: 972
|
|
Thank you gents. Just window shopping on ebay, the obligatory pre-purchase prep. haha
|
10th October 2016, 08:37
|
|
Senior Member
|
|
Join Date: Jan 2014
Location: Egham, Surrey
Posts: 1,780
|
|
Only problem with buying in advance is that you can't return them 9 months later if you have a problem or it doesn't work. I ordered some stainless steel headlight rings, they rusted within a month so I returned them for exchange, would have been a problem if they had been ordered a long time ago. I also tend to loose things!
Most things nowadays are a couple of days delivery maximum. The only things I order in advance are LED bulbs, wiring and connecters from China as they are so much cheaper.
|
10th October 2016, 08:43
|
|
Senior Member
|
|
Join Date: Apr 2016
Location: Camberley
Posts: 972
|
|
I would give the game away if i actually started buying the stuff. My wife has only just come to terms with the fact I want a Z3. "You've just got rid of a car with 200k miles because it was too expensive to repair, why do you want something that old?"
Me: Because I like them
and "BMWs and Mercedes always give you backache"
Me: That was 30 years ago, they changed (well the Z3s are under 20 years old anyway)
|
10th October 2016, 11:03
|
|
Senior Member
|
|
Join Date: Mar 2012
Posts: 1,152
|
|
Quote:
Originally Posted by Jaguartvr

Reversing a car with no reversing lights at night is horrible, you don't realise how much of a difference they make.
|
I have a Morris Minor that predates the requirement and agree 100% with the above. |
10th October 2016, 11:34
|
|
Senior Member
|
|
Join Date: Jan 2014
Location: Egham, Surrey
Posts: 1,780
|
|
 Boot adjustment advice please
Working my way around the back today (can't face doing another door top yet). The boot is proud on the right hand rear edge, too proud I think to sand down. How to I lower it, the hinge is loose so isn't the problem. On the left hand side the boot lid is low at the front corner, I have put a 5mm shim in-between the hinge and boot lid which has raised it up, don't know why because the hinge is again loose.
At the bottom trailing edge in the centre it is about 8mm proud, again to much to sand off and I don't want to put that much filler on the lower panel where the boot lock is located to build it up.
I thought maybe a slice in the two outer ribs to sharpen the curvature to bring the rear in but the curvature around the edges is pretty good.
Anyone with a cunning plan?
|
10th October 2016, 12:44
|
|
Senior Member
|
|
Join Date: Apr 2016
Location: Camberley
Posts: 972
|
|
When I saw how well you had done with the bonnet, then saw the boot, I thought it would be a b*gger, but you can sort it if anyone can.
|
10th October 2016, 18:37
|
|
Junior Member
|
|
Join Date: Apr 2012
Posts: 9
|
|
Not sure if you have internal or external boot hinges, but can you put shim under the front bolt of the hinge and not the rear to tip the boot lid . Also do you have a gap at the front edge of lid where it meets the body . Can you slot the hole in the hinge to allow the boot lid to slide back ,and if necessary trim the top edge of the lid until the back edge fits nicely
|
10th October 2016, 19:10
|
|
Senior Member
|
|
Join Date: Jan 2014
Location: Egham, Surrey
Posts: 1,780
|
|
It has internal boot hinges, they drop all the way down if the boot lid is not attached so they are not pushing the lid up in any way.
I will shim the front hinge as you suggest.
I had fitted a new boot seal and thought that may be the problem but it sits in exactly yje same way with it removed.
At the moment I think the cure may be to cut some slices in the ribs that run along it and introduce some more cure, that way it should bring the top down and tuck the bottom edge in some, which is what it needs.
Trouble is most of the builds have been hardtops, common as muck!
Last edited by Jaguartvr; 10th October 2016 at 19:22..
|
10th October 2016, 20:15
|
|
Junior Member
|
|
Join Date: Apr 2012
Posts: 9
|
|
If you undo the hinge bolts and let the hinges drop away does the lid fit the gap properly . I think I would try slotting the holes in the hinges to allow the boot lid to slide forward until the rear of the lid aligns with the body
|
10th October 2016, 20:18
|
|
Senior Member
|
|
Join Date: Jan 2014
Location: Egham, Surrey
Posts: 1,780
|
|
The boot is tight against the body at the top so it cannot be moved further back. The bottom edge however sticks out too far so needs to be brought back, I think it is more a question of curvature that the hinges but will remove the hinges tomorrow and see how it fits.
|
10th October 2016, 20:57
|
|
Member
|
|
Join Date: May 2015
Location: Lincolnshire
Posts: 85
|
|
Sounds like you have a cunning plan!
By the way, do you have any tips ref door tops/window frames?
|
11th October 2016, 08:04
|
|
Senior Member
|
|
Join Date: Jan 2014
Location: Egham, Surrey
Posts: 1,780
|
|
Mine is the much more desirable convertible so it doesn't have a window frame!
However the same principle should work. I cut a strip of garden rubbish bin loader, about 3" wide, I also have a length of plastic "L" shape, about 1cm on each edge.Place the L against the window and then push the thin flexible plastic under it pushing firmly against the window, using duct tape stick the plastic down and the the L to the plastic. I cut a small section out to allow for the front window upright. When all stuck together take the skin off and I placed it upside down on a table leant against a wall (this is all precision work). Now the the plastic is on the table with the weight of the door skin pressing down it forms the correct curve. I placed a piece of timber against the L to stop the door sliding. Then back fill with GRP paste, let it dry and the plastic will peel away, GRP does not stick to it.
If you are not using a door rubber on the sliding window I would pack the L out slightly from the edge of the plastic sheet, that way with a little sanding you should be able to get the gap closed completely. Then its just a matter of sanding down.
When I do the other door I will post some more detailed photos.
The plastic bin loader is very useful. I took a mould of something and used the plastic to make the upright shuts so the mould could be split. I cut it to roughly the contour then placed it upright then ran a felt tip along the panel horizontally to marl the cantor on the shape. Cut it out and it was a very close fit. Held it in place with duct tape and some wooden blocks. When the moulded section had dried I just removed the tape and plastic, put mould release on the newly formed flanged and glassed the next section directly to it. Worked a treat.
Link to bag loader plastic
http://www.ebay.co.uk/itm/Easy-Fill-...oAAOxywXFSb7-B

|
12th October 2016, 00:11
|
|
Member
|
|
Join Date: May 2015
Location: Lincolnshire
Posts: 85
|
|
Thanks for the info. I'm not sure I understand them 100%, but can see the value of the polypropylene bin loader material and the L section plastic. I'm sure I can work it out!
Meanwhile I think my time working in a marquee is coming to an end due to the clocks changing, and the onset of winter... My plan is to store my car in a friend's garage until spring. Unfortunately management has found me some winter jobs to do in the house - so needs must etc!
|
12th October 2016, 09:04
|
|
Senior Member
|
|
Join Date: Oct 2013
Location: norfolk
Posts: 695
|
|
Quote:
Originally Posted by Mikewade
Meanwhile I think my time working in a marquee
|
For a moment there I thought you were a trapeze artist  |
12th October 2016, 16:55
|
|
Senior Member
|
|
Join Date: Jan 2014
Location: Egham, Surrey
Posts: 1,780
|
|
Boot Lid Adjustmet
Boot lid doesn't fit too well, O/S front corner sits proud, N/S front cornet sits low and the back edge sits about 8mm too far back sticking out over the rear. The low side can be overcome by packing under the hinge, I did try packing part of the proud side as suggested but it didn't help.
I decided to try and curve the boot lid some more, that should in theory lower the front and pull the back in.
I sliced the two side ribs underneath, tensioned them with a pair of ratchet steps and held it in place with builders band. The two rear corners sat further in and looked much better but the centre still needed pulling in. The proud corner also sat much better. I then cut a slice through the numberplate housing, it's shape was stopping the panel from bending. I then fixed the slices with some GRP tape.
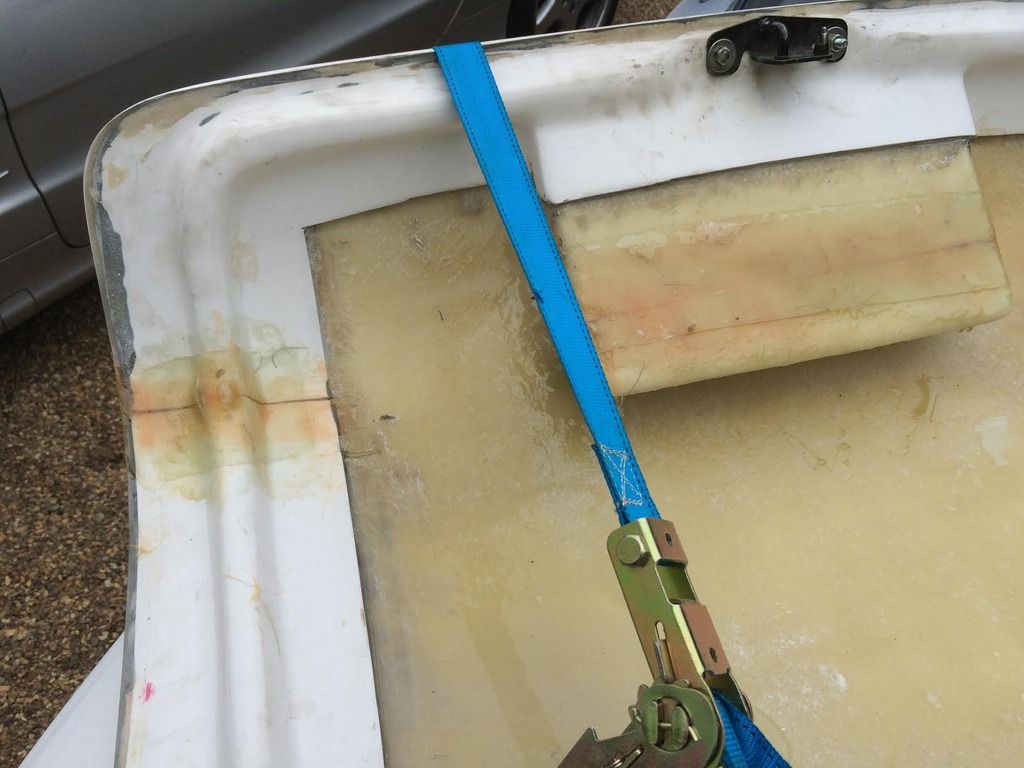
The boot lid sat much better but was still a little too proud in the centre at the back.
To get the back to sit further back I put a hydraulic ram in the boot and pushed it out a little, cut some slices and grp taped them. 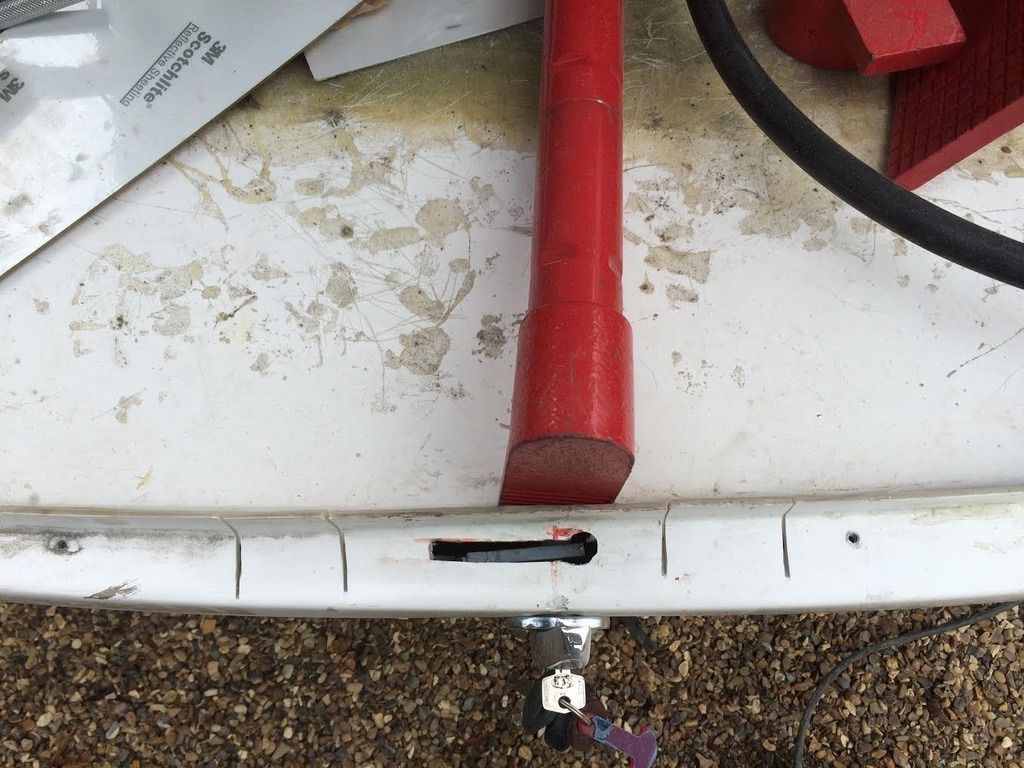
The boot lid now sits a lot better, a bit of sanding and packing should get it to an acceptable fit.
|
17th October 2016, 09:54
|
|
Senior Member
|
|
Join Date: Jan 2014
Location: Egham, Surrey
Posts: 1,780
|
|
Bubbles in the GRP
I'm glad to say are almost non existent. It has just been baked in an oven and we got two tiny bubbles, along with the one bubble I found previously on the front wing makes 3 in total.
|
22nd October 2016, 17:07
|
|
Senior Member
|
|
Join Date: Jan 2014
Location: Egham, Surrey
Posts: 1,780
|
|
Central locking
Bugger, bugger dam and bugger.
Remote central locking stopped working while it was locked. I had put an emergency cable in just in case this happened but although I had tried the cable, this time it wouldn't release.
I tried hooking a string around the inner door handle but it just wouldn't open so in the end had to open the zip on the rear window. I got my daughter to climb in but with her pulling the door handle and pulling up the lock button at the same time we still couldn't open the car. In the end the ignition had to be switched on and the door opener pulled before it would open. I don't think my emergency cable was faulty but I think it needed the ignition on before it would allow the locks to open.
I think the answer is to wire the door window to a switch in the boot that will allow you to open the window directly from the battery. Typically I have misplaced my Haynes manual with the wiring diagram.
In opening the zipped rear window the half of the zip that was attached to the hood has started pulling away so I will have to try and sow that up before I can refit the window.
The remote locking on these cars seems to be a bit of a problem, you need to have a backup plan as you can't get to the original door locks.
Last edited by Jaguartvr; 3rd June 2017 at 06:38..
|
|
Currently Active Users Viewing This Thread: 1 (0 members and 1 guests)
|
|
|
 Posting Rules
|
You may not post new threads
You may not post replies
You may not post attachments
You may not edit your posts
HTML code is Off
|
|
|
All times are GMT +0. The time now is 08:25.
|


 Linear Mode

