You'll have to give lessons! I spent ages googling without coming up with anything. The catcescon ebay look like they should fit the bill. As possibly the LandRover ones referred to in the Morgan article. Anything Land Rover related generally seem to be in plentiful supply. And sensibly priced.
Cheers Robin
That's a good idea. In fact many years ago I used a sand blast attachment on my Karcher to good (if messy!) effect so I might do that. My lawn could do with some sand treatment anyway ;-)
Cheers, Robin
Prototype door
The original Marlin Roadster doors are pretty small due to the position of the running boards. But as I am going for cycle wings I thought I would take advantage of the extra depth. So I have removed the frame that the doors shut on. The picture shows a mock up of the new door with much better access. Should be much easier to get in now I am not quite so flexible as I used to be lol. I still have to add something for the door to close against at the bottom.
The original doors are basically a lump of 25mm ply skinned in aluminium. I plan to do something similar with the new doors although I will probably make the plywood more of a frame to keep the weight down. In my drive for a bit more safety I am planning to use anti-burst door catches from the series 3 Land Rover, as also used by Morgan. (Thanks to Peter for the suggestion.) More pictures once the catch arrives and I have made the first door....
 original_door1
 by
Robin Martin, on Flickr
 prototype_door1
 by
Robin Martin, on Flickr
 prototype_door2
 by
Robin Martin, on Flickr
I have finished making the prototype door and have been experimenting a bit with cleaning and painting the chassis.
I have used a Land Rover latch as suggested by Peter. Morgan also use this type of latch but I suspect they must have a special version of it as the standard one has handles both on the inside and outside plus a lock barrel. I only wanted the inside handle and so the lock barrel and outside handle have been "treated" with the Dremel.
The standard Land Rover striker is HUGE and so I have made one myself a little more in keeping with the scale of the Marlin.
The current chassis finish is a mixture of old paint, rust and old paint & rust. Where the chassis is visible I have cleaned it back to bare metal. Other places I have flattened the old paint and treated the rust as appropriate. Then applied several coats of Isopon Zinc 182 primer. It's beginning to get there but will need at least another coat particularly where it's visible and I have flattened it back. One big relief is it didn't react with the existing paint so where there is no rust I can just flatten it back without having to strip it all off.
I am now on the hunt for some decent plywood to make the doors proper from. Not so easy as one might think nowadays...
Cheers, Robin
 door_with_latch
 by
Robin Martin, on Flickr
 modified_lr_latch
 by
Robin Martin, on Flickr
 striker_plate
 by
Robin Martin, on Flickr
Yes, it's expensive. The problem I have found is that even some of the expensive stuff is rubbish. I don't mind the cost if the quality is there but the stuff from the usual builders merchants suppliers is, without exception, rubbish. So that means mail order which almost doubles the cost. Grrr
Cheers, Robin
Thanks for all the suggestions guys. The original doors were 25mm ply skinned with aluminium and never warped - so I was following that method. The trick I hope is to get some good quality ply and then seal it against moisture ingress. My favourite so far is something called duraply which is an engineered ply made from Poplar.
I will be cutting out the centre though so as to allow for a small door pocket and lighten the whole thing. I have just completed building a camper van from scratch so have all the good tools for that kind of thing.
Cheers, Robin
A little update
It seems ages ago since I last posted an update but I have been beavering away.
I have made new seatbelt mounts to take standard inertia reel belts. I say new, but there wasn't really any proper seat belt mounts previously with static seatbelts just being attached to the aluminium inner skin. Ooo-err...
I have also been working on the rear tub repairing myriads of holes so its back to how it would have originally been supplied by Marlin. Also, in an attempt to improve both the appearance and strength I have added several layers of fibreglass tape to the top edge. It's now fairly consistantly about 6mm thick - previously it varied between about 2 and 6mm. Still needs some work but its getting there.
 seatbelt_mount4
 by
Robin Martin, on Flickr
 tub2
tub2 by
Robin Martin, on Flickr
The observant may spot that there is more clearance between the tub and seatbelt mount one side to the other. Not sure what is out of true yet - some careful measuring needed...
Cheers, Robin
Some more progress....
I have re-made the rear tub support plate. The original was pretty ugly with oversized holes. The new one is a tad lower so I should be able to get some tite-n-fast trim arround the top edge of the tub. The original went right to the top which would have made that impossible.
 tub_support
 by
Robin Martin, on Flickr
 tub_support2
 by
Robin Martin, on Flickr
I have also made some new floor pan sides from 1.2mm zintec steel. The originals were alluminium -a bit scary as the seatbelt lower mount is bolted to them. My home made bender was just about up to the job but I may have to think again for the next step which is to remake the rear bulkhead. This was also ally but again I would like to make it from steel but I think my home made bender will struggle with that as it is nearly a metre wide.
 floorpan_side
 by
Robin Martin, on Flickr
And finally - bought these of Ebay. Ex Austin Healey 3000 - 15x4.5J - just what I was after. I didn't want spanky new ones as they are:
A - Expensive
B - I am going for the well used classic rather than show car look.
You may spot there is actually 7! One guy had 4 for sale and someone else 3. Of course I wanted 5 so I bought both lots. They are all made by MWS - 4 seem to be original British made and the others later Indian manufacture. All 7 cost less than 1 new one.
 wheels
 by
Robin Martin, on Flickr
Cheers for now, Robin
I have cut down the rear bumper. It's robust but a bit utilitarian looking and as I am planning cycle wings I thought it would better a little smaller.
 rear_bumper1
 by
Robin Martin, on Flickr
The old fuel tank was well beyond rescuing and so I think I will see about getting a custom one made. There are loads of places offering this service but does anyone have any recomendations?
 tank
tank by
Robin Martin, on Flickr
The plan is to use a vented cap. And I will make the cut out for the fuel sensor myself once I know what I am using.
Had a quote of £240 from CompBrake which seems reasonable. Made from 3mm ally and baffled.
Cheers Robin
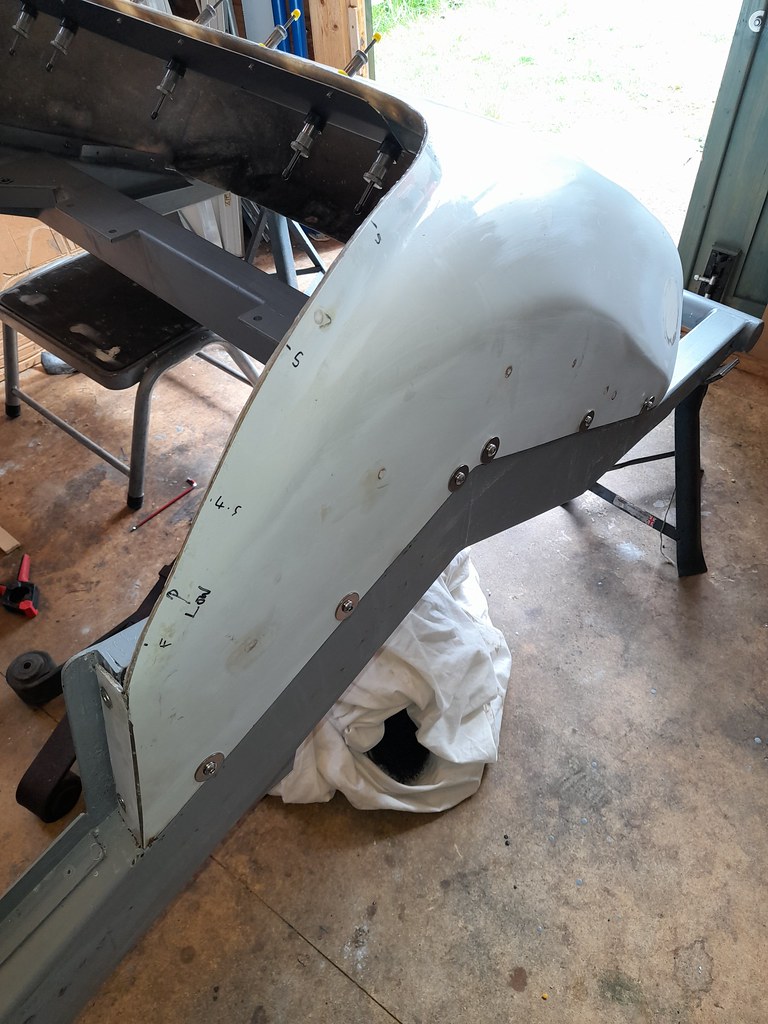
Made some good progress in the last couple of weeks. After a lot of fitting and refitting the rear body tub now fits square. It had been originally fitted (by Marlin) not very well and I had to fill all the original mounting holes and redrill them. Also, as it had not been square for some 40 years, the moulding had become a bit distorted and it resisted my efforts to sort it out. Fits fine now though!
 tub_fitted1
 by
Robin Martin, on Flickr
Originally countersunk head screws were used for the fixings but these were perilously close to the edge so I have replaced them with conventional allen screws and large washers. Hopefully the wheel should hide most of them.
I was going to get some new leaf springs made but this was starting to look expensive so I thought I would check the originals a bit more closely. They turned out to be far better than I expected with little or no age related sag. Not bad seeing they are nigh on 50 years old. Picture shows them compared to a NOS original spring.
 rear_springs
 by
Robin Martin, on Flickr
I was also able, to my suprise, to obtain new metalastic bushes. I suspect this is because they may be the same size as used in 1970's Fords. There isn't a lot of Marina bits out there. Burnt the old bushes out and the new ones pressed in suprisingly easily.
 Rear_spring_bush
 by
Robin Martin, on Flickr
That's all for now and probably for a while. New kitchen fitting starts in ernest soon...
Cheers, Robin
The fuel tank, made by CompBrake, arrived and is exactly as my fag packet sketch so thumbs up to them. It fits almost perfectly (see below!) between the chassis rails as planned. The original tank was suspended much lower which made it rather vulnerable IMHO. The new tank is made from 3mm aluminium and so should be tough as old boots. It's also baffled and sumped so there shouldn't be any problems with fuel surge.
So - it fitted perfectly - almost... I discovered after a trial fit that the original tank mounting flanges on the chassis are positioned in such a way the the back of the tank is angled downwards by about an inch. Doh! No idea why but as the fuel take off on my tank is at the front this could prove to be a problem. Also I planned to use the tank top face as a level for the boot floor. Had I realised I could have had the flanges on the tank mounted at an angle to compensate but too late now. So i am going to have to grind off the flanges on the chassis and remake them so the tank is level. Grrrrrrrr......
Cheers, Robin
 tank1
tank1 by
Robin Martin, on Flickr
 tank3
tank3 by
Robin Martin, on Flickr
Today I bit the bullet and chopped the old, very rusty, spring pads off the axle and replaced them with new shiny ones.
My main concern was getting the new ones back in exactly the right place. To position them laterally I marked the axle with the ends of original spring pads with a centre punch. I then cut of the first mount. The axle was extremly rusty due to the design of the spring pads allowing water to collect - I hope the strength hasn't been compromised.
 axle1
axle1 by
Robin Martin, on Flickr
I then levelled up the new pad by axle using a spirit level on the remaining pad and then again on the new pad.
 axle2
axle2 by
Robin Martin, on Flickr
And then welded the new pad in place. The process was repeated for the other pad.
 axle4
axle4 by
Robin Martin, on Flickr
Ok - so my welding won't win any prizes but its strong enough...
And finally, cleaned up the brake back plates which were in suprisingly good condition considering they are 50 years old! The shiny bits in the picture are good clean bare metal.
 axle6
axle6 by
Robin Martin, on Flickr
Just needs a coat or two of paint now....
Cheers, Robin
A little bit of progress mainly due to the fact that IKEA seem to be out of stock of some of the components for our new kitchen! Which seems to prevent you ordering any of it....
So - I trial fitted the rear springs and all the bits that the axle hangs on. Bit of a milestone this as it means I am actually starting to assemble the car rather than dismantle!
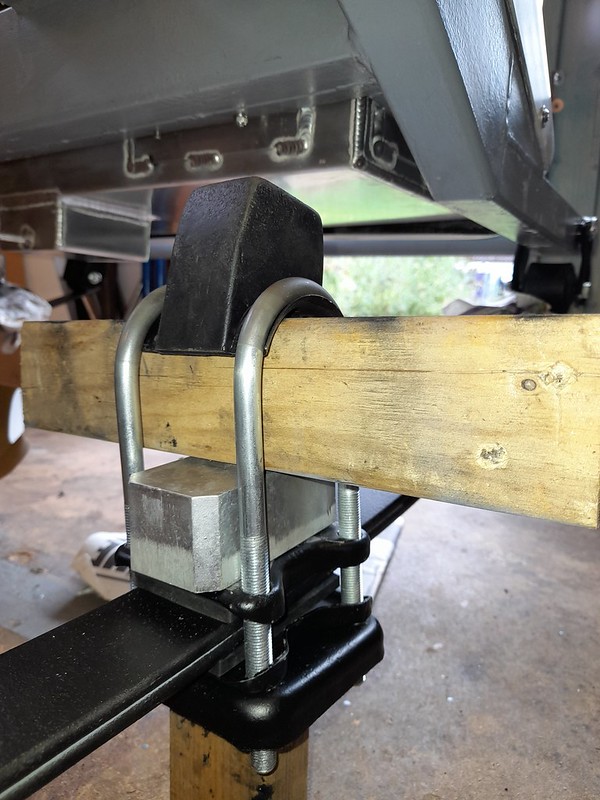
Not quite as simple as it would first appear as the original U-Bolts and lowering block were shot so I had to get some replacements. Of course Marina ones are simply not available so in the end I used some Grayston lowering blocks and U-bolts intended for the Ford Escort. Actually better quality than I expected. I had to squish the u-bolts slightly as they were a few mm wider than the original ones. But they are made properly from HT steel, it seems, so I had to heat up the U bit to cherry red before they would move. They are also 1/16" greater in diameter so had to fettle the spring plates.
The other good game was the rubber spring pads. Again originals unavailable. You can get them from one of the polybush companies but they are over £100 for the 4! In the end I modified some intended for an MGB. Cost me all of £6.
 axle5
axle5 by
Robin Martin, on Flickr
Cheers, Robin
PS - The block of wood is the axle simulator...
I trial fitted the refurbished axle this weekend. It is very heavy! I have been pontificating about what dampers to use but Ebay had a special offer on Spax adjustables (20% off) so I spashed the cash and bought both rears and fronts (which are actually Herald rears).
 axle trial fit
 by
Robin Martin, on Flickr
The only real issue I had, prior to fitting, was the handbrake compensator lever which mounted using some long ago perished rubber top hat bushes. I managed to find an oilite bush of almost the correct size which was a tight press fit and used that instead. Probably better than the original.
 hand brake compensator
 by
Robin Martin, on Flickr
The only snag, and yet to be resolvled, is the proximity of the handbrake cables to the damper. I think it could well touch when the car is moving. Which probably wouldnt really matter but I guess it would be an MOT failure....
 hand brake cable
 by
Robin Martin, on Flickr
Next job is to remake the rear bulkhead - which I am going to make in steel rather than the original ally. That's going to be fun - folding 1.2mm zintec. Watch this space...
Cheers, Robin
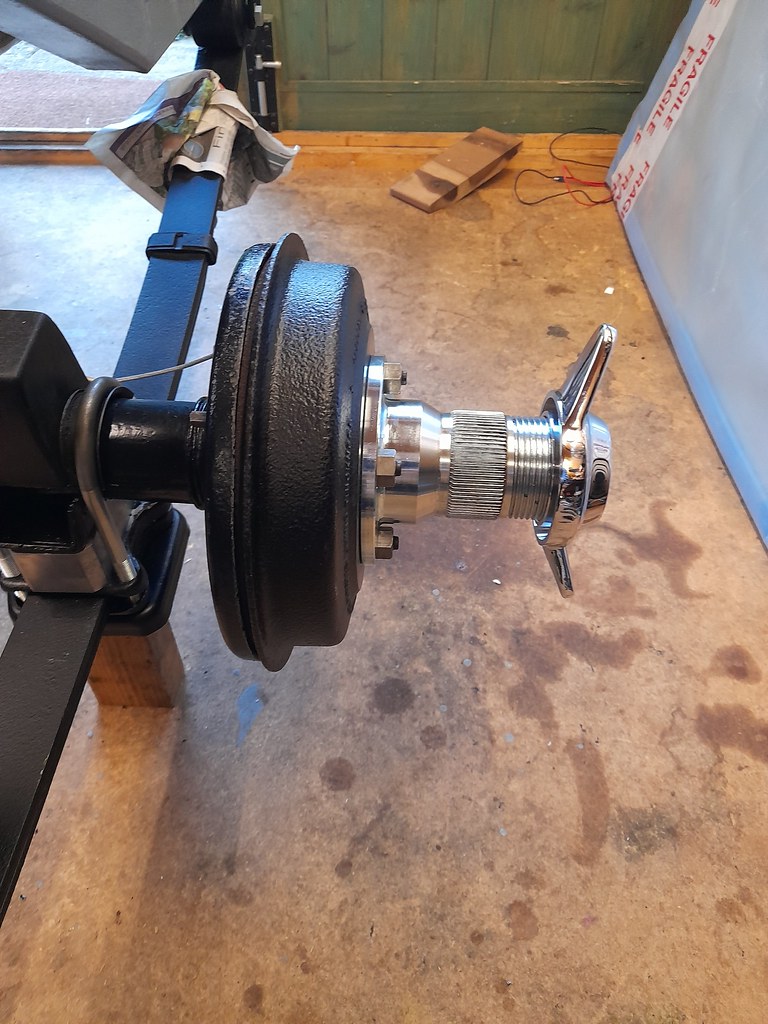
Couldn't resist trying a splined hub and wire wheel. The hubs were intended for one of the small Triumphs, but as these share a lot of parts with the Marina I gambled they would fit.
They look awfully wide until you fit a wheel at which point - they look perfect IMHO...
Cheers, Robin
 splined_hub
 by
Robin Martin, on Flickr
 wire_wheel
 by
Robin Martin, on Flickr
Thanks for the comments and tips. STILL waiting for my Ikea kitchen so progress continues. After a lot of delays the zintec steel for my front and rear bulkheads arrived. I am making them from steel as opposed to the original alluminium for strength. The front bulkhead tends to crack arround the pedal box and the rear bulkhead has the seatbelts mounted to it. I was able to use my newly beefed up bender for the first time. As expected the folds are fairly soft but fine for the purpose.
 on_a_bender
 by
Robin Martin, on Flickr
 rear_bulkhead2
 by
Robin Martin, on Flickr
It fits considerably better than the original factory made effort - even if I do say so myself!
Cheers, Robin
Heater Options
I am currently re-making the front bulkhead of DRL152K and, as that is where it may be mounted, I am thinking about heater options. I wondered what others have done and I have a few questions.
Is it worth the effort fitting windscreen demisters? I will only very occasionally be using a hood.
Is it worth trying to get fresh air in, or is a simple recirculating heater the better (and simpler!) option.
And where is the best place to mount the heater? I was going to put it on top the bulkhead, as per the manual, but if I use one of the smaller aftermarket jobbies (T7 design is favourite) it's probably small enough to sit under the dashboard on top of the transmission tunnel.
Cheers, Robin
I have made some good progress on replacing the front bulkhead. The original was rather tired and had a scary crack from pressure from the pedal box.
 cracked
 by
Robin Martin, on Flickr
I have made the replacement in steel, the same as the rear bulkhead. Proved to be quite tricky getting it right particularly at the bottom arround the chassis members. I have a couple of closing plates to still to fit there.
The pedal box is also trial fitted. I have made a L & H shaped reinforcement from 25mm angle to help spread the load. The clutch pedal needs a little adjustment using the blowtorch and hammer it seems.
The observant might notice there are 2 rows of fixings at the top rear of the bulkhead. The original design used the same fixings both to fix the scuttle (dashboard) moulding and secure the bulkhead to a chassis crossmember. I decided to make those seperate thereby improving the strength. I know the fixings are stainless, generally frowned upon for anything structural, but there are enough of them to well distribute any loads. On the final assembly I will also bond the bulkhead using a Sikaflex adhesive - same as I did on the Pembleton.
 front_bulkhead1
 by
Robin Martin, on Flickr
 front_bulkhead2
 by
Robin Martin, on Flickr
Next job: overhaul the steering rack and decide on the position for the steering column. I want it under, rather than through, the dash as in the original design. The orginal Marina steering column is pretty shot so I am thinking of using one from a Triumph Spitfire for which you can still get things like bushes.
Cheers for now, Robin
I have almost (see below) completed the revised steering column arrangement. The column now exits at the bottom of the dash, instead of through it, and the steering wheel is angled at about the same inclination as the dash, instead of being almost vertical.
The arrangement under the bonnet loooks a bit odd due to the fact that the steering rack is mounted so high in the Marina. But it gives me a nice angle between the lower and upper steering column which the SVA people would be delighted with. The idea is, in a front end crash, the upper steering column is not directed straight into the drivers chest! It should also miss all the engine ancilliaries, fingers crossed.
 steering_shaft
 by
Robin Martin, on Flickr
From the bulkhead backwards the steering column is mounted on some sturdy, and adjustable, brackets. I made the steering column itself using some Triumph bushes and an alluminium tube. And, yes, the brackets do use exhaust clamps, but after a lot of thinking they seemed the easiest and sturdiest way of mounting.
 steering_column3
 by
Robin Martin, on Flickr
 steering_column1
 by
Robin Martin, on Flickr
I said almost completed.... I was very satisfied with the result until I offered up the pedal box and, despite carefull measuring, found the lower support bracket fouled the brake pedal. Grrrr - the air was a bit blue. Anyway, after sleeping on it I have come up with a slightly different bracket which should be fine. I'll post a picture when I have fabricated it. Which could be some time as my Ikea kitchen is due to arrive Tuesday. I have told the wife it's her Christmas present ;-)
Cheers, Robin