MadaboutKitcars

Build Stories are assembled automatically from a build thread's own author, in their own words and order — see all featured builds.

Royale Sabre - Take two!

By peterux · 372 updates · Sep 2012 to May 2025

Read the full original thread (with everyone's replies) in the archive →

April 2020

13 Apr 2020, 9:03pm Engine Chassis and Body Electrics
More wiring.........

Jack and Froggy, cheers for the feedback.

------------------------------------------------------------------------------

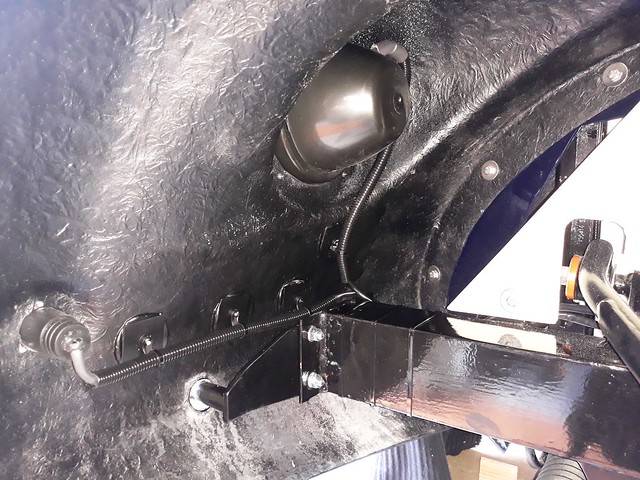
With the nearside wings in place I could crack on with the front lights wiring. To meet the IVA requirements I needed to securely fix the wiring under the wings. To fix to the GRP wings I made up these pads......... I pop riveted these special cable ties to 4cm square pieces of aluminium. (I've had a packet of these cable ties in my box for years and never found a use before.)

Cable tie mounts by Sabrebuilder, on Flickr

I then glued the cable tie mounts to the front wing with a good dollop of PU adhesive. This time I remembered to remove the black schultz coating and I roughened the surface with some sandpaper.

Wiring pads by Sabrebuilder, on Flickr

I also bolted a cable tie mount to the side of the headlight shell.

Headlight wiring by Sabrebuilder, on Flickr

After painting the support pads and surrounding areas, i have completed the headlight and front indicator wiring.

Headlight and indicator wiring by Sabrebuilder, on Flickr

The side light wiring runs along the upper wing support.

Side light wiring by Sabrebuilder, on Flickr

..and the side repeater wiring runs along the lower wing support.

Side repeater wiring by Sabrebuilder, on Flickr

Now I need to do the same on the offside.......

.........peter
21 Apr 2020, 7:10pm Chassis and Body Electrics
More wings.....

Thanks Dpa

-------------------------------------------------------------------------

I've now finished fitting the front and rear offside wings. It took slightly longer than planned because I got distracted and started playing around with door locks and window winders, but more on that another time :icon_surprised:

Offside Front wing by Sabrebuilder, on Flickr

Fuel Filler flap by Sabrebuilder, on Flickr

I had a small problem with the fuel filler flap hinge which fouled the fuel tank 'rollover' vent. I lowered the vent with an m5 hex spacer.

Vent mounting change by Sabrebuilder, on Flickr

Now I can get on with finishing the front lighting......

Stay safe everyone.

............peter
28 Apr 2020, 6:58pm Chassis and Body Electrics
Another milestone completed

Thanks for the positive comments, Jack and Paul :thumb:

----------------------------------------------------------------------

I achieved another milestone this week by completing the external lighting!

Offside wings and lights. by Sabrebuilder, on Flickr

I was thinking of starting on re-assembling the doors but a bit worried I might damage them whilst working on the interior so I have decided to work on that first. At least that's today's plan ....:eusa_shifty:

Stay safe..

........peter

May 2020

14 May 2020, 8:06am General Update


Thanks, Patrick.
Yes, it's coming together nicely. But still lots to do on the interior.
23 May 2020, 8:11pm Mechanical Overhaul Interior & Trim


Thanks, Amir. Glad you and all watches are enjoying my updates.

I'm currently working on the interior and specifically I'm making a centre console with an armrest to fit between the seats and hide the ugly Ford handbrake. It's taking a lot of time as it's evolving rather being designed and built. I'll post some pictures when its complete.

August 2020

16 Aug 2020, 8:47pm General Update

Hi Amir,
thank you for your concern and yes, we are all safe and well. The lack of updates is due to too many other non-car related projects :-)
No real progress since my last update but I hope to back working on my Sabre in the Autumn.
All the best, Peter

December 2020

24 Dec 2020, 8:11pm General Update
Christmas and New Year

Thank you to you both for your best wishes.
Happy Christmas to all members and readers of this forum and let's all hope for a Happier New Year.:hug::thumb::amen:

January 2021

31 Jan 2021, 10:17pm General Update


Hi Amir,
yes, I and my family are all thankfully well but I'm still struggling to find time in the garage :-)
(But I will be back soon, promise :eusa_liar:)

Yes, I am a ROC member so I had already sent Barrie details of my Sabre. But, I didn't mention to him that I am 'Peterux' so he didn't tie the two together. I've now dropped him a note to explain who I am.
Thanks for letting me know.

...peter

February 2021

5 Feb 2021, 4:12pm Getting Underway


Thanks, Amir.
But I think you have raised a good point that there may be others that follow my build thread who may have a Royale that they are building or restoring and who are not members of the owners club.
If there is anyone lurking here who owns a Royale car, then please supply details of your car to Barrie. (contact details above)
20 Feb 2021, 5:53pm Chassis and Body Electrics Interior & Trim
First 2021 update....

Well, after far too long, I managed to find a couple of hours in my garage this week. My last update was last May in the middle of the first lockdown when I was working on a centre console/arm rest which is still not complete.
The reason for the lack of progress was due to having an extension built on our cottage which was done by a builder but inevitably lead to a string of other jobs, like decorating, lighting, curtain rails and, not least, re-laying the patio. Despite three lockdowns, I've still not found much time to work my Sabre.
So back in the garage, the first job I've tackled is remounting the rear fog and reversing lamps. I had mounted these using the rather flimsy adjustable brackets that they came with. But they seemed to move every time I walked past the car which I was not happy about. Not wishing to fail the IVA test on something silly like this, I decided to sort this out and I have removed them and re-mounted them on some more substantial fixed brackets. I have also fitted the rear reflectors whilst I had the bumper off the car.(Nothing worth photographing)
I'm now working on the upper seat belt mounting points. My car was designed and manufactured in 1994 which was well before SVA/IVA and the seat belt mounting points are too low to meet the current requirements. One advantage of a 'somewhat protracted build schedule' means I've had lots of time to mull this kind of problem over and I think I have come up with an elegant solution. I'll take some photo's when it's finished.

...peter
27 Feb 2021, 8:15pm Mechanical Overhaul Chassis and Body Interior & Trim
Belted up.............

Thanks Amir and Mr. Towed.
--------------------------------------------------------
This week I've addressed a long standing issue that I've been aware off ever since I first got my Sabre.
As I said above, my car is a very early one manufactured in 1994, well before the SVA now replaced by the IVA test.
This is the diagram from the IVA manual that shows how to check the height of the upper anchorage point for the seat belts. The minimum height from the reference point 'R' is 450mm in the text. And as you can see the seat type and mounting height is also important.

IVA seatbelt height by Sabrebuilder, on Flickr

This is the view of the Sabre's upper anchorage point as designed in 1994. The upright is welded to the chassis. The diagonal brace takes the seat belt upper mounting and the hood frame.

Hood frame and rear brace by Sabrebuilder, on Flickr

On later Sabre's the seat belt mounting point is welded into the top of the vertical 'B' post. The post is longer making this point higher and the post is mounted more inboard so the diagonal is flat and bolted to the outside edge of the post.
Photo courtesy of Stewart Arnott
Later Sabre chassis by Sabrebuilder, on Flickr

I could have had the chassis reworked as this type of welding was way beyond my capability. Instead, I've raised the seatbelt mounting by welding a small plate to the diagonal and re-drilling the mounting hole in this plate. (The folding hood frame will need to be modified but that shouldn't be too difficult.) The plate is the same thickness as the original diagonal brace and I welded it on both sides to make it as strong as possible. In an accident, the weld will be mostly under compression.
I also plan to rework the interior trim so that it covers the diagonal upper edge.
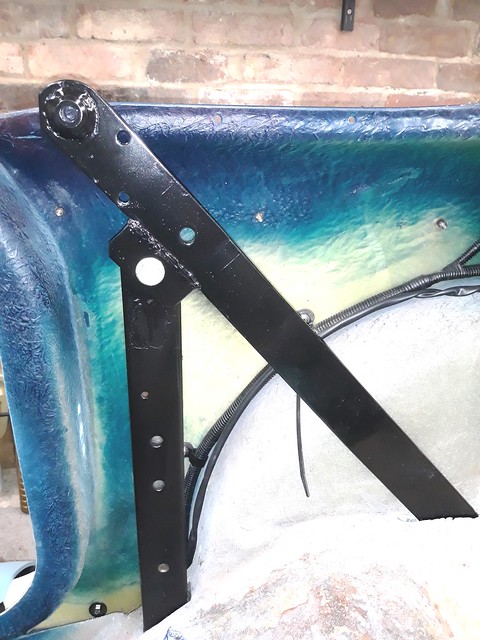
Modified seatbelt diagonal by Sabrebuilder, on Flickr

The IVA examiners have a special measurement tool with string and spirit levels. I improvised with a piece of timber mounted between the seatbelts. The top surface of the timber is the 'effective anchorage point'.

Seatbelt height measurement by Sabrebuilder, on Flickr

I made up the IVA specified 'distance piece' from a cereal carton. The cross section is exactly 136mm x 53mm

IVA distance piece by Sabrebuilder, on Flickr

I then clamped a steel rule to the timber and used my magnetic spirit level to make sure the steel rule was level.

Seatbelt height measurement by Sabrebuilder, on Flickr


I could then measure from the reference point to the horizontal steel rule.

Seatbelt height measurement by Sabrebuilder, on Flickr

Seatbelt height measurement by Sabrebuilder, on Flickr

My measurement comes out at 468mm so hopefully I have about 18mm 'contingency' for measurement error.

So, I think I've cracked this issue but if anyone can see a flaw in my solution please shout out as I'd rather know now than find out at the IVA test :help:


....peter

March 2021

2 Mar 2021, 9:52pm Interior & Trim


Hi Paul,
many thanks for your feedback and the BIVA link. I haven't read the whole thread yet (25 pages!!) but the description of the IVA test and failure points are always good learning points.
The photo's have 'flattened' my spacer piece. It is actually a box with six sides that lifts the ruler off the seat by the required amount. It just looks flat in the photo's.
I also like your idea of a cross brace. I'm not sure it's needed but I think it will be relatively simple to add so I'll take a look next time I'm in the garage.
cheers, Peter
6 Mar 2021, 8:24pm Chassis and Body Interior & Trim
Dash surround........

I'm not finished with the seatbelt mountings, but happy that I now have a solution I have moved on to the Dashboard Surround.
This is something that I've been putting off for a long time whilst considering whether to leave it as it is or try and change it.
From a distance, the leather covered dash surround looked smart but close up it was poorly finished and starting to come loose.

Dash surround by Sabrebuilder, on Flickr
But close up it didn't look so good.
This is an example of the finishing that could have been done neater, This is the passenger side top of the surround and was visible when the door was open.

Dash surround by Sabrebuilder, on Flickr

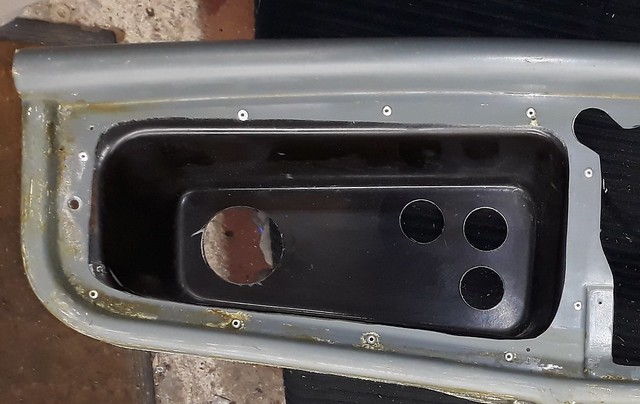
Also, the preformed glovebox was badly fitted and the hole in the dashboard surround looks like it was done in a hurry and doesn't match the 'box.

Glovebox by Sabrebuilder, on Flickr

Removing the leather cover was easy with just my fingers as the 25 year old evo-stick adhesive had gone brittle and crumbly. Of course, it then took me a few hours removing the old glue with adhesive cleaner.
This picture is the surround after I had cleaned it up and started filling the gaps around the glovebox.

Dash surround by Sabrebuilder, on Flickr
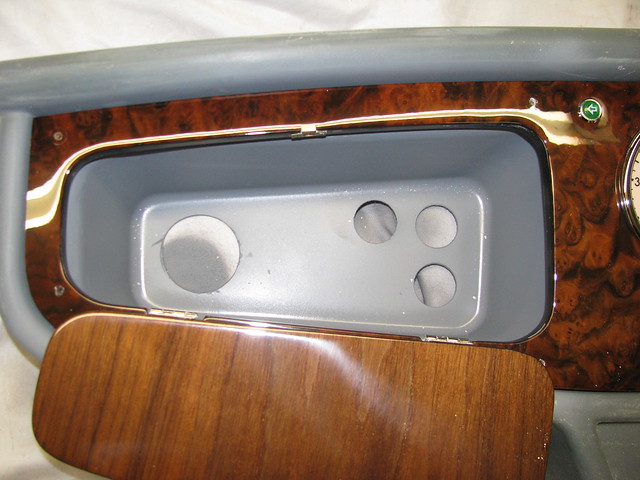
I then sanded and smoothed the filler.

Glovebox by Sabrebuilder, on Flickr

And gave it a coat of primer.......

Glovebox by Sabrebuilder, on Flickr

I then checked what it looked like with the dash in place.....

Glovebox by Sabrebuilder, on Flickr

It looks a lot better but needs a bit more filling and smoothing before I give it a coat of satin black.

More work planned on the surround next week............

........peter
.
13 Mar 2021, 8:41pm Engine Chassis and Body Interior & Trim
I've done some more work on the dash surround this week....
First, I sprayed three coats of satin black paint to finish off the glovebox.

Glovebox by Sabrebuilder, on Flickr

I then fitted a couple of LED footwell lights to the rear lower edge of the surround.

Footwell lights by Sabrebuilder, on Flickr
Footwell lights by Sabrebuilder, on Flickr

The connection from the heater box to the built in de-mister vents in the surround is via this small steel pipe. The original builder had glued these in with clear silicone and after +24 years they were less than secure. The pipes were slightly rusty so I removed them for a coat of paint. I plan to re-fix them with PU adhesive.

Demister vent hose connection by Sabrebuilder, on Flickr

Before re-covering the surround I had to try and make it IVA compliant.
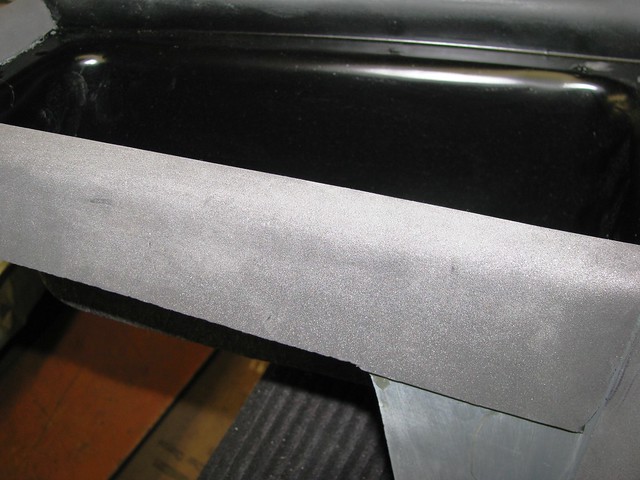
The IVA standard requires that the lower edge of the dashboard is either greater than 19mm radius or greater than 5mm with padding that can be depressed with your thumb. The bottom edge of the Sabre dashboard surround is about 10mm radius so I have covered it in a layer of EVA foam. I'm hoping that this will be enough!!

Lower dashboard treatment by Sabrebuilder, on Flickr

Technically, I only needed to pad the lower edge of the surround but that would give the lower edge a different profile to the rest of the surround so I covered all edges to keep it looking consistent.

Dash surround by Sabrebuilder, on Flickr

So, all I have to do now is cover it in a new piece of vinyl!! :eyebrows::eyebrows::eyebrows:

...peter
22 Mar 2021, 7:33pm Mechanical Overhaul Chassis and Body Interior & Trim
Skipping back a couple of weeks, Paul made this comment about my upper seatbelt mounting point..........

I've had a look at Paul's suggestion but I don't think it would add much strength because the upright, diagonal and the chassis are already effectively
a large triangle.
However, it did prompt a new idea........
I've added a 6mm thick plate across the welded extension plate. This 'locks' in position the original diagonal to the upright support. This makes an extremely strong arrangement and the extra plate would stop the diagonal tearing away from the welded piece in an accident.

Seatbelt support by Sabrebuilder, on Flickr

Here is a view of the upper seatbelt mount from above with the extra plate.

Seatbelt support by Sabrebuilder, on Flickr

And for completeness, here's a photo of where the seatbelt diagonal is bolted to the chassis.

Seatbelt support by Sabrebuilder, on Flickr

I'm now happy with this arrangement and I can cross this task of my list. :smile:

I'm now working on covering the dashboard surround and will post some pictures next week.

Stay safe..............peter
24 Mar 2021, 3:00pm Chassis and Body Interior & Trim


Yes, of course , you are right but on the Sabre all this gubbins is covered by a trim panel.
But thanks for your thought :smile:
27 Mar 2021, 10:01am Interior & Trim


So this week I've made some more progress on the dashboard surround.........

First I made a paper template, not wishing to mess up a large length of vinyl.

Dashboard surround by Sabrebuilder, on Flickr

I then cut out the piece of vinyl which turned out to be 108" long.

Dashboard surround by Sabrebuilder, on Flickr

I'm using this contact adhesive from Woolies.

Dashboard surround by Sabrebuilder, on Flickr
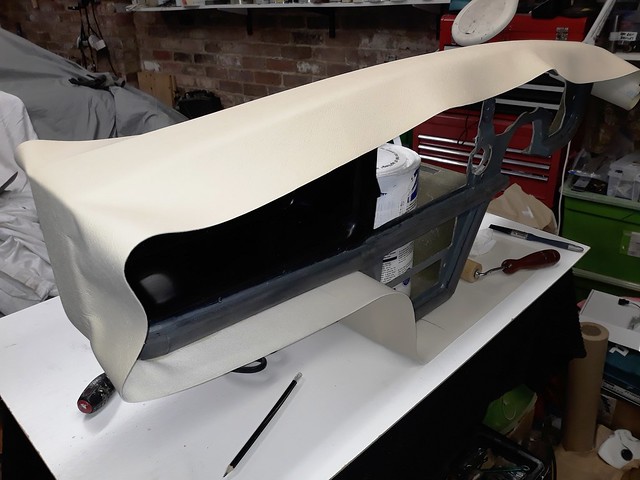
I started gluing at the base of the surround.

Dashboard surround by Sabrebuilder, on Flickr

I then worked my way around the edge.

Dashboard surround by Sabrebuilder, on Flickr
After much trimming and gluing I've got his far.

Dashboard surround by Sabrebuilder, on Flickr

A bit more work required to finish off around the steering column shroud and fixing the de-mister vent escutcheons.

Stay safe..........
...............peter

April 2021

3 Apr 2021, 7:29pm Chassis and Body Interior & Trim
Thanks for the feedback, Robin and Patrick.
----------------------------------------------------

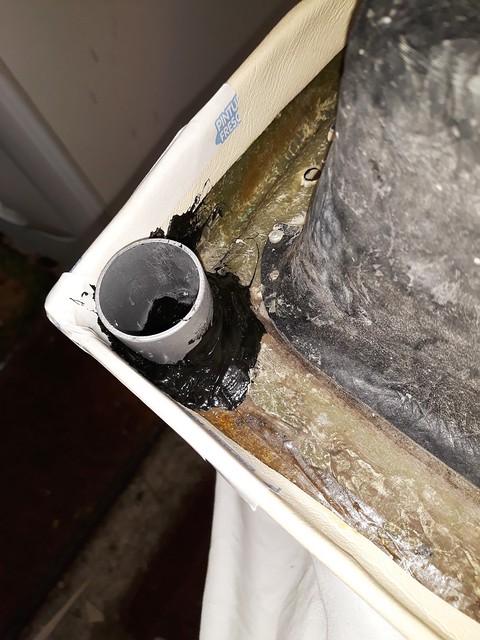
This week I've finished covering the dashboard surround so I've PU glued the demister pipes back in again.

Demister pipe by Sabrebuilder, on Flickr
CORRECTION: THESE TUBES SHOULD HAVE BEEN FIXED AT 45 DEGREES. SEE POST #535 for the correct method.
And, I've made up these little adapters to connect the demist hoses to the Sierra heater box. I Araldited the tubes into the plywood bases before giving them a coat of black paint.

Demister heater adapters by Sabrebuilder, on Flickr

I'm planning on fitting my windscreen glass before re-fitting the dashboard surround as it's easier access to both sides and I don't want to get the windscreen adhesive on the dash surround.:eusa_think:

Stay safe.................peter
11 Apr 2021, 7:10pm Chassis and Body Interior & Trim
This week I've finished off the dashboard surround by fitting a new pair of chrome plated vents. Amazingly these are still available after 27 years!

Dashboard surround by Sabrebuilder, on Flickr

I've pre-wired the aux power outlets and attached the demister hoses ready to be connected to the heater box.

Dashboard surround by Sabrebuilder, on Flickr

I then remembered to fit the chrome side finishers. The rear fixing stud is very difficult to reach and see and would not be possible to reach with the dashboard surround in place.

Chrome finisher by Sabrebuilder, on Flickr

The rear stud is fiendishly difficult to reach and should have been fitted before anything else. A lesson for any other builders following my re-build. :nod:

Chrome finisher by Sabrebuilder, on Flickr

Stay safe...............peter.
19 Apr 2021, 8:40pm Mechanical Overhaul Interior & Trim
Windscreen recovery

The original windscreen fitted to my Sabre was BSI marked but not E-43R marked as now required for the IVA test. I'd removed the old windscreen when I first stripped the car down and purchased a new 'E' marked from Automotive Creations back in 2013 or maybe 2014. But for some reason, which escapes me now, I had never trial fitted it in the car, that is until a coupe of wees back when I found it didn't fit. :eusa_wall:
I was dreading the thought of taking the laminated windscreen to the local glazers expecting to be greeted with the usual sucking through teeth and shaking of heads!
So I turned to YouTube for inspiration where I found lots of 'how to' video's. One guy in particular impressed me as he was cutting down curved laminated 'screens for American custom cars. He made it look so easy so I thought I'd give it a go.
I first armed myself with a new 'professional' glass cutter (Japanese Toyo TC17), a small bottle of cutting oil and a cheap pair of 'grozing' pliers. You also need a blow lamp to soften the plastic core of the laminated screen!

Windscreen by Sabrebuilder, on Flickr

The oil goes inside the glass cutter and automatically feeds a small amount to the wheel.
I also bought the cheapest laminated windscreen I could find to practise on. It cost me less than £35 including delivery.
I had a few practise runs with quite a good result.

Windscreen by Sabrebuilder, on Flickr

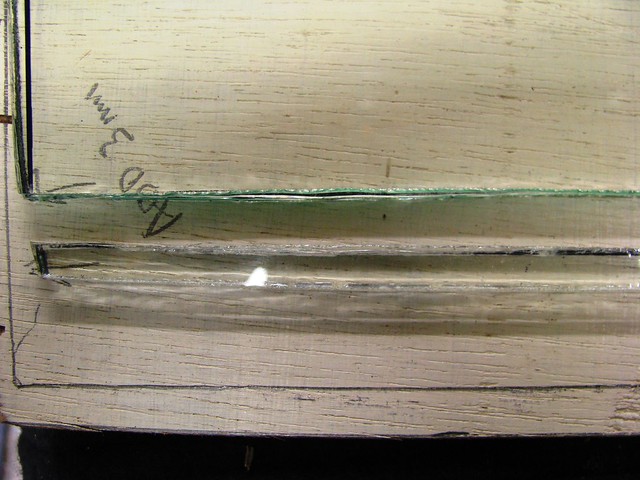
I then made a plywood template to fit the car so that I knew exactly what cuts to make. It turned out I needed to remove 8mm from the long edge and 4mm from the short edge. I was lucky that the curved side of the windscreen was fine. So I had another practise removing 8mm strip from my test 'screen.

Windscreen by Sabrebuilder, on Flickr

I then took a deep breath and had a go at the Sabre windscreen...

Windscreen by Sabrebuilder, on Flickr

Success......

Windscreen by Sabrebuilder, on Flickr

The edges were a bit rough so I bought one of these from Amazon...

Windscreen by Sabrebuilder, on Flickr

Which gave a very acceptable finish........

Windscreen by Sabrebuilder, on Flickr

Not bad for pure novice but I haven't had a go at cutting a curve yet :flypig:

The other little job I've done this week is make and fit a tether for the fuel cap.
I used stainless steel picture wire and part of a bath plug chain.
(Another pesky IVA requrement).

Fuel tank cap tether by Sabrebuilder, on Flickr

Fuel tank cap tether by Sabrebuilder, on Flickr

Fuel tank cap tether by Sabrebuilder, on Flickr

Fuel tank cap tether by Sabrebuilder, on Flickr

So another couple of tasks crossed of my list..........

Stay safe, peter