I have just acquired a previously built Marlin Roadster which I am planning to re-build/restore.
It has an interesting history in that the guy I purchased it from is the original builder. The car itself is correctly registered although never really finished having never been painted or trimmed. You could call it a blank canvas!
The kit is based on a Morris Marina (yes really!). This particular car used a 1.8 as the donor and so has a BMC B series engine. Not exactly a firecracker and pretty heavy but due to the love of the MGB there are plenty of tuning parts about.
It won't be a quick re-build so don't expect frequent updates!
The car currently looks like this:
 blank_canvas
 by
Robin Martin, on Flickr
But I am not planning a standard build. So it may end up looking like this:
 11898940
 by
Robin Martin, on Flickr
Or this:
 10377971
 by
Robin Martin, on Flickr
Robin
PS - Must try to understand how the pictures on this forum work.
I took a few pictures of the dirty bits yesterday before covering the car up till I am ready to start stripping it.
 20200820_114555
 by
Robin Martin, on Flickr
Chassis is in good condition other than some surface rust.
 20200820_113916
 by
Robin Martin, on Flickr
Front suspension. Tie bar bushes completely disintegrated!
 20200820_113803[1]
 by
Robin Martin, on Flickr
BMC B series engine with a mere 130k miles
 20200820_115115[1]
 by
Robin Martin, on Flickr
Rear spring arrangement. Not the prettiest part of the car. I am considering shortening the spring by about 50mm and shortening the chassis accordingly thereby bringing the spring mounts closer to the rear tub. Sounds a bit drastic but I have seen it done on another car with no ill affects on the handling.
On the plus side I was ploughing through the history file that came with it and although it hasn't run for nearly 30 years it had an MOT just before it came off the road. So other than those items affected by time, mechanically it shouldn't be too bad. And I found an invoice for a new gearbox so that's one less thing to overhaul. The engine itself will need a complete rebuild I suspect. At least an unleaded head conversion. Currently thinking about the Peter Burgess EconoTune head which allegedly produces about 20% more power without much further modification.
Cheers, Robin
Finally made some progress albeit on the dismantling. Front wings, bonnets sides, radiator cowl and radiator all removed. No real horrors but the car was built before the availability of cheap stainless fastenings so I have had to dremel at least 50% of the screws.
 20201211_153504
 by
Robin Martin, on Flickr
A couple of surprises:
1. The engine still had water in it - but the original builder that I bought it from assures me it had been stored inside for the last 30 years so unlikley to have frozen up.
2. The offside torsion bar appears to have been making a bid for escape. It wouldn't have been much longer before that side of the suspension collapsed!
And some observations:
1. The bulkhead is beginning to crack arround the pedal box. Apparently a common problem.
2. The rad is quite compact but very chunky. I believe it originated from a Vauxhall Viva so I am suprised how deep it is. I have looked into alternatives but have come to the conclusion that getting it recored is the simpest solution.
3. The chassis itself has plenty of surface rust but nothing that a bit of cleaning up won't remove. I was a bit concerned when removing the rad is it had been fitted with just two primative brackets at the top and the bottom wedged between the chasis rails. but it seems no harm done.
I have also removed a few other odds and ends including the heater which wasn't salvageable. Anyone got a MK3 Spitfire heater going spare?
Cheers, Robin
That's an interesting idea. I know some owners have replaced the tie rods but that alone isn't that useful. However replacing the torsion bars with coil overs means the suspension could be adjusted. Not possible with the torsion bars. I think a bit of investigation would be worth doing.
Cheers Robin
The problem with the torsion bar arrangement on the Marlin is the end of the torsion bar goes through a hole in the chassis. Meaning that the torsion bar angle and hence castor and camber angles are non adjustable. Changing to coilovers would eliminate that problem.
I found some info on the Marlin Owners Club forum about the coilover solution. The only issue I can see is that the original bracket for the damper mounting wasn't designed to take the weight of the car so may need beefing up or remaking.
Cheers Robin
Rust removal rust using electrolysis
I have been experimenting with rust removal using electrolysis. There is a lot of info about it on t'internet but I am always suspicious of magic solutions to rust removal so I thought I would try it. Amazingly it works!
I used a large food container with some re-bar as the anodes and a weak solution of Sodium Carbonate. I already hace a handy 12 volt supply in my "man shed" so that bit was easy. I adjusted the current flow to about 1 amp with a couple of resistors. Not sure if that is right or not but seems to work. I guess it depends on the size of the piece you are de-rusting.
 witches_brew
 by
Robin Martin, on Flickr
And the proof of the puddding (or before and after....)
 before_after
 by
Robin Martin, on Flickr
It seems to be a great process. Removes the rust without removing any underlying metal. And far lesss messy than a wire brush in an electric drill. If you try this though, the process generates hydrogen, so it must be done in an area with good ventilation or preferably outdoors.
Now all I have to do is the 100's of other parts...
Cheers, Robin
I don't have that luxury unfortunately. Electrolysis might be slow but certainly cleaner that the old wire brush in a drill. And I am not in any hurry.....
Cheers, Robin
I have now removed most of the body and the floors. Lots of rusty M6 screws. Just the rear tub to remove now and that's the body stripped.
 floor_out1
 by
Robin Martin, on Flickr
The fuel tank mounting is - err - interesting. Just dangling from some metal straps. For some reason the builder had ignored the flanges on the chassis that it was supposed to be fixed to. It must have been reasonably secure as the car had done 30k miles like this. Does anyone recognise the tank? Rumour has it it was from a MK1 Escort estate. Now unobtanium of course so I will have to look for something else.
 tank2
tank2 by
Robin Martin, on Flickr
And the boot floor was just a piece of hardboard resting on the top of the tank! Oooooo....
It was cut nicely to shape though.
Cheers, Robin
Removed the engine this weekend. I decided to drop it out underneath as that avoided having to use my hoist. Nothing wrong with using a hoist to remove the engine but it's not a job I like to do single handed. The old B series is a heavy old thing.
Getting the chassis up high enough was a bit tricky. The slightly dodgy looking supports (axle stands on wheels) were actually very stable.
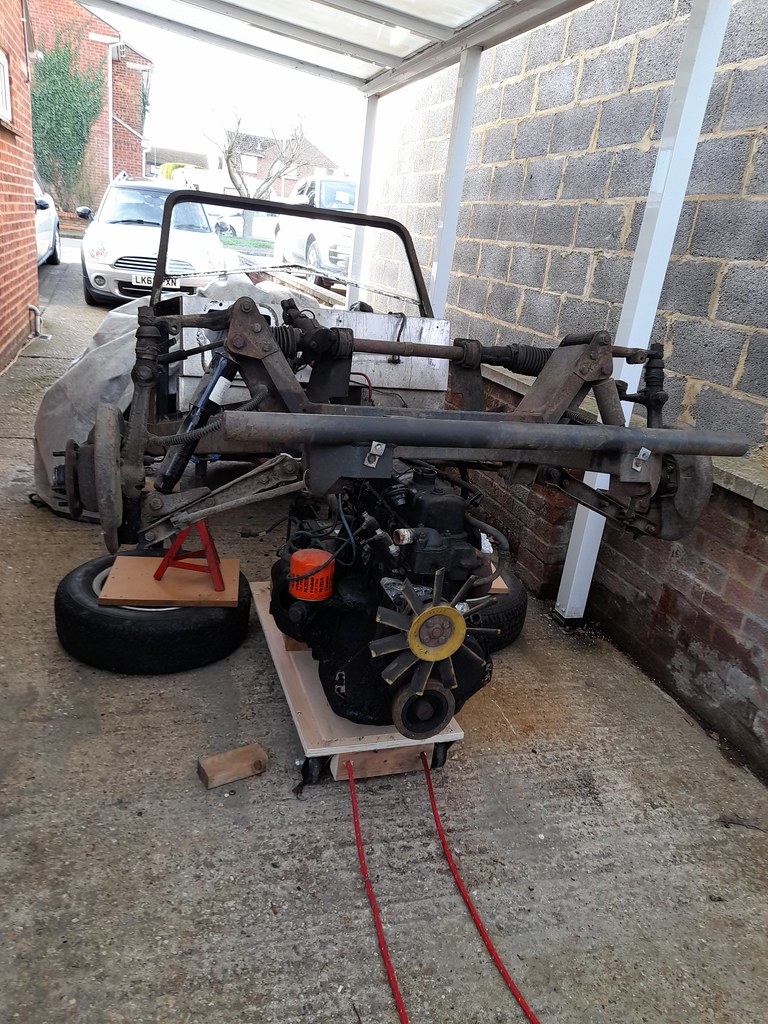 engine_out4
 by
Robin Martin, on Flickr
And the engine in all its oily glory. I had forgotton how old school british engines tended to leak. The gearbox is actually almost new in that it was replaced just before the car was taken off the road 30 years ago. Hence the green paint.
 engine_out1
 by
Robin Martin, on Flickr
Next job is to clean it all up before it is allowed to go into my fairly clean garage. Not looking forward to that....
Cheers, Robin
It's been too cold do do an awful lot on the mechanical side as the car is outside atm. But I have done a little work on the first of the fibreglass mouldings, all of which need some form of repair.
Here's a before
 scuttletop1
 by
Robin Martin, on Flickr
And after
 repair1
 by
Robin Martin, on Flickr
My main question now is what primer to use? There doesn't seem to be one answer unfortunately. I have "discovered" Epifanes Multi Marine primer which allegedly is good for fibreglass, steel and aluminium of which I have all. As I will be coach (hand) painting the car it may fit the bill.
Cheers, Robin
The front suspension is now entirely off revealing some fairly horrible construction in places. Odd bolts, holes in the wrong place etc.
 without_front
 by
Robin Martin, on Flickr
And aso plenty of evidence of the use of a large hammer when the suspension was removed from the donor, plus the torsion bars are well and truly rusted into the suspension arms at one end and the adjuster at the other. Amazing it ever passed an MOT but then things were rather different 30 years ago! Good job I bought a spare set of front suspension components off Ebay - between the two lots should be able to make one decent set. And the chassis itself hasn't been butchered at all.
Just the rear to dismantle now. The rear axle case is very rusty, particularly arround the spring saddles one of which has a hole rusted right through it. It looks like some serious repairs may be needed. I am also currently trying to get some prices for new rear springs. The plan is to:
A. Have then slightly shorter at the rear to avoid the spring sticking out look that the Marlin suffers from.
B. Have them made flatter than standard to avoid using the 'orrible lowering blocks that the car currently has.
 rusty_axle
 by
Robin Martin, on Flickr
And I learnt something today. I was suprised to find that the springs are assymetric in that the axle is positioned further forward than centre of the spring by some 4 inches. Curious as to why that was I did some Googling and it seems it's to reduce axle wind up (tramping) under heavy acceleration. And I always thought leaf springs were simple!
Cheers, Robin
The chassis is pretty now pretty much dismantled and ready to be moved up to the man shed for restoration and a couple of planned modifications. I'm surprised how heavy it is - I guess the box sections must be quite a heavy gauge.
 bare_chassis
 by
Robin Martin, on Flickr
The rear axle, although being generally good, has rusted through spring plates and so I will have to do something about those. I think the only solution is to cut them off and fabricate some new ones and have them welded on. The position is fairly critical though. Apparently the diff flange needs to be 3 degrees off vertical otherwise the UJ's in the propshaft suffer.
 spring_plate1
 by
Robin Martin, on Flickr
The rest of the spring mounting hardware seems to be OK other than the U-Bolts which I had to take the Dremel to. Even the rubber pads look servicable, although you can get new ones from SuperPro at a price that's not nice.
The large lump of rusty steel is a lowering block. It's 'orrible and doesn't feature in my rebuild plans!
 spring_mounting
 by
Robin Martin, on Flickr
In my drive for a slightly more modern and safe car, and after some searching, I managed to find a rare Marina pedal box with servo and dual master cylinder (wow). Both were options would you believe...
 pedal_box
 by
Robin Martin, on Flickr
The servo looks pretty grotty and new ones are non existant. It's possible to get them rebuilt but apparently with this type (crimped construction) they have to saw them in half and then weld the two halves back together! I suspect that may be outside of my budget. But a bit of Googling has revealed that the Landrover Seies 3 servo has the same mounting points and looks very similar, and importantly is freely available. So I may take a punt and buy a new one of those. Can always sell it again on Ebay if it doesn't work out.
I am hoping to be able to rebuild the master cylinder. next job is to strip it to see what the bores are like. Can anyone idenity the model number? It's (obviously) Girling but do the long string of numbers mean anything? Unfortunately the Marina, even with the rare servo and dual master combo, used 4 different models so I can't identify it that way.
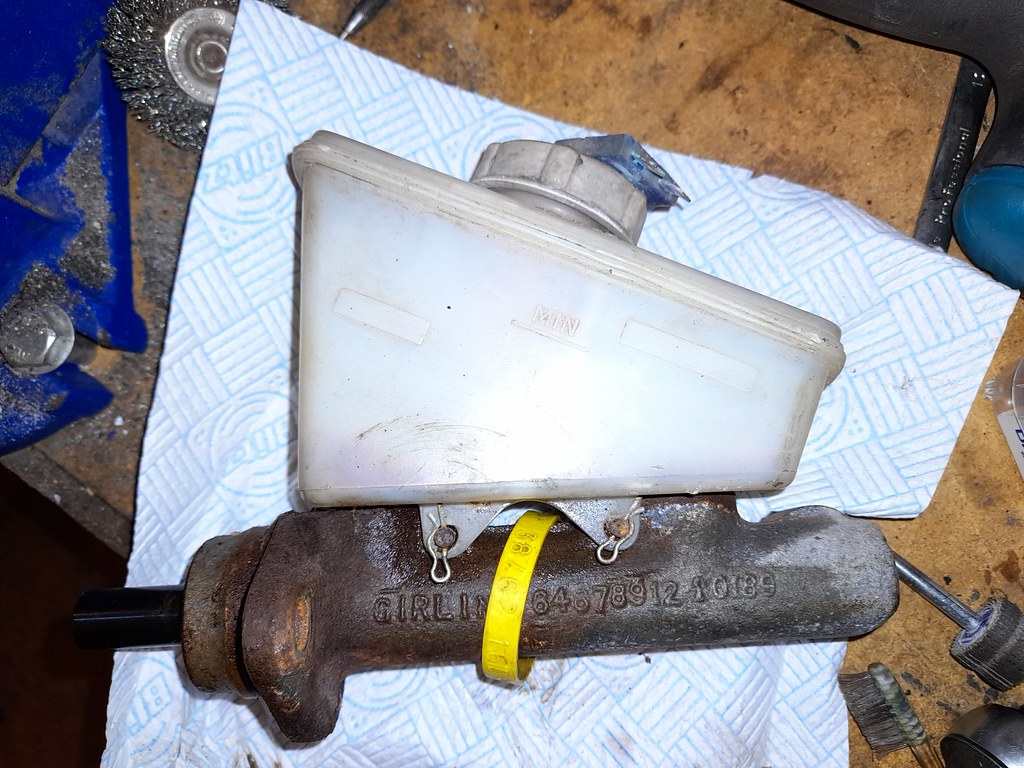 master_cylinder
 by
Robin Martin, on Flickr
Cheers, Robin
Good and bad today.
First the bad news....
I attempted to dissasemble the master cylinder and it's just one mass of rust. I don't think it's worth saving.
 master_cylinder_us
 by
Robin Martin, on Flickr
So the hunt is on for an alternative. After a lot of Googling I found the GMC234 which is used on the TR6. It is designed to be mounted at an angle, and the bore is 20.3. A bit larger than the cylinder used on the Marina but probably not disastrously so.
 gmc234
 by
Robin Martin, on Flickr
It also has the advantage that the servo it is used with (still available new) looks pretty much identical to that used on the Marina.
And the good news is, after much fretting, I decided to go for drilling out the old studs on the exhaust manifold and re-tapping it to fit new ones. All my other efforts at removing the old ones had failed miserably. But in the end it proved to be much easier than I thought.
 manifold
 by
Robin Martin, on Flickr
The observant might notice one of them is a bit on the p!ss. Well 5 out of 6 isn't bad and I don't suppose anyone will notice!
And this arrived in the post. The Alfa 8C was what the Marlin was loosely based on. You can see the family resemblance.
 alfa_model
 by
Robin Martin, on Flickr
Cheers, Robin
The TR6 servo and master cylinder arrived today. Pretty much a perfect fit other than the servo needed packing out about 6mm. Temporarily done with washers but I willl make a proper spacer. The angle of the reservoir on the master cylinder is identical to that of the standard Marina one so fluid levels should be good. I do like it when a plan comes together.
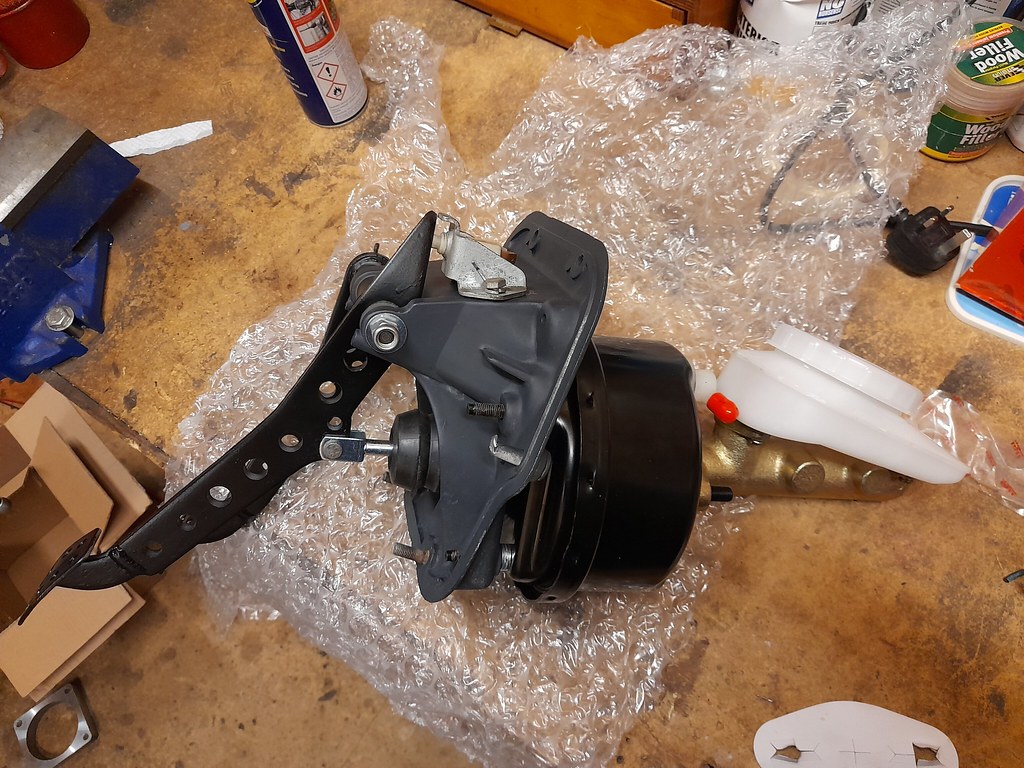 new_pedal_box
 by
Robin Martin, on Flickr
I should mention that the Marina pedals are shortened for use in the Marlin and someone has drilled go-faster holes in them...
Cheers, Robin
Yes the reservoir is shallow but quite wide. I never thought about it before but you are probably right in that it is to clear the bonnet on the TR6.
It's interesting how all the bits from different marques fit one another. I guess there was a lot of plagiarism going on in those days. The servo also looks almost identical to the Metro one that the Sportster used - except the mounting studs are at different centres.
Cheers Robin
Stage 1 complete
The chassis is now in the man-shed ready for the start of refurbishment and re-assembly! It fiited lengthways with only a few inches to spare but fortunately plenty of space widthwise. I had measured it up beforehand but you never know if there is going to be any unforseen issues.
The downside is that I promissed my wife the kitcen refurbishment would start once the chassis was in its new home so progress may slow down for a while....
The chassis is very sound but covered in a mixture of old paint and surface rust. Any suggestions how best to remove it greatfully received. I am trying to avoid mechanical (wire brush in drill) means as it makes such a mess.
 in_man-shed1
 by
Robin Martin, on Flickr
Cheers, Robin
Ah. Could have done. So now you recommended it to me does that mean I recommended it to myself? :-)
Cheers Robin
Door catches
I am using the IVA manual as a bit of a guide while rebuilding the Roadster even though it is already registered and has no need for an IVA test or even an MOT due to its age.
I would like to use some IVA compliant door catches which means using the two stage claw type. I liked those used on the Sportster, as the handle and latch were all incorporated into one unit, but they were supplied by Marlin so I don't know where they originated from. Can anyone suggest where I might get them from?
Cheers, Robin