This is a read-only archive of the old Madabout Kitcars forum. New posts and replies are no longer possible, but every thread is still here to browse and read.
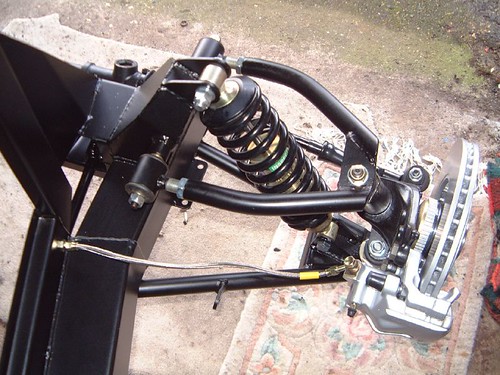
I have just been trying a first set up of the front suspension. I was surprised how far out of the upper wishbones the eyes have to be unscrewed. To get approximately neutral camber they are unscrewed about 12 turns. Has anyone else done this yet?
Does anyone know what the camber should actually be - I seem to remember reading in the Bently manual it should be between 0 and 1deg positive - but I can't find the reference now.
And another question...
Is it really essential to fit those rubber boots over the steering rack nuts for the SVA (They are actually cable gland covers...)
Sounds like you are getting ready for your first drive?
I remember speaking to Mark about it ages ago and he said sometheing like "don't worry about that until your finished" so i haven't!
The "old" Ford based Sportster build manual says to set the front camber to 1 degree negative. Not sure if this is applicable to the BMW version but is probably a good starting point.
I read that the SVA men want every nut and bolt covered. Marlin's latest customer car even had rubber boots on the bush carriers lock nuts covered. Simon told me that they are rubber glands from heavy duty electrical installation junction boxes, but I haven't been able to source any yet.
BTW, it also says that tracking should be 1-2mm Toe IN and 20-22 psi tyre pressure.
Looks from your pictures that you are making some great progress lately,
I read that the SVA men want every nut and bolt covered. Marlin's latest customer car even had rubber boots on the bush carriers lock nuts covered. Simon told me that they are rubber glands from heavy duty electrical installation junction boxes, but I haven't been able to source any yet.
Anyone else been able to locate these yet? You can buy them on e-bay for about £5 pair but I can't help thinking they should be more like £5 for 10 if you can find a source. Screwfix do them as part of a kit with a brass cable gland - but don't sell them on their own.
Looks like we will need about 6 for each car if we also have to cover the locknuts on the top wishbones.
Anyone else been able to locate these yet? You can buy them on e-bay for about £5 pair but I can't help thinking they should be more like £5 for 10 if you can find a source. Screwfix do them as part of a kit with a brass cable gland - but don't sell them on their own.
Looks like we will need about 6 for each car if we also have to cover the locknuts on the top wishbones.
RESULT - hey we could all go into business selling them on ebay. Lets see - the guy on ebay was selling them at £3.50 for two. From TheSiteBox they would be about 50p - a massive £3 or 600% profit - I am in the wrong business lol.
On a more serious note - thanks for the info Peter. I will measure up and order some myself - anybody else want some while I am at it - I am sure we can save on postage?
I'm not sure which are the correct sizes, so I've ordered a few of sizes 20, 25 and 32.
Peter
Hey Peter
Can you let me know what sizes fit - looks like I am doing a group order. I think we need them for both the track rod ends and the upper wishbone (to cover the locking nuts)
In related news, I'm assembling my front suspension for the first time, and I've got a few questions that aren't being answered by the ever helpful 'build manual'
Firstly, I've followed the instructions and screwed the eyes into the top wish bone. It says to screw them in all the way, and then back them off 2 turns as an initial setting. The thing is, on both sides one of the eyes goes in exceptionaly easily, and the other (the side with the more acute bend in it) it gets very difficult... Where yours like this? I did get them all the way in eventually, and have set it as per Marlin's instructions.
Secondly, I've got to screw in the ball joints into the top of the strut and the lower wishbone. My ball joints each came with a set of thin, copper coloured washers - a large, round one, a 't' shaped one and an oblong one. Do I need to use these? I only ask as I can't see them on any of the pics on the CD.
Thirdly, my lower ball joints look different from one another - each came in it's own packet, but one of them had a code number starting SSJ and the other STJ. Looking at them, one has blue wire clips holding the rubber boot on, and the other has just a single greyish wire clip on the bottom most part of the rubber... Even the shaft comming out of the top seems to be different - the shoulder after the thread is shorter on one than the other. Am I just being picky, or have Marlin sent me the wrong joints?
I had to find someone with a large tap so I could get them in past 1/2 way as the threads were filled with stuff.
I didn't get any washer etc. with my ball joints and therefore didn't use them! - They were a right bugger to get as again the threads were not perfect. Ended up with the wall joints in the vice and turning the strut!
Some of my ball joints looked slightly different but it was only cosmetic. Sizes were all the same. I think they need to all be the same.
Firstly, I've followed the instructions and screwed the eyes into the top wish bone. It says to screw them in all the way, and then back them off 2 turns as an initial setting. The thing is, on both sides one of the eyes goes in exceptionaly easily, and the other (the side with the more acute bend in it) it gets very difficult... Where yours like this? I did get them all the way in eventually, and have set it as per Marlin's instructions.
Some of mine were tighter that others. Screwing them all the way in and then back out 2 turns is a load of nonsense - I think the instruction is a hangover from the Ford days. I recently set up my front suspension to have a neutral camber and I had to screw the eyes out about 10 turns to achieve this! If you screw out just 2 turns the front wheels would have a huge amount of negative camber!
Secondly, I've got to screw in the ball joints into the top of the strut and the lower wishbone. My ball joints each came with a set of thin, copper coloured washers - a large, round one, a 't' shaped one and an oblong one. Do I need to use these? I only ask as I can't see them on any of the pics on the CD.
The thin washers were to lock the ball joints in place on whatever car they originated on (IMHO). I managed to do the same. You just bend one side up and the other down. Be careful screwing in the ball joints. The threads are very fine and it is easy to cross thread them. They will be stiff but a smear of grease should help and make sure you clean out any cr@p that is lurking in there. I don't think you should need to put them in a vice like Patrick had to do!
Thirdly, my lower ball joints look different from one another - each came in it's own packet, but one of them had a code number starting SSJ and the other STJ. Looking at them, one has blue wire clips holding the rubber boot on, and the other has just a single greyish wire clip on the bottom most part of the rubber... Even the shaft comming out of the top seems to be different - the shoulder after the thread is shorter on one than the other. Am I just being picky, or have Marlin sent me the wrong joints?
I think if that were me I would want them all the same. Mine all had the part QSJ (Quinten Hazel - they are from a rover metro allegedly) They may be substitutable but you never know. Initially Marlin sent me 1 correct track track rod end and 1 duff one so they are not infallible
Jason,
I agree with all the advice from Patrick and Robin above. (I have a Haynes Metro manual and they certainly look the same)
I think the main problem with the threads is that the powder coating gets inside. Spent ages picking the bits out of mine, but since doing mine i've read (but not tried) that powder coating comes off with ordinary paint stripper. So an old toothbrush and a bit of paint stripper should do it.
Just checked the metro Haynes manual and it says to use two thin beads of Loctite 245 and to tighten the balljoint in the hub carrier to 105Nm torque. Halfords sell a suitable deep socket.
The top nut should be tightened to 55Nm.
Ok, I started bolting the front suspension onto the chassis last night. I double checked the lower ball joints and they are the same - it's just the cover is different. So I got the ball joints screwed in to the tops of the struts and lower wishbones. It was a bit tight, but some copper grease helped.
So, feeling chuffed I put the bottom wishbone on the car, and put the coilover on. That's where it's all started to go wrong.
The top shock mount - no probs. Bottom mount... err... well, look:
I can't get the lower bolt in, due to where the mounting point is. It's the same on the other one as well:
Comparing this picture:
With Peter's:
You can see that the mounting point has been moved. It's impossible to get the bolt in due to the arm. I've even tried cutting one of the bolt down by about 1/2" (the most I thought I'd get away with, and still get the nut on), but even that's too long:
Have Marlin made a mistake? Or am I missing something gobsmackingly obvious?
I am working on my car today.I have e30 front set up,I can send you a picture of mine via mobile phone, if I had tour number. I think your mount is in the wrong place.
The shock mounts on your lower wishbones are completly different to mine. Mine are little triangular bits that sit on top of that flat metal plate - I wonder why they changed them?
I had the same problem with my shock mounts and had to cut the lugs off and then convert mine to the same type as Peter's. I made a new mounting out of box section.
The reason for the different design is that E36 struts foul the shocks with the ones like peter's.
I think thats a likely explanation;Mine are the same as robins, correct for an e30 set-up.Any of the e36 builders listed on the forum should be able to clarify if they had a look.
I think you guys have solved the problem.
If you look at the Marlin Build CD you can see the e36 wishbones are like Jason's.
Looks like they gave you the wrong wishbones. Better check if the top ones are the same , as well.
I spoke with both Terry and Mark today. Apparently, I have got the correct wishbones.
According to Mark, what you need to do is 'shave' the bolt so it will slide past. He didn't elaborate on this past that it needs a side of the bolt head cutting down so it's level with the shaft.
My take on this is to file the bolt down as specified, but I've chamfered it back putting a radius from the new flattened side up onto the flat topmost surface of the bolt.
I tried this on the bolt I'd cut already, and it with that overall length it works a treat. So I've managed to get one side of the front suspension on tonight. I've cut and filed another bolt for the other side, so I'll get that side on later.
The only slight down side is I don't think I'll be able to use the nylocs that where supplied - When tightened up the threads left on the bolt won't reach the nyloc material. I'll just have to get two nuts with the same thread on that aren't so deep, and put a dab of loctite or stud seal to stop the nut from shaking loose.