
MadaboutKitcars

This is a read-only archive of the old Madabout Kitcars forum. New posts and replies are no longer possible, but every thread is still here to browse and read.

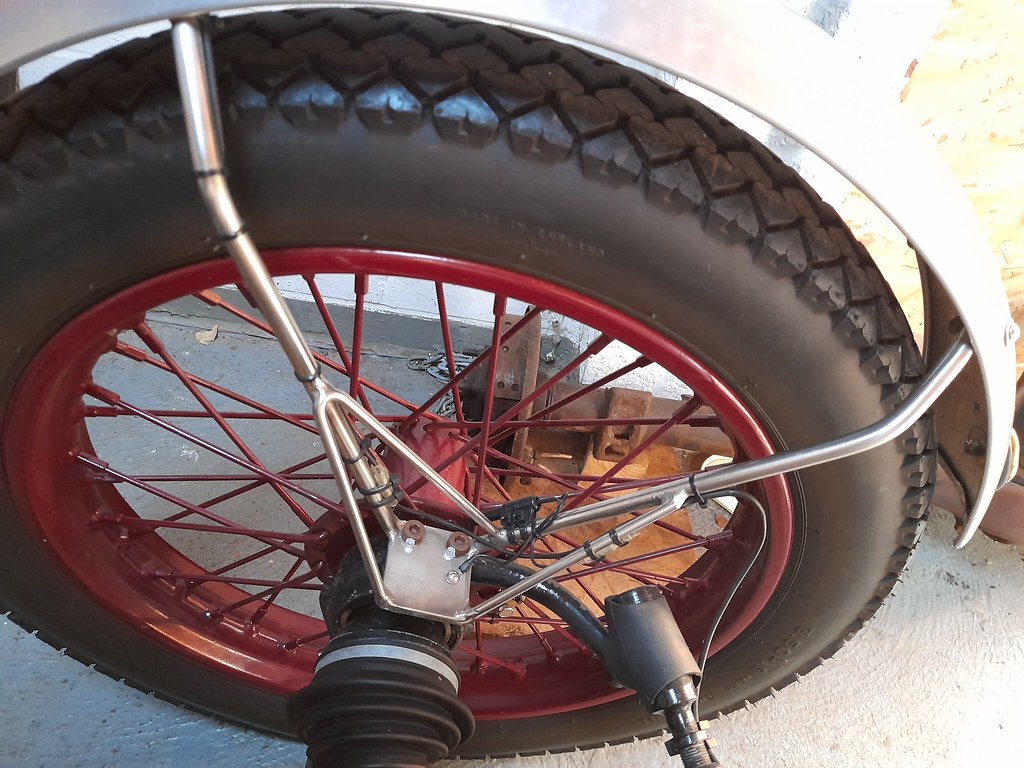
New front wing stays, old ones broke again

7 May 2020, 12:02pm
The front wing stays rusted and broke again, did a temporary fix a few months ago, but finally it’s time to make some new ones which will hopefully be more resilient to the elements.

Started with two 1 meter 10mm diameter solid rods


A piece of bar to turn into the bracket that will hold the rod on to the front uprights with a U clamp (51mm u clamp)


Bracket cut shown with U clamp.


Test fitted to the uprights


Used a clamp to hold the round bar to the bracket to get a it roughly lined up.


Used a caliper to evenly space the round bar away from the alloy wheels


Held in by hand for a better view of the bracket and round bar


Tack welded the round bar to the bracket


My temporary workshop setup – don’t recommend using a workmate for welding due to the risk of burning wood and fire. Use a metal welding table, which I don’t have in my garage. Grabbed the round bar quite far away from the weld so it was fine. Also used a TIG so no splatter.


I’m still a total amature at welding but these are OK


The main thing is that is holds together well. The angle grinder hides the bad.


One of the most time consuming parts of the build was creating a jig so that all four final bends ended up very similar.


It may only look like two bends, but there are hours of measuing, eyeing up and carefully deciding where the bends need to go.


The rod lines up with the holes on the carbon wings.


Now here’s one of those things that happens all too often on a project – the rods ended up 10mm too high on the first go. This is jig MK2 with the height adjusted. It did mean having to straighten out the rod and rebend it to the right position.


Here’s a test fit of the front of the rod bent into place


The jig is holding the back up.


Left to right the mount positions are little way off on the back, so some creative bending and P clip positioning evens out the rod placement.


The back bent into shape, again two bends took many hours to get to the right position.


Here are the P clips that will mount the wings to the rod


First test fit of the driver side, got some really nice new A4 grade cup washers, bolts and nuts from Westfield Fastners to finish it off.


Test fit on the passenger side. The wing was too close to the tyre so this one needed a bit more fine tuning to get it right.


A view from underneath with the wheel off.


There is enough gap between the tyre and the carbon, looks quite close from this angle. If there are problems it is easy to tweak the bends to create more clearance.


Before and after, the before is version 3 of the mounts which also failed eventually.


Ahh shiny parts!
7 May 2020, 9:03pm
Good job , what form of heat did you use for the bends ?

Where you were 10mm off I think I would have cut and shut the straight section especially if you had TIG to hand :badgrin:

regards Paul
7 May 2020, 10:22pm
Thanks :) I used a yellow MAPP gas container with a blow tourch (it says that's is a replacment for MAPPon the label). The type you get in DIY stores for plumbing. Did the trick pretty well!
If my welding skills were better I'd have considered it, straightening out and rebending was easier for me to do! It added some extra time but most of it was adjusting the templte. The template has some globbed on ali welding on it - now that's something I've only tried one other time, but it was string enough to hold it together for a template. I've spent more time stainless welding as made up a new exhaust last year.
8 May 2020, 7:00am
Good work Paul. Time consuming but very satisfying in the long run.

Liking the MCM stickers and wall covering by the way. Love their show as well as Skid Factory, Binky and recently Nathan’s Garage.

Hope they last as the fit and finish deserves that

Dave
8 May 2020, 7:38am
Thanks Dave, yeah MCM is up there amoung my fav YT channels. I quite like bad obession motorsport too. Also Roadkill, Roadkill Garage and Hotrod Garage but those are now behind the motortrend paywall. The 3rd party content they've licensed for the UK has gotten a lot better recently, to start with it was mostly only their own content.
18 Mar 2021, 11:20am
Good write up as usual Patrick, I have a similar very jury rigged setup with a U Clamp holding the original stays in place but looks like the welds on those have failed again.

Can I ask what failed on version 3 out of curiosity?

Andy
22 Mar 2021, 6:35pm
Thanks Andy! On the last mild steel version the part that bends up and over the tyre had rusted, fatigued and broken off. That's why you see a bit of damage on the carbon where it impacted the tyre and locked the front wheel up.

I'd perhapse consider welding a bracket to the upright to bolt it to on a future version but that would have needed a lot more disassembly. The u clamp factory style mount works well enough when bolted up tight
26 Mar 2021, 9:00pm
Just looked at your pics again and doesn't look like your uprights are thecsame as mine, is yours not an E36 front suspension?
27 Mar 2021, 9:38am
The uprights are modified E30 uprights - on the E30 the shock is mounted inside the upright which is a tube design - they chopped the top of the tube and weld in an insert with a thread for a metro ball joint, the factory mount design used the U bracket very similar to what I recreated:

https://www.realoem.com/bmw/enUS/showparts?id=AG52-EUR-07-1988-E30-BMW-325i&diagId=31_0143

On the E36 the shock is bolted from the back, I don't remember what the upright design looks like on the E36 version but I'll likey a bit different.

https://www.realoem.com/bmw/enUS/showparts?id=CG12-EUR-07-1997-E36-BMW-316i_16&diagId=31_1252
27 Mar 2021, 4:13pm
One solution with wing stays (if they are breaking near a weld) is to braze joints rather than weld them - this has been used successfully on bicycles for over 100 years. I know some will say 'lugged joints', but there are also thousands of lugless frames out there as well - VERY thin tubes taking huge forces (think front forks, the ends are a simple brazed joint consisting of a plate in a slot!)
All to do with the heat affected zone....... when welding takes place the metal near the weld can be adversely affected by the heat, causing it to break - the heat of brazing is much lower.
27 Mar 2021, 5:52pm
Cycle wings tend to flap about and resonate unless the brackets are really heavy duty and solid. The only solution on the Lotus 7 style cars I've owned is to make the brackets from over size material which solved the problem in the end !
27 Mar 2021, 6:12pm
Lucky@LeMans wrote:
Cycle wings tend to flap about and resonate unless the brackets are really heavy duty and solid. The only solution on the Lotus 7 style cars I've owned is to make the brackets from over size material which solved the problem in the end !


I have had two Sevens, and concur that the solution is to make the brackets
quite oversized. No issues after doing that. (learned after three attempts).
27 Mar 2021, 6:54pm
molleur wrote:
I have had two Sevens, and concur that the solution is to make the brackets
quite oversized. No issues after doing that. (learned after three attempts).

I remember seeing a LSIS at Stoneleigh one year which had a clever arrangement....... in addition to the usual stays inboard of the wheel, there were 'exterior (lighter) stays attached to a bearing at the wheel centre cap!
The benefit of brazing is that a large diameter (but thin-walled) tube can be used, which may be no heavier that the original solid bar, but will be more rigid - the light tube will be durable enough using the brazing process.
27 Mar 2021, 9:24pm
Mitchelkitman wrote:
I remember seeing a LSIS at Stoneleigh one year which had a clever arrangement....... in addition to the usual stays inboard of the wheel, there were 'exterior (lighter) stays attached to a bearing at the wheel centre cap!
The benefit of brazing is that a large diameter (but thin-walled) tube can be used, which may be no heavier that the original solid bar, but will be more rigid - the light tube will be durable enough using the brazing process.


examples of cars using brazed components are Lotus, Cooper (all of the tube chassis were brazed. Many Formula Jr. cars, as well as Morgan. It works.
30 Mar 2021, 8:15am
Not 100% relevant, but this is how it's done on my Pembleton. The stays are made by a guy in Belgium who started off making them for the Lomax but now makes them for any 2CV based kit.
As you can see the diameter of the actual stays is quite small (9mm?) but the important bit is the triangulation (6mm) which stops any flexing and vibration - the killer for wing stays.
Cheers, Robin

wing_stay by Robin Martin, on Flickr
2 Apr 2021, 8:41am
Those look nice and sturdy, much more triangulation and a larger mount surface. I could extend my mounting plate adding a second U bolt and some triangulation.
7 Apr 2021, 9:27pm
Very nice.