MadaboutKitcars

This is a read-only archive of the old Madabout Kitcars forum. New posts and replies are no longer possible, but every thread is still here to browse and read.

Another Cordite Is Born ...

22 Apr 2016, 2:49pm
Looking good Paul, you will have an incredibly strong structure when all the glassing is finished!

The body certainly will not be coming off the chassis for any repairs!!

Not long now.
23 Apr 2016, 10:19am
Scottie - Thanks and the longer the bonding paste & fibreglass has to fully cure, the stronger it all feels. :cool:

By the time I am finished, I think my new Swordfish body tub could be lifted clean off, just like my old Spitfire one.


Although, I really hope there is no need to do any major repairs requiring that in my life time! :pray:

- - - - - - - - - - - - - - - - - - - - - - - - - - - - - - -

Saturday - False Start:
It was pretty chilly outside this morning.

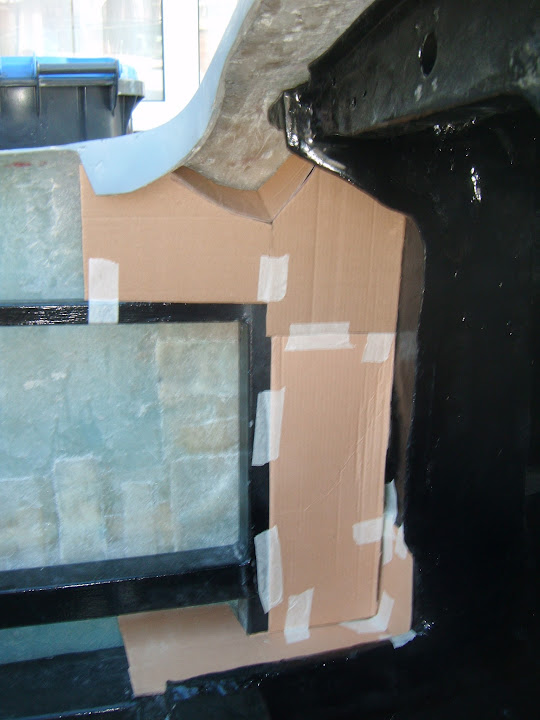
I started off by trying to work out if there was a better way of boxing in the side mirror access hole on the driver's side.
( As building it up in small steps is both fiddly and time consuming. :icon_sad: )

Obviously, it seemed like a simple thing to do when I originally mocked it up in cardboard. :rolleyes:


I now have a plan, so let's see if it works.

I taped up the hole I cut out yesterday before making a mess tidying up all the stray bits of fibreglass.


But I was in the middle of cutting out the shapes I needed when I felt some rain. :rant:


I couldn't risk the matting getting wet, so the covers went back on and I came inside.
( At which point I realised just how cold I was. )

- - - - - - - - - - - - - - - - - - - - - - - - - - - - - - -

Kitcar Magazine:
I picked up this month's edition because there was a Sammio Spyder featured in it (plus the yellow Tribute MX250).


This was a rare Spyder with doors and it also had a lot of modification work done to it.

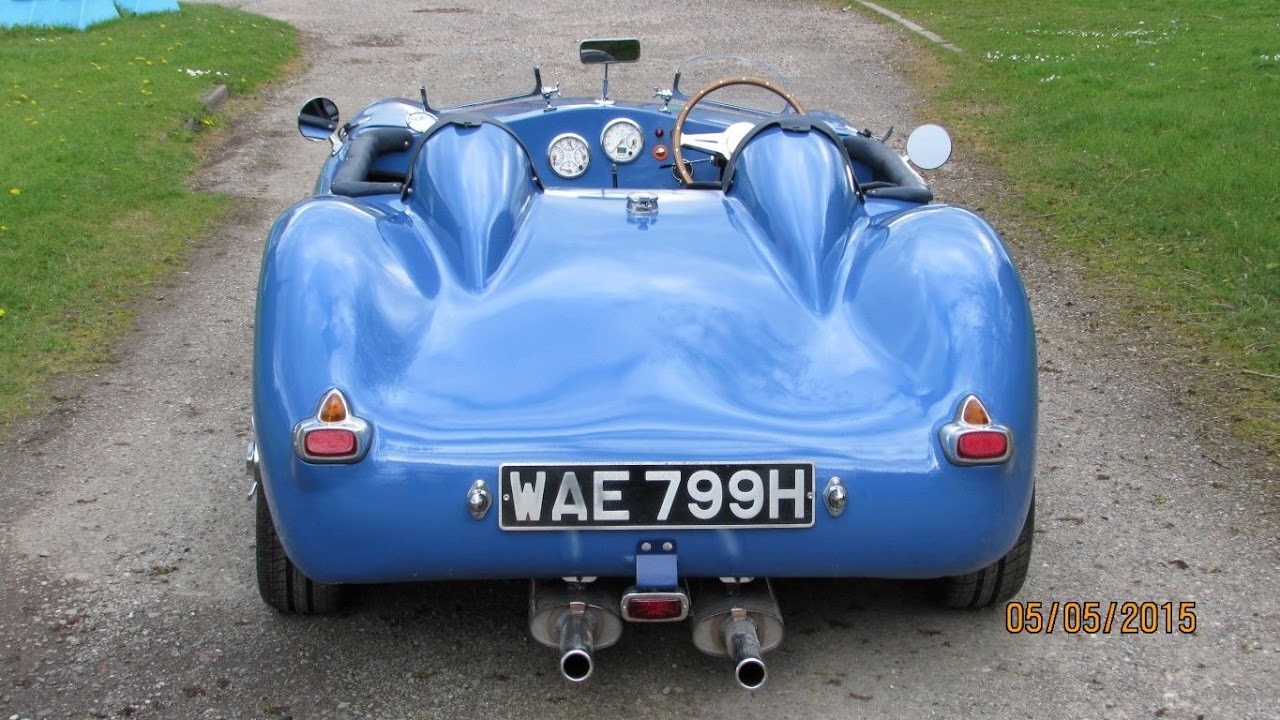
I really liked the tail pipe exits and side mirror mounting pedestals. :cool:


- - - - - - - - - - - - - - - - - - - - - - - - - - - - - - -

Right, the sun appears to have returned outside, so I'm heading back outside.

Cheers, Paul. :)
23 Apr 2016, 3:20pm
Saturday Continued:
Whilst it was fair to say there were blue skies overhead when I stepped outside…


There was also a very dark cloud approaching.


So it was a very nervous fibreglassing session, but I managed to cover a few areas:

Mirror access holes on both sides.


The join along the bottom edge of the rear cockpit wall.


The join between bulkhead and floor pans (on both sides).


But by the time I'd finished the weather was definitely turning again, so I quickly loaded everything into the cockpit…


Before pulling the covers on again and it just started raining by the time I'd finished.

- - - - - - - - - - - - - - - - - - - - - - - - - - - - - - -

When I went back out for my third session of the day, the matting I'd applied earlier was still tacky.

So I mixed up a batch of fibreglass filler in an effort to improve the top edges of the cockpit.


This might look a bit rushed and that is because it started raining on me while I was applying it. :rant:

Obviously the sun was back on by the time I'd finished, but I'd already had a major sense of humour failure by now.

So I just did one more quick job before packing up completely...

I made 3 small brackets out of my aluminium off cut.


Then nailed them to the back of the plywood "hole" I had cut out of the cockpit side panel.


I will then be able to nail this piece to the side panel when the time comes to fix it back in place.


As, given my clumsy nature recently, I could see this dropping into the hole and rolling away out of reach. :rolleyes:

Until next time, take care, Paul. :)
23 Apr 2016, 7:32pm
Might have to actually buy Kitcar magazine this month then ...not seen that one ...does it mention the builders name at all ?
23 Apr 2016, 7:41pm
Think the guy is called George Hodges.

Like the look of the wing mirror mounts, might pinch the idea for mine.
23 Apr 2016, 7:57pm
Raised wing mirrors always look quite cool ...and it means you can actually use them !!
Towed has raised mirrors on his , looks the part ...

Some nice little touches on that car ....the bonnet bulge looks serious and the little ferrari-esque rear vent is cool ..
24 Apr 2016, 6:43am
Lancelot Link & Swifty - Yes, George Hodges was the builder.

There really are lots of nice touches on that car. :cool:

- - - - - - - - - - - - - - - - - - - - - - -

Sunday - Being woken early by the sound of the rain lashing down outside is never a good omen. :rolleyes:

So let's see if I can squeeze some car work in later on (around family stuff).

Cheers, Paul. :)
24 Apr 2016, 7:15am
When will the rain ever stop?!? My back garden is like a swamp. Paul with that in mind you have achieved more than most are able with an outdoor build, you should be proud of the constant progress you are making. Plus rain = opportunity for a brew!
24 Apr 2016, 5:48pm
Jones - Cheers, I am still amazed at how much I have managed to achieve by trying to constantly chipping away at this. :cool:

But I must confess the recent run of sudden showers has slowly driven me mad, as getting the covers on & off wastes so much time.

- - - - - - - - - - - - - - - - - - - - - - - - - - - - - - -

Sunday - Plan B:
A major change in plans saw me join my wife & teenage daughters on a shopping trip for clothes/shoes. :eek:

By the time we got back (and my trauma councillor had left :icon_wink:) I could only get a little bit done...

Ground/sanding down the fibreglass matting I laid on yesterday.

Which makes it easier to see this join slowly expanding.


But while cleaning up the mirror access holes I had a very bad feeling about the space I had left.

In my head I was looking at the space for a nut & washer to fit on the end of a bolt, no problem.

Except that it will be a bolt pushed through from the inside and fixed to the mirror like so.


Obviously, I had to pull the mirror out of its storage box just to check I had't messed things up.

Thankfully, there is plenty of room for the bolt (which will be cut a bit shorter) to fit in. :cool:
( Sorry about the blurred photo. )


I then did one small fibreglassing session to finish off the access holes on both sides.


Note:
You can see that I have started joining the top corners of the Spitfire bulkhead to the body shell at this point too.

- - - - - - - - - - - - - - - - - - - - - - - - - - - - - - -

Fibreglass Air Pockets:
It is a shame to read about the problems Smash is having with his 250 SWB "next door".

As his custom made bumpers looked amazing. :cool:


Apart from some rough "patches" that were there when my kit was delivered, < Touch Wood > my car's body work seems OK.

It has been kept outside for years now in sub-zero temperature during the Winter and over 90 degrees during the Summer.

Although Mister Towed made a valid point about how dark colours (mine will be BRG) get hotter than lighter colours, such as his silver.

- - - - - - - - - - - - - - - - - - - - - - - - - - - - - - -

"Real" Work Update:
I will be back in the office tomorrow morning for a briefing on my next project.

So this will give me a much better idea of how much car time I will have in the next few months.

- - - - - - - - - - - - - - - - - - - - - - - - - - - - - - -

Until next time, take care, Paul. :)
24 Apr 2016, 5:58pm
swifty wrote:
Think the guy is called George Hodges.


I'v been in regular contact with George over the last few month and your right he is a real nice guy and although he 75 years young he's still a bit of a "petrol head" on the quite. :heh:
Interestingly he told me he brought the body tub from Mike in Poole!!

This is his latest project, it's a NCF Torino (I thought Starky and Hutch drove a Torino).


I have asked him to use this forum but he's old school and not into computers :twitch:
25 Apr 2016, 3:45pm
Micky1Mo - If you get the chance, please let George know that we like his Spyder build. :cool:

- - - - - - - - - - - - - - - - - - - - - - - - - - - - - - -

A Mildly Manic Monday:
Given the forecast, I was taking a chance to quickly peel back the covers and start working on the car this afternoon.

I just managed to enlarge the holes on both sides of the hand brake panel, where the seat belt anchor bolt goes.
( It was a rushed job. :rolleyes: )


During which time the sky looked like this.


But a quick look in the other direction told a different story.


I was just about to mix up some fibreglass filler to seal up the gaps around these holes when I knew my number was up.

Thankfully I got the covers on just as the rain started and I was safely indoors when the hailstones arrived!

- - - - - - - - - - - - - - - - - - - - - - - - - - - - - - -

Even though I haven't managed to get any work done on the car, there have been some major developments…

First of all, I popped into the office this morning and my next project has a kick off meeting at 8.30am tomorrow!

I've also been enrolled me on a 5 day training course next week, so this is all good news for me (& my family). :cool:

- - - - - - - - - - - - - - - - - - - - - - - - - - - - - - -

Secondly, you might remember that I posted this "Next Steps" plan a while back.

Phase 1 - "Home":
- Reshape the rear driver's side arch.
- Extend the rear inner arches to meet the body shell.
- "Seal off" the remaining gaps at the rear end of the car.
- Fit the internal cockpit panels.

Phase 2 - "Away":
- Triumph specialist help, including wheel alignment.

Phase 3 - "Home":
- Reshape the front arches and extend the sides of the body shell.
- Complete all remaining work required to get the car on the road.


As I have almost completed Phase 1, I dropped an email to the Triumph specialist ( [url]www.jyclassics.co.uk[/url] ) this morning.

Normally they have a waiting list, but, due to a late cancellation, my car is now due to be collected at 11am on Thursday!! :eek:

Obviously, I have explained the car is still (very much) a "work in progress".

The current list of work includes:
- Engine - Full service / set up.
- Clutch - Pedal will not budge, so it is currently stuck in neutral.
- Brake & clutch fluid - Replace.
- Set up hand brake
- Oil pressure gauge - The broken gauge currently fitted in the engine bay needs to be replaced with a sensor for the new electric gauge I've fitted in the dashboard.
- Set up wheel alignment and tracking
- Fix sheered off bolt in the rear passenger drum brake
- Fix cross threaded seat belt mounting on hand brake panel
- Check gear box drain plug, as I think that is cross threaded too
- Replace temporary fuel filter arrangement with a permanent solution

I am actually really excited at the prospect of being able to drive the car when it is returned.
( Even if it is only for a few feet forwards and backwards within the confines of my driveway. :rolleyes: )

Although the real leap forward for the build will be the fact the position of the front wheels will be correct.
( I will have to keep my fingers crossed when the rear wheels are set up properly. :pray: )

Which, in turn, will allow me to start "Phase 3", which represents the last major bit of modification work. :cool:

From that point on, it will be a case of working my way through the final tick list of jobs to get ready for an MOT.

- - - - - - - - - - - - - - - - - - - - - - - - - - - - - - -

Until next time, take care, Paul. :)
25 Apr 2016, 5:49pm
micky1mo wrote:

Interestingly he told me he brought the body tub from Mike in Poole!!


I think , in the early days of Miglia , Mike might have p/ex a Sammio kit against a Miglia , rings a bell ...would be around 3 years ago , so if the timings fit , that may be the body George bought ..?
26 Apr 2016, 7:10pm
Tuesday:
Tried to do a bit of work on the car this afternoon, but it all got a bit messy. :rolleyes:

It started well enough, as I just unwrapped the front of the car.


So I could remove the battery.


I want to give it a quick charge today, before attempting to restart the engine tomorrow.
( Before it gets collected on Thursday. )

Then the front got covered back up and the back was uncovered.

I then sanded down the body shell where drops of resin & filler had made a mess.


I then cleaned up the inside of the cockpit and it was all so far, so good.

The sky was looking OK, so I put some etch primer over the sanded down sections of body work.

Rather than stop to take any photos, I went straight on to mixing up some fibreglass filler.

And I was in the middle of applying this when I could see SNOW landing all around me. :rant:

I couldn't believe it, as it has come out of nowhere. :icon_sad:

So there was a mad dash around as I tried to get the covers on the car and everything else indoors.

What a pain in the :tape:

Until next time, take care, Paul. :)
28 Apr 2016, 6:31am
Wednesday - Part 1
Peeled off the covers to see if yesterday's snow had any effect on the primer.


Thankfully, it all seemed OK, apart from the fact the snow left water under the covers.


And the filler I abandoned mid application needed to be cleaned up. :rolleyes:


I also had to clean filler mess on the inside & edges of the cockpit, which then required a touch up with etch primer.

I had apply some filler over one of the fibreglass joins near the bulkhead.


So at some point I will do this properly over all of the fibreglass on the inside of the cockpit.

My close up photos were rubbish, but I needed to seal off some small gaps between the bulkhead and body shell.


I used some tiger seal and this was the best I could do for the 'after' photo.


As I had the tiger seal out, I nailed the "hole" back into position.


Before sealing the edges and pilot hole in the middle.


Once this has set, I'll add some fibreglass over the top.

Hoovered the boot and this is the cleanest it has looked in ages.


I then wrapped the rear wiring loom in a dust sheet to keep it out of the way.


Put some etch primer on the filler I had used around the seat belt mounting holes on the hand brake panel.


While I was at it, I also sprayed some other sections in this area.
( Obviously, I still need to come back and do the whole interior properly. )


End of Part 1&#8230;
28 Apr 2016, 6:33am
Wednesday - Part 2:
Pushed the car along the driveway so I could get a better look at the new twin pipes. :cool:


They seemed very low to me & a quick check confirmed there is currently just over 4 inches of clearance.


So getting the car over the lip of my driveway without hitting the pipes may be a challenge.

Anyway, while the car was "out", I took a few photos of the cockpit.


I know it still looks very rough at this stage, but it all feels very strong. :cool:

I also took my usual 'before' & 'after' photos of the driveway.


However, in between these two photos Mr Clumsy struck again&#8230;

As I managed to break the hose connection&#8230;


Which covered me in water before I could turn the tap off. :rolleyes:

Then to make matters worse, the weather suddenly turned and I had to get the car back in position and the covers on ASAP.


At least this time the light rain/snow/hail mix landed on the outside of the covers.

End of Part 2&#8230;
28 Apr 2016, 6:33am
Wednesday - Part 3:
Unfortunately, everything else was piled into the porch.


But I had to wait until the weather improved before I could carry all of this to the Summerhouse/shed at the end of the garden.

Both of which are now a complete mess (again), but at least the porch is tidy.


- - - - - - - - - - - - - - - - - - - - - - - - - - - - - - -

Close, but no cigar&#8230;
I then tried to make the most of the dry weather to restart the engine.
- I got some "fresh" petrol to add to the tank.
- But the battery back in & a seat to sit on.
- Turned on the ignition and absolutely nothing, I was gutted! :icon_sad:
- Eventually traced the problem to the wires for the heater switch as these were hanging loose & shorting out against the bulkhead.
- With the wires taped out of the way, the ignition light came on.
- My glass fuel filter lets me see that petrol is getting through.
- But despite using some 'easy start' it just wouldn't start and run.
- It would only fire up for a few seconds before cutting out again.

Whilst this was disappointing, it will shortly be in the hand of people who know what they are doing. :cool:

So until next time take care, Paul. :)
28 Apr 2016, 7:01pm
Thursday
I found a couple of photos to compare my twin pipe set up with other Cordite/Navigators:

Me


DonnySoutherner


Mac


It is always hard to tell from the angles of the photos, but my pipes don't look too low.

Actually, I really love the way the back end of my car looks. :cool:

- - - - - - - - - - - - - - - - - - - - - - - - - - - - - - -

Thankfully the pipes passed their first couple of "tests" today.

Test 1
The guy from JYClassics arrived with the car trailer and there was nowhere to park. :icon_sad:

So he had to stop in the middle of the road and my neighbour helped as we pushed the car out of my driveway.

The pipes cleared the edge of the drive, where it drops down from the pavement towards the house.

Test 2
Pushing the car onto the ramps on the trailer tipped the nose of the car up & the pipes down.

But, again, the pipes cleared the road (although there wasn't much in it).

As it was all a bit of a rush I didn't get a chance to photo the car on the street next to a "normal" car.

However, seeing it on the road for the first time really highlights how tiny it is compared to everything else. :cool:

Even sitting on the trailer it is still lower than the Golf parked behind it.


So my car is now in the hands of Triumph specialists and I am sure they can sort out all the issues that are beyond me.

It seemed very strange to be looking at a completely empty driveway.


Later on, when my wife swung her Micra into my "workshop" it looked like a 4x4 by comparison. :eek:

Until next time take care, Paul. :)
28 Apr 2016, 8:10pm
Looks like a perfect spot for another project........
29 Apr 2016, 3:34pm
Rene - That spot would become my new home if I even suggested putting another project there!! :icon_wink:

- - - - - - - - - - - - - - - - - - - - - - - - - - - - - - -

That Friday Feeling
I must confess that I was quite nervous about how "unfinished" the car looked when it was collected yesterday.

But fair play to the guys at JYClassics they have been very positive and even posted a couple of photos on their Facebook page. :cool:

https://www.facebook.com/JY-Classics-ltd-197354516947231/

The positive reaction the car now gets from people seeing it for the first time is really heart warming.

As many people on here have said, when the car is finished no one would ever guess just how much work was involved in building it.

So I can't wait to have it back and start tackling the front wheel arch profiles/body shell side extensions/bonnet & scuttle join.

I know it has been a long time coming, but the project is definitely heading for the finish line.

- - - - - - - - - - - - - - - - - - - - - - - - - - - - - - -

Stoneleigh 2016:
Unfortunately, the dates for this year's show clash with a family event, so I can't make it.

Maybe 2017 will be the year that I finally go to this show in my own kit car. :pray:

If anyone reading this is going to the show, please let Chris @ Tribute know we appreciate his work.
( As the amount of Tribute bashing going on "next door" recently is quite depressing really. )

The SWB 250 is my favourite Tribute model, but it is a tribute to the original, not a mm perfect replica FFS!

Which reminds me of one of Basil Fawlty great rants.

"Well may I ask what you expected to see out of a Torquay hotel bedroom window? Sydney Opera House perhaps? The Hanging Gardens of Babylon? Herds of wildebeest sweeping majestically across the plain…"

:icon_twisted:

- - - - - - - - - - - - - - - - - - - - - - - - - - - - - - -

Until next time, take care, Paul. :)
29 Apr 2016, 5:29pm
Paul L wrote:
Rene - That spot would become my new home if I even suggested putting another project there!! :icon_wink:

-


Well....if you get another project and it becomes your new home you have more car time............i suggest you put a army tent up instead of a tarp:violin:
1 May 2016, 8:12am
Rene - I think my current build conditions are hard enough as it is, without living outside on a permanent basis too. :icon_wink:

- - - - - - - - - - - - - - - - - - - - - - - - - - - - - - -

Some Interior Thoughts:
I knew buying an 'off cut' of aluminium sheet for the inner wheel arches would lead to 'mission creep'. :rolleyes:

As I find myself looking at other people's great work, e.g. DaveCymru & Scottie. :cool:


Although, I do have the small issue of how 'wonky' my internal plywood panels are compared to most.


So making large panels fit over the odd shapes might be quite a challenge for my limited tools/talent.

This lead me to think about using a series of smaller, over lapping, panels to cover the internal cockpit walls.

Unfortunately, at this point, my fascination with 'make do and mend' Rat Rod interiors started to lead me astray...


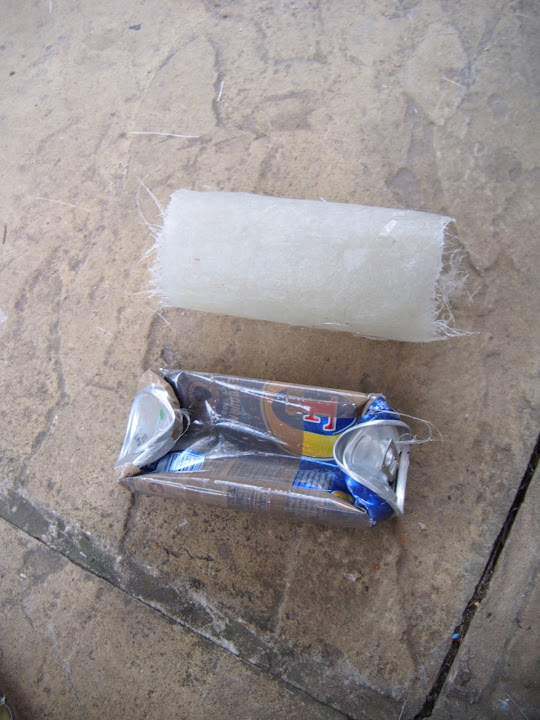
Because, after all, I've already recycled some beer cans to make my body shell's tail pipe exits.


So how about an ally interior made from cans of Fosters, something like this?


Thankfully, I have now come to my senses and if any beer cans get used, they will be "inside out".

Take care, Paul. :)

PS
The plan remains to aim for a rough, but painted black, interior to get me through the first MOT.
1 May 2016, 11:58am
Paul L wrote:


- - - - - - - - - - - - - - - - - - - - - - - - - - - - - - -

The positive reaction the car now gets from people seeing it for the first time is really heart warming.

- - - - - - - - - - - - - - - - - - - - - - - - - - - - - - -


If anyone reading this is going to the show, please let Chris @ Tribute know we appreciate his work.
( As the amount of Tribute bashing going on "next door" recently is quite depressing really. )

The SWB 250 is my favourite Tribute model, but it is a tribute to the original, not a mm perfect replica FFS!

Which reminds me of one of Basil Fawlty great rants.

"Well may I ask what you expected to see out of a Torquay hotel bedroom window? Sydney Opera House perhaps? The Hanging Gardens of Babylon? Herds of wildebeest sweeping majestically across the plain…"


You will need to get used to the attention these cars command Paul ...it's constant ...Everybody with half a petrol head knows Cobras and to be honest , they are kind of boring nowadays ...they know this isnt a Cobra ..but dont know what it is !! Thats what creates the interest ...

Well said on the Chris , Tribute statement too ....Running a kit car company is f*cking hard work , often thankless and not the pot of gold creator people think it is .....it can be soul destroying when expectations are too high or any of the other niggles that arise to kick you in the proverbials ...
1 May 2016, 2:30pm
Paul! Don't you DARE ruin your car with some hair brained scheme!
You panel it out properly with alloy!!!!!

You know you really want to!
1 May 2016, 7:09pm

Thankfully, I have now come to my senses and if any beer cans get used, they will be "inside out".


Paul stick with full ally sheet if you are looking for a bare race type interior, it will look better in the long run, but i do like your train of though in using beer cans.

Ally sheet is not too expensive in the grand scheme of the build plus the interior is what people look at after being amazed by the exterior so why compromise your build at this stage, if the cut ends of full ally sheets are a concern then try to hide them up inside the fiberglass, this is what i did because the shape of the fiberglass sides are not flat or straight in any way at all.

Good luck matey and i am sure you will come up with a neat solution in the end.
1 May 2016, 7:25pm
Gary - Thankfully, I have reached a point where I am really happy with the overall look of the car, warts and all. :cool:

Especially, as my decision to create my own Frankenstein approach to the build was such an enormous leap of faith.

I've just dug out these old photos and, quite by chance, they are actually from 6th May 2013, so almost exactly 3 years ago! :eek:


So the fact the car looked like this a few days ago is nothing short of a motoring miracle.


By the time I have sorted out the mods required at the front end, it should really look the part.

- - - - - - - - - - - - - - - - - - - - - - - - - - - - - - -

Scottie & Swifty - Don't worry, I did realise that a Rat Rod / beer can interior was not really a feature of 1950s race cars. :icon_wink:

But, unfortunately, there will be a bit of a wait a bit before any form of aluminium interior goes in.

As I now need to be ruthless in deciding what work is really required pre & post a 1st MOT.

- - - - - - - - - - - - - - - - - - - - - - - - - - - - - - -

Cheers, Paul. :)