MadaboutKitcars

This is a read-only archive of the old Madabout Kitcars forum. New posts and replies are no longer possible, but every thread is still here to browse and read.

Scottie's Tribute A352 build

17 May 2015, 7:54am
Scottie22 wrote:
... I still cannot find / trace the indicator unit on my build...


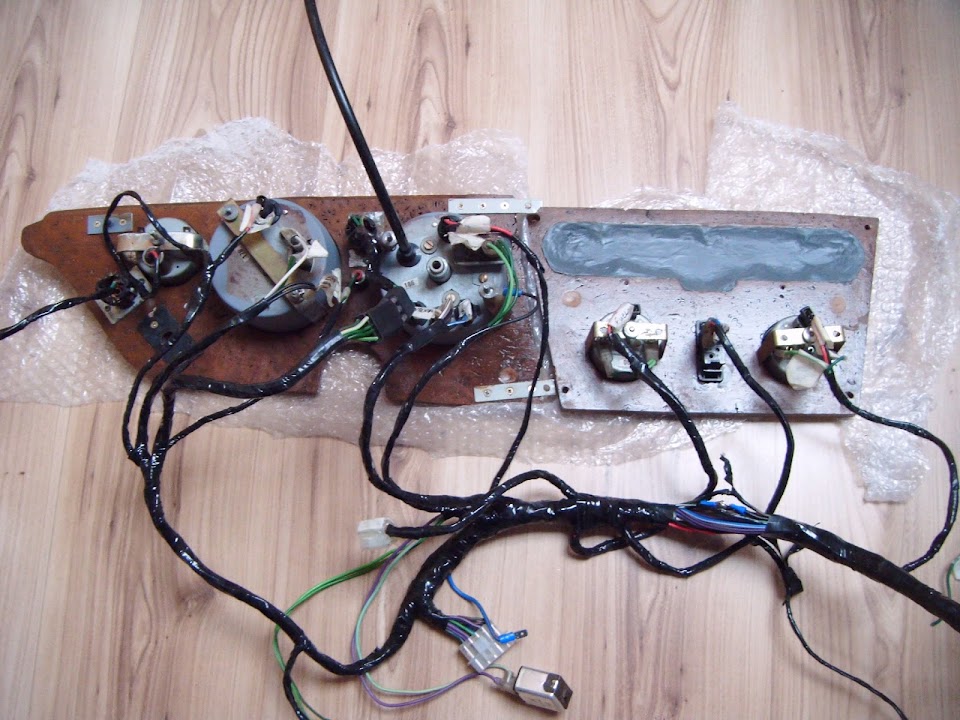
Scottie - I've had a look through some of my old photos to see if they will help.

On the 1500 Spitfire, there are two replays, one fore the indicators and one for the hazard, although they look the same to me.


They are wired up pretty close to the rest of the dash board wiring.

Not easy to spot in this photo, but they are roughly level with the steering column cut out in the dash as you work towards the grass.


But they are fitted into little holders behind the metal dashboard support, you just about see one at the top of this photo next to the speedo/rev counter hole.


Hope that helps, good luck, Paul. :)
17 May 2015, 8:46am
Having just completed wiring the front and back lights, I have cracked my Hazard Flasher issue. Those flasher units which you refer to as relays will be Lucas FL9 flasher units. The reason there are two is that the hazard warning flashers need to be available without the ignition being on but the turn indicators should not work UNLESS the ignition is on.

Having chosen to use a Transit column stalk it changed things for me because the hazard warning flasher switch is part of the steering column switch and that makes the wiring different. I chose the transit switch because it's commonly available and pretty robust, also it has all the functions I need, in one unit.

I still have the two flasher units but I will install a two way switching relay to select the flasher unit appropriate for either the turn indicators or the hazard warning flashers.

I will post a wiring diagram in my own thread in due course.
17 May 2015, 5:56pm
Sunday

Paul, thanks for the diagrams, they did help, and you are right about the Spitfire 1500, and so is 8 valve Ed.

However.............. Although my donar Spit came with a 1500 engine, that engine was retro-fitted by the last owner, and my Spitfire is actually a Mark 1V.

Just for interest, the car would have been fitted with a 1300 engine originally,
which is a better unit than the 1500, but there we go.....

Being a Mk 1V, some of the wiring is different to that on a true 1500.

The car I have does not have a hazard flasher unit fitted, and it is not present in the wiring diagram either.

Having said all that, I have found my car's indicator flasher unit, and it does work when given a live feed. I jury rigged it and got the flashers all going, so I will fit a double pole switch, and get it to hazard flash, ex-ignition circuit like Ed suggested.

Ed, glad to hear you have sorted your flashers out!

You will have read the above bit to Paul, which will explain where I am at now.

What a palaver, but slowly it is coming together.

Today I got the fuel gauge and water gauge working, and decided to change both (Spitfire) of them in my new dash for proper Jaguar ones.

The jag ones were rusty and mucky, so I gave them a brush up, and fitted them in my dash, and they are an improvement on the Spitfire ones.

I also tried to fit the chrome headlight rings that I had bought at Stoneleigh,
only to find that they would not fit behind the headlights, as there was just not enough room. The cowl-space was too narrow to allow the rings in at the back.

Not to be outdone, and determined to fit them, I chopped them down a bit thinner by slicing them almost in half, and that did the trick and now they fit a treat, and the butchery cannot be seen behind the scenes!
I also painted them to stop the rust.

All in all a good productive day.

[IMG][/IMG]

[IMG][/IMG]

[IMG][/IMG]

[IMG][/IMG]

[IMG][/IMG]

[IMG][/IMG]
18 May 2015, 3:50pm
I like the headlight surrounds Scottie

I'm off now for a few days so I hope to see this car finished when I get back. :banplease:

Good luck!
21 May 2015, 7:02pm
THursday

Although I have not posted for a couple of days, I have been putting lots of time in on the car. It is amazing how I keep finding more and more things that need sorting out. It seems to go on forever.

I think I have cracked the wiring, and appear to have got most things up and working. A lot of the circuits, I have had to re-wire.

Unbelievably, whilst actually working on the wiring, I had another short and burnt my hand trying to get my crocodile clip off the offending wire.

Fortunately, the circuit that was damaged was the door courtesy light and seat belt light one, which I am not going to use anyhow, so I just disconnected them.

Thank goodness for my cut-off switch which I used to avoid any further damage! (Or injury)


My new toy finally arrived and this evening, and I used it for the first time.

The paint has at last cured on the doors, and has sunk only a few microns, but enough to show the edges of some of the "patches", which infuriated me.

I wondered if I could get rid of the marks without spraying the doors again, so I had a go at it.

I flatted the marks very very carefully with a small wood block and 600 grit,
which I used "dry". (Shock horror) However it worked, and I flatted out all the imperfections.

Then I fired up my new toy, and set to work with some G3 and water.
It only took about 5 minutes and the results were (to me at least) totally spectacular! I just could not believe how smooth and deep the shine was.
I think even a professional body-shop man would have been pleased with the results.

And I still have not used any polish yet, that may come later.

The "selfy" picture is taken using the door as a mirror.

I am definitely a huge fan of mopping now!!

Pics:

[IMG][/IMG

[IMG][/IMG]

[IMG][/IMG]

[IMG][/IMG]

[IMG][/IMG]

[IMG][/IMG]
21 May 2015, 7:25pm
That looks really good Scottie I'll have to get one of those toy's for mine ( in a year or two) or better still you can come and polish it for me :laugh:
21 May 2015, 8:28pm
you do like your selfies... Like the ad said - if you've got it, flaunt it. Great work on the car as well.
21 May 2015, 8:29pm
The selfie makes your door paint look wrinkled but having met you in person at Stoneleigh I know the paint is perfect.

:-)

Glad you got the wiring sorted
21 May 2015, 9:17pm
WCA its the lens on the camera honestly!!
22 May 2015, 7:36am
Mot?

She's looking good Scotty, MOT anytime soon?

Now that my spare NX650's gone, I can concentrate on the rough body edges on mine that are the only bits in the way of its test, which might be as early as next week :).

Lotus Day at Castle Combe tomorrow in the Marlin, always a great event when the sun shines.
22 May 2015, 7:48pm
As soon as I am confident that all the electrics are 100% Mick,,
I will connect my dash up and then hopefully Mot time!

Looks like you will beat me onto the road!

I worked on the loom yet again today and could not get the Installed hazard system to work, so just got rid of it and made a simple mod using a double-pole switch, and now have a good system which does work well.

I have no pictures , but if anyone is interested in how to make an easy cheap workable hazard system, on a vehicle, here is how I did mine.

[IMG][/IMG]
23 May 2015, 10:54pm
Looking good Scottie, is that a curved panel anomaly on your door picture or have you grown a man boob? Thursday night channel 4 is showing the million pound jaguar, might be of interest to you. You should of had a time lapse camera in your tent and you could of aired your own show, the million hour jaguar. Ed
24 May 2015, 7:15am
I think its a man-boob Ed, they say its the stuff in our water that causes it!

If you look carefully, it has three nipples too!
24 May 2015, 8:12am
Scottie - Great to see you are still making solid progress. :cool:

Keep chipping away, as you are nearly there.

Good luck, Paul. :)
26 May 2015, 7:37pm
Tuesday

Well, I haven't posted for a couple of days, so here's an update.

Having prepared, and done all the connections possible on my dash panel in the house, and having done the same sort of stuff out on the loom in the car, ( and had to re-wire a lot of it) I managed to jury-rig it all to work, so today, the big scary job loomed up at me, which was to try and marry the two things up together.

I put a plank across the two door sills to balance the dash on so I could work on it in an easier way. I tied the dash top to the windscreen top to steady it and got to work.

I have all the lights, indicators, start button, ignition key, gauges, hazards and most other things like the stereo, sat-nav speedo (hidden under the dash) all working too, so I am nearly there.

The dash is not finished or bolted in place yet, but its a lot closer to it.

I still have one or two connections to make, and small jobs to do like fit the choke cable to the carbs and stuff, but the bulk of the work is done now.

Wiring it all up certainly would not have been possible with the dash panel fixed in place first.

It was hard enough to do as it is now!

If a bulb ever blows, it'll take about 6 hours to change!!

Pics:

[IMG][/IMG]

[IMG][/IMG]
26 May 2015, 8:22pm
You can fit LED bulbs to all of the Jaguar instruments, they are meant to last a lot longer than traditional bulbs.
In my MK2 when I fitted LED bulbs I cleaned inside where the bulbs sits, there are blue plastic shields inside. After cleaning the instruments have a pleasant blue tinge to them. I have owned old Jags for years and they all shone a dull yellow. I can only presume that they had a blue tinge when new. Anyone going to admit to being old enough to remember what they were like when new?
26 May 2015, 10:03pm
I also have owned a lot of old Jags over the years, but could never afford a new one, so I wouldn't know what they looked like new!

Ref the LED bulbs, as I modified the Triumph clocks to work with Jag faces, they are half Jag, half Triumph, so most of the bulbs and holders did not fit, so I had to buy smaller bulbs, get holders about the right size, solder all the wires on and made the holders fit the instruments and so on, it was time consuming and fiddly, but not a problem for me, but to change them all now for LED and do it all again?
No way Jose!
27 May 2015, 8:06am
Jaguartvr wrote:
You can fit LED bulbs to all of the Jaguar instruments...


No doubt but what of authenticity???

I remember seeing a 1930's Aston Martin on the Mille Miglia revival a few years ago which had LED rear light bulbs- yes they were brighter therefore safer and probably more reliable but not really in the spirit...
27 May 2015, 8:25am
I know what you mean but in the case of the Jag instruments you just get a slight warm blue hue, not a nasty bright blue light. It is very subtle and does look good. I haven't fitted LED bulbs t the rear lights, although they would give a better and safer light, they just wouldn't look right.

Quite understand where you are coming from Scottie, even fitting them to the Jag instruments is a pain in the arse.
27 May 2015, 8:34am
[i]No doubt but what of authenticity???[/]

Of course! LEDs wouldn't be authentic on an old triumph that had been hacked about with some plastic body work stuck on to make it look like an old Jag...

Not knocking the car btw, just the worry about what 'authentic' might look like :-)
27 May 2015, 8:53am
WorldClassAccident wrote:
... just the worry about what 'authentic' might look like :-)


Means different things to different people- the sort of detail that Scottie aspires to (thinking of rivets with correct appearance, dashboard configuration, etc) may extend to the "colour" of the lights.

The first thing I look at on so-called Cobra Replicas (and I mean replicas) is the layout of the dials on the dashboard and if that's not correct = fail.

For some reason- those LEDs on the Aston really irked me even though they must be safer!!!
27 May 2015, 11:21am
I know what you mean, I was striving for 'authenticity of look' on the Z300S and there wasn't anything original to be authentic to.

I just got a bit irked at a car show recently when I heard some blokes talking about 'real' and 'authentic' and 'original' when they meant 'a good copy' or 'bits from several different old cars'. Plus I was bored on a conf call when I replied earlier
27 May 2015, 11:35am
Yes- there's a world of difference between "antique" and "antiqued".

I always cringe when I see a car finished in 2-pack when I know that the process hadn't been invented when the car was originally made.

Speaking of inventions- apparently cellulose paint was a by-product after the use of nitro-cellulose gun-cotton in shells during WW I.

Acrylic paint came about after the development of plastics for WW II bomber windows.
27 May 2015, 2:52pm
Just a quick update, I was hoping to finish the dash and get it finally in place today, but it was not to be.

Just about all the wiring is done now, but when I tested the indicators, the hazards were not connected up, but they both worked individually, I had however, made a mistake with my hazard wiring, to the effect of when the indicators were on, whichever side the red hazard tell tale was connected to would make it flash at the same time as the green light. Not what is required.

It then dawned on me that I would need a triple-pole switch, and connect the red tell tale to the centre connection.

Luckily, the switch I was sent, having ordered a double-pole, turned out to actually be a triple-pole, so I was able to get the system working correctly in the end.

I don't have any pics of the work as it looks just the same, but not wishing to disappoint people who like pics, here is a non-related picture, which amused me:

[IMG][/IMG]
27 May 2015, 2:58pm
My kind of humour...