
MadaboutKitcars

This is a read-only archive of the old Madabout Kitcars forum. New posts and replies are no longer possible, but every thread is still here to browse and read.

Another Cordite Is Born ...

25 Mar 2016, 6:08pm
The Short Good Friday - Part 2:
So I marked up then next cutting line and increased the size of the "hole".


This time, I chamfered the outside edges of both the body shell and lip.
( Which will hopefully make it easier to add the matting to the 'Sunny Side' later on. )


With the template was fixed into position, the lip was cut into sections & put back together.


Although, as you can see, I came up a bit short. :rolleyes:


So I will have to do a bit of extra work to fill in these gaps.

But I decided to start with the other sections and come back to that another day.

Still, at least I now had my "During" photo.


Then I could remove the template, jack the car up & remove the wheel.

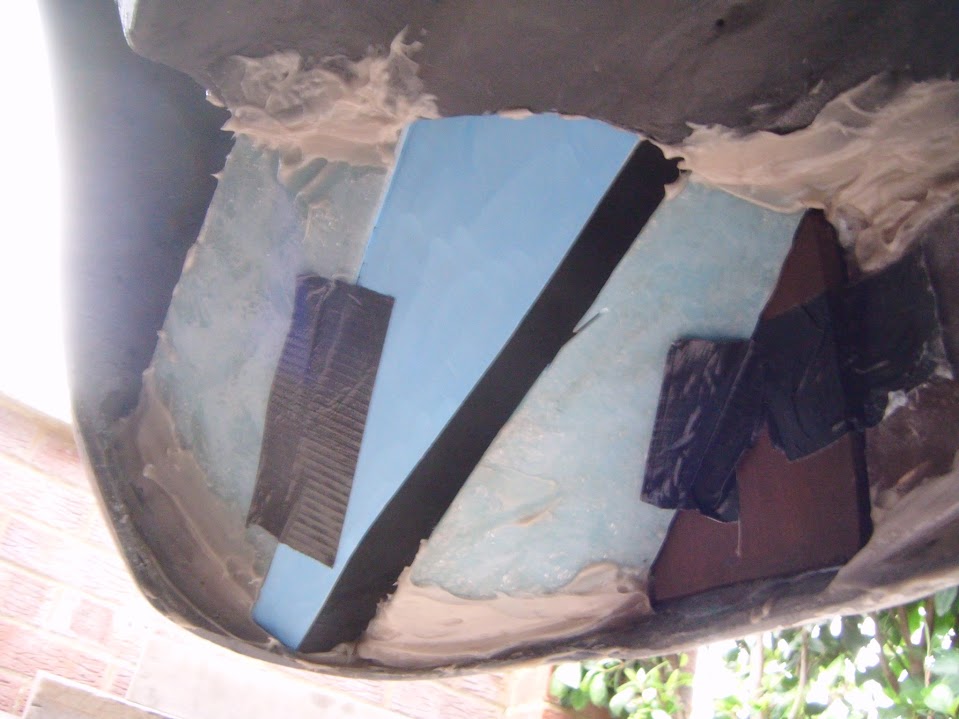
Next I put some parcel tape across gaps & held it in position with more tape like so.


Then I completed the first round of adding lots of small fibreglass matting strips on the inside to hold the pieces together.

This a really a pain to reach as the brake drum keeps hitting my head/back as I try to see what I am doing. :rolleyes:

Then it was time to tidy all my stuff away and leave that to set.

Last job of the day was to cover everything back up again.


- - - - - - - - - - - - - - - - - - - - - - - - - - - - - - -

Adele:
We went on a family trip to see Adele on Tuesday night, absolutely amazing. :cool:

Shame I didn't bring my proper camera, as my photos are poor.


- - - - - - - - - - - - - - - - - - - - - - - - - - - - - - -

Anyway, it feels good to be back working on the car again after over 3 months away.

Happy Easter, Paul. :)
25 Mar 2016, 7:42pm
Nice to see you back Paul and i hope the wheel arch mods goes well, looking good so far.
26 Mar 2016, 10:46am
Hi Paul,
Thanks for your reply regarding Kurust - I hope it meant that you've painted over the layer of dried Kurust without cleaning it first, because that's what I did....
Good to see you are working on your car again, and to be honest your car looks great. Good luck with wheel arches. Cheers, Deni.
26 Mar 2016, 10:55am
Swifty - Cheers. :cool:

It is funny how the debate about painting the car has helped me focus on finishing this build.

The fact is, if I can get this car on the road, in any way, shape, or form, I will have done well.

So what, if the finished car is not going to be one of the highest standards of Sammio builds?

Given my limited experience and facilities, the best I can do will be good enough for me.

Even if they are not perfect, the rear arches should still look better "After" than "Before". :pray:

- - - - - - - - - - - - - - - - - - - - - - - - - - - - - - -

Misty Morning:
Initially, it looked like I might be able to get a bit of car time in-between the rain promised today.

Unfortunately, whilst it looked dry from inside the house, there was a very fine mist in the air when I got outside. :icon_sad:

But, as I had my work clothes on, I took a sneak peak under the covers and yesterday's matting has set solid. :cool:

I thought I should at least try to get a photo of the work, but this poor effort has reminded me why I didn't bother yesterday. :rolleyes:


So rather than remove the brackets and add more matting on the inside, I'm going to leave everything as it is for now.

With the clocks going forward tomorrow, I might be able to sneak that job in one night after work next week. :pray:

So until then, take care, Paul. :)
26 Mar 2016, 10:59am
Deni - Sorry I missed your post while I was "copying & pasting". :cool:

I certainly didn't "clean" the surface after using Kurust.

I figured that the multicoloured look if left on the metal I treated was part of the protection it offered.

Thanks for the kind words about the car. :cool:

Which ties in with my reply to Swifty.

My car will stand out compared to most cars on the road, which is part of its appeal.

I think that the fact that there are other "real" classics & kit cars out there at a higher standard is missing the point.

Cheers, Paul. :)
26 Mar 2016, 11:03am
Paul we build cars for ourselves not others approval.
When I first saw the job your were undertaking and you confessed you had limited experience I could never have dreamed how it looks now.

When you get behind the wheel and you head out to the country lanes neither you or any on lookers will think of the journey you took to get there.

Im confident you will exceed your expectations when you paint it.
27 Mar 2016, 12:58am
Hi Paul,

Thanks for a clarification regarding the use of Kurust.
Good luck finishing your car, it will be a great achievement and, I am pretty sure, a great looking car too.
27 Mar 2016, 5:44pm
Stumbled upon this site and build thread a few days ago. I was searching for pictures the the Rover BRM and haven't left since.

I've completely gone throw this thread and I am very very impressed on your attitude and resourcefulness of everything you've done. Not everything done right first time but shows with determinations comes great reward.

As for painting it yourself, it has it be done. You've done all this work yourself so far you can't hand it over to someone else to do one of the final touches.

Well done Sir I commend you.:eusa_clap:
28 Mar 2016, 10:01am
Roadster & Deni - Thanks for the kind words. :cool:

The thought of finally being able to drive the car is now a big motivational factor for me.

As there was a time when I really thought I would never be able to put all back together. :eek:

- - - - - - - - - - - - - - - - - - - - - - - - - - - - - - -

WelshOne - Welcome to my build thread and I remember Scottie22 posting a photo of a BRM Rover.
( It had an orange band painted around its grille opening and I am planning a yellow one around my car's nose. )

As you have read, I've learnt a lot over the last few years and had a lot of help from people on this forum. :cool:

So I will definitely be painting the car myself and doing my best to get a decent finish.

- - - - - - - - - - - - - - - - - - - - - - - - - - - - - - -

Monday Morning:
Didn't had a great night's sleep with storm Katie lashing our loft bedroom and we had hailstones yesterday!

With more family stuff due later on, I grabbed a few minutes outside this morning.

Although it didn't start very well, as I moved a wheelie bin and water poured off the top into my foot. :rolleyes:

Still, I peeled away just enough of the covers to get at the arch.


Then used a screwdriver to quietly remove some of the brackets.


As always, I am still pleasantly surprised that the various sections now form a, solid, single unit. :cool:


Unfortunately, there are a couple of areas that need to be ground away and redone due to the fibreglass "ballooning".
( So those brackets have been left in place for now. )


I also started preparation for bridging the gaps from the 'sunny side, as access from the rear is so restricted.


Note: These areas will still be strengthened from behind as well.

The wind was still blowing quite strongly which meant that I couldn't do any fibreglass work. :icon_sad:
( As the wind blows all the bit of fibreglass matting around the driveway / into the street. )

Depending on how other things go, I might be able to do the noisy grinding work later on.

Until then, take care, Paul. :)
28 Mar 2016, 10:36am
Welcome back Paul, glad to see you back on the car and fighting the elements again. Good luck!
28 Mar 2016, 3:14pm
Jones - Cheers. :cool:

- - - - - - - - - - - - - - - - - - - - - - - - - - - - - - -

Monday Afternoon:
A slight change in family plans gave me another opportunity to edge forward a little bit more.

So out came my cheap Dremel look-a-like tool.


Which is great for trimming excess fibreglass matting from around the bracket screw holes.


My angle grinder also came out to play as I tidied up the rest of the wheel arch.


Including removing the small sections that had "ballooned", ready to re-do them.


I also tidied up some of the joins on the sunny side.


I then used a couple of wheelie bins to form a bit of a wind break for the fibreglass work.


Note: Spookily, the old newspaper I was using included a review of Bowie's last album, just days before he died.

I used an excess of fibreglass matting all around the two big gaps I needed to bridge.


This should allow me to remove the brackets and add extra matting to the inside edges, before sanding down the outside edges.

Actually, there will be quite a bit of work to do before I am left with a smooth arch. :rolleyes:


But at least this was another step in the right direction.

I will now leave that to set a bit more before getting the covers back on again for the night.

Until next time, take care, Paul. :)
28 Mar 2016, 3:31pm
Looking good so far Paul. Well done for going out in the gales :)

Dave
30 Mar 2016, 5:00pm
DaveP - Cheers, thankfully the worst of the high winds had passed.

- - - - - - - - - - - - - - - - - - - - - - - - - - - - - - -

Bonus Afternoon:
The bad news is that I actually started work at 5.20am this morning. :rolleyes:

The good news is that at least this meant I was able to head home early to work on the car. :cool:

Removed the last of the brackets from the wheel arch and tidied up the join, both inside and out.


Then I added more layers of fibreglass matting to both sides of the join.


Unfortunately, it looks like the edge section at the top of the arch twisted slightly when it was fixed back into place. :icon_sad:

Not easy to see in the photo, but one area is sitting proud of the others.


I've started building up the inside edge of this area, so I can grind it down flush later on.

Thankfully the sun is still shining outside, so I will leave that to set a bit longer before I cover it all up.

Until next time, take care, Paul. :)
30 Mar 2016, 6:17pm
Ohh happy days Paul, i remember reshaping the rear arches which i found to be good for the morale as you start to see major things changing with the build.

Good luck and keep posting.
30 Mar 2016, 8:43pm
Keep up the good work Paul. 200,000 views coming up!....
31 Mar 2016, 6:52am
Swifty - Thanks. :cool:

Hopefully, this rear arch re-shaping work will allow me to finish off a number of jobs at the back of the car:
- Extend the 'boot floor to body shell' panels to meet the rear arches.
- Extend the Spitfire inner wheel arches to meet the body shell.
- Finish joining the body shell to the Moon Rover along the bottom edge.
- Fit the internal cockpit panels.

Whilst all of these jobs will take a bit of time, they will make a big difference to the overall project.

Because, if I ignore the gaping hole over the cockpit, the car will finally be "water tight" underneath.

Given how long it has taken me to reach this point, it will be nice to have some more bits completely finished.

- - - - - - - - - - - - - - - - - - - - - - - - - - - - - - -

JG - Cheers. :cool:

Although I am never quite sure how the forum view counter works, as it seems very optimistic to me.

To be honest I am more grateful for the number of people who have taken the time & trouble to reply to this thread.

As it is fair to say this build has been a bit of a roller coaster of highs and lows over the years. :rolleyes:

However, the support and encouragement I've received has really helped me keep plugging away.

So even if I don't know when it will be, I do know that this car will be on the road one day. :pray:

- - - - - - - - - - - - - - - - - - - - - - - - - - - - - - -

Another Cordite is MOT'd:
Great to see nellieb has just got one of the original Sammio Cordite kits on the road. :cool:

It also looks like Swifty's 2nd generation Ribble Navigator will be next up for an MOT.

Which would just leave me as the last Cordite/Navigator builder still regularly posting on here.

Obviously, if any of the other builders are reading this, it would be great to hear how you are getting on.

- - - - - - - - - - - - - - - - - - - - - - - - - - - - - - -

Until next time, take care, Paul. :)
31 Mar 2016, 6:46pm
Evenin' all:
Seemed a shame not to take advantage of a lovely evening after work…

I keep forgetting to show you the "protection" I have to leave in front of the car.


Because when I moved it closer to the wall, I forgot about the porch door opening.


Without the plank, these is a risk the door could swing open and smash my headlight. :icon_sad:

In the end, I only had enough time to clean up the fibreglass work I did the other day.


The good news is that the "sunny side" now had enough strength built back into it. :cool:

So next time I will add some fibreglass filler to this side to start smoothing out the rough join.

I will also add the final bit of extra matting on the inside of the join.

- - - - - - - - - - - - - - - - - - - - - - - - - - - - - - -

April Plans:
The first phase of the project I was working on ended today, so I will definitely have a few "car days" in April. :cool:

Although it now looks like I will also be involved in the next phase which may start sooner rather than later.

So I will try to make the most of the time I have and see how far I can get.

Having said that, I have some domestic priorities over the weekend that must come first.

So until next time, take care, Paul. :)
4 Apr 2016, 3:38pm
A Little Bit More:
Came back from a weekend away with my family this afternoon and got a bit more done.

Started by sanding down the join on the "sunny side" of the wheel arch & cleaning the area.


Then I added some fibreglass filler over the join and in the screw holes.


By now the sky was not looking very promising.


Thankfully the rain held off while the filler started to set.

Then I sanded it all back down again.


With the template quickly propped into position, you can see the arch isn't far off.
( And remember the template itself isn't a perfect arch. :rolleyes: )


But as it felt like rain was imminent, I decided not to push my luck and add the next round of filler.

Instead, I put the wheel back on and swept up most of the mess I had just made.


A quick hose down later and everything was looking a lot better.
( Sorry the photo is a bit blurred. )


I had just stepped back indoors when the rain started and it is still going now.

So I am happy the timings worked in my favour today.

Until next time, take care, Paul. :)
4 Apr 2016, 7:22pm
It must be satisfying Paul with each round you are getting closer to the end.
Whats next after the rear arches?
5 Apr 2016, 8:34am
Hi all, I drove the Cordite around my local village and beyond! What a magnate the little special is! I have driven quicker cars mainly kit cars with Ford running gear but for grin factor, nothing gets near to the Triumph Cordite. Lots of jobs still to do! But if the sun is shining I'll be buzzing around in my recoated classic Cordite. I will post pics soon!:israel:
5 Apr 2016, 8:37am
Paul my e mail is [email]cathbuxton@lineone.net[/email] and see me in the Cordite! This should push you on to complete your lovely Cordite.
5 Apr 2016, 12:06pm
Roadster - It is certainly nice to see the arch looking a bit more respectable after the initial "butchery".

Once the rear arches are done, I can finish the remaining "joins" from the Moon Rover to the body shell.

You may recall my patch work quilt approach to joining the original Spitfire boot floor to the Cordite body shell. :rolleyes:


Thankfully this looked a lot better by the time I'd finished it. :cool:


Well, I stopped all that panel work short of the wheel arches so I could cut them out and reshape them.


So the panel work will be extended to meet the body shell and the Spitfire inner wheel arches.

I also need to finish the join between the internal framework and the sides of the body shell.


Finally, when all that fiddly work has been completed, I can start installing the internal cockpit panels.

- - - - - - - - - - - - - - - - - - - - - - - - - - - - - - -

Neil: - I am sure your car turns heads and a key point of these builds are that you will stand out from the crowd. :cool:

There was a time when I really couldn't see how my build would ever get finished, so I didn't picture myself driving it at all.

But now, even though there is still a lot of work to do, I can't wait for the day when I can take it for a spin.

- - - - - - - - - - - - - - - - - - - - - - - - - - - - - - -

Tuesday - Part 1:
Although you can hardly notice it, I've added the final round of fibreglass filler to the wheel arch.


There was one screw hole to fill.


Plus some of the "bumps" along the inside edge were covered.


Once that was set, it was sanded down.


Then the depth of the return lip was trimmed/tidied.


Some fibreglass filler was added to the odd "hole" along the inside surface of the arch.


Once this has been sanded down, a final layer of fibreglass matting will be added.

Then a layer of normal body filler was added to the outside edge.


I left the filler to set while I prepared this first update.

So I'm heading back outside now for the next round of sanding…
5 Apr 2016, 2:32pm
That arch is a very pleasing shape. Nice one, Paul.
5 Apr 2016, 7:26pm
Oxford: - Cheers Rob. :cool:

A throw away comment you made a long time ago has now become my path to finishing this build.

…like a 50 year-old race car that has been into the hay bales a few times in its life…

So whilst the arch isn't perfect, it doesn't need to be & I can keep moving forward.

- - - - - - - - - - - - - - - - - - - - - - - - - - - - - - -

Tuesday - Part 2:
It actually took quite a bit of effort to sand down the body filler.


Obviously I just couldn't resist putting some etch primer on to see how it really looked.


At this point, I put the wheel back on, jacked the car up, removed the blocks and let it back down.

Before:


During:


After:


Note:
My sloping driveway is extending the gap between the tyre and the arch in this photo.

I pushed the car to the other end of the drive and the different angles there, squeezed the gap.


And here is the "Before" for this photo too.


While the car was out of the way, there was a bit of cleaning up to do.


End of Part 2…
5 Apr 2016, 7:27pm
Tuesday - Part 3:
A while back I bought a rubber strip to cut down and use to mount the twin tail pipes a bit lower than before.


Because the rear of body shell is actually bonded on a bit lower than I originally planned. :rolleyes:

I dusted off the tail pipes (as the boot isn't sealed off yet).


But quickly realised that I needed the car jacked up again to get better access to the mounting brackets.

So I pushed it back into a more central position, jacked it up again and supported it on blocks.


However, I will come back to this job another day.

Instead, I spent ages crawling around under the car trying to work out the best way to extend the panelling.

Initially, I was going to continue from the bottom like so.


Then I though I should follow the lines of the Spitfire boot.


In the end I decided on a mix of the two options, when I remembered to check what the other side looked like.


I also made a couple of templates for the driver's side.


Unfortunately, other domestic chores prevented me from doing any more car work, but it was still a good day.

So until next time, take care, Paul. :)