This is a read-only archive of the old Madabout Kitcars forum. New posts and replies are no longer possible, but every thread is still here to browse and read.
Since the sun came round the fron tof the house this afternoon, the circus tent became like an oven and so the paint dried off quickly, meaning that I could have a tinker and get some bits on.....
I got the headlight buckets and front indicators in.....
And then the bonnet fixings and the wind-deflector, oh and the side repeaters...
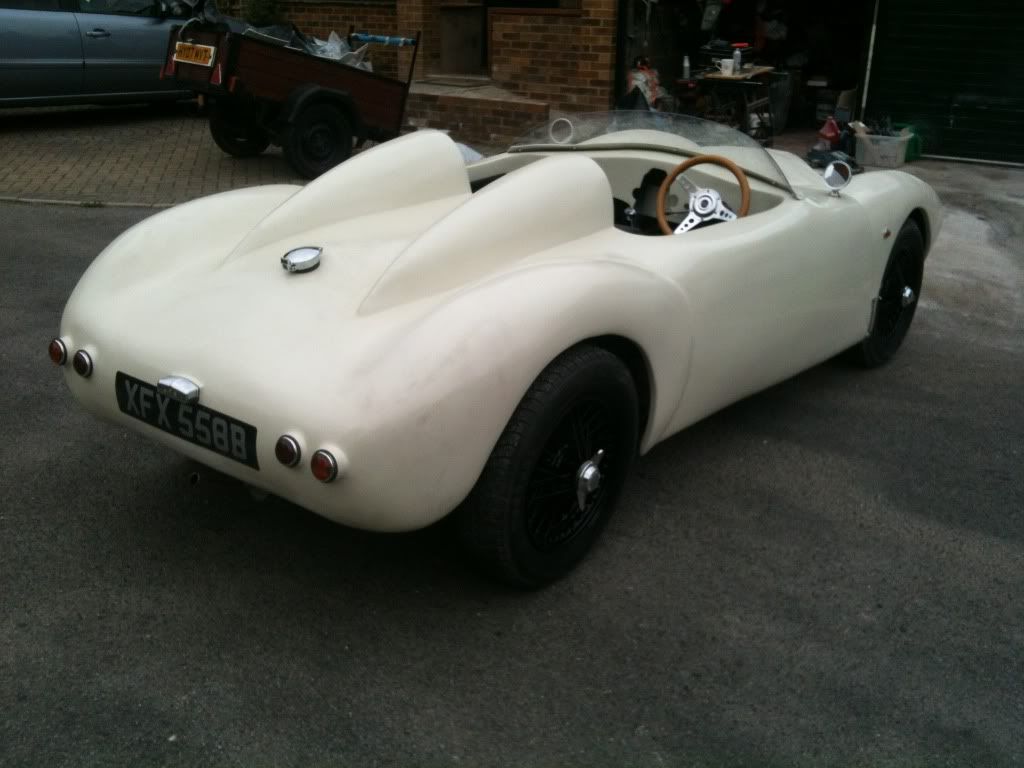
and then at the back I got the lights on and the fuel cap mounted....
The Aston cap hides the original Vitesse locking cap...
and then I put on the brake reserviors and the battery - I will bleed the systems this week. The orange peel effect in the bulkhead area is over-paintable stonechip which gives it a bit of protection and hides some of the bonding etc, so I didn't have to spend ages trying to make that area look great!
So all in all a good weekend and although I am away at work most of this week, I will try and get some of the interior in and then I can concerntrate on getting the engine started and the brakes/clutch sorted out next weekend.
Brilliant, that colour really works well! I also will look forward to your painting lessons. Did the flapping tent ruin the paint?
I managed to get a couple more coats onto the patch before it dried out so averted a major repair. I looks like bad orange peel now, and I am hoping that I have put enough paint on to flat it and polish it out this week. Fingers crossed!
Well what a difference a day makes. I can't believe you've managed to spray it and build up so much in one day.Great colour choice. I hope you had time for a beer or two tonight. Thanks for the paint tips so far and look forward to anymore you have time for.
Spent and hour or so last night just putting the interior bits in for a trial fit.
The carpets are a nearly new set of moulded carpets from a Herald I did up a few years ago. I put a brand new set in the Herald and this set got put in my cupboard waiting for a opportunity to be fitted! A bit of trimming and they will do the job nicely!
I have to trim the centre tunnel yet, and behind the bench seat and put in the centre console, but at least everything still fits!
The back part of the seats are away being shortened that are trimmed like the seat bases and have shaped lumbar supports etc, so should look nice when they are bolted to the back frame. You can see the hidden catch for locking the seat upright is hidden behind the arm rest when it is closed.
I will take it all out and paint the floor with another coat of chassis black as a couple of areas have rippled where it reacted with the fibreglass bonding pasted, so I will do that today and hopefully get the interior finished at the weekend. Then it is getting the brakes/clutch bled and the engine started!
Not long now......
Very neatly done, i like how the dash finishes against the side panels. How are you finishing the cubby holes, paint? wit a cargo net across the front?
Very neatly done, i like how the dash finishes against the side panels. How are you finishing the cubby holes, paint? wit a cargo net across the front?
thanks, I wanted to make the side panels looked "sunk" into the sides, which they do nicely - but obviously you need to plan this at the early stages so you can adjust the bodywork to accommodate! This means that they won't get kicked on the way in and out, and I like the look of the painted bit at the top.
The cubby holes will be lined with a cream vinyl to contrast the black, and I am considering a net behind the panels, although I have made the access hole in the panel smaller than the cubby hole so it will keep the contents in!
Land Rover seats look great and the fold-down back looks really professional.
Spoke to someone who re-trims Lan Rover seats today. They have offered me 2 bases plus 2 modified backs, trimmed in any colour I like for £80 plus £15shipping. Seems an absolute bargain to me and I can't wait to get them ordered.
Tony, can you tell me what size you are cutting your backs down to?
The backs actually fit in the car below the humps but the lumbar supports are too low to be of any use, so I took the backs apart and cut off 60mm from the MDF backing and foam. The covers, were then taken apart at the stitching along the piping and hte top part of the covers shortened by 60mm too. This is the only way to do a neat job without losing the lumbar shapes etc. I am expecting them back in the next few days, so will fit them up and take some more pictures.
For me they seem to fit a treat, and were a relatively low cost "risk" for ready made seats - when I priced up just the foam to build my own seats from scratch it came out at more money than buying ready covered and shaped seats!
The downside you have to consider is that the seats become non-adjustable, so I am getting a cushion made up for the wife so she can sit forward a bit. The Spyder cabin is snug anyway, so adjustment is limited at the best of times!
The price you have been quoted seems bloody excellent, so just make sure you can work with them first and they fit you own requirements, but I can say they are really comfortable when I put them in as a trial fit before I cut them down!
I would be really interested in seeing the photos when your seats come back.
Chris
no probs, I will fit them all up and let you know how it goes... I think you are not too far away, so if you want to come over and try them for size then happy to make coffee and talk Sammio!
Tony , On my way back from Sam's birthday party last night , I sneaked down your road and took a look at the car quickly ...looking pretty cool....wasn't sure about the colour choice , when you first said it ...but it works , the car looks really great.....
Tony , On my way back from Sam's birthday party last night , I sneaked down your road and took a look at the car quickly ...looking pretty cool....wasn't sure about the colour choice , when you first said it ...but it works , the car looks really great.....
pity I missed you Gary, I was down the pub for Jayne's birthday!
I have taken the circus tent down this morning and it looks even better in daylight and outside! Glad I dared to be different from the Red and Green ones!
I got a little bit nearer to the shakedown run, with a few more bits and bobs done.
I put on the number plates and mirrors, and painted the wheels black.
I got the engine started after taking out the starter motor and cleaning the brushes and commutator, and getting the plugs leads on the right way round! (luckily I took a picture before I stripped it down, so I could refer to it for an easy solution!)
So the engine runs, and clutch works, the only problem is a hole in the radiator! I know about it and hoped it would be okay with Radweld or the like, but when I started putting water in, it just came out as fast. I will take it to a local rad specialist this week and get it re-cored.
I still have to get my seats back, so there is no rush with the radiator for now, and also I am getting a new fibreglass tunnel as my original one is now bust and so i will put a new one in.
So I am very close to being able to go out for a spin and my aim is for the Poole Quay open top sports car night on the 1st June. It should raise a few eyebrows as noone will know what it is!
Oh, and I need to get some decals for the side, but I am not sure what to go for...
...luckily I took a picture before I stripped it down, so I could refer to it for an easy solution!
Excellent advice. Wish I'd taken loads of pictures as I'd stripped my donor down. I didn't bother because I just thought to myself 'I'll be able to remember where that wire on the back of the fuel gauge goes' but it's a year later and I'm scratching my head with some of the connectons to the instruments.


 and getting the plugs leads on the right way round! (luckily I took a picture before I stripped it down, so I could refer to it for an easy solution!)


