MadaboutKitcars

This is a read-only archive of the old Madabout Kitcars forum. New posts and replies are no longer possible, but every thread is still here to browse and read.

G46 V8 Mk1

13 Jan 2013, 6:11pm
Good effort. Love the exhaust recess.
13 Jan 2013, 10:23pm
Great to see your G46 special progressing. I think people underestimate the amount of standing back / thinking time involved.

(I wonder how many cups of tea are imbibed in the course of a project...)
22 Feb 2013, 5:58pm
Looking forward to braving the cold and getting into the garage when i get back, definitely want to finish the wheel arches whilst i'm back.......... i've got 7 weeks ! ................... Many a cupa T will be partaken in !


Charlie.
23 Feb 2013, 8:51am
llooking forward to see more .. i think its going to look great some great work done .
29 Apr 2013, 6:02am
Updates

First this is a test as I wrote an update last night with photos went to enter post and lost the lot.


lets see if that worked
29 Apr 2013, 6:11am
Yes it did

We have been working on three new areas of the car:-

1. The front head lights
2. The rear end
3. The windscreen position

Apart from still working on other aspects of the body. As you can see from the to see we made a new head light position over the weekend we wanted to get rid of the idea of a lens cover as we thought that beyond us and also wanted to reduce the bulk when view from the side. Back to the Ferrari 625 TRC for guidance.


This has reduced the height of the light above the ground, extended the wing line and reduced the width of where the light was sitting which was a little lost due to the width of the wing at that point.

Lots of foam, fibreglass and filler and endless repeated filling and sanding to get the shape


The sides look a little angular in the photos but they are not they slope with nice curves. The red cardboard cut out head light is 205mm dia which is enough for a 7" head light and surround, just occurred to me we need a position for a side light and indicator.

Back to work now will post on the rear end and the windscreen later in the day.
29 Apr 2013, 7:04am
That's an improvement to the styling imho, well done.

Are you doing the other side the same? :drum:
29 Apr 2013, 7:29am
Mister Towed wrote:
That's an improvement to the styling imho, well done.

Are you doing the other side the same? :drum:


Dooh! you know what it like bugger one side up first!
29 Apr 2013, 8:05am
Looking good. More elegant than the original.
29 Apr 2013, 9:18am
Rear end

As shown in earlier posts we "bob tailed" the rear end.

Have experimented with flat rear panel and that did not add anything to the styling so we decided to form a new rear end using the cut off part.

What we wanted was a flat rear end to take lights and the number plate but wanted to mould that into the top sides and underneath of the reshaped rear wings so we made a new panel up so here is the effort, this is a long way from finished and just stuck in position at the moment.


we frenched in the number plate and rear lights partially but not sure if the light position works and there is some shaping to do as the bottom panel meets the lower side of the rear wing.


As I said not sure about the rear light position or where reverse or fog light may go I think they will hang down as additional items as this period never really had them as standard

I guess with both the front and rear lights we are not going to get into all the silliness with the SVA poistion above ground and all that as this is a re-bodied car?


Still might loose the filler cap hump and make it a smooth line across the back.
29 Apr 2013, 4:29pm
The headlight position is now pretty much correct IMHO.

Also like the change to the rear.

Can't answer the SVA (now IVA) query. Someone on here can probably define a 'Re-Bodied Vehicle' versus a 'Radically Altered Vehicle'..?

Look forward to more updates.
29 Apr 2013, 7:16pm
Front End

Charman.tech wrote:
Yes it did

This has reduced the height of the light above the ground, extended the wing line and reduced the width of where the light was sitting which was a little lost due to the width of the wing at that point.


The sides look a little angular in the photos but they are not they slope with nice curves. The red cardboard cut out head light is 205mm dia which is enough for a 7" head light and surround, just occurred to me we need a position for a side light and indicator.

.


Great work Chairman

I like the new light position it makes the front wings look really muscled!
It must make for a huge area of bonnet from the top of the light to the screen.
Have you dropped the lower front edge of the light cutout by about 5cm?
This alteration would help my build as the headlight pods are hitting the existing inner wheel arches, which I am keen to retain.
However the sleek looking lights was one of the points that sold the Kit to me.

I think the rear looks fantastic, certainly going to make a beatiful car.

I have a 356 screen to fit to mine so I will be very interested in your next posts as Andrew Hush has cut his skuttle top quite a bit to get a screen door gap similar and I think I will have to do similar.

HM
30 Apr 2013, 7:00am
G46 Screen

HM

Yes the light position is at least 50mm lower then the original location and 170mm forward, I will check the dims and post them latter.

We never considered using another screen other than a cobra but that is to flat and looks to cobra.


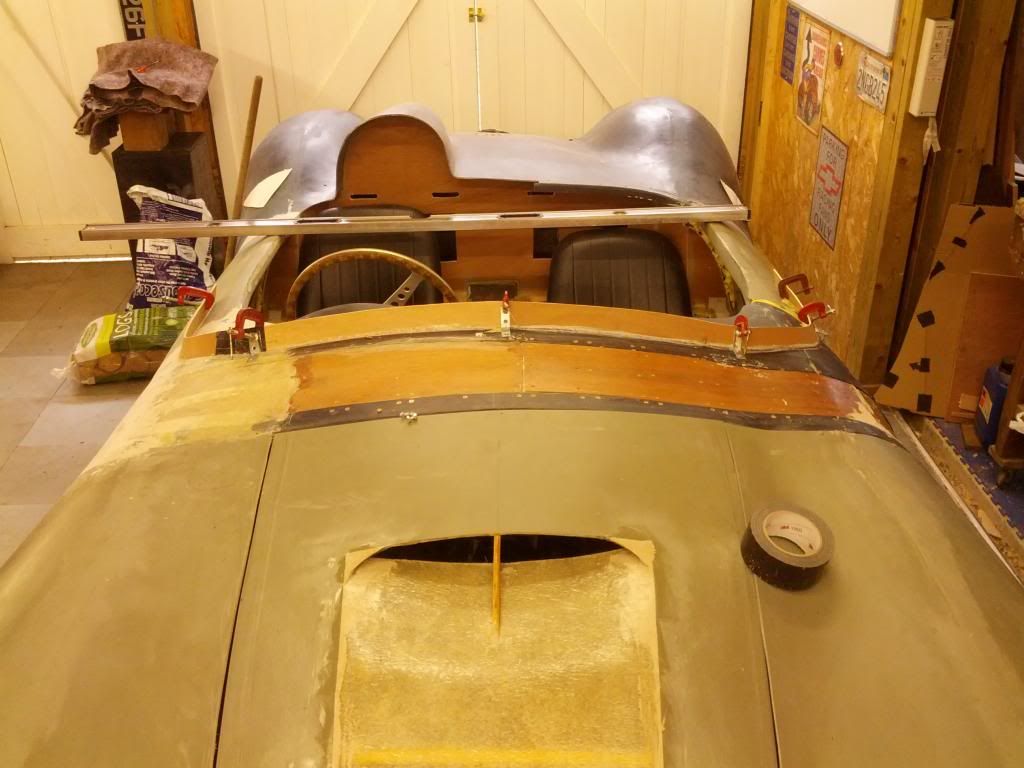
The screen as it curves over the bulkhead / scuttle is fairly flat on plane bu 0mm at the centre dropping to 62mm one side and 50mm the other we form that part of the template in 4mm ply but could not get that to work going thru 90 degs back over he doors so we formed that in heavy paper


This shot shows the rake and curve combined. The height of the screen or length back across the doors has not been determined yet nor the height of the screen but concious of the regs surrounding windscreen wipers.


I am fairly sure we are going to make our own screen rail bonded into the body work at the various contours at the correct angle for a perspex screem to fix to.

Can anyone recomend a supplier my thoughts ar that the screen material is bought in sheet form (flat) cut to a flat template fix to the car and heat gunned around the curves, I will have to look on utube! (font of all knowledge
30 Apr 2013, 7:02am
boot lid

Just found a shot of one of the boot lid configurations considered along with the "bob tail"


consigned to the cutting room floor
15 May 2013, 9:16pm
G46 Lights

CT I am thinking that this talbot look might work on G46 with the addition of some sugar scoops..maybe


HM
16 May 2013, 7:05am
HouseMartin wrote:
CT I am thinking that this talbot look might work on G46 with the addition of some sugar scoops..maybe


HM


HM

Uncanny how similar the lights are to the G46.

I am for the benefit of my son Charlie going to add photo's displaying my skills of transferring from my phone to the computer and from there to photobucket and to the forum, only slightly harder than building the car.

http://s1135.photobucket.com/user/charmantech1/media/IMG_20130511_144353_zps3f33bc1b.jpg.html?sort=3&o=0

http://s1135.photobucket.com/user/charmantech1/media/IMG_20130511_144353_zpsa0ae0465.jpg.html?sort=3&o=1


http://s1135.photobucket.com/user/charmantech1/media/IMG_20130511_144337_zpsca30b7a3.jpg.html?sort=3&o=2

These may have failed I will have to post first and see
16 May 2013, 8:22am
Hope I'm not teaching you to suck eggs here, but the final step is to click the 'img' tab in the drop down menu to the right of the image, then right click and paste in your thread -


Nice pic's btw.
16 May 2013, 7:08pm
Replacing the "url" at both ends of the file name with "img" gives...


I do like this build and might steal the idea of shaping plywood to match the hump. :cool:

Good luck, Paul. :)
16 May 2013, 9:37pm
Paul L wrote:
Replacing the "url" at both ends of the file name with "img" gives...


I do like this build and might steal the idea of shaping plywood to match the hump. :cool:

Good luck, Paul. :)


Thanks for the tip I will try again or ask a small child to assist.

The ply you see bent and shaped over the bulkhead took several attempts after snapping in sections at different places at different times then I realised it dependable on the where the laminations of the ply ran being more difficult to bend in some places, so I had to re-cut the template so the point that needed the most bending fell in the right place on the sheet of ply.

Still got half of the screen rail glassed this evening took a photo but there is no way I am going to attempt loading it now.
16 May 2013, 9:55pm
nice steering wheel

CT. Thanks for making the effort to post the pictures.
It is really good to see your build progressing so well.

I love the steering wheel, it goes well with all that ply.
Are you going to varnish all that wood?
Nice side vents to.
I see the passenger will get more protection from the screen being a lot lower
Have you bolted the seat to the chasis rails?

I have been cutting out my floors tonight so I can get my legs under the steering wheel. I will also need to shift column about 2" towards the centre as the door wont shut with the scimitar 15" wheel.

Unfortunately my 356 screen does NOT fit the bulk head.
The Sammio bulge raises the centre too high.
So the decision is to recess the screen or
create a fairing around the sides to lift the bodywork to the screen.

I must follow your example and post a few shot of my build.

HM
17 May 2013, 6:49am
HouseMartin wrote:
CT. Thanks for making the effort to post the pictures.
It is really good to see your build progressing so well.

I love the steering wheel, it goes well with all that ply.
Are you going to varnish all that wood?
Nice side vents to.
I see the passenger will get more protection from the screen being a lot lower
Have you bolted the seat to the chasis rails?

I have been cutting out my floors tonight so I can get my legs under the steering wheel. I will also need to shift column about 2" towards the centre as the door wont shut with the scimitar 15" wheel.

Unfortunately my 356 screen does NOT fit the bulk head.
The Sammio bulge raises the centre too high.
So the decision is to recess the screen or
create a fairing around the sides to lift the bodywork to the screen.

I must follow your example and post a few shot of my build.

HM


HM

I have had the steering wheel for 43 years which came off a Vitesse that was owned by a man my dad worked for, can't tell you how many cars it's been fitted too. It is to big I only used to use it for show on my MGBGT and Hawk 289 (should note they are previously owned cars) but regularly drove them with a smaller wheel. I must check the diameter? Constantly rapping knuckles on the body work or turning indicators on!

No the passengers side is just sitting at a skew and the drivers side is the height they will sit which is above the chassis rail, however I will look to see if I can get them to sit at the lower level with a bit of cutting and chopping. We are also going to cut the hump out of the floor where the original front seats sat as its to tight on the back of your legs and makes pedal functions dangerous, jobs for Charlie when is next home.

Yes it's known locally as the "Plywood Special" Ronseal has been suggested as "it does what it says on the tin"

I see your dilemma with the screen time for cardboard templates and lots of standing back and looking, love to see some photos.

CT
17 Oct 2013, 6:53pm
More filler!

At last we have done a little more work on the car and here are some photos, the first one is to show what odd shapes expanded foam can make overnight