This is a read-only archive of the old Madabout Kitcars forum. New posts and replies are no longer possible, but every thread is still here to browse and read.
Yeah, bonnet latches ordered from Marlin leaving just the interior and few extra P clips for pipe work to do! Lights still need connecting up and the exterior made SVA safe!
Yeah, bonnet latches ordered from Marlin leaving just the interior and few extra P clips for pipe work to do! Lights still need connecting up and the exterior made SVA safe!
Hi Patrick
Have you sourced the mirrors yet? I have been looking around and there seem to be very few that are "SVA" friendly.
I have a set of plastic mirrors from Halfords to go on for SVA, I also have set of chrome bullet mirrors to go on afterwards!
The nice thing about the plastic ones is the mount holes are universal so I can mount the chrome ones then put plastic ones in the same holes for the test - they are the same as the ones that were on the customer car at Stoneleigh..
Due to the exhaust being really very loud with just the magnaflow boxes we've decided to add a pair of Jetex micro mufflers. The clamping method of holding pipes together proved not to be a brilliant solution so we've decided to weld all but a few of the connections.
Extra Jetex micro mufflers welded on - the bend has been welded as well.
Richard's welds are starting to get good, it was almost a shame to grind down the metal!
Exhaust is finished, needed one more weld on the front of the angled part to extended it a little. On the straight side the front part of the exhaust need about 8cm chopping off as the muffler was longer than the original pipe.
Only clamps left in the rear of the system. Decided to double clamp these ones to avoid any leaking.
Here it is from the back, left had side still has space for the secondary clamp, driver side will need a modified one round the muffler.
We finished sorting out P clipping and zip tying the the fuel lines at the back, bolted down the drop links for the anti roll bar and tested the rear lights!
The rings are a bit bright for normal rear lights so I think those will need dimming - a pair of rings wired in series should do the trick! Or it needs brighter bulbs in the red centres. Needs a bit of experimenting.
Also fitted two stainless hose clips on the steering rack to limit the movement to avoid damaging the brake lines - was an easy task. Take off the rubber boots put the hose clips in place and bolt down tight!
Rear lights in series doesn't work - far too dim! So plan B needed. The brake light bulbs (middle ones) are 21w so they should be bright enough. I'm just worried that its not obvious enough of a difference.
Did a bit more tonight - put some more P clips in on the brake lines at the front of the car and zip ties where I couldn't get P clips in. Also zip ties all the electrical cable around the bottom of the engine bay. Finished off by trimming back the scuttle above the gauges so the fit in properly!
I don't think anything other than a proper job would satisfy the SVA. Anyway if you rivet or bolt something on it would probably mean more holes to potentially leak. I think I would go back to Marlin and see if they will fix it. Bit of a pain 'cause it will mean draining the tank completely and probably rinsing it out with something (water - not sure?) to get rid of any trace of petrol before it can be welded.
Interestingly - my tank does not have baffles - I wonder if that's why they
stopped fitting them?
The hylomar stopped the it completely no stains or drips. So it doesn't need much.
This is in fact the 3rd hole in the tank. Two others I've already had fixed.
Guess what I'm pulling the tub back off again this weekend! I know someone who can do a bit of welding for me.
I have got the kit at home but no clue how to weld ali - other than its really not easy! The two states of amature ali welding - it doesn't stick or I've got lots of holes!
I got the tank modified as I was told there were no baffles.
During modification the company that did it said look there's baffles in there. That had me confused!
I then got someone I know to patch the last two holes as the company where I had it done didn't really want to do in the first place (insurance for car stuff or some such rubbish)! I'll be going back to him to fix this one. Although I'm not sure he'll be enthused about weld a tank that's had petrol in it.
Marlin specifically state (when you pick the tank up) you need to get the tank tested, so I guess the answer is no they don't test.
I have some of that POR tank sealer stuff but wasn't sure about using it. Didn't want bits flaking off and blocking holes up.
Yesterday we did some work on the dash and bought some square steel tube to use as seat frame mounts.
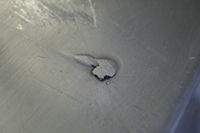
Today we fixed the tank which we found another leak in! After much head scratching Richard spent some more time practising a bit of ali welding - really not as easy as you might think. However the tank only need a blob on an existing weld to fix it. So we gave it a go (after a very good cleaning and a stand overnight)
Here's the problem:
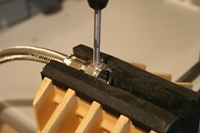
And here's the fix:
Took two goes, first time there was a tiny amount still coming out second time round nice an sealed up!
Also spent time adding nice covers to the wiring for the head lights:
As tub has to come off to take the tank out and seal it up we spend some more time on this cleaning and adding more bolts to hold it on. Also added some sponge under here to reduce any rattles.
The other project that's been knocking about for a bit is the glove box. Would have wanted to weld this but it's just not a viable option for beginners without any training! So we riveted it instead, just don't look to closely as its not really straight ;o) But a bit of material to cover it up and that will hide the imperfections! The glove box will house the fuse box - needs a bit more tweak before it's 100%.
Also spend more time zip-tying wiring in the engine bay and adding extra support. Added one extra P clip to the fuel lines. There was one part where the distance between clips was 35cm - I think I read somewhere it needs to be every 30 at least for SVA - not sure if that right but better too many than too few!
really great those lines instead of the shower hoses.
Am I correct understanding your english that these are lines that are used by plumbers to connect waterlines? That's how it looks to me.
I must say that this is such a thing that cost a bit but makes the car look far more expensive. Price compared to looks are on the good side of the scale. Nice work.
Me?
by your pictures I started fitting the rear tub last weekend with good confidence.
Problem is that by now I now for sure my doors are distorted...
Me?
by your pictures I started fitting the rear tub last weekend with good confidence.
Problem is that by now I now for sure my doors are distorted...
Peter-Jan
Peter-Jan,
don't panic about your doors. I thought mine were badly distorted. (They looked like bananas when placed together)
Having just fitted my second door today, i can assure you that they do fit.
Two tips:
1) first, put spacers behind the hinges until the door is level with the chassis, then
2) cut small pieces off the rear tub where it rests on the chassis (near the door striker pin) until the rear tub is parallel to door rear face
Don't forget to fit the rear bumpers first, because this sets the correct height for the rear tub.
really great those lines instead of the shower hoses.
Am I correct understanding your english that these are lines that are used by plumbers to connect waterlines? That's how it looks to me.
I must say that this is such a thing that cost a bit but makes the car look far more expensive. Price compared to looks are on the good side of the scale. Nice work.
Me?
by your pictures I started fitting the rear tub last weekend with good confidence.
Problem is that by now I now for sure my doors are distorted...
Peter-Jan
Yes they are for connecting water lines
My doors needed a bit of adjustment - they do need to be banana shape as Peter said.
A table edge and carefully putting your weight on either end was my solution!


 better get my sunglasses!
  at the back where one of the internal baffles are welded on.
 and it should be a permenant fix.