This is a read-only archive of the old Madabout Kitcars forum. New posts and replies are no longer possible, but every thread is still here to browse and read.
Yes, very satisfied, it's taken all day but I finished about 9pm. Head a bit numb, tired. Just hope my back holds out, I can't do standing for long periods.
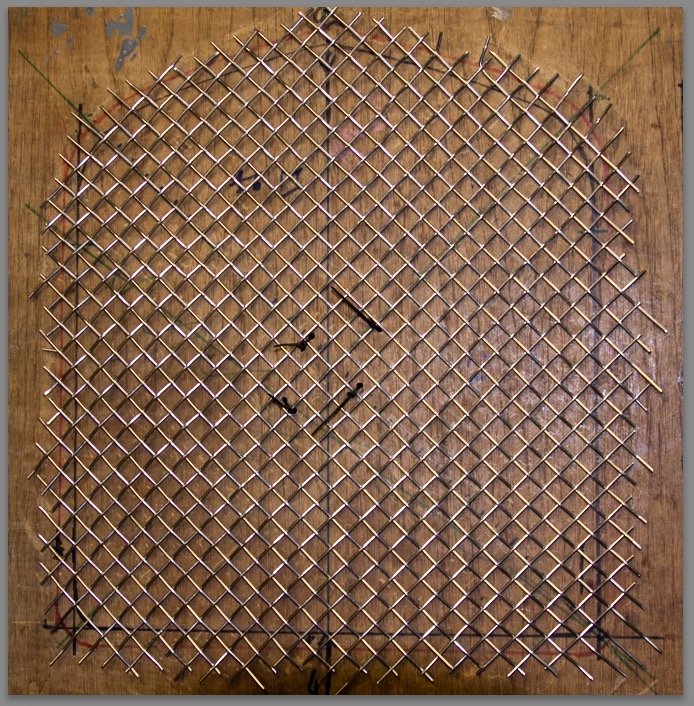
It was touch and go if I had enough rods, but in the end I had one and third left, almost no wastage. I want to try to wrap the rods around the frame and weld the occasional one to make it solid. I think if I weld all of the wire/frame connections it will distort big time, even though it's relatively light, I think it could wreck it, so I will be very wary of that. I also have to weld some small fixing brackets to the frame, so I can attach it to the nose cone, neatly and securely.
Need to get onto the dashboard next, that's about the last big challenge. Seems we have a couple more nice days before the rain returns so I need to make the most of it.
Being a tight sod, I always used to weld the new rod onto the previous rod so as not to waste the last 100mm or so. I think they will tack to the 4mm frame rod OK. We will see, IF I can arrange for some argon of course...
Have you ever tried welding lead with TIG? It works a dream, about 5 or 6 amps with a WT9 torch. With careful setup no filler rod needed.
Never welded lead,only steel,ally, stainless and even titanium.
I think welding them to a frame will be no problem,but i thought you wanted to tack some places in the mesh you made and that is something i would'nt risk.
No, never intended to weld the mesh, only to the frame, and then only a few tacks just to stop the stainless mesh 'walking around'. I aim to wrap the ends of the mesh wires around the frame rod, if I can.
I just wondered if you had come across lead, it was the original reason I started using TIG, my little ESAB DC set goes down to about 4 Amps and is perfect for the job. I used to lead burn with o/a but it's very slow and skilful, with TIG it's a doddle and so fast compared with gas. Really just trying to spread the word. You can use AC or DC but DC does the job provided you clean the joint first with a scraper. AC tends to splatter the joint with the cleaning effect, lead being much softer than aluminium it marks the metal badly.
I did a lot of Lead work on church roof restorations and large houses in the area, very interesting.
Thanks Paul, my visiting experts are well impressed, I have a succession of visitors most days who are retired shipyard workers on a wander, they tend to stop by and check out what I am doing, keep an eye on me so to speak. The grill had drawn several complements. One neighbour tells me he has a spot welder which he thinks will weld the mesh to the frame neatly and without the distortion which I could get with TIG. So he is bringing it home for me to try tomorrow evening.
I have never used a spot welder so it will be a new experience for me.
I have cracked on with several undocumented tasks like making an access hole in the gearbox cover, so I can top the gearbox oil without needing to go under the car.
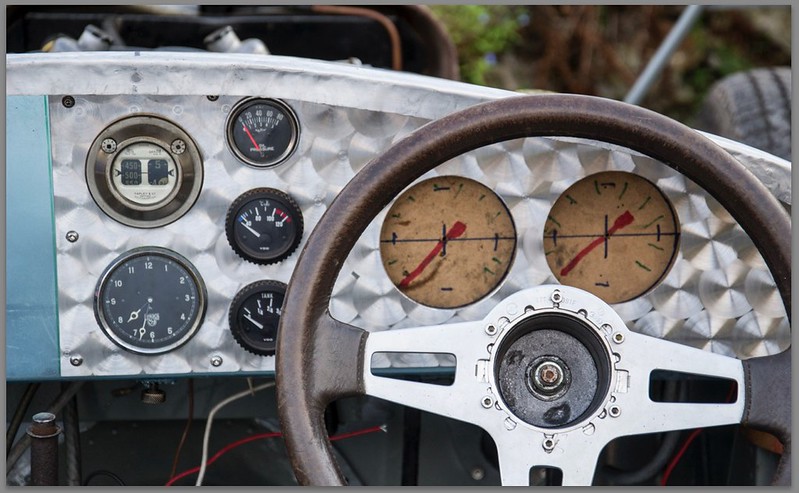
I have started to make the finished dashboard. In the end I have opted for 1.5mm aluminium, I plan to spot finish it (engine turn). I still haven't decided exactly how I will present the dials. I have laid out the positions and folded the shape, the dash is bolted in and just need fine adjustment in the morning, too late for the tap, tap, tap of my panel beating hammer now! I have to take the dash back out again and cut the holes for the oil pressure, water temp, fuel and to mount my old clockwork clock which I intend to fit. I also have an old Tapley meter, it sort of the reverse of the old brake testers they used to use for the MOT, except it measures acceleration or the steepness of hills, a sort of inclinometer. If I can I would like to fit that in the dash too, I am sure there is room, it works perfectly.
Started in earnest on the dashboard today, in between a spot of sunbathing before the dull weather returns at the w/e.
I had folded and shaped the back section yesterday but overnight having read Scotties sad account of his wiring problems I decided I had to make access to the wiring easier, just in case I need to get to things. I have some 'spare' 2mm sheet which I had earmarked for the base of the back seat... However, first come, first served, so a chunk of the 2mm aluminium is now my dash! There is still enough left to make the back seat but I still have the other half of the dash to make...
The trouble with these jobs is as soon as you finish you see an easier and better way of doing it, so I have been mentally making dashboards for days now each better than the last! Today I turned thoughts into reality. What do you think?
My attempts at spotting the aluminium aren't perfect, I have missed some little bits but it's good enough, it's the overall effect I am after.
I need to obtain some glass for the speedo and tacho and mount the dial subframe properly behind the dash. Once I have mounted it I will start running the wires and adding the four switches. When I have finished the rough work I will fit the speedo and tacho dials and final fit the scuttle. I also have to mod the printed circuit board because this afternoon I chopped it down with the angle grinder to fit the greatly reduced Rover dash.
I don't think I HAVE to have hazard warning flashers but I think it's a good idea to have them anyway.
I have had a dig amongst my electrical junk and come up with this Lucas 152 SA switch. It seems to have been a very common switch on BMC, Triumph and most other Lucas based cars and commercials.
However, I can't seem to find the pinouts to suit a single, two pin flasher unit. I have found Triumph Spitfire wiring diagram but that seems to use a second flasher unit for the hazards. I suppose it's not a big deal but I prefer simple solutions where possible.
Also, none of the diagrams specify the actual pinout numbers for the switch, can anybody help on this please?
Thanks for the kind words Paul, I spent some time with a test meter and have concluded pins 1-4 are all separate in the 'OFF' position and are all connected in the 'ON' position; pins 7-8 are connected in the 'OFF' position and are separated in the 'ON' position.
From some research looking at writing diagrams of numerous cars it seems there are a confusing variety of configurations using the switch.
Generally two flasher units are used, the 'normal' one and a dedicated four way flasher unit. When the switch is set to off, the normal flasher unit is fed via pins 7-8. When on, that connection is broken and pins 1-4 connect both side indicator circuits, the output from the four way flasher unit, and the four way flasher warning lamp.
I plan to create my own hybrid circuit using most of these features inc. two flasher units and separate indicator warning lamps, left and right.
I am currently fitting the warning lamps and switches into the dash prior to wiring them up. One sticking point is the stalk switch, I had one which came with that car but having spent a couple of hours fitting it, it refused to work properly and finally fell apart. :roll eyes:
I know I have two more , I found one which was missing half it's innards, the other is in hiding... So Monday may see me visiting my favourite breakers yard...
The spot welder has arrived but the metal to form the grill frame has not. I tried the spot welder on two 2.4mm rods and it welded them instantly. I don't see any difficulty in spot welding them to a 4mm rod.
No worries Ben, thanks a lot. More info is good, there seem to be so many ways this switch is used. I am starting to get the hang of the circuits though.
Hi robert loving the build, when I had problems with wiring of my hazard switch I referred to The CBS catalogue (car builders solutions) I found there diagrams and explanations of the the switches helped me.
Thanks Groobster, Lot's of useful info in their catalogue, I have downloaded the PDF. The DIN standard list of pin numbers is something I have wanted for a while, it's on page 196, very useful. I may see if I can get the paper copy if they do one.
Well another month has passed, good progress has been made.
I am currently at 96.29% Slightly distorted by two small jobs, I have realised since the car became drivable that the front flexy brake pipes are liable to rub on the upper wishbones, so I need to address that by re-fitting the bracket and solid pipes that were on the car when I got it.
The other silly job is the clutch master cylinder is weeping, it's a Marina master cylinder and is from my original Roadster build so my guess is the bores will be corroded/scored so I need a new master cylinder, I rarely have had success just fitting new seals. The concern is that currently available master cylinders may have different bolt fixing centres. I DO NOT want to have to take the pedal box out at this stage...
Other than that it's just a matter of finishing the wiring and fitting the wings.
My pace of build has relaxed slightly, especially since the nicer weather came along, I am in no great rush, I enjoy the build as much as anything so why rush it?
I spot welded the edges of the grill yesterday, that has made it much more rigid and prevents it from 'lozenging'. I have some stainless 'U' sections to form the edges with much like the original Alfa grill, my problem with that is the stainless is much too hard to curve around the corners, so it will need fabricating and welding. Sufficient incentive to get my TIG welder working.
I made my grill frame from stainless U profile. I used a very simple set of adjustable rollers to bend it.
I'm sure you'll be able to knock something up to replicate the set up.
The only advice I can give is find a piece of flat bar that is the same internal width of your u profile and insert. Then roll first, pushing the profile forward and back through the rolling mill slowly increasing the bend setting, and do not nick the inside until you have the bend you want - just let it twist as you roll it. The inside obviously has a tighter radius so has to lose material somewhere, but if you nick it first I found that I could not get an even bend, it just creased at the nick.
Let it twist, get the basic bend as you want it - it will look like a twisted swan neck! Then nick the inside with a slitting disc and take the twist out, and weld back up. Mine looks fabulous - but did take a long time.
I made mine from at least 4 or 5 small sections, cut along the straights - that way I could make a perfect bend for each part of the cowl, and then cut and join them to the right length.
Have a look at the very simple rolling mills I knocked up using three bearings and a bit of U profile I had lying around.
I used a couple of bolts and bits of angle to gradually pull the rollers turn by turn to increase the bend until it matched the cowl.
That's brilliant Mike, looks really good, thank you for posting those images, I like the roller idea.
Being an awkward old sod I want to bend the 'U' section the other way... To wrap the edge of the mesh, rather than as a frame like you have made. I want to mount the grill in front of the nose cone, not within the aperture. I have tried curving it edgewise and it's a definite no-go, even a few degrees needs extreme force which destroys the shape. Maybe with proper press tooling but not improvised, hammer and vice! Eventually I plan to make a stainless or aluminium nose cone, then I will be able to mount this grill in front again. If I make it fit within the aperture I will be stuck to making the aperture exactly the same, which will make it much harder.
My biggest concern is whether I can weld this thin polished stainless neatly and without making a mess of it. It must be nearly 30 years since I did any TIG welding, it's one of those jobs where you need to practice regularly to make a sparkling job (no pun intended!). I plan to give it a go, I have some spare bits of stainless, if I can't do it to my satisfaction, this place is bristling with some of the best welders in the business, so somebody will be able to do it for me, but I really want to do it for myself.
Having the profile fit over the mesh was my preference, but I soon gave up on the idea! I compromised by having the outer profile leg longer than the inner profile leg, and welding the mesh to the outer leg so that it could not be seen.
My profile is also 40mm deep so it was possible to have it fit inside the cowl, yet also project 10mm forward of it.
I did not weld mine, I used a mate who welds stainless for a living!
Good luck with trying to profile yours in the other orientation!
Could you do it the way I have, and then weld a flange around the outer edge to give the same look that you are aiming for? This could then soak up any tolerances against your future nose cone? Just a thought...........?
I'm currently embroiled in the wiring, I have finished the dash and the front end , I have worked my way to the back now. One side nearly done, making some numberplate lamps at the moment, then it will be the other side.
I am adapting some GM numberplate lamps, because I have loads of them and they are discrete.
Mentioned in another thread; I seem to have developed a dodgey knee in the last month or so, not helped by all the kneeling I am doing atm. Off for an X-ray tomorrow so should know something next week.
Both front and rear wings are now fitted, once all the wiring is done I will be final fitting the scuttle and bonnet. That will only leave a few minor tasks to complete before the MOT. One of those will be to replace the clutch master cylinder.
If it's fine over the weekend I will take some photo's of the car outside, unless you really want to see a messy pile of coloured spaghetti?
Good to see you cracking on at the jobs, my knees used to give me greif I thought I was going to have to pack in building and get a real job, I got some dickies overalls with the knee pads built in and one day they just stopped hurting so much, I now have cargo shorts and bib and brace as well as several overalls with them in,the only problem is you get used to kneeling down fast and sometimes I slam down onto the kitchen floor whilst looking in a cupboard which hurts a lot when padless, now if only they did pads for backs. Ed.
When I was working in my heyday I worked on heavy machinery, welding girders, lifting digger buckets, wagon and digger wheels, putting bulldozer tracks back on in two feet of mud etc, etc.
Since I stopped all that stupidity my back has been really good, gone are the regular pain killers and anti inflamatories, I can still lift the occasion engine or gearbox if I really want to but I soon know when to stop! The sheer joy of being pain free is a great release, but that said, to have had my career which I don't think I would swap, the heavy lifting came as a part of it.

 hoto:
hoto: 



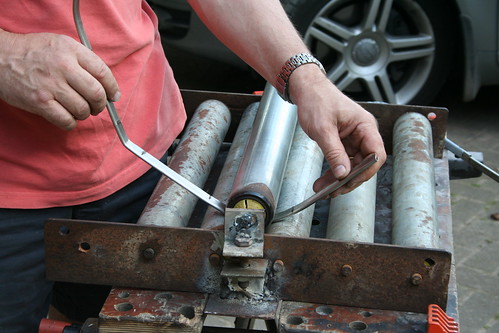 Rolling Mill No. 1 by Mike's Marlin BMW Cabrio, on Flickr[/IMG]
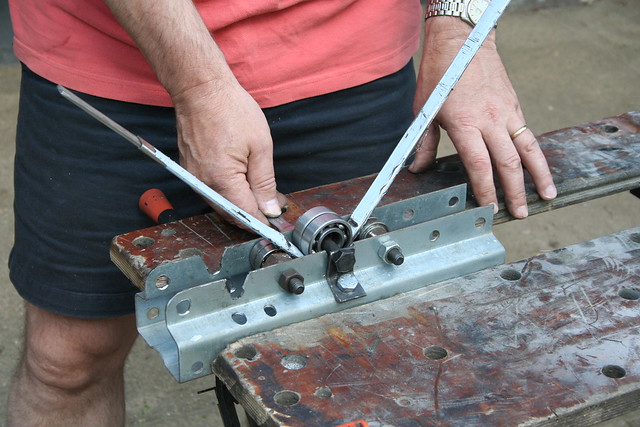 Rolling Mill No. 2 by Mike's Marlin BMW Cabrio, on Flickr[/IMG]
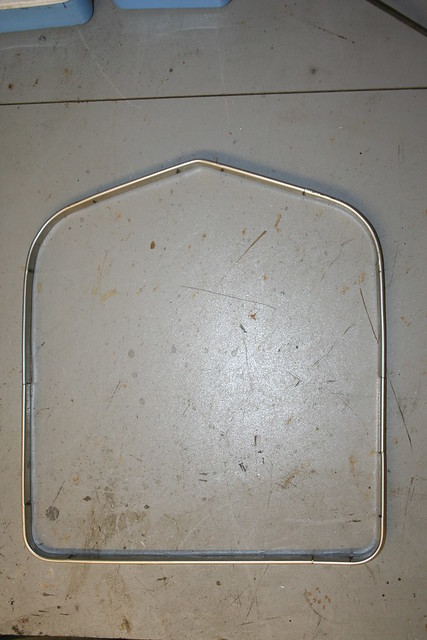 Grille Surround - A Work-in-Progress by Mike's Marlin BMW Cabrio, on Flickr[/IMG]
 Grille Surround WIP on Stainless Mesh by Mike's Marlin BMW Cabrio, on Flickr[/IMG]
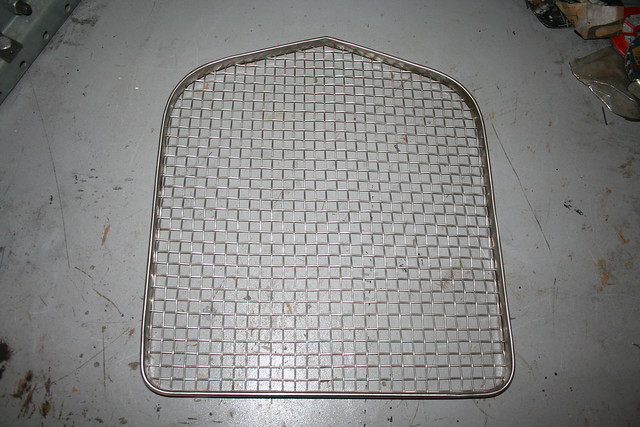 Grille Welded by Mike's Marlin BMW Cabrio, on Flickr[/IMG]
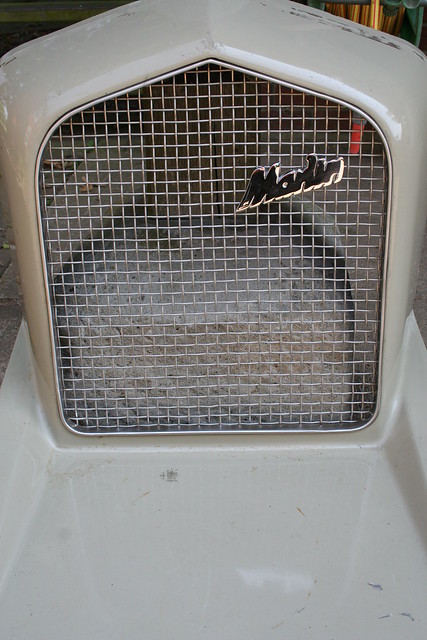 Grille Fitted by Mike's Marlin BMW Cabrio, on Flickr[/IMG]