MadaboutKitcars

This is a read-only archive of the old Madabout Kitcars forum. New posts and replies are no longer possible, but every thread is still here to browse and read.

Build progress

30 Apr 2007, 10:10pm
What they didn't even ask you?

That's a poor deal.........
30 Apr 2007, 10:25pm
yes they did ask - and i sent them photos with the condition that it clearly states where the pics came from.
1 May 2007, 10:56am
Oh well, at least they asked!
2 May 2007, 8:36am
peterux wrote:

"Within hours the body was assembled on the chassis, another tribute to the quality of the kit."


Its perfectly true lol.... They just don't say how many hours, 10, 100, 1000, 10000.... :eusa_shifty:
3 May 2007, 7:42am
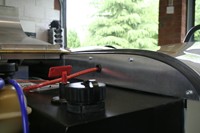
Cold air will be taken directly from the outside world through this ali intake.


The chicken mesh to stop small animals nesting in the engine - and stop it sucking up larger lumps of dirt from the front wheels. Some kind of mud guard may be required on the front wheels.

3 May 2007, 8:48am
Is that the intake from CBS? I was thinking of using one of those myself when the time comes.
6 May 2007, 5:36pm
It was another good day out at Stoneleigh today! It was great to meet up with all of you again this year - next year we'll all be in our cars I hope! :D

Lots of pictures to take a look at here


Also picked up from parts from the SVC stand (nice chap I bought the fog/reverse and indicators gave me a discount!) Also got some new head lamps - these use standard H4 type bulbs!


7 May 2007, 5:11pm
If ever there was a job for two people its putting the bonnet on! Took a lot time of measuring, eyeing up and fiddling.


This is not 100% final yet. The whole panel is slightly over size most of the way round by around 1mm to allow for fine tuning once everything else is in place. With the clamps in place this will side nice and flat the whole way along - right now the masking tape is not holding it very well!


Hinge attached at the scuttle - will be putting a pictures of the front up too but the file for that one broke for some reason!


Biggest tip we can give here is getting a permanent marker and draw lines and guides everywhere - the rubber moves around a lot so by drawing your ideal line directly on the scuttle and nose cone you've got a line to follow.
7 May 2007, 9:22pm
Patrick wrote:
It was another good day out at Stoneleigh today! It was great to meet up with all of you again this year - next year we'll all be in our cars I hope! :D


Yes, it was ood to meet up. Thanks for all the great pictures, especially as I forgot my camera this year :der:
Some of those cars are real inspiration to get the car finished.
I had a good shopping spree getting headlights, number lights, side repeaters and all kind of bits of trim, wing piping, etc. Just need to find the time to fit them all! :D

That bonnet fitting looks a real difficult job to get right!

Good luck with drilling those holes......
8 May 2007, 8:41am
No problem :) I just notice I can't use the fogs, reverse or indicators for the SVA test as they don't have E numbers on them! Doh.

It was nice to have a look around some finished ones, answers a few questions! Also had a long chat with the owners of the customer car at the Marlin stand - just can't wait to get out and drive it properly now! :D
8 May 2007, 12:02pm
Patrick wrote:
Also had a long chat with the owners of the customer car at the Marlin stand


So did I - really nice couple, who where very helpful, answered every and any question put to them without any Marlin bias. And they're obviously besotted with their car - and with good reason! :)
8 May 2007, 9:48pm
Patrick wrote:
No problem :) I just notice I can't use the fogs, reverse or indicators for the SVA test as they don't have E numbers on them! Doh.


I can't believe those lights were not e marked! You'll have to fit some cheap e marked ones and replace them after the test :D

It's still not clear whether the lights have to be E marked or just have an equivalent brightness. The SVA manual implies that they do or equivalent, but doesn't list 'No E mark' as a Reason for Failure?

Anybody know what the other letters are in the SVA manual lighting table under the 'Approval Mark' column?
8 May 2007, 10:23pm
hmm another SVA grey area....

I do have the generic trailer lights from marlin, and the indicators to use so that's not really a problem. I'll just have to fill the mounting holes that I wont need any more after the test!
12 May 2007, 4:23pm
Patrick,

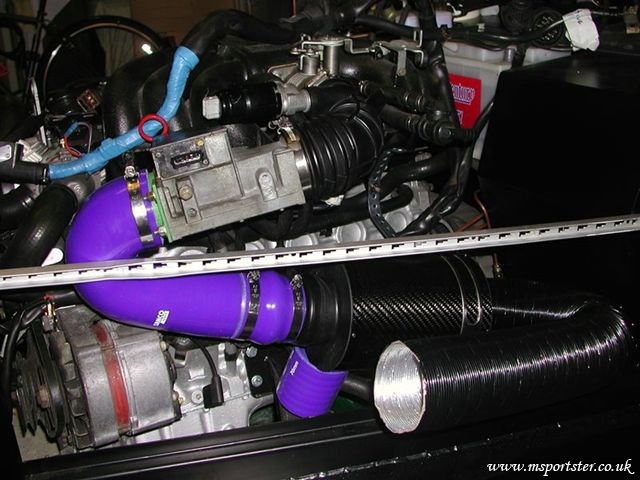
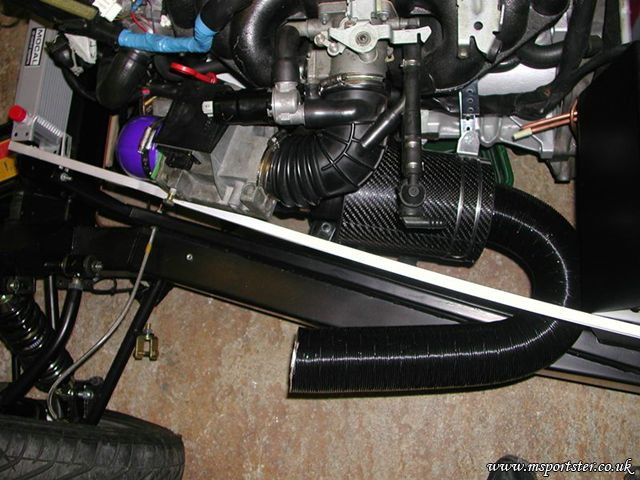
Any chance of a photo of how the airintake connects inside the engine bay please? I've been pondering where the air for mine is coming from and whether I can jury rig a section of tubing to feed colder air from outside. Well I have to do something whilst waiting for SVA, and have something to finish off myself!!

Ta
Andy
12 May 2007, 5:49pm
Andy,

In this picture you can see the carbon airbox I'm using - there's a flexi pipe that goes from the back of that to the intake:


These are still from the design stage, the extra blue pipe is not in there to bring the airbox forwards a bit.


This flexi pipe is then connected up to the ali intake:
12 May 2007, 6:09pm
cheers - thats kind of what I was thinking of - at the moment I have a filter like this in place -(Pic hopefully attached!)

Andy
12 May 2007, 7:53pm
Can't see the pic yet it's pending approval! I don't think that the intake I have is optimal for airflow but the air should be a lot colder than a cone filter in the engine bay :) Suppose it depends on many air holes you've got in the bonnet.

Speaking of bonnets it was a long day in the garage today:


Step 1: Mark a line with the bonnet off using the rubber as your guide, then place the bonnet on and use tape to run a parallel line to the one you drew with the pen.


Step 2: Run a marker along the tape and pull the tape off - we used an angle grinder with a very fine cutting disk (1mm) to cut the ali along the line. Here you can see the parallel line on the bonnet - remember that the back of the bonnet is not sitting flush so use a bit of force to push the bonnet into its final place to get the line in the right place.


With the front cut, clean up the back using the same technique - follow the red pen line with tape, run a pen along the tape and cut!


We've left a few mm each side of the bonnet panel that can be trimmed down further once everything it bolted on and clamped down.


Once the front and back is cut its time for the hinge cut - mark front and back then run a straight edge between the points, mark with a pen and cut!


Fitting the bonnet to the hinge - start by fitting the hinge and drilling holes along it for bolting the bonnet to - a piller drill is great for doing this. Fit the L shaped ali to the opposite side to the one your working - this will keep the hinge nice and straight!


With these clamps on here its possible to open and close the bonnet to check fit before drilling holes.


We drilled every 4th hole and bolted them to start with then moved on to the remaining ones.


Close up!


All holes drilled! That was a lot of work :)


Both sides now in place - looking good :D The L shaped ali piece that provide support underneath just fit past the engine without need to modify anything.


A short break in the rain meant another run on the drive way! It's really looking like a proper car now :)


Another shot of the completed bonnet! The sides need a bit of trimming but it's nearly there!

Looks a bit hotrod ish without the headlights!
Bodywork wise all it needs it a bit of tweaking! The front wings need cleaning, the rubber needs adding to the rear wings and everything needs to be made SVA friendly!
12 May 2007, 9:13pm
Patrick and Richard,

Thanks !
this is good information where we all have our websites for.
Feel much more confident when I'll put my angle grinder in my bonnet!

What "nibbler" ? did you use to go rigth through that plate?
Never seen such thing.

Peter-Jan
13 May 2007, 7:02pm
Filler cap attached


Fog and reverse lights attached - these are just for SVA, the round ones will go on afterwards!


Bonnet clearance - just fits!


Under bonnet scuttle panels cut to shape and bolted in place.


Driver side scuttle cover - single hole for battery cable.


Passenger side panel with the same configuration as the driver side.


Modified Marlin headlight mounts - hole is milled out for the SVC headlights that have a larger diameter mount. The reason for milling rather than drilling was to move the hole back a bit - the damper mounting bolt gets the way otherwise!


Final dash wiring in progress - this is a clean up and tie down of everything.

13 May 2007, 10:22pm
The final gauge wiring is now complete, everything has been connected.


The dash lights on, at the moment the rpm & speedo lights turn on with the ignition, the light bulb holders will need to be modified so the bulbs can be wired into the same circuit as the other dash lights. This will allow them to be dimmed from the light switch.


The fuel tank was filled with 25liters if fuel to test the gauge. Success, the gauge shows half full, we need to see how accurate the gauge once we have the car on the road.

14 May 2007, 5:45pm
Guys,

are you expecting 25 litres to be half a tank or was that full?

Andy
14 May 2007, 8:45pm
I was expecting it to more like 2/3's or 3/4's - I think the sensor may just be a bit rubbish. Won't see until the first time we take it the pumps I guess!
16 May 2007, 8:49am
Ok I've given in to worry regarding the exhaust noise for the SVA and have order two Jetex micro silencers and some extra pipe work - at least they will go right on to the pipes without much hassle!

I was going to get magnaflow ones but both the uk distributor (who I've dealt with before when I got the back boxes) and their main UK online sales shop don't seem to want to answer my emails!

Jetex are the same straight through design, just not sure if they are 100% stainless all they way through as the Magnaflow ones are.