MadaboutKitcars

This is a read-only archive of the old Madabout Kitcars forum. New posts and replies are no longer possible, but every thread is still here to browse and read.

Scottie's Tribute A352 build

4 Mar 2015, 6:17pm
Bulging top, waist, bum etc...

The one on the left?

4 Mar 2015, 6:43pm
Now, how did I know that you would respond first??

Because you were set up WCA!

Hey! At least you did not disappoint me! Well done that man!!
4 Mar 2015, 9:34pm
It is hard to resist a large slow moving target

Happy to oblige

:-)
4 Mar 2015, 10:06pm
I just knew that, which was why I posted it!!
A bit like going fishing......
4 Mar 2015, 10:15pm
Mr Towed had trouble with a conventional jack lately, when he got a puncture on his very low car. It has alerted me to the problem which I will also face given the same circumstances.

I already have one of those inflatable car jacks but they do not work with twin exhausts.

I am considering a "quick-lift" F1 style jack, but cannot find out any lifting capacities, anyone know anything about these things?

[IMG][/IMG]
4 Mar 2015, 11:06pm
Made one once. Rarely used it and eventually it morphed into something else.

The lifting capacity from zero height is very poor, the higher it get's the easier it will be. I would say no chance for the engine end of a car, especially if it is a cast iron six.

I used to use a sack truck which worked better, same principle.

Machine Mart do a low profile jack, goes down to 80mm, should be able to get that under *something* even with a flat tyre.

https://www.machinemart.co.uk/shop/product/details/clarke-ctj2250lp-2-25-tonne-low-profile-trolle
5 Mar 2015, 7:16am
80mm you say?

Not sure if I had 80mm clearance to get a jack underneath as my pocket rule wouldn't actually fit under the car -


Luckily I have a single, side exit exhaust so I'll be ordering an air-bag jack.
5 Mar 2015, 7:36am
Mister Towed wrote:
80mm you say?

Not sure if I had 80mm clearance to get a jack underneath as my pocket rule wouldn't actually fit under the car -


Agreed but you could probably put the jack half way down the chassis rail perhaps under where the seats are and lift it there, THEN get your tape measure under to hold it so you can get the jack in next to it? :loco:


Mister Towed wrote:
Luckily I have a single, side exit exhaust so I'll be ordering an air-bag jack.


Sounds more sensible! (And a cork, for the second exhaust?)

All this discussion about getting jacks under when a tyre is deflated makes me feel better for battling to get 8inches (200mm) ground clearance under my Marlin. :icon_cool:
5 Mar 2015, 8:53am
[QUOTE=Mister Towed;64120]80mm you say?

Not sure if I had 80mm clearance to get a jack underneath as my pocket rule wouldn't actually fit under the car -

I hadn't realised how low your car is...
5 Mar 2015, 1:30pm
Thanks for the feedback and suggestions fellahs.

I will have to do more research into this, its not important right now, but will be when I get on the road with the car.

Today I worked on the last big panel and got most of it sorted.

I now have to design and fabricate rain channels for front and rear of the doors, and fit the locks to the car.

Really easy to type but not so easy to do!


Pics:

[IMG][/IMG]

[IMG][/IMG]

[IMG][/IMG]
5 Mar 2015, 1:39pm
Excellent progress. I am definitely reserving you a position on the club plot at Stoneliegh. I am also making sure I am not parked next to you as I don't want to show up my meager efforts.

Having said that I bet my quick and simple build has encouraged as many people to build Tributes as you meticulous and time consuming one has put off!

I am so looking forward to seeing this in the metal.

Make sure you pick up the loose screw* before you put everything in place. Can you imaging how annoying that would be lost and rattling behind one of the fake panels?


*I avoided rising to the bait of making a 'screw loose' joke. :-)
5 Mar 2015, 3:06pm
There are two of those in each footwell, and their job is to bolt the seats in, so I won't be losing those WCA!
If I put them anywhere else I will lose them, I know, because I HAVE!
5 Mar 2015, 5:41pm
Scottie - Those cockpit panels are a real work of art. :cool:

Good luck, Paul :)
5 Mar 2015, 6:15pm
Not wishing to waste the rest of the day, (and panicking about Stoneleigh) I plowed on in the afternoon with several small shitty mundane jobs, which still have to be done.

I got a shaft sliced in two, welded some washers on the ends and fitted them to the locks for the doors.

When I made the cockpit rear divider, I knew that I would one day have to seal it up, so I did that as well, having first cleaned all the dust and crud out of the join.

Then I figured a way to clip the divider trim panel in place and made that work. It does stay in place and looks okay, but I am less than happy with the top clip, but it will do for now.

Some pics:

[IMG][/IMG]

[IMG][/IMG]

[IMG][/IMG]

[IMG][/IMG]

[IMG][/IMG]
5 Mar 2015, 6:18pm
Thanks for the encouragement Paul!

The centre divider trim panel looks a bit lost on its own, but when flanked by the seats it will perk up a bit!
8 Mar 2015, 5:52pm
Sunday

I spent a lot of today planning, experimenting and trying to work out how I would finish off the door trims, with the rain channels and lock plates in place.

I made rain channels in plastic, and binned them, considered making them in copper tube, and discarded that idea, then I used logic, which I should have done to start with.

So far, I have made a lot of complex shapes using aluminium and fibre-paste, the curved dashboard being a good example.

So I started to make the passengers rain channel and door trim that way, and so far it has been successful.

Although I have not finished even the first one, I am over the moon !

Because I have actually cracked the problem, made one, and now know exactly how I will make the other three, what I will make them from, and so on.

It is now just a simple engineering exercise.

So, I have had a good day, and another time will do the rest of them.


Pics:

[IMG][/IMG]

[IMG][/IMG]

[IMG][/IMG]

[IMG][/IMG]

[IMG][/IMG]

[IMG][/IMG]
8 Mar 2015, 8:08pm
looking great :)

re ground clearance - make a nice wooden ramp and find somewhere to hide it in the car. simply drive onto it to get extra clearance.
8 Mar 2015, 8:53pm
Yeah, that sounds like a reasonable idea!
9 Mar 2015, 8:14am
Scottie - Glad to see you have worked out how to make those corner pieces, as they look great. :cool:

Good luck, Paul. :)
9 Mar 2015, 9:23am
Its on my watch list now Mick! Thanks.
9 Mar 2015, 3:19pm
I am still working on the "simple engineering exercise" and have, after what seems forever, stuck the rain channel to the endplate.

Then it will all come off yet again, for the paste to be applied to the underside to strengthen and waterproof it.

It may be a simple job, but hellfire, how time consuming, and this is the first one!!!!!!!!!!

[IMG][/IMG]
9 Mar 2015, 10:13pm
Later Monday

I took all the clamps off the bonded panel, and to my dismay the epoxy adhesive failed, and the two bits fell apart.

I had prepared them correctly, so could not understand why this happened.

Also, this is not the first time this stuff has let me down,as most times it has been very good.
Anyhow, I clamped both bits together, and removed them as one piece, and went ahead and bonded the rear of the join with fibre-paste, and lots of it, which has never failed me.

I think there is a lesson to be learned here.

Then I filled the front channel face for a smooth look, sanded and primed it. I will put it back on the car tomorrow.

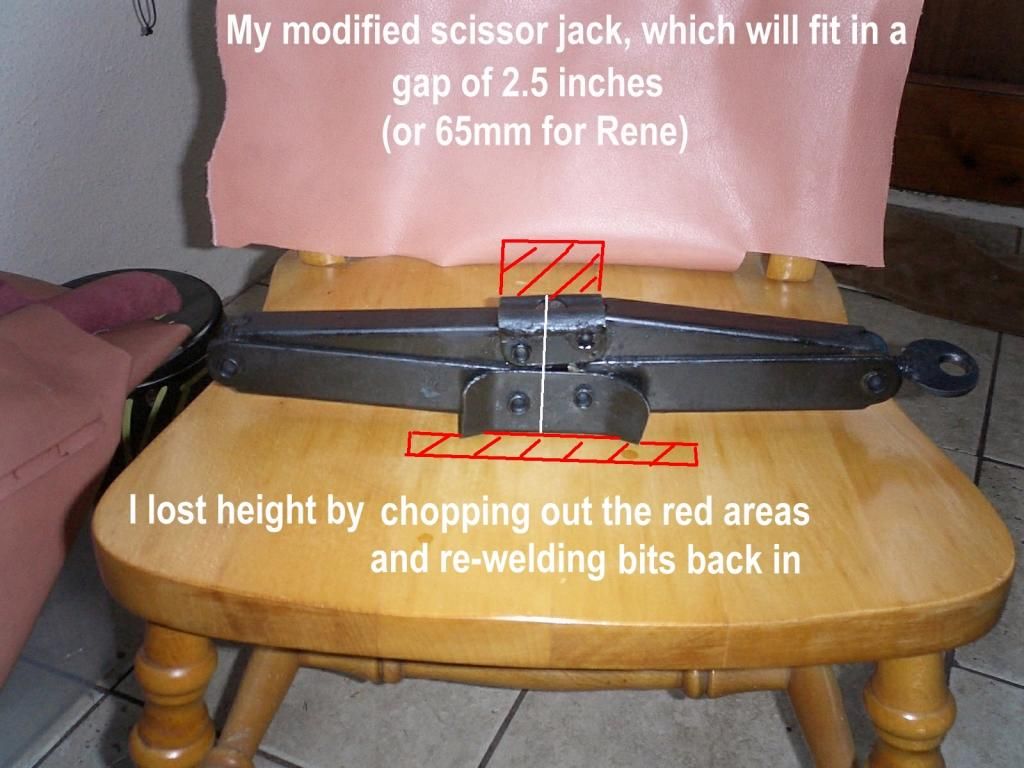
While I was waitng for the (now failed) epoxy to go off, I dug out the smallest of two scissor jacks I had been hoarding, and modified it so I could use it to jack up a very low car.

I was pleased with the result, as a 2.5 inch gap is quite small, so the
device ought to come in handy at some stage.

It will lift fairly high, but would be a bit unstable at that height, but the plan would be to jack a bit and timber block it, just enough so a normal jack would then fit under.

P.S. I could not wait for tomorrow, so I went out just now, (10pm)

and put the panel back on the car.


Pics:

[IMG][/IMG]

[IMG][/IMG]

[IMG][/IMG]

[IMG][/IMG]

[IMG][/IMG]

[IMG][/IMG]
10 Mar 2015, 5:49pm
Tuesday

I have worked on the car since breakfast, and have just finished for the day.
I have completed the drivers front rain channel, which did take all day.

That's two down two to go. I hope to do one each day, we'll see.

Pics:

[IMG][/IMG]

[IMG][/IMG]

[IMG][/IMG]

[IMG][/IMG]

[IMG][/IMG]

[IMG][/IMG]

[IMG][/IMG]

[IMG][/IMG]

[IMG][/IMG]
10 Mar 2015, 8:15pm
Nice work again .
Ofcourse i have something to moan about...........the hood attachment thing!
Can't you solve this another way?It looks out of place,ugly and when you try to get out of the car it may rip the sleeve of your blue blazer or the back pocket of your tweed plus-four:whoo: