This is a read-only archive of the old Madabout Kitcars forum. New posts and replies are no longer possible, but every thread is still here to browse and read.
Hoping to get back to the Marlin today, I have been fitting a new clutch to my neighbours car, turned out the dual mass flywheel was knackered too, then the factors supplied the wrong release cylinder so I have had to modify the hydraulic connection. It's nearly back together so then I can resume my fun job! He needs the car for tonight...
Have still to decide how I am going to make the dash. I feel aluminium or stainless are the best options. For an open car wood isn't practical, I feel plastic would ruin the look of the car, leather wouldn't look right. I was planning to spot turn the surface but having looked at many spotted dashes I think it's a bit boring, just a repetitive pattern... Am looking to do something a bit more imaginative but what? that's the question...
I am wondering about etching some motorsport related scenes into the metal, either with an acid technique or perhaps sand blasting with a small nozzle? Perhaps even hand engraved...
I also have more ideas for the radiator grill now. The promised stainless strips haven't turned up yet so they may not materialise. I think I will go for 316 stainless mesh on the diagonal, with a polished mock stainless radiator surround, which lifts off, hack the current GRP nose cone and make the stainless mock radiator surround an easy 'lift off' affair, that would give me easy access to the radiator to top up etc.
I sold my daily before it needed a new clutch (had 130k on the original still going strong). I'd read they needed the fly wheel changing too which makes for a bit of high parts bill!! New car has an auto so I don't need to worry about clutches (except with the sporstster!)
I sold my daily before it needed a new clutch (had 130k on the original still going strong). I'd read they needed the fly wheel changing too which makes for a bit of high parts bill!! New car has an auto so I don't need to worry about clutches (except with the sporstster!)
Hi Patrick, very little change from £400 for the parts. I had never even seen a DMF before, rather a step learning curve! There was a lot of rotational slack but also the two components were not 'tight' in their axis either, one wobbled inside the other. When I compared the two the old one was obviously worn out.
On a much cheerier note I drove the Berlinetta today, I drove it out of the garage and up and down the back lane to my garage. The clutch feels very good, smooth and easy. wheelspin is easy to achieve... Although second gear seems a bit tall, not easy to judge in ten yards!
Have rather lost momentum. Have tinkered and done a little wiring but I am pretty tired from doing the clutch repair, and my knees are playing up from all the kneeling it will take me a day or two to get back to normal (whatever that is!).
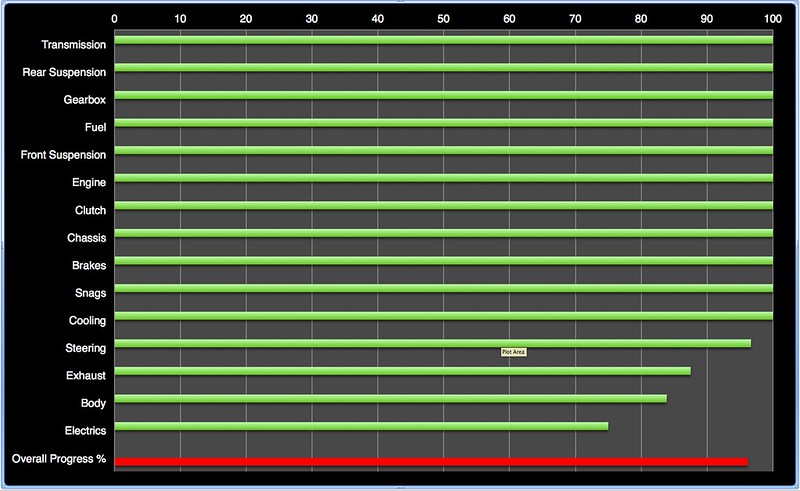
The build is currently at 96.2%:
I am going to turn out the register for the steering wheel tomorrow evening on my friends lathe. That should allow me to tick off the last task on the steering.
Then to finish the exhaust and the wiring, bolt some body panels on and it's finished!!! LOL Oh, and a couple of mirrors, some number plates, a VIN plate, find the two missing wheel nuts, fix the slow puncture on one tyre and a few other tasks not on my list no doubt!
Thanks for the encouragement Paul, have started back this morning amid computer OS updates!
Spent the morning trying to get one of the horns to work, finally got it working but not reliable so I have dumped it. Will keep looking for another low horn, the high is fine, beeps every time. Must go the comp wants to re-start AGAIN!
While waiting for my computer upgrade downloads and installs to go through I have been head and chin scratching...
I got a quote for stainless mesh which almost knocked me off my chair. I had been promised some stainless folded bars to make the grill but they haven't materialised so I need to re-think. My second option was to use 316 mesh but because I want it 45º diamond pattern instead of horizontal/vertical squares, it's very wasteful of material. I need at least a two foot square, four square feet, the suppliers want to cut it across the roll, 4 ft wide. That make it very expensive.
However, I have a plan... I will make my own. The problem with that is I need to kink the rods at exactly the right intervals and exactly the same angle EVERY time, each alternate kink has to be at exactly 180º rotated from the previous kink. I have calculated I need to make (at least) 780 kinks. I have just figured how to do it with stuff I have lying about. May take me a couple of days but I have more time than money, so that's the way forward. I am intending using 2.4mm 316 TIG welding rods, I am making the apertures 12.6mm square. I make that a ratio of 69% gap to bar by area. I don't really want a bigger gap, I think I will get sufficient cooling air with that ratio, my grill is 400 mm wide and 450mm high.
My secret weapon is a very large nut and bolt... M30 by 100mm long, I will photograph the device when I have made it. It may be helpful to others. It's really very simple but it's taken me all day to work out how to do it easily, accurately and quickly.
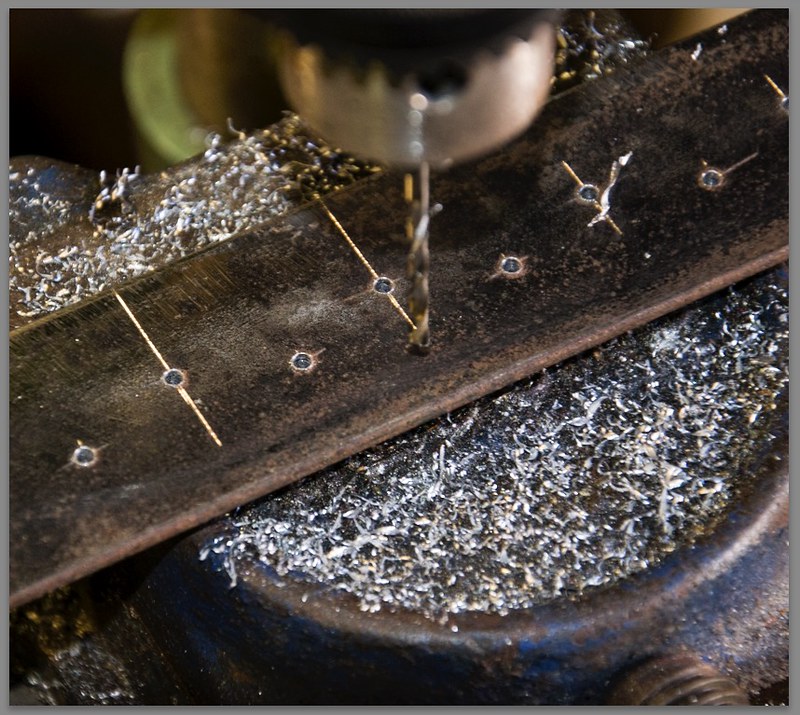
Well, I have made the kinking tool. Not from my biggest bolt but from a smaller brother. I actually used a 20mm bolt and two nuts. It was easier than I expected but the indexing bar was a bit of a long winded job, 62 holes to mark out and drill, to mm accuracy, then I made 62 little pins from 2.5mm MMA welding rods and welded them into the holes. Snag... the indexing bar has bent with the heat distortion.
That's tomorrows job, straightening it up without damaging all the little indexing pegs or twisting it. I should have glued them in.
I will post some pix tomorrow, once I have straightened the indexing bar and tested it again.
Just couldn't get in the groove today. Anyway I finished the rod kinker! I also tried it out on my sole surviving 2.4mm silicone aluminium welding rod. Just hope I don't need to weld any aluminium in a hurry.
Photographs as promised:
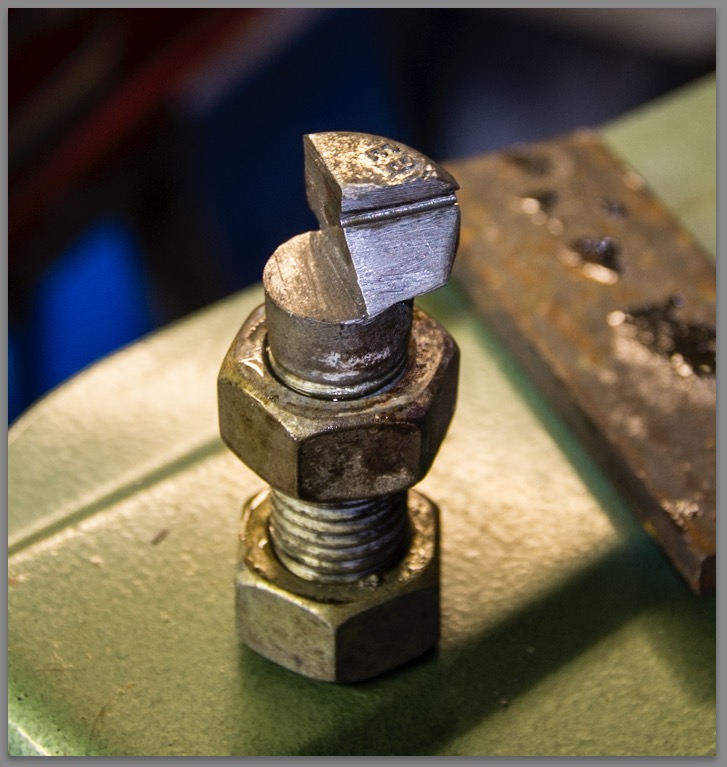
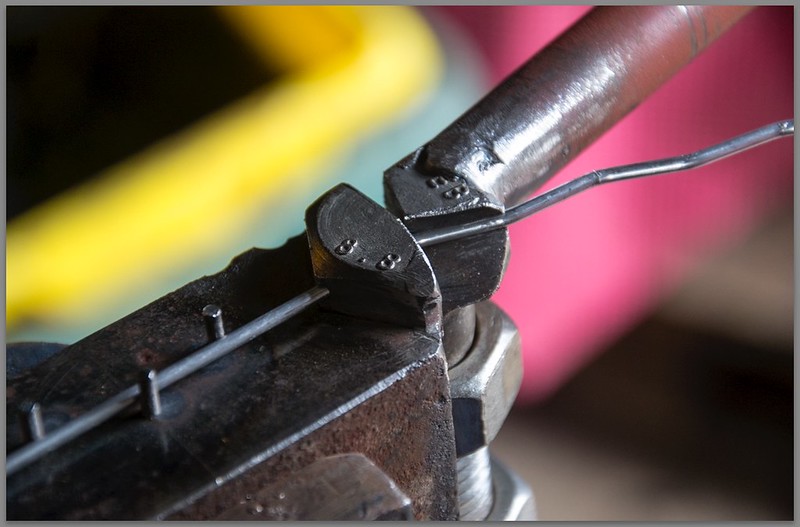
The basis of the kinker tool, is this this M20 bolt and two nuts, welded to a bit of angle iron about a metre long. I decided the M30 bolt would have been overkill, in fact the M20 was exactly right for size.
Some patience was called for to drill the 2.5mm hole through the bolt head, it wasn't exactly centred but it's near enough, it works!
Followed by 62 more 2.5mm holes drilled exactly on 16mm centres staggered alternately either side of the centre line of the angle iron.
Into which I inserted and welded (doh! stupidly, should have glued them.) 62 little bits of 2.5mm MMA welding rod. The rod is rotated 180º for each kink and the leg at the end of the rod is hooked against the peg to index it's position.
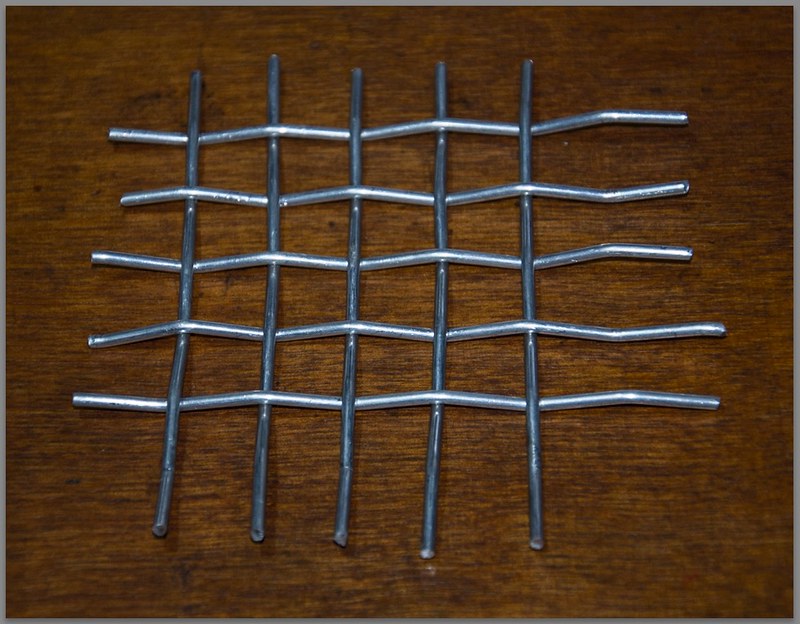
This is the result:
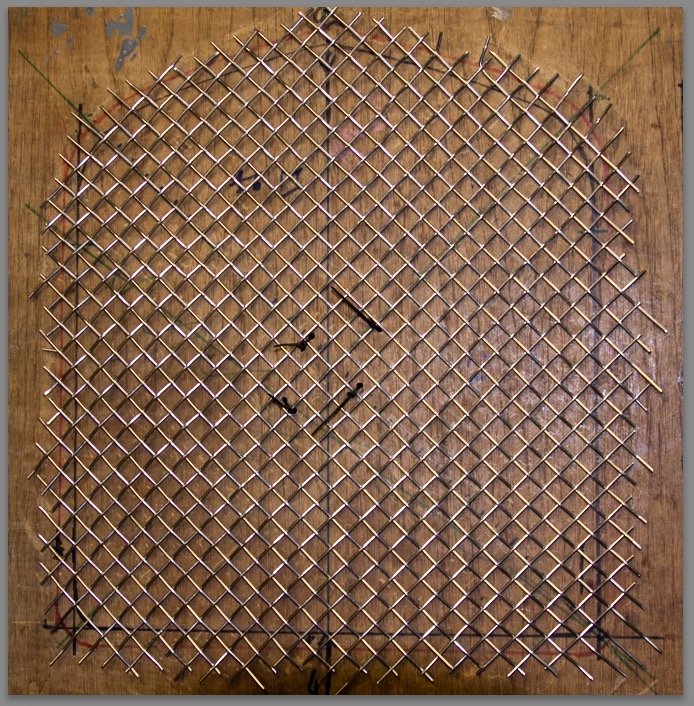
Made from aluminium 2.4mm rod, The proper thing will be made from 316 stainless.
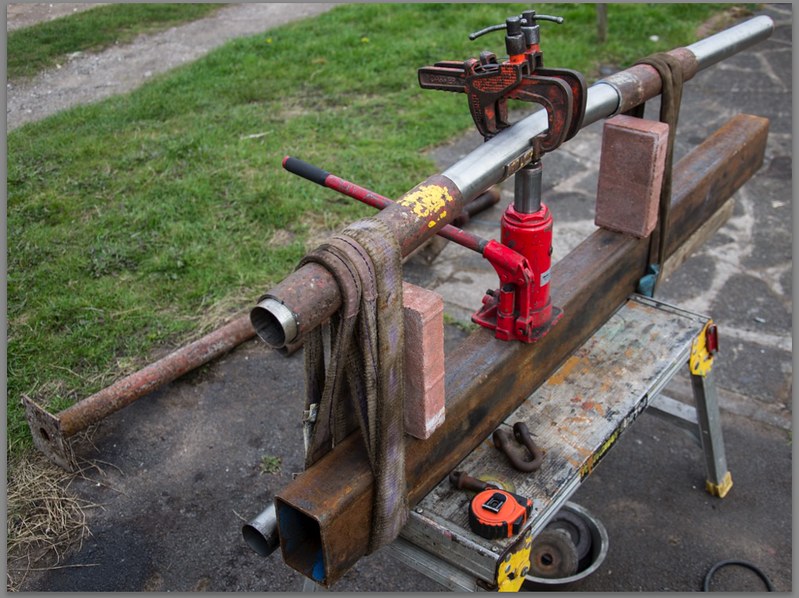
This evening I bent my stainless exhaust, not as pretty as the mesh but it will have to do.
I actually bent it quite a bit more after I took the photo, it's kinked but I'm not that worried, if it proves to be a problem I will cut and weld it later. I just want to get these jobs out of the way.
Hopefully no welding at all, I have just managed to get one Kilogram of 316 rods and have started kinking them, done 8, thats 480 kinks tonight!
The stainless is MUCH springier than the aluminium, I have just woven a patch with the 8 rods and they are very tough to weave compared with the aluminium. I may give them a tad more º kink.In a way tight is good because it will hold the mesh tighter and not be waffy, or rattle. I haven't decided how to finish the edges, I would like to use some 3.2mm stainless wire for the frame, then bend each mesh wire around the frame wire, but that may be a bit much. I know a man who can weld 28 gauge tubing in jet engines, so I may ask him to tack the edges for me, I don't have any argon, although I do have a TIG torch and a good DC supply... All I need is the argon.
Will probably do the rest of the kinks tomorrow, only 1260!!! Enough to put me off kinks for life!
Apart from my kinky adventures, I have almost finished off the exhaust, only needs trimming at the back and some hangers fabricating, another task for tomorrow. Than I can final fit the floor, transmission tunnel and gearbox cover. That will be good, some visible progress.
Robert - Amazing skills to attempt to make your own grille.
Good luck, Paul.
More a question of needs must when the devil drives! LOL
The grill has always been a sticking point for me, I know what I want but with my current equipment I couldn't achieve it. I had been promised some folded polished ss 'U' sections to form the grill but that was over a month ago and I ain't getting any replies to texts to the chap who offered, so a plan 'B' was needed.
The grill on the car I have used as my 'model' guide car, is mesh and very much the style I like but potentially very expensive, I have had a quote for £160 for the mesh and the surrounding trim, which is £10 more than I paid for the engine and gearbox... I know there are ss mesh grills on eBay and the like but they are thiner gauge and I need at least a piece two feet square, so If I am to have a grill I have to make it myself.
The welding rods are just under £20, OK it took me a bit over a day to make the tooling but it was a day well spent. To me getting over these hurdles is where the satisfaction and sense of achievement lies. It's actually so simple, it was just sussing how to get the repeatable accuracy which was the issue.
From the mesh point of view, that's what I plan, to replicate the surround from stainless would be much harder, but not impossible...
I am fresh back from Halfords, looking for exhaust mounts, my local guy doesn't have them??? While I was there I stumbled upon some Argon cylinders, admittedly only 60 Litres but that would probably enough to weld up the ss surround for the grill, so it's possible I could get the same surround in ss. Watch this space.
I suspect the original Alfa grill has been made from chrome plated steel, the surround may be made from brass perhaps? It appears somewhat crumpled at the bottom corners, which is to be expected but rather spoils the effect on an otherwise perfect £250,000 + car, but it's also indicating it's hand made!
The grill in question:
I think I have pretty well de-Marlinised the car already but the radiator grill is probably the most prominent and distinctive feature of the car. I'm not anti Marlin in any way but I want this car to be MY car, with much more than a passing resemblance to the 1930 6C Alfa Romeo upon which it was originally modelled. If I can live with the car once it's on the road I intend to make a new back tub and wings to closer resemble the 1930 Alfa Romeo style. I HATE the flat top wings, given they were made in GRP they could have been almost any shape, why did they not give the wings a crown, to me they ruin the car but I am not prepared to spend the time, effort and money needed to make new aluminium wings until I have 'proven' the chassis first.
I agree completely re wings, even though the berlinetta is and has been for the last 30 years my favourite kit, hard and soft tops proper doors wind up windows and almost a back seat and even a tow bar, but the marlins grill surround is about its most distinctive feature, I would also like to see one with bigger headlights.
Not sure you have posted any pictures of the whole car from a distance for a while I would be very interested to see what you have achieved so far. Ed
It's a couple of weeks old but nothing much has changed significantly. It starts on the button and drives nicely. To be honest I have dumped the wind up windows, the soft top will no longer fit because there is no windscreen yet and it will be different when I do fit one...
I have made the scuttle curved rather than two flat sides, likewise the bonnet. I have raised the floor a good two inches and the back tub by four inches. As I mentioned I want to create my own back tub eventually.
Bigger headlamps would be good, a pair of P100's would be perfect but probably cost more then the entire car!!! I have a new pair of 7" lamps which I will be fitting, I am hoping to raise them to a similar height to the Alfa ones in the pic below, mounting them on pedestals in a similar manner.
Thanks for that. The curved scuttle will really change the look especially with your new blended bonnet, although a one off screen sounds expensive, or are you going aero screens? Taller wheels and skinny tyres would look pleasant too what's the diff and rear axle off on yours? Could the diff be changed out to gear for big diameter rims? I saw a car a chap had built himself in holmfirth last summer and oddly he looked a lot like Wesley Pegden the mad mechanic man from last of the summer wine, people where doing a double take as that's where they filmed it. He had used galvanised steel wheel arches from a twin axled trailer as his front arches and running boards they had a nice radius to them even after he had slit them down the middle and added a section, he had even used the curved bit he'd cut off from one end as the start for his rear arches.can't find any on eBay but I'll try find a PIC. Ed.
Hi Ed, just got back in from returning smaller son to his mothers!
He made this today from a rather nice cradle he was given yesterday, it's fallen apart twice but he has mended it himself, while I have been kinking ss. mesh rods.
The curved scuttle was pretty well key to the whole build. The PO had ruined the original bulkhead, literally shredded the panel to get the clearance for the V8 bell housing.
Make your own mind up about that bit of panel work...
So I had to make a new bulkhead, so I decided to make it how I wanted it. I felt that although the Marlin style was resembling the 1930 Alfa Romeo 6c it was missing many of the nice styling features, so I decided to try to recreate as much of the original design as I could without trying to make a replica. The windscreen will be a tubular folding frame, like this:
I am planning to create it once the car is on the road. I particularly like the glazed portion below the hinge, it may be difficult but I think it will be worth the effort. If I can organise my TIG welder then it will be pretty easy in stainless, although I haven't come up with a neat way of making the angle lock for the screen hinge yet. It's a face to face serration, not easy to make without sophisticated machining. There used to be Meccano gears which would have done the job but all my Meccano went, so long ago I can't remember when.
The diff is a 3.44:1 a bit tall to make the wheels larger, they are 205-15 at present. I could get a lower diff but given the diff has to be built in the axle casing and isn't a salisbury type, I would need to change the entire axle. It's Ford Cortina Mk3/4/5 with the 4 link suspension.
I was contemplating getting a Transit diff and another axle casing but when I got the new Rover V8 I decided I didn't need it with all the torque the V8 has.
Big fan of Wesley's! My garage is very similar with clouds of black smoke and loud bangs issuing forth from time to time!!!
When I mod the wings I will roll them myself on the English wheel from 1.5 or 2mm aluminium, that's partly why I built it. I don't feel the shape is particularly difficult, although I haven't actually tried to replicate it yet!
Now my brain hurts as I own something with a serrated friction type lock mechanism with a thumb bolt that is exactly what you need for the windscreen and I can't think what it is, the lower glass in the screen is very nice you could probably use plexi for the lower then the folding portion would be square and cheap. That bulk head picture is amusing looks similar to some of the creations my daughter welds up with the MIG, my grandma was a lot like Edie Pegden Weslie's wife, makes me smile when I watch them now. Ed.
copy paste number into ebay 141625191572 or Google/eBay schnorr washer.
Now my brain hurts as I own something with a serrated friction type lock mechanism with a thumb bolt that is exactly what you need for the windscreen and I can't think what it is, ebay 141625191572 or Google/eBay schnorr washer.
Thank you Ed, although it will be a while before I am tackling that aspect of the car that's very useful info, I hadn't heard the term schnorr washer, although I was obviously aware of them.
They crop up on barbecue table sunshades, bicycle seats and occasionally angle headed tools like window cleaner mops and the like but mainly made in plastic nowadays. Looking at the example you posted it appears to be simplistically moulded, so perhaps I could make an attachment or fixture for my angle grinder and make them myself... I have access to a milling machine but it doesn't have a rotary index.
For the windscreen the location will have to be very positive.
Given I will probably only need the windscreen in perhaps two positions, flat and upright, I had considered instead of using schnorr washers, to use two small dowels at each side of the car, which engage in holes in the screen pivot hubs instead of using radial grooves. That would be very positive but lack the authentic serrations and the ability to make smaller angular adjustments to the screen rake.
A less elegant but simpler solution would be a variation of the Land Rover windscreen pivot hinge. At least that is naturally strong and fail safe, in that it can only pivot back as far as it is allowed until it locks. It doesn't have to be as crude as the LR design, although I really would like to use the neater schnorr washer style if I can.
Schnorr had i. My Jeep screen has 2 hinges and 2 lever clasps it is held in place by its shape only. The item in question was my pivot shaving mirror I only use it twice a year whether I need to or not, so that's why I struggled with my brain. I think when you get to that stage and start mocking stuff up an elegant and simple 2 position solution will spring into your mind, You can buy 2 lug drive dogs in various sizes someone probably does stainless ones, it will be a crucial part of the aesthetics and as you say would be nice if it was elegant, I hope you have made some extra kinked rod for your headlight guards and while you have your hand in a removable BBQ on the back rack would be most era correct? Ed.
P.s was the steering wheel just for show on his cradle racer?
P.s was the steering wheel just for show on his cradle racer?
Err yes, a broken brush shaft and an hexoctagonaltriangular bit of old Marlin floor board from the original Berli passenger side floor, just so he could claim the cradle racer was actually a Marlin!
I'm sure when the time comes I will devise some sort of dog clutch or Schnorr serrated coupling, possible even have my own lathe again by then, I had a lovely Colchester 6" with vari speed but had nowhere to store it and it was ruined by the weather, ended up in the scrap.
Had an uninspiring day today, painted the new exhaust brackets, which meant taking the tail pipes off again, took it for a test drive and horrified my neighbour by spraying gravel about fifty yards giving it a boot full setting off on the back lane. My goodness it can pick it's feet up, it's going to be a handful in the wet...
Main floor all bolted in, final fitted. Have spent two hours polishing the rods I have kinked before I weave them into a mesh.






 My goodness it can pick it's feet up, it's going to be a handful in the wet...