MadaboutKitcars

This is a read-only archive of the old Madabout Kitcars forum. New posts and replies are no longer possible, but every thread is still here to browse and read.

Mikes BMW Marlin Cabrio

11 Dec 2013, 8:27pm
morris wrote:
Well done Mike, that's great news.

So, what's next, paint I guess? Or are you just going to direct all your funds for the next few months into copious amounts of petrol to burn tearing up the A roads of the local countryside.

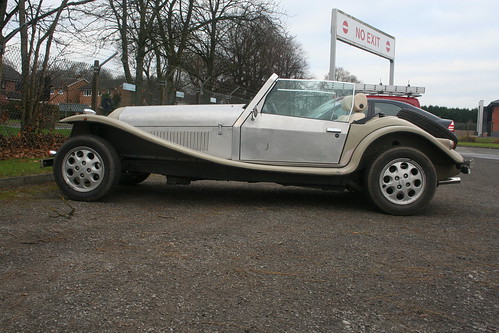
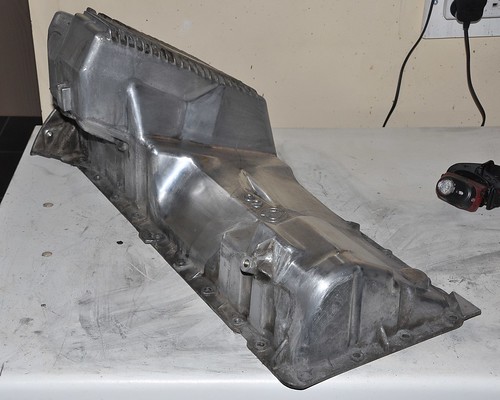
Once I get through IVA (one day maybe) I think that a dry sump will be my number one priority. Every time I see a side on shot of a marlin cabrio or sportster with that M50 sump sticking out the bottom centimetres from the ground it makes me wince.


Sleeping policemen don't bear thinking about....


Dry sumps and a new pump are the best way, but very expensive.

When I built my Roadster I put a Triumph 2.5 straight six in it, and had the same issue. I made a special sump by cutting 50mm off the bottom, but then extending the deep part of the sump the full length of the engine to retain a similar capacity.

It has crossed my mind to try the same with the BMW?

Also I believe the deep part of the sump are at opposite ends in the 3 series and 5 series, which might give scope for cutting and shutting two shallower sumps together along the full length of the engine. The guys down at my local engineering company are dab hands at welding alloys - I often see two or three alloy wheels that have been badly curbed and they weld sections in them. So if it good enough for a wheel, I'm certain it'll be good enough for a sump.

Do you know what the oil pick up looks like? - can it be shortened easily enough? (The triumph one was very easy - just cut the end off a tube.
11 Dec 2013, 8:37pm
Brilliant Mike, well done. A testament to your drive and determination.
Must be extremely satisfying.

Ground clearance is only a problem with roads having sleeping policeman and peoples drives with high kerbs.
11 Dec 2013, 9:48pm
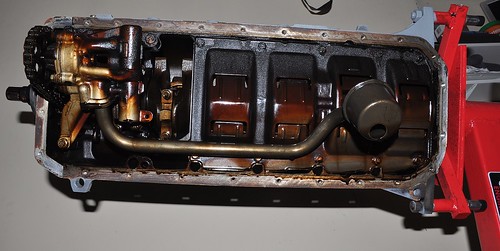
You can see the oil pick up arrangement here


On the 525s the pick up was right at the front under the timing gear.

I don't know how much scope there is for chopping out that main volume of the tank without just lowering the amount of oil you put in and risking starvation on a turn.


It's been designed to drain back into that big area at the back so any custom job that makes it shallower but also the same volume stretched forward would need a similar slope.

The dipstick also goes into that part so you'd either have to go stickless, carefully modify the existing one's bottom end length or fit an electronic one.

Dry sumps are expensive e.g.
http://www.ca-int.co.uk/single_prod.php?prod_id=2028
and I've better things to spend 4K on than that, like rebuilding and fitting an M70 V12. I'm sure if an M20 fits so easily the M70 is just more of the same on the opposite side of the engine bay :)
12 Dec 2013, 12:32am
Fantastic result mike, well done!

Quite scary to think I might have another 6 years to go - partly because of the work involved and partly because of the ear ache I will get from her indoors!

Cheers

Cammy
12 Dec 2013, 1:37pm
Well done that man. At least you have a windscreen. When I drove the Sportster to the SVA (as it was then) in February all I had was a pair of goggles. I think they gave me extra points for trying....

I went through an actual Police road block at the time - they never batted an eyelid at the lack of numberplate or tax disc.

I never found the sump a problem. The sump being relativity close (latterly) to the front wheels goes up and down at the same time and avoids the worst of the obstructions.
Its the central exhaust mount on the gearbox which is smack in the middle of the car that I get a problem with. You can always ask your passenger to get out although I find that doesn't go down well with her indoors haha

Cheers, Robin
15 Dec 2013, 5:36pm
Congratulations Mike !

It's a fantastic feeling when you finally get the car on the road.

I agree that the centre heating vent is great for keeping your left hand warm on colder days.

Simon
16 Dec 2013, 6:57pm
morris wrote:
You can see the oil pick up arrangement here


On the 525s the pick up was right at the front under the timing gear.

I don't know how much scope there is for chopping out that main volume of the tank without just lowering the amount of oil you put in and risking starvation on a turn.


It's been designed to drain back into that big area at the back so any custom job that makes it shallower but also the same volume stretched forward would need a similar slope.

The dipstick also goes into that part so you'd either have to go stickless, carefully modify the existing one's bottom end length or fit an electronic one.

Dry sumps are expensive e.g.
http://www.ca-int.co.uk/single_prod.php?prod_id=2028
and I've better things to spend 4K on than that, like rebuilding and fitting an M70 V12. I'm sure if an M20 fits so easily the M70 is just more of the same on the opposite side of the engine bay :)


After a bit more research, I agree it will be difficult to alter the sump depth without running into oil starvation issues. I've measured my sump clearance with my new wheels at 125mm, which is not too bad.

Picking up on Robin's point, it may prove beneficial to swap to a 5 Series sump, at the front of the engine, to bring it much closer to the front axle line:then only middle of the road humps will be an issue. Trouble is, if I do then I'll have to abandon my front Anti Roll Bar and buy adjustable
compression joints as this sump would pass directly over the ARB.

I may just make a sump guard and hope for the best!
31 Mar 2014, 10:20am
Never believe what you are told, nor make assumptions.......

When I bought my Cabrio kit, Marlin had only built one demonstrator using the BMW M50 engine, and sold one kit to a builder. In order to fit the engine width in the engine bay they had both cut 3" out of the width of the entire inlet manifold, requiring 6 individual inlet tubes to be cut, sleeved and joined. So, although I was nervous about doing it, I accepted the perceived wisdom of the time, and did the same.

Inlet manifold Cut and Sleeved


Although I felt I had made a good job of the modification, I always had a niggling doubt that this could prove to be its Achilles Heal - making the engine unreliable sometime down the road.

Several years later Jeremy created a solution to the issue in his Sportster by fitting the intake boot back to front, trimming it down where it fits to the throttle body, and facing the boot back towards the bulkhead. Very simple, very cheap, and the two ports molded into the elbow (to the ICV and sump) both faced downwards - perfect.
I began to wonder if the same might be possible in a Cabrio?
Initially I assumed the Sportster engine bay was bigger than a Cabrio - I always felt it looked wider.

But, never make assumptions................!

Over time, talking to Danny Nelson, and seeing other Sportster builders achieve the same solution I began to ask about Cabrio/Sportster similarities, and asked for comparative measurements. I have come to understand the original Ford based Sportster shared the same chassis as the Sierra based Cabrio, and though it has undergone bulkhead and rear end changes to accommodate different BMW donor rear subframes, the front chassis/engine bay still shares the same original Cabrio DNA.

So, maybe this meant I could use the same solution as the Sportster builders? It was an intriguing thought, but was going to involve some serious engine surgery just to even find out, so I held the thought until after IVA.

Well, this weekend I finally took the plunge. I had been prompted by a very small water leak under my bell housing, which I had traced back to somewhere under my inlet manifold, but was impossible to get at unless, and until, I removed the inlet manifold.

Another factor was that I was not happy with the cobbled up Smiths sender I had been obliged to fit to make my standard Smiths Water Temperature guage work, as it was too short and didn't extend deep enough into the waterway.

So, with three jobs to do, off came the inlet manifold!
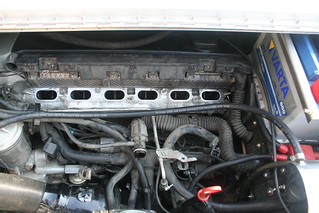


Once removed the culprit for the water leak was soon located (the rear head water port)
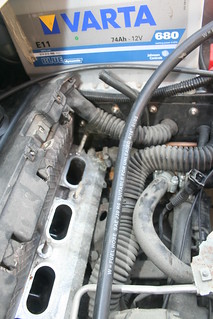


At the back of the head is the port which feeds the internal heater, and the rubber pipe had not sealed properly despite the jubilee clip being tight.
This was easily resolved by fitting a smaller diameter piece of rubber hose.

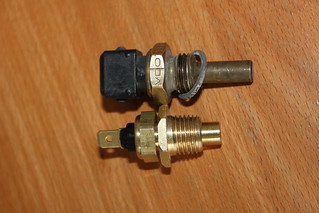
Whilst the manifold was removed I changed the water temperature sender back to to the original BMW VDO sender: this will have to be connected to a new Smiths Classic VDO based guage.


It's the sender on the right of the two - the blue one on the left is the engine management temperature sender which feeds into the ECU.
I had to buy a new Smiths VDO guage to match the BMW VDO sender, so there is a knock on to all this which means the dash will have to come out again to replace the water temperature guage: oh the joys of kit car building!!

Once these two minor jobs were done, the moment of truth had arrived - could I fit a full width inlet manifold and keep it all within the width of my engine bay?
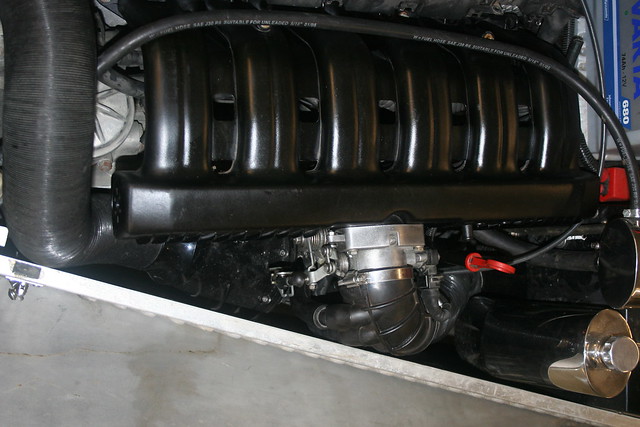


............and the answer is, Yes........... JUST!

By fitting the inlet elbow back to front, and trimming it down to the bare minimum where it fits the throttle body, it just fits. This is exactly how it had worked out in the Sportsters - very very cosy, but just possible.

I am delighted, as this means I can now run my engine normally with a standard inlet manifold.
One of the things I am hoping for is that the torque curve will be shifted back down the rev range a little with the longer inlet runners: only time will tell?

(I do have two other changes in mind which will have an impact on the torque curve of my Cabrio, but they will be have to wait).

I didn't get a chance to put all my pipe connections back on this evening so have not had the chance to run my engine yet - I'm looking forward to that almost as much as the first start, as this will hopefully be the final engine configuration for this year, and will give me a lot more peace of mind.
31 Mar 2014, 10:50am
Very nice, that longer intake will sort the torque out! Cutting is just a bodge without other work to the engine / engine management :)
31 Mar 2014, 2:53pm
Good news mike. I had to trim may intake elbow right back to get it to fit and I think I also removed one of the throttle body springs so I could squeeze it on that bit further.

Have you already bought your new gauge? I ask because I'd hoped to use the original BMW sender with an off the shelf VDO gauge but when it came to it I needed to buy a matching sender as the resistance range was well out (and back to front I think). The new one matched the length of the old so wasn't an issue in terms of its reach into the head.

31 Mar 2014, 3:57pm
Hi Ian

Thanks, it was your engine bay dimensions that suggested that it was going to be possible in my Cabrio. And like yours I have trimmed the elbow back as far as possible. One thing that did help was to put a cable tie around the two hoses that come up into the elbow ports and slightly pull them from below back towards the car, which created the last few mm of clearance.
I may even move my engine mounts over by 10mm towards the offside, as I have much more space on that side (all of 20mm!)

I received my VDO guage some time ago - I bought a special from Caerbont (they make the Smiths Classic range) which is a VDO guage to match a BMW sender, but with the Classic face and bezel.
I have not calibrated it, but guess I should so that I can have some confidence in it.

Thanks for your help with both.

Mike
31 Mar 2014, 4:10pm
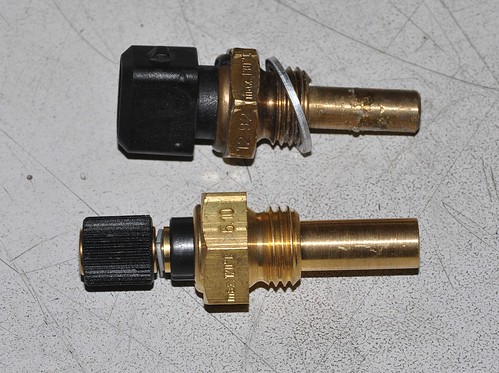
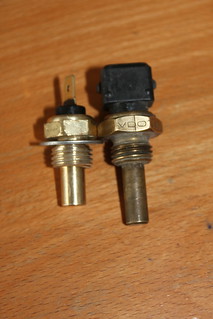
This was my Smiths sender in a collar to fit the BMW head compared to the original - you can see why I was not happy with it!


Even after I trimmed the collar back as far as I dare there was still not enough reach into the main waterway

10 May 2014, 10:05am
Water Temp Sensor/Gauge Saga

Despite ordering a special Smiths classic VDO temperature gauge from Caerbont designed to work with my BMW VDO sensor, when I tested it to calibrate the scale, I could not get a reading.

I then bought a new sensor, thinking it must the problem, but it did not work either.

After a chat with Caerbont technical services and testing the resistance profiles, they advised they would not work with the gauge they had specified, and would I send it back with my sensors, and they would see what they could do?!

This has now been dragging on for weeks..............and I'm still waiting!!!!!!!!!
6 Jun 2014, 10:24pm
BMW M50TU Vanos

BMW M50 VANOS - Variable Valve Timing

The internet is a wonderful resource for finding information easily..............and finding problems too, real or imagined!

The following may not be of general interest, but hopefully may help anyone using a BMW M50TU engine in their Marlin in the future.

Driving back from Stoneleigh was my first long distance run, and allowed me to get a feel of my Cabrio's performance. Subsequent driving has confirmed my initial assessment that it pulls very strongly over 3000rpm, but I feel is disappointing below this band.

Trawling through the BMW forums was both reassuring and worrying.
The M50, with its steel block straight 6 cylinder design has been refined through almost 2 decades such that it is incredibly robust, often exceding 200k miles. However, with the M50 TU (stands for Technical Upgrade) BMW introduced their first variable valve timing system - VANOS. This is designed to improve the power delivery over a wider rev range, and improve fuel efficiency.


The Vanos unit bolts to the front of the head and is the bulge on the right side when viewing the engine as above.

VANOS works by applying controlled oil pressure on a piston which acts on a helical gear set to vary the angle of the Inlet camshaft relative to the Outlet cam/crank.
When new it works well and performs as designed.

However, having trawled the BMW forums, looking for why my engine was less strong below 3000rpm, it became clear very quickly that there is a design weakness in BMW's VANOS: the oil pressure seal is made of inappropriate material, and is usually worn out by around 70k miles. This allows the helical gears to oscillate in and out against the Vanos piston producing the commonly known "VANOS rattle".

There are a couple of remedial actions which can be undertaken with the M50TU Vanos.

The first is to buy a new BMW vanos unit - very expensive!
Secondly buy a refurbished unit from an after market supplier called "DrVanos" at a more reasonable cost (Very good apparently, but still £250).
Thirdly there is a DIY option: Beisan offer a seal kit which cures 95% of the problem for a much more reasonable total cost of around £30. Better still, the new seals are made of material more suited to operating in oil and heat, so are longer lived than the genuine BMW VANOS units.

There are several very good Youtube videos on how to change the Vanos unit, and seals, and it looks pretty straight forward, so this is the route I'll take. The kit from Beisan comprises just two seals, and a new bearing housing:


(- the videos below are 25minutes long, but if you want to know what to do are very good)

Vanos Removal
https://www.youtube.com/watch?v=JPlKrOC718w

Vanos Install
https://www.youtube.com/watch?v=23jXHhkpV_I

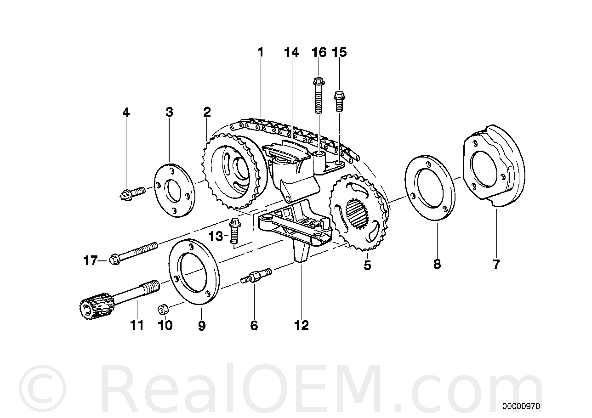
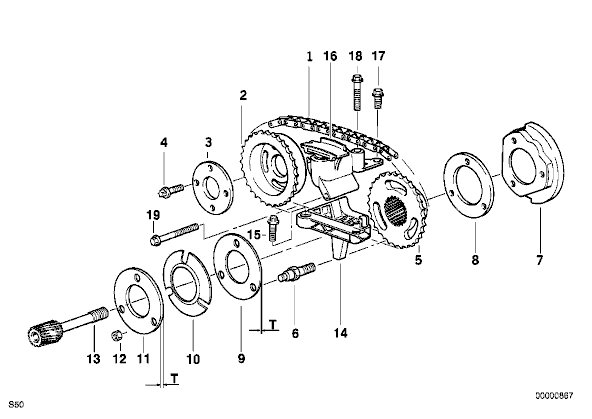
BMW were quickly aware of the "Vanos Rattle" and introduced an upgrade in the M52 single vanos engines, changing the single plate No. 9 in the M50 to 3 plates Nos.9, 10. & 11 in the M52.


M50TU Vanos


M52 Vanos


As with a lot of BMW developments this upgrade can be retro fitted to the M50 provided the longer studs (#6) are used too.

The improvement comes from the "Cup Washer" #10 which is a compressed dish plate between two flat plates #9 (2mm thick) and #11 (4mm thick), and helps to stop the cam advance oscillating. It has continued to be fitted to all later BMW heads, so presumably does work.

Ironically BMW charge only £3/4 for the cup washer plate, but want over £30 each for the two flat plates (#9 & #11) - so I sourced a pair from a BMW breaker for £10 delivered!


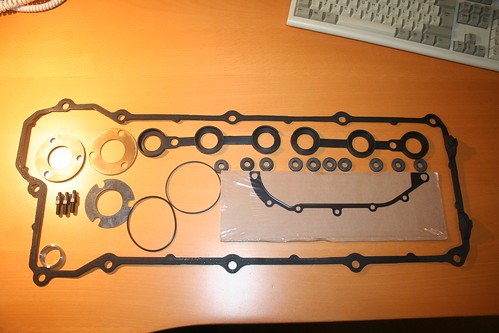
Of course things are never quite as easy, or as cheap, as you first think, and I've ended up buying a raft of genuine BMW gaskets to replace the old ones when I make the upgrade as the plastic gaskets become brittle and fail on removal:


My expectation is that these upgrades will help improve the low down torque, and eliminate an odd "rattle" I can hear in my engine around 2700rpm - by all accounts a classic Vanos seal failure symptom.
6 Jun 2014, 11:22pm
VDO Temperature Gauge

Mike wrote:
Despite ordering a special Smiths classic VDO temperature gauge from Caerbont designed to work with my BMW VDO sensor, when I tested it to calibrate the scale, I could not get a reading.

I then bought a new sensor, thinking it must the problem, but it did not work either.

After a chat with Caerbont technical services and testing the resistance profiles, they advised they would not work with the gauge they had specified, and would I send it back with my sensors, and they would see what they could do?!

This has now been dragging on for weeks..............and I'm still waiting!!!!!!!!!


After a further 4 weeks Caerbont have now told me their VDO 'Low' Temperature gauge will not work with the BMW sender!

However, they have a programmable gauge which will work with the BMW VDO sender (as it can be programmed to give the correct reading for a given temperature) - but of course it is more expensive!

Rock and hard place come to mind.........
7 Jun 2014, 8:00am
Extensive VANOS post, I'm sure it will be really useful for anyone with an M50. Look forward to hearing how it goes :)
7 Jun 2014, 10:28am
I haven't done the VANOS seals on my M50 but I did do them on my 130K M54B25 as I also perceived a lack of torque low down. The old seals were very brittle and flattened but the new ones didn't make a blind bit of difference as far as can tell, either on performance or economy. I've come to the conclusion that the BMW straight six is just not a very torquey engine low down. My old 3.0 V6 used to pull hard from 1500rpm but the straights seem to be a different kettle of fish.

I hope if makes a difference for you though. Have you got the special tool for setting the cam position or are you going to fabricate something?
7 Jun 2014, 7:17pm
morris wrote:
I haven't done the VANOS seals on my M50 but I did do them on my 130K M54B25 as I also perceived a lack of torque low down. The old seals were very brittle and flattened but the new ones didn't make a blind bit of difference as far as can tell, either on performance or economy. I've come to the conclusion that the BMW straight six is just not a very torquey engine low down. My old 3.0 V6 used to pull hard from 1500rpm but the straights seem to be a different kettle of fish.

I hope if makes a difference for you though. Have you got the special tool for setting the cam position or are you going to fabricate something?


Your m54 should have plenty of bottom end torque - have you checked your DISA valve - these are very prone to wearing out?

You may be right about not improving the M50 bottom end torque...... it will be interesting to see? If it solves the strange "rattle/rumble" noise I get at 2700rpm I'll be pleased enough.
If the torque improves then it will be a welcome bonus.

The M50 is known to have relatively aggressive cams, which have been tamed with each new M5x engine. The M50TU is milder than the M50, and the M52 milder than the M50TU. The forums suggest the M50 has been criticised for lack of low down torque, and the M52B28 was introduced to produce its torque lower down the range (due to milder cams).
The M54 introduced DISA which allowed a more aggressive cam to be brought back for the top end, but improved the bottom end torque by changing the inlet runner lengths between slow and fast revs.

I've not looked at the M54B25, but the torque figures for the M54B30 make me very envious! So much more torque, and significantly lower down the rev range too - my kind of touring car engine!

A spot on one of the forums showed a very simple way to set the cams - place a flat bar across the tops of the flat cam lobes, and then clamp them with two G-clamps - very simple and works a treat.
I'll make myself a bar with two pins to rotate the exhaust cam sprocket to push the Vanos unit off. It seems fairly easy for a single Vanos unit.
8 Jun 2014, 9:02pm
yeah it was the tool to rotate the cam sprocket I was thinking of. They don't cost very much but the proper tool for clamping the cams themselves costs well over a hundred.

My 325 is an auto too which also kills some of the low end and torque across the range generally. Once I've recovered from the £470 worth of parts I've thrown at it in May :( I was planning on doing a transmission fluid drop and refill, new filter etc in the next month or so. That should help a bit.

My DISA is fine, it was one of the first things I check when I bought the car to make sure that the pin wasn't about to drop out and take out a valve. You hear a definite change in engine note at around 4K rpm that I've always assumed was the DISA cutting in but may be wrong, that may actually be the VANOS cutting in?
8 Oct 2014, 5:41pm
Mike

Where did you get to with your temp sensor problem?

I have used the Smiths eclipse gauges which also do not work with the standard BMW sender.

The m20 also has a long sender tube which gives me the same issue you have.

The 1/8 NPT sensor with adapter supplied by speedycables provides about 20 mm less length into the thermostat housing than the original even cutting the adapter down as much as possible.

I assumed when they said they did a solution for the m20 it would be the same length (a fool and his money). It means the sensor is buried in a threaded tube in the thermostat housing with only 5 mm of the sensor exposed beyond the thread adapter, speedycables say it will be fine but I remain unconvinced.

Just wondered if you had found a solution.

GOO / Patrick did you have similar issues and how did you sort it.

Any info most appreciated.

John
8 Oct 2014, 8:17pm
On further examination there are two spare take off ports in the thermostat housing which are blanked off with 14 mm studs. One of them has a much thinner threaded boss which will allow the new sender in its adapter to sit in the water flow.

Both spare ports are on the hot side of the thermostat so I think should be fine, does anyone happen to have a spare 4 port thermostat housing lying around that they could sanity check for me to make sure the spare ports are open to the original sensor location just to save me taking mine off the engine to check. I can't see any issue with using the front spare port.

Cheers


John
9 Oct 2014, 10:09am
Hi,

I used the supplied senders that came with my instruments - and I got all of them from ETB

http://www.etbinstruments.com

Never had an issue with them - so can't really comment further. Sorry.
9 Oct 2014, 11:45am
Hi Jason

Without knowing I think you have answered the question.

I looked at the ETB sensors on the link you provided and the sensor they supply for their gauges looks to be the same dimension from the pictures as the one I have for mine.

I can see from your pictures on your website of your installed sensor that its fitted into an adapter boss exactly as mine would be, and is "buried" in the thread of the adapter and thermostat housing thread in the same way.

I think the fact you have seen no issues with this setup reassures me that speedycables are right and it should work fine. I am maybe trying to fix a problem that doesn't exist.

I'll fit it as is and see what happens when I fire the engine up for the first time.

John
9 Oct 2014, 11:49am
Hi John

Looking at my new, as yet to be fitted, housing and checking with the actual M20 installation on my spare donor, the 2 fitted senders (brown upper blue lower) are on the top hose side of the thermostat. The 2 large blanking plugs are on the bottom hose side of the thermostat. As you say, one of these has a much better penetration into the water flow than the other but whether they can be used successfully is another matter. Incidentally the original senders penetrate approx 5mm into the water flow.

Sorton