This is a read-only archive of the old Madabout Kitcars forum. New posts and replies are no longer possible, but every thread is still here to browse and read.
Paul, I am really happy with the bodywork generally to be honest i'm having a ball! Some of the tasks are a challenge, especially with a meagre budget, but that's half the fun.
The dashboard should be nice although I haven't worked out how to make the cubby hole door work yet. I am thinking in terms of a large letter box but upside down. I want the spot faced swirl effect to be continuous across the whole facia. Needs more thought, apply the 7 p's, prior planning etc. also KISS.
René, Thanks for the encouragement, I am just about 90% complete but this week, although I have been working hard all week about 12 to 14 hours a day, I don't seem any further forward. It took us all day Saturday to rivet the bonnet halves to the hinge. Today I have been trying to make a bracket for the Kenlowe Fan but I have also been showing Michael how to mix body filler and apply it and keeping an eye on Christopher, the younger of my two boys.
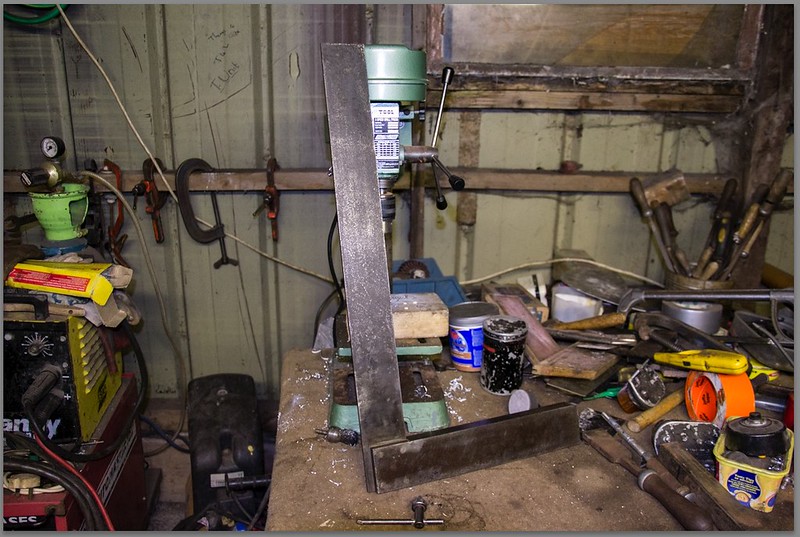
One of my neighbours has given Christopher a lovely tool chest with quite a few nice tools and various 'bits and pieces' so I went over to make sure he had thanked my neighbour properly, when he offered me an engineers square! A real mammoth one 24" on the blade, weighs a ton, it was a bit rusty but I cleaned it up and it's a Moor and Wright 402 precision square. OK, it's old and it has a bit of weld splatter but for me it's wonderful, I have cleaned and oiled it, I already have a 6" one so now I have a matching pair, little and large! Will post a pic in a day or so when I have caught my breath after the weekend with the boys.
For those interested in making bodywork from ali its also worth a look at the Pembleton forum. http://thepembleton.org.uk. These little three and four wheelers have a body made entirely of ali.
Cheers, Robin
Robin, I confess I have only just visited the Pembleton website you gave me the link for. I 'lost' the link, buried in the posts, I had skimmed through my entire thread several time trying to find your link without spotting it. This morning I was at a loose end and went carefully through each post in an effort of find it, it is in post #99! I am really pleased I did because it's a valuable insight into another world of car building. The workmanship is second to none, I would say it rivals aircraft construction in it's quality.
I need to spend more time browsing the various links, but it has given me several ideas, particularly for the dash. Food for thought...
Thank you for bringing it to my attention, a belated New Year's resolution, "I must read and bookmark links when I first see them".
Welcome aboard RRB, I hope you enjoy your read. Thank you for the kind words, I have been working on cars since I was very young, occasionally getting into deep trouble!
I remember on one trip to London (from Yorkshire) we were passing Scampton airfield in my fathers Alvis speed 25, when the car started bumping along with a bit of a wobble. My father instantly diagnosed a puncture, naturally I was elated! This meant I would get to operate the jack, hammer the wing nuts off with the copper/leather mallet and change the wheel. My father wasn't pleased about my enthusiasm, muttering dark words! LOL I suppose I was about seven or eight. Between us we changed the wheel, he was not well, suffering badly from TB over the years.
LOL! It was a bit of a sad time when it went, I think it was about '59 or thereabouts. My father sold it to a local 'enthusiast' because it was rather thirsty, the triple SU's could gobble petrol at an alarming rate. About six months later it was advertised in Motor Sport by a Park Lane dealer for £6,000. That was a LOT of money back then. My father had been ripped off big time, but that's life as they say.
I started the engine again for the first time in a couple of weeks, I needed to resolve some issues before I closed of the front end ready for final fitting the wings and fitting the bonnet etc.
Today I drove it forwards and backwards, only a few feet in the garage, but enough to assure myself the clutch is fine. No clanking when I engaged gear, the clutch pedal felt nice, smooth take up and the pressure was pretty good. Huge sigh of relief. I had envisioned pulling the engine to resolve the non release issue, that wasn't on my list!!!
So, the percentage of tasks completed is 93.4 right now. Today I completed several of the tasks I had been putting off. I fitted the reversing light switch, this meant I had to make a little domed cap to cover it because I couldn't get the transmission cover back on once the switch was screwed in.
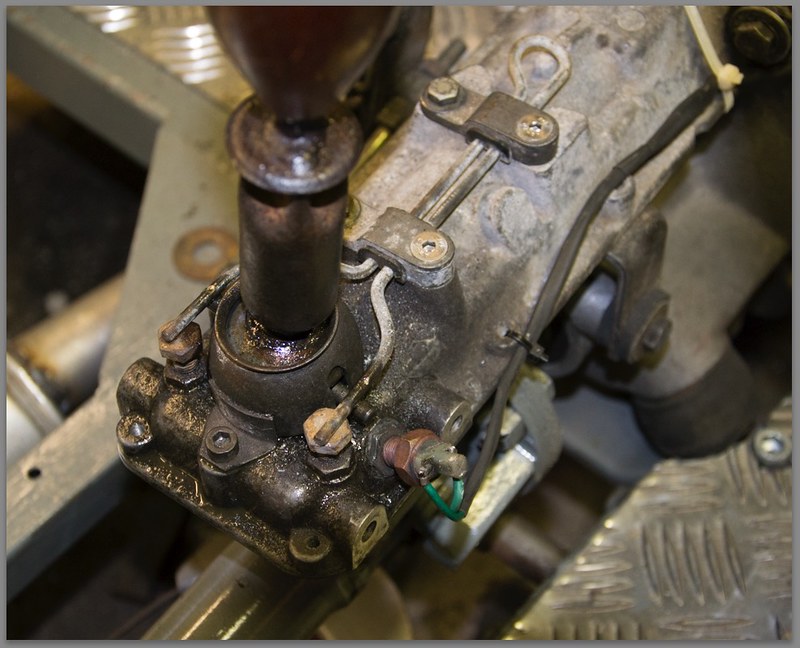
Another task in the same area was the gear lever bias springs, somebody had fitted the spring so it was easy to engage reverse but hard to engage fifth, I fixed it simply by turning the spring over and bending the ends.
I have made up the mountings for the electric fan, simple but they took some making. I have also raised the radiator by about two inches, to the maximum I can without taking lumps out of the nose cone or the header tank. This means the top of the radiator is slightly higher than the topmost part of the engine water system, so to should work better now.
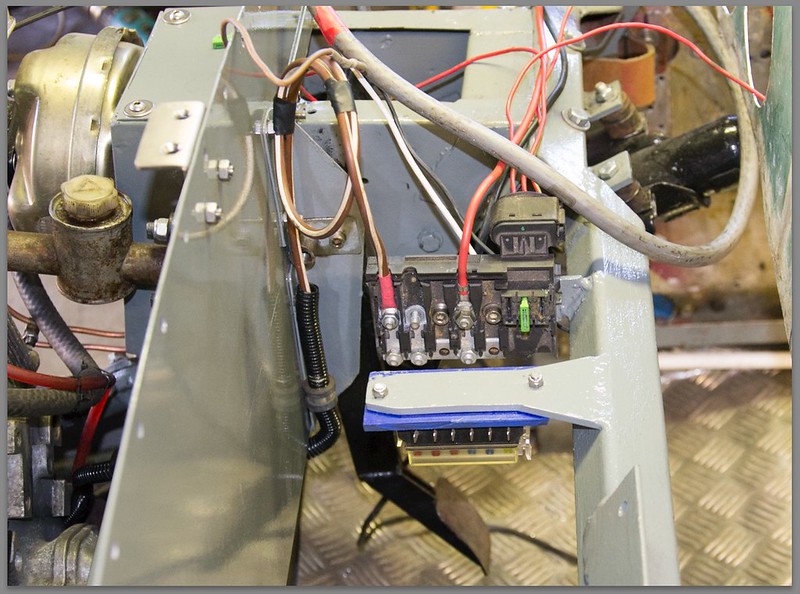
I have installed the two fuse boxes, a main 'power' box and a second ignition controlled circuit box. I have installed the engine side wiring to the front. Still to wire the lighting circuits.
I will add some pix later. I need to go tidy the garage now.
Have sorted some pix from the last couple of days, they say a picture tells a thousand words, so, here goes, with a few words too.
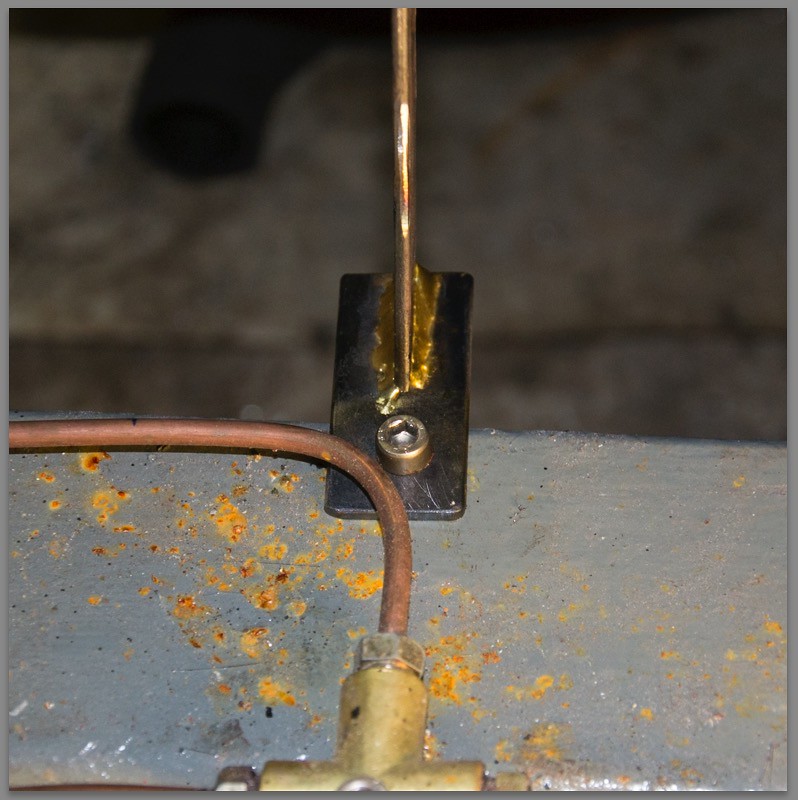
The fan brackets I spent over two days making.
The bottom bracket:
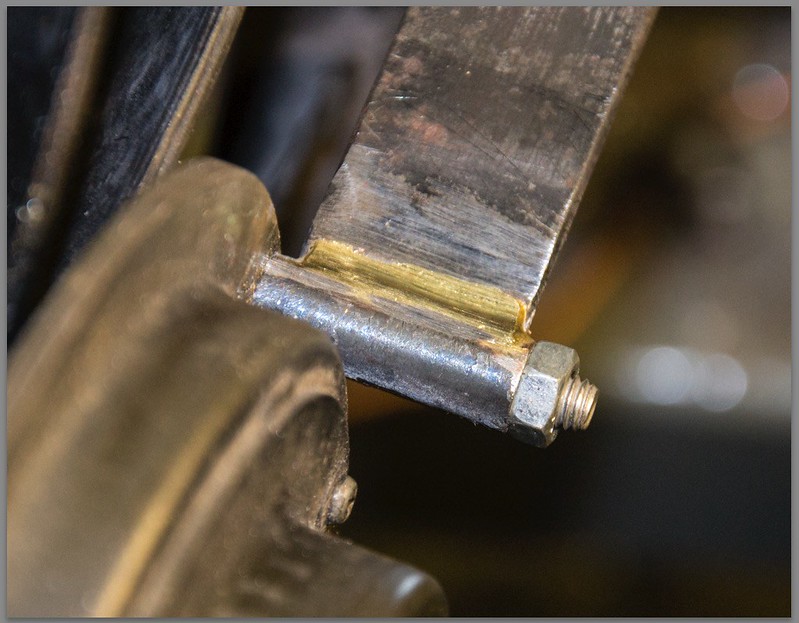
This is one of the three connections to the hub motor, the tube is cut from a child stairgate, brazed to a piece of 1/8" X 1" strip held to the motor by an M6 Stainless cap screw and nut. It's so long since I did any brazing I can't remember when! Bit like riding a bike, it soon came back to me. Brazing is rather like soldering, very handy for holding two bits of metal together when they aren't doing too much heavy work.
A general view of the fan assembly:
The fuse Boxes I fitted today. The far one is taken from a Renault I think, the other is a spade 6 way fusebox which I have looped all the inputs together by soldering a link underneath.
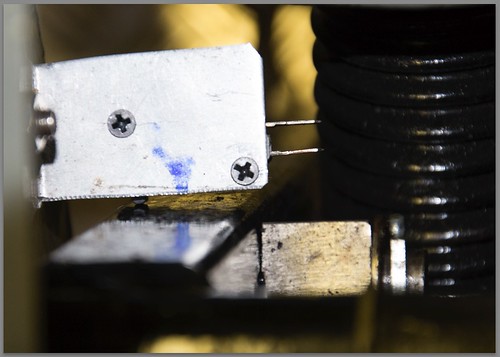
It's a bit difficult to understand this one, it's my brake light switch. There is a microswitch behind that aluminium plate held by the two black X point screws. You can just see the switch contact with the brake pedal lever, when the brake pedal is pressed the contact is released and the switch turns the brake lights on. The concertina bit is the Ford steering column and the split pin is the brake pivot pin holding the shaft which pushes the servo.
The handbrake and gear lever, the bias spring can be seen here. Note, also my Marlin gear lever knob! The hand brake is from a series 2 Land Rover.
A second view of the gear lever with the reversing lamp switch. The wires broke off the switch and needed re-soldering on.
The little cover I made for the reversing lamp sw.
This is the Moor & Wright engineers square I had given at the weekend, 24" tall, bigger than my little pillar drill!
Well that's all the pix for now. Thanks for reading my thread.
Hi Ed, as promised back on the first page of this thread here are the photos of the Lexus sc430 seatbelt arrangement s front and rear and the bracket off my Jeep roll hoop to hold the seatbelt. Sorry it took so long I had a spaniel phone tablet smashing incident. Ed.
Having bother getting pictures up but the links seem to open fine PIC 1 at 6'1" my shoulder is 3" above the seat belt outlet the belt passes through the strap that is fixe to the seat one end and has a magnetic clasp at the other so belt can be slipped off for rear seat access.
PIC 3 left to right rear belts my shoulder is prob 6-8" above outlet not that I can really fit in the back.
PIC 4 bracket on the roll hoop for my Jeep that takes the standard belt holder ( as fitted in most older cars.)
A removable roll hoop may be a very safe option abling you to correctly position the belts the female mount could raise the belt exit a way and be permenantly fitted and trimmed and the hoop could be lifted out for shows etc may not be Alfa esq as the original but I have just seen a car flipped over on the M62 and it wasn't pretty. At least a roll hoop and correct on the shoulder belts would give you a fighting chance. Enjoying your build I really like berlinettas. Ed.
BSM, Thanks very much for this pix, not a problem clicking on the links and then returning to the post.
Initially I will be going without a hoop but as soon as I am satisfied with the car I will install one.
Michael and I have been running the Marlin RV8, it purrs like a big pussy cat! I have set the dwell and was about to check the timing when the bottom hose burst off it's connection, we both got showered in pretty hot water. Nobody hurt and I think it's mended now. I think it could have been my fault, I think the Jubilee clip on that connection wasn't tightened properly.
It's a hang over from the previous owner who's engineering skills were second to almost anything. The tube used to connect the two halves of the bottom hose is polished stainless steel with no bead, so it's just a short, smooth piece of slippery pipe. I should have junked it but the prices CBS (and others) charge for such a small component are well within my definition of rip-off. I may have to bite the bullet or get myself to a lathe to make my own. Even ribs machined in the existing tube would help, I suppose roughening it with the angle grinder would be another alternative.
There is a berlinetta on eBay at the mo that has a hoop although the pictures are not very good. Ap performance in mirfield west Yorkshire sell all manner of tubes and silicon hoses I have always found them keen on price they have a large eBay shop. ebay link 190884993451
Ed.
Thank you, that Berlinetta seems a bit odd, brand new for £5,000??? No plates and not even any details of what engine etc... As you say the pix are very lacking for what it is.
Mine is running at £3,000 (so far) and it's built on a scrooge budget with chewing gum and string.
Thanks for the link to the hoses and connectors, most useful, I don't tend to use eBay much now but that seems a good source. I definitely need to do something I can't leave that joint like it is indefinitely.
Thank you, that Berlinetta seems a bit odd, brand new for £5,000??? No plates and not even any details of what engine etc... As you say the pix are very lacking for what it is.
I can't remember the specific details but I think there is an issue with getting a Berlinetta through the IVA. Something to do with the front suspension that VOSA have decided is not safe. The price probably reflects the fact that is not IVA'd or registered.
I can't remember the specific details but I think there is an issue with getting a Berlinetta through the IVA. Something to do with the front suspension that VOSA have decided is not safe. The price probably reflects the fact that is not IVA'd or registered.
My understanding is there is no way VOSA will pass a Berlinetta with the Cortina front cross member/subframe because it's not carrying the imposed loads in the way Ford intended, nor is it mounted as Ford intended. I am aware of a Berlinetta with welded in suspension mounts like the Cabrio which uses a form of Sierra suspension but are't there issues with using the cut down struts?
When I fist saw mine I thought it needed a strut across where the engine would have been, that isn't practicable because of the position of the nose cone but I have put a strut across the front extensions which carry the tie rods to help strengthen that area. Time will tell if that improves things.
There is no mention of a V5 or date of registration, if it is unregistered then it's grossly overpriced in my opinion, only worth the value of the parts, which while they may be new they are old hat.
My understanding is there is no way VOSA will pass a Berlinetta with the Cortina front cross member/subframe because it's not carrying the imposed loads in the way Ford intended, nor is it mounted as Ford intended. I am aware of a Berlinetta with welded in suspension mounts like the Cabrio which uses a form of Sierra suspension but are't there issues with using the cut down struts?
When I fist saw mine I thought it needed a strut across where the engine would have been, that isn't practicable because of the position of the nose cone but I have put a strut across the front extensions which carry the tie rods to help strengthen that area. Time will tell if that improves things.
There is no mention of a V5 or date of registration, if it is unregistered then it's grossly overpriced in my opinion, only worth the value of the parts, which while they may be new they are old hat.
Hi Robert,
I guessed you would have heard about the Berlinetta suspension issues. But Marlin do use cut down BMW front struts on the Sportster and they pass SVA/IVA without issue so that could be an option, if indeed necessary.
Buying an unregistered car would certainly be a huge risk and I wonder if the dealer selling that car is aware and just chancing his luck in finding someone unaware of the VOSA issue?
That brought home to me that no matter how good a build you create, if the fundamentals are wrong then it's doomed to failure. Also the essential of correct registration.
Anyway without being smug, mine has a correct V5 so THAT shouldn't prove a problem.
I am however having problems with the ignition... Unbelievably my simple, reliable, basic P5 points distributer is playing up. It starts perfectly and runs at low speed beautifully but stutters and isn't 'happy' being revved up. Also my Snap-On Tach-Dwell meter is erratic on the tachometer mode, the needle is leaping all over and no steady reading is possible. If I rev the engine the needle goes down to zero or leaps about even more. I have tried two rotor arms, two condensers , three coils and have cleaned the points several times. My next move is to try to get a new set of points.
In desperation I dug out all the parts to make up a 'proper' SD1 distributer last night (it is actually an SD1 engine), the insulation of the internals looks dreadful with cracked leads and peeling coatings but I thought it might just work. Once re-assembled and fitted, to my annoyance the engine burst into life at the first touch, ticked over perfectly and revved on demand as expected. Grrrr! Why do we not have a smilie for tearing hair out? I could make good use of one right now! LOL
The big downside is that the SD1 distributer does not seem to be tachometer friendly, the Snap-On Tach-Dwell doesn't seem to work with it and the P6 Jaeger RVC rev counter doesn't seem to work either. Until I resolve this I can't move forward much because my dashboard hinges around the use of these instruments.
I cannot for the life of me understand how/why the points don't work properly. The engine starts and runs beautifully, it just doesn't like revving and the tachometer is erratic.
Will try checking the LT leads and connections later. The points themselves appear to be OK, I can't see any signs of damage or faulty insulation.
If it's a points type distrubutor worth checking that the earth braid between the points terminal and the case is intact. Maybe it's broken and the earth is via other things that make enough good contact when slow tickover but poor contact when revving up due to vibration. Just a thought. Peter.
Thanks Peter, I checked that but it tests OK but as you say it could appear to be OK even if it isn't, it's riveted at one end. I am going to solder another fine strand connection over it just in case.
I have got a new set of points now, am in process of fitting them, then I will solder a new link wire in, I will switch dizzy's later this evening.
Wow! Another month gone by. Been a bit of a toil with the weather and one or two setbacks, the last three days have been spent chasing my tail, trying to get the engine running properly.
I fitted the new points but my Snap-On Tach-Dwell meter is still erratic. However, I was able finally to get the Rover rev counter to work in a stable manner. I now know it's a four cylinder rev counter. In the morning I will have to get on to my friend who I got it from, to get another, a V8 one this time. I know he has at least two more V8 Tacho's so I will get one eventually. I thought the one he had given me was an 8 Cyl one. Would have been much easier if they were identified on the back or something.
Here is the Bar Chart of my progress up to now. I am at 93.64% complete. I have sorted the items by most complete first, least complete last.
The electrics and body are the only significant aspects of the build left. The other lingering tasks are mostly simple things like track up and check the brakes for operation on the move which I can't do in the garage!!!
For comparison, here is the progress chart as of the end of February:
For comparison, the progress chart at the end of January:
What HT leads do you have? If carbon type ditch them! Just thinking I had a similar problem with a classic and spent months chasing fuel pump / filters / carb etc. With electronic ignition fitted, I recently eventually found that the output from that had burnt out the core of the (5 year old) carbon HT leads, just inside the dizzy cap entry holes so you couldn't see any evidence, but enough to give a misfire as soon as the revs increased! Worth a try? Peter.
Hi Peter, The progress chart is what keeps me motivated, chipping away at the various aspects of the build trying to progress them as much as possible. Also, I won't sign tasks off until they are truly finished, that helps.
Re. the Snap-On multimeter, it's an MT826, I hadn't allowed for the idiot factor... There are no instructions with it, I haven't used it since the late 80's so I had forgotten how to connect it... I was connecting it to the live side and the CB. In fact I should have been connecting it to the negative and the CB.
Connected correctly the revs are now as steady as you would expect. I just need my mates timing light now to check the advance. I guess a set of new points were't amiss.
Have arranged to go up and swap the Rover rev counter tomorrow, so I have plenty to get on with now.
The leads I had were a mishmash of junk, copper, black rubber and a couple of sillycone, I binned the lot and got a set of proper Land Rover ones from my local LR dealer, cheap! At least I should get a good grip using them.
The engine is running beautifully now and I can switch back to electronic if I choose, just by swapping the distributers.
I am entering the wiring phase, coloured spaghetti all over the garage floor. Christopher is sorting the wires into various main colours and Michael is re-constructing the rear fog and reversing lamps and making brackets for them.
A real hive of activity. The wind might have dropped a bit but it's still darned cold here. Will try to post some pix later, still trying to get my head into 'wiring gear'.
No work done on the Marlin today. Been helping a neighbour out. I did get some heat shrink sleeving though, I was running low on that.
I find the heat shrink sleeving indispensable now. It's so good at insulating joints, terminating cables and a multitude of other wiring related jobs, so neat and efficient.





 In the morning I will have to get on to my friend who I got it from, to get another, a V8 one this time. I know he has at least two more V8 Tacho's so I will get one eventually. I thought the one he had given me was an 8 Cyl one. Would have been much easier if they were identified on the back or something.


