MadaboutKitcars

This is a read-only archive of the old Madabout Kitcars forum. New posts and replies are no longer possible, but every thread is still here to browse and read.

Mister Towed's Bugless Outlaw Speedster build

18 May 2020, 1:00pm
Dash plug has now had half a dozen coats of Iris blue -


Next step is to cut back and polish the paint once it's fully cured, then add flanges ready to take a mould from it.

Exciting stuff!
18 May 2020, 2:24pm
that looks really good!
18 May 2020, 5:18pm
Thank you. The colour is left over from my Midget restoration and does suit the shape of the dash, but I'll be sticking with silver for the finished article.

Speaking of sticking, there are a couple of tiny flies firmly attached to the dash - light blue is their favourite colour, in a sort of fatal attraction way for these two as they both landed on it while it was still tacky.

There are also a couple of sags where I put a bit too much paint on in one go. It's nothing that won't sand out, flies included, and it'll teach me not to open the garage doors until the paint's touch dry and not to move the gun too slowly.

I'll report more progress when it happens.
18 May 2020, 5:45pm
Try dealing with Florida love bugs when fiber-glassing.
It will make you crazy!
19 May 2020, 6:17am
molleur wrote:
Try dealing with Florida love bugs when fiber-glassing.
It will make you crazy!


I hadn't heard of those before but Google suggests that they spend most of their lives in an airborne hedonistic shag-fest.

We're possibly genetically related as that's exactly how I spent my twenties. I still wouldn't want them walking on my fresh paint though, spiritual cousins or not.
21 May 2020, 4:57am
Mr T - Dash plug looks good. :cool:

Looking forward to seeing how you build the mould & the end result.

Good luck, Paul. :)
21 May 2020, 6:03am
Thanks Paul, should be more progress and pics over the weekend.
30 May 2020, 7:07am
must be an age thing my dream car a Speedster I check ebay daily for one to pop up with my name on it. good luck with the build very jealous
30 May 2020, 9:00pm
andysharrock wrote:
must be an age thing my dream car a Speedster I check ebay daily for one to pop up with my name on it. good luck with the build very jealous


Ha ha, not an age thing in my case, I've wanted one since I was nineteen.

I built my Spyder as a result of not being able to afford a 356 Speedster kit and the experience I gained from building it gave me the confidence to buy a neglected Speedster body shell and do the rest myself.

Will be updating again in a few days - for reasons I'll explain then my dash mould is taking longer to get right than expected.
31 May 2020, 9:14am
Mister Towed wrote:
Ha ha, not an age thing in my case, I've wanted one since I was nineteen.

I built my Spyder as a result of not being able to afford a 356 Speedster kit and the experience I gained from building it gave me the confidence to buy a neglected Speedster body shell and do the rest myself.

Will be updating again in a few days - for reasons I'll explain then my dash mould is taking longer to get right than expected.


lol that's what I meant sort of ,my first car @17 a VW beetle CRB618L I rebuilt it so many times and change the colour 4 times .it was my mums car she wrote it off in an accident and I put it back on the road after passing my test. always wanted a 356 porsche but could never afford a real one. been a DINK I can now make some of my childhood dreams come true :thumb:
1 Jun 2020, 7:10am
andysharrock wrote:
lol that's what I meant sort of ,my first car @17 a VW beetle CRB618L I rebuilt it so many times and change the colour 4 times .it was my mums car she wrote it off in an accident and I put it back on the road after passing my test. always wanted a 356 porsche but could never afford a real one. been a DINK I can now make some of my childhood dreams come true :thumb:


My first (only) Beetle was SGP 345F back in '89. It was a 1500 Automatic (two pedals, manual change with electro-hydraulically actuated clutch and IRS instead of swing axles), which i converted to a proper manual and three pedal setup from a 1303S when the 1500 threw a rod through the crank-case and damaged the gearbox.

I kept the outside looking shabby and stock but uprated to a 1600 motor with 85hp and lowered it with dropped spindles at the front and a one-spline turn at the back.

It had enough go to put a smile on my face, but it always sounded like my dad's Suffolk Punch lawnmower right across the rev range. The handling also always demanded 'respect' (read fear). It wandered all over the road at anything over 55mph, the tail would try to overtake the nose at every opportunity and you needed at least three lanes clear to pass a truck on the motorway due to the wind blast blowing you across the carriageway.

My main reason for going down the Spitfire chassis route was the experience of trying, and failing to get that bug to handle. At least I know I can get this one to change direction without having to check the shipping forecast first.

Anyway, I've got a bonkers Outlaw Speedster to build so I'd better get on with it.
11 Jun 2020, 10:58am
Time for an update on progress, I feel.

My dash mould is now almost ready to use. It should've been ready to use about a fortnight ago but I had a bit of a setback to sort out...

As you may recall, my dash plug was finished, painted and in the process of being given a dozen coats of release wax -


I then added flanges and laid up five or six pretty heavy layers of CSM reinforced in places that might flex. I've never made a split-mould before, so I included recommended features like wedges built into the dividing flange and applied a pva release agent (on top of the wax) on one 'half' of the buck to see if there was any difference in ease of release -


After a suitable curing period I broke the buck out of the mould. This took a great deal of force, far more than I expected, and what a mess it revealed -


Okay, so it appears that the gel-coat on the inside of the mould had reacted with something and caused a few issues. All of the gel-coat had tiny bubbles in it and it had stuck to the paint on the face of the dash where I had only used release wax, tearing the paint and high-build primer from the plug when I separated it from the mould. At least the paint didn't stick where I used the PVA release agent, so I'll definitely be using that again.

The gel-coat looked fine when I applied it, but it was a part-used tin that had been sitting in my garage for about 30 months, so I guess it had either gone off or maybe I didn't leave the paint to cure for long enough on the plug before glassing over it.

I thought about scrapping it and starting again, but decided to have a go at making it good with lots of filling and sanding, which I've got to say is much harder on the 'negative' impression of the dash rather than the actual dash itself -


Anyway, after loads of effort and half a dozen coats of white cellulose it looks like this -


It's now sitting at the back of the garage for a week or so to allow the paint to fully cure and I have a nice, new tin of gel-coat ready to use when I lay up my 356/550 Spyder hybrid dash.

More later.
11 Jun 2020, 11:30am
...and while I'm waiting for the paint to cure on my dash mould, I've started work on the body.

As my 'kit' is of dubious origin - I think it's a Banham New Speedster, but I'm not certain - some panels don't appear to be quite the same size as your average Speedster kit.

Having secured a curved grille from Martin & Walker, I found that it was exactly 1/2" too long for the opening in the engine cover. Additionally, the radius of the corners of the opening didn't quite match that of the grille and the curve didn't match at the lower edge just for good measure.

So, using a technique I developed when trying to get the lower rear edges of my Sammio bonnet to match the curve of the body, I cut a section out of the opening and sawed 'comb' teeth around the opening where it needed to move. With the grille encased in polythene sheet and fitted in place, I then glassed the reverse of the engine cover, fixing the 'comb' teeth in their new positions -


The grille now fits the opening and the opening matches the curve of the grill, so I'm happy with the results -


I also decided to see if I could make a head-fairing that would suit the Speedster body shape. Most of the fairings I've seen added to Speedsters look a bit short and dumpy to my eye, so I thought I'd try to replicate the ones Porsche fitted to the 718RSK Spyders -


I'd already made a start on fabricating a rear deck cover that (deliberately) looks a lot like the RSK's rear deck, but to make a start on the fairing I needed something roughly the right size and shape to use as a template for the head fairing 'pad' itself.

Luckily, I had previously used a sheet of plywood as base when spraying some Triumph engine parts and noticed this outline of the front timing cover -


A bit of pencilling in followed by some careful jigsaw action and my head pad was pretty much the right size and shape. Having measured the distance and drop from the front face of my deck cover to the engine lid opening and with reference to many images of cars with head fairings (including my old Spyder) I drew the profile shape of the fairing freehand onto some plywood and cut that out.

The next steps were to cut out smaller and smaller versions of the head pad shape and slot them together like this -


...resulting in a former to work from that looks like this -


Happy with progress so far, next step is to cover it with cardboard and parcel tape and glass over the outside, wihch I'm off to do now.

More later :)
11 Jun 2020, 12:46pm
Good work , will it be detachable from the rear deck cover ??
11 Jun 2020, 6:34pm
redratbike wrote:
Good work , will it be detachable from the rear deck cover ??


Thanks and yes, the rear deck and fairing will be separate mouldings, mainly to ensure that the rear deck cover seals properly to the tub.

The rubber U channel seal I have to go around the edge of the deck cover will run through notches in the fairing. If I make the fairing integral to the deck cover there'll be two 'weak' points where water could get in. The plan is to have a mohair tonneau cover mounted under the leading edge of the deck cover so it can be rolled out from underneath and seal the cockpit at the same level as the door tops and dash.

It's so simple it might just work...
11 Jun 2020, 10:25pm
That looks terrific, very different but we'll resolved and nicely cohesive with the body shape. Great work.
12 Jun 2020, 1:21am
I was reading about the cars used in Ford vs Ferrari a couple of days ago. The interview was with one of the production crew. Apparently the red 356 Matt Damon is seen driving around in was one of several 356 replicas the company happened to own already and guess what they were based on? According to the Bloomberg article....Mazda Miatas - MX5s in pounds shillings and pence! So if a front engined 356 is good enough for Matt Damon you're in good company :-)
12 Jun 2020, 6:37am
Thanks guys, I'm glad you like what I'm doing.

I've watched Ford vs Ferrari during the lockdown and did notice that Speedster and it looked great.

I'm a little surprised it was a Miata in a party frock - the Mazda wheelbase is seven inches longer (ironically only 3mm different to the Banham New Speedster body I started with before I shortened the doors) and the track is six inches wider, so the car would look very big if it was parked next to an original, a bit like a BMW Mini parked next to a proper one.

It did look fine on screen, though, but then people and things can look bigger or smaller when they're filmed - Tom Cruise always looks six-foot plus in his movies as do Ben Stiller and Arnie (The Governator), but they're all famously short-arses, and Father Ted spends most of an episode explaining the difference between 'small' and 'far away' to Father Dougal.

I'll be making some more progress over the weekend so I'll post another update then.
12 Jun 2020, 7:45am
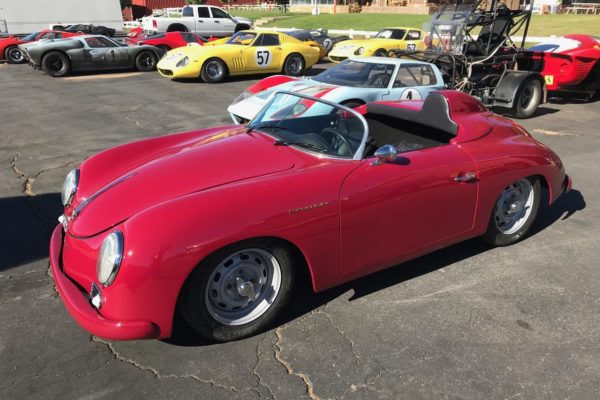
And I've just noticed that the red Speedster driven by Matt Damon also has a rear deck cover and head fairing -


(image sourced here - https://productplacementblog.com/movies/porsche-356-red-convertible-car-used-by-matt-damon-in-ford-v-ferrari-2019/ )

Looks pretty good to me.

One thing I've noticed is that the rear deck covers I've seen fitted to Speedsters often run straight across between the rear of the door openings. I trial fitted my seats in position (when I was assessing whether my madcap Spitfire/Speedster plan was feasible), and found that my back will encroach a couple of inches into the rear space behind the doors if I'm to get a comfortable driving position.

For that reason I've set the front edge of my deck back about 80mm (it'll have padded trim added), but I did initially include curved 'horns' either side so the deck cover extended to meet the door openings. I recently cut those off because they were visibly not symetrical, but I see from the image above that Matt Damon's car has that feature - the front edges of the deck cover meet the door tops but the cover then curves back to allow the driver and passenger more space. It looks that good that I think I'll give those horns another go. :)

Oh, and you can see from the fact that Matt's Speedster isn't dwarfed by the Yank Tank parked behind it that it's clearly much bigger than the genuine article.

There's another famous movie that uses a 356 Speedster, Top Gun. Kelly McGillis drives this black one, which must also be a replica as it's clearly only 2/3rds scale because it only comes up to Tom Cruise's waist and it should Tower over him...

13 Jun 2020, 5:16am
Mr T Sorry to hear the dash mould didn’t work as planned.

But at least you seem to have got back to the point where it should work.

Nice work on fitting the grill and getting the basic shape for your head fairing. :cool:

I was also unaware of the ‘behind the scenes’ history of the Le Mans 66 Speedster.

But have now found this photo to help me understand what you are aiming for.


Good luck, Paul. :)
13 Jun 2020, 6:44am
Aah, thanks Paul, that's a better picture of the head fairing so you can see what I mean about the 'horns' at the sides. You can also clearly see how far back the cover sits to allow space for the driver and passenger.

I didn't twig that it was a replica when it was on screen, but it doesn't get much (enough) screen time or any close-ups as I recall.

Up close and static it gives itself away in a few seconds, though - it doesn't have a rear engine cover, just a flat grille from a coupe set directly into the back which is a one-piece moulding -


Also, those steel(?) wheels with spinners look just like Rudge alloys (an original option on the 356, see below) from a distance, but the four-bolt pattern shouts 'kit car' to anyone who knows their 356's as soon as you see it.


Images sourced here - https://borderreivers.co/portfolio/porsche-356a-speedster-1957/

Having said all that, I wouldn't turn it down if the studio rang and offered it to me as a gift...
16 Jun 2020, 7:07am
I've made some positive progress over the weekend without any serious setbacks.

I finished off taping up my head fairing. It's only going to be a 'close enough' shape to work on out of the mould, hence the plug being somewhat basic -


Off the car to reinforce the lower edge it is very reminiscent of one end of a Viking longship, fit for a trip to Valhalla -


Back on the car I covered it with half a dozen layers of 500gsm CSM -


Leaving me with a basic mould for the head fairing -


The mould needs a little work on the inside: a bit of filler here and there, sanding smooth and painting, but it'll do the job once that's done.

Speaking of which, after a week or so for the paint to cure, I also set my hybrid 356/550 dashboard mould to work over the weekend.

As it's a two-piece mould with a pretty complex shape for the eyebrow over the instrument cluster it's definitely the most ambitious fibreglass item I've ever tried to fabricate.

Here's the mould clamped together after multiple coats of release wax had been applied -


Next job was to put PVA release agent on top of the wax. This is where I did have a bit of a problem, though: Following the manufacturer's guidance, I sprayed the PVA into the mould using a conventional gun with a 2.2 nozzle, but rather than a smooth, thin coat, the PVA just beaded on the surface, even though the first few coats were just a dusting. Googling it, I found that some release waxes cause this and some don't, and I was just unlucky enough to be using one that does.

I couldn't find any posts that said what to do about it, I figured I could wash it off and just go with the wax but didn't want the dash to stick in the mould, which could be a disaster.

Instead I took a 1" paintbrush and kept brushing the liquid out across the inside of the mould as it beaded until it started to set and stopped beading. That left a rather uneven coat of PVA on the mould, but I figured it was as good as it was going to get so I went ahead with the next steps.

After leaving the PVA to fully dry overnight, I gave the mould a couple of fairly thick coats of white gelcoat, brushed on as I don't have any thinners compatible with it for spraying (and it's the consistency of treacle out of the tin).

Once that went tacky, I used a layer of 30gsm 'surface tissue' making sure it was smoothed as far as possible onto the gelcoat. Then it was on with the resin and layers of 200 and 300gsm CSM to build up the dash in the mould.

As the dash eyebrow is quite intricate and impossible to get a roller into, I found it was best to fully stuff it with the lighter weight CSM and resin, ramming it home with the tip of a paintbrush to make sure there were no voids and that the eyebrow will actually be solid fibreglass.

Anyway, after leaving it for 24 hours to cure, the time came to see what I'd achieved.

Drum roll, please...

So far so good, the front part of the mould came off with some serious screwdriver prying -


Then the back of the mould followed suit, leaving a newborn dash moulding, complete with PVA placenta!


And after a wash with warm water and as sponge -


I was in tears (of joy) even if my new baby wasn't.

Okay, it's not up to pro standard, it needs quite a bit of work to make perfect - the gelcoat surface is quite pitted from where the PVA had gone on lumpy and there's a heavy moulding seam to sand out, but it's light, strong and the shape I want, so I'm over the moon!

Here it is dropped into the shell (prior to trimming) -


More later :)
16 Jun 2020, 8:06am
Well done that man. Looks great.
16 Jun 2020, 8:18am
Was there wax on the mould before the PVA was added? I've tried to use PVA in the past, and found it beeded, also when I tried to get my object out that it was stuck fast in the mould! I gave up using PVA, and just rely on wax. Last year a made a mould, and a week later waxed it many times (no PVA) and a part got stuck permanently in the mould. I then read on the 'net that GRP that isn't fully cured can still cross-link with more GRP even with a release agent separating them - that seems plausible, because I then made a new mould and let it cure for 2 weeks, did a couple of wax coats, and subsequently laid up a part with popped out with hardly any effort. I was making a very small plug for a part a few days ago and couldn't get a great finish on it, and decided I'd put some PVA on it to achieve the smooth finish..... As I was putting it on by brush I couldn't get it smooth anyway, so thinned it with water, which meant i achieved a smooth finish. but interestingly when it dried it appeared a lot thinner! We'll see what happens. BTW It was the same PVA as I'd used before, but no wax on the plug, and the PVA didn't beed.
16 Jun 2020, 1:30pm
Ideally, PVA should be applied by spraying at least three "fog" (very thin) coats allowing it to fully dry between each. This will go over mould release wax, 5 layers on a new buck or mould. allowed to dry at least 15 minuted between coats and buffed. Never had an issue using this method for 25 years.