This is a read-only archive of the old Madabout Kitcars forum. New posts and replies are no longer possible, but every thread is still here to browse and read.
I'm in this shakepeare fase: "much to do about nothing". I have been working many hours, but it doesn't really show. However, some things have completed now. For instance the wheel tubs for the rear. I bought a set of used rear wheel tubs from a VW Transporter T5. They have a good size. The inner sides are closed, so you can cut out an appropiate shape for the drive shaft and rear leaf spring to go through. I still have to cut the outer edge to the right size. Now they stick out a little and the body won't come over it. I haven't figured it out yet how. Here are some pictures.
This is the bracket I made:
[IMG][/IMG]
These are the two wheel tubs with the right cut made:
[IMG][/IMG]
This is the bracket in place. There is also a second little bracket up front:
[IMG][/IMG]
Maybe I can add some walk to the talk. I placed my body and bolted it to the frame. There was some discussion about bonding vs bolting. There was concern about the wobblyness of the body which needed bonding for that reason. I think I can show that bolting could get a pretty strong result.
It starts with laying the body on the frame and bonding in some profiles (I got mine from GRP rain gutter material, but there are different solutions offcourse). The profiles lay against the frame. After cure, I drilled holes thru frame and profile.
[IMG][/IMG]
I removed the body again and finished other jobs on the body. I also tried to strengten the connection between body and profiles as good as I could by adding epoxy everywhere.
After the body was placed back I could bolt it to the frame. I used 8 times m8 under the dash.
[IMG][/IMG]
[IMG][/IMG]
At the back I made a grp support to the crossmember of the frame. I used 2 x m8 to bolt it.
[IMG][/IMG]
[IMG][/IMG]
At the back I had made a box section that rests on the frame. It is reported somewhere in this thread. And also the connection/bolts/strips at the lower sill.
[IMG][/IMG]
[IMG][/IMG]
And then the eating of the pudding, is it strong or wobbly? OK, here it goes.
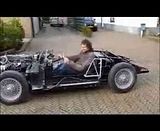
No problems here:
[IMG][/IMG]
And yes, to my surprise as the face shows, no problems here:
[IMG][/IMG]
Then I had to test the parafan.
[IMG][/IMG]
I would say, mission accomplished! (well at least this mission, not won the war yet).
My boot has finished. Offcourse I don't know the capacity, but it has become quite spacious.
And indeed Mike, with paint it would look so much better They have to prep the lit a bit though
First a made panels at exact the right size to fit just withing the measurements of the inside of the frame.
[IMG][/IMG]
I put them in place and I cut some small pieces in lenghts and put these pieces on the frame/glued them to the bigger pieces. After that cured. I took of the panels which had now the perfect inside shape and lips that support on the outside of the frame with the right angles. I Laminated over them to give it all strength.
[IMG][/IMG]
For the bottom I used Aluminium. I had it bend at two sides (front and rear) This bottom plate is attached to the underside of the rear outriggers which is flat..
[IMG][/IMG]
With a flat GRP panel in the front, and two layers of Top-coat in the inside and black bodyschutz on the outside you get to this:
[IMG][/IMG]
The underside of the laggagespace is done. The upperside is formed by the boxed section that I made into the body as a support of the body to the frame. It works as a lit. This is a picture of it, without the underside of the luggage space.
[IMG][/IMG]
I have made a new boot lit, with reasonalble equal thinkness all around, which is neccesary to get a good fit with the rubber seal.
[IMG][/IMG]
Then I had to make a gutter for the seal. A bit difficult because it has to be at the correct depth for the seal. I also made a cross bar for the attachement of the bonnet pins.
[IMG][/IMG]
Then a multi-adjustable base for the hinge. And adjustment is important I found out...
[IMG][/IMG]
A framework for the inside of the lit with a double hinge.
[IMG][/IMG]
The result:
[IMG][/IMG]
Ooops, it only just goes over the body when opening. I think I haven't made the correct shape of hinge. But on the other hand, it works.
[IMG][/IMG]
@Paul: You are the man if it comes to details buddy. (Took me months to produce these.....)
@Mike: Prep is your middle name, No prep, no glory, no putty no story...
@ratbike: I got this one from Speedway motor in the USA because I couldn't find one nearer. They should though, only I couldn't find it. I have a cherry bomb silencer. I also used a inline damper (DB-killer). But why it is called silencer/db-killer, I don't know. Good lord what a noise! It gives me the shiffers all around. I'm addicted to it allready. The neighbourhood doesn't however. I have a video, but it's fairly large of size (225 MB). I look into it. Maybe I can extract the sound
Let's see if this works. It's my attempt to add a video to this post. The best part is not on video, that's where I really reved it and the machine went mad.
That is a top job buddy.
you should be rightly proud of your achievement to date.
I see you are thinking about paint? I am right in thinking that it is going to Miglia to be painted?
You have a color in mind?
Hello PJ.
Thanks. Indeed, I would like to have Mike (Miglia) prep and paint my car. I think he has lots of experience. He can make a real beauty of it, I'm sure.
The colour will be definitive when it is on the car. Until that moment I will remain in doubt.
Another form of progress to report. I finally could finish the plating behind the seats. And with that the luggage space (cubby box?), took shape.
This is the situation before (you can clearly see how the battery is placed as well):
[IMG][/IMG]
This is with the plating in Place. Primarly fixed with the 4 seat belt fixing points. There are 3 pieces joint together with pop-rivets. I made a sliding hatch (not hedge! thank you gary) to get into the luggage space.
[IMG][/IMG]
And with the hatch open:
[IMG][/IMG]
The hole I made into the hump will be covered by a cusion. This way it works as a service hatch. You can reach the fuel tank, fuel line conections, filler pipe, and the fuel meter (when the tank is placed in the way that the fuel meter is in front).
That's looking mighty fine buddy. top job.
It is going to be a superb job when done.
I am very keen to see the car with its new paint on.
when is that happening ?
I know you won't want to disclose the cost of the prep and paint job on here but perhaps Mr. Miglia could give us an idea of what finishing this beauty will cost?
If I go the Ribble Roller route then I wouldn't rule out getting the ol' gal painted by the miglia crew myself before she is shipped over here.
 [/IMG]
 [/IMG]
 [/IMG]
 [/IMG]
 [/IMG]
 [/IMG]
 [/IMG]
 [/IMG]
 [/IMG]
 [/IMG]
 [/IMG]
 [/IMG]
 [/IMG]
 [/IMG]
 [/IMG]


 They have to prep the lit a bit though
 [/IMG]
 [/IMG]
 [/IMG]
 [/IMG]
 [/IMG]
 [/IMG]
 [/IMG]
 [/IMG]
 [/IMG]
 [/IMG]
 [/IMG]
 [/IMG]

 [/IMG]
 [/IMG]
 [/IMG]
 [/IMG]