This is a read-only archive of the old Madabout Kitcars forum. New posts and replies are no longer possible, but every thread is still here to browse and read.
OK well a good weekend, not that much achieved but it feels good to have started again.
So, as you all know, I have been trying to finish the model jeep because it is in the way. I have given up on that for a short while because it is essentially finished and striped for painting (my least favourite bit) it will be red and black, I have started but it will go on hold now - Dougie is too young yet so I have time.
[IMG]http://IMG_0052 by oldpropuk, on Flickr[/IMG]
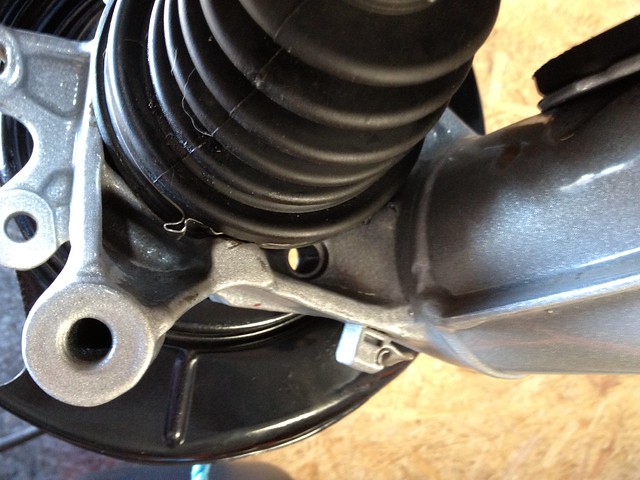
So as well as painting I have finally resolved the halfshaft gaiter conundrum. The recon halfshafts I got with the car definitely have the wrong gaiter on which is attached in the wrong place.
I spent the afternoon in the gentle rain removing the halfshaftes from the donor I bought. It went pretty smoothly but thank goodness I have the right tools. Both the hub nuts came off ok but the shaft splines were very tight. I have a heavy duty 3 leg puller which pushed them out fine. They look good with all four gaiters in good nick. I will clean them up and repack the bearings and fit these.
[IMG]http://IMG_0048 by oldpropuk, on Flickr[/IMG]
[IMG]http://IMG_0049 by oldpropuk, on Flickr[/IMG]
This is where the gaiter is located on my recon halfshafts - on the larger diameter which does not clear the hub casting
[IMG]http://IMG_0607[1] by oldpropuk, on Flickr[/IMG]
I also learned how to press the wishbone bushes in - many thanks for the help guys - i screwed one but then learnt!
One problem is that Marlin have made a very scrappy job of tapping the arm so the bush carrier won screw in on one side. I have just ordered a 20mm tap to sort this.
Well, I spoke too soon. It is now obvious that the outer CV's on the "recon" halfshafts were also taken apart. This is very bad news and became apparent when one of the covers broke the silicon that was holding it on and came away! Oh well, a weekend spent doing up the ones that came off donor 2 and at last I really DO have the rear driveline sorted! I hate those CV boot clips btw.
I also got the handbrake linings etc sorted and mounted and actually mounted the spring and damper on one side so it would be ready to mount a wheel if I had hydraulics!
I got the new tap and tapped out the threads on the upper wishbone, now the bush carriers screw in fine. The new wishbones are not a brilliant fit and needed some fettling to get on...
Two problems!
1. Handbrake cables. I got two with the car, identical length (already shortened) one BMW looking one, black sheath with brass endcaps, one thinner plastic sheathed one with plastic endcaps. Although the setup looks symmetrical one outer cable needs to be about 25mm longer than the other! No idea why but its not an issue because I dont want to fit the plasticky one anyway. Has anyone else noticed this?
2. My bump stops dont line up. I know this was common with this vintage chassis. I intend to get it sorted but have left it for now. Actually the spring mounts really well and I am not sure that the job is essential - any thoughts?
Two problems!
1. Handbrake cables. I got two with the car, identical length (already shortened) one BMW looking one, black sheath with brass endcaps, one thinner plastic sheathed one with plastic endcaps. Although the setup looks symmetrical one outer cable needs to be about 25mm longer than the other! No idea why but its not an issue because I dont want to fit the plasticky one anyway. Has anyone else noticed this?
2. My bump stops dont line up. I know this was common with this vintage chassis. I intend to get it sorted but have left it for now. Actually the spring mounts really well and I am not sure that the job is essential - any thoughts?
Thanks all - John
Hi John,
when I built my car, Marlin didn't supply the handbrake cables so it was up to the builder to buy some cables and shorten them. I bought a pair of cables from GSF and used the shortening instructions in the Marlin build manual. (But do be careful when you cut the cable with a cold chisel!!)
It sounds like the previous owner bought two different types?
My bump stop alignment seemed OK so I didn't modify my wishbones.
2. My bump stops dont line up. I know this was common with this vintage chassis. I intend to get it sorted but have left it for now. Actually the spring mounts really well and I am not sure that the job is essential - any thoughts?
Thanks all - John
I had the same problem. I removed the spring plates on the lower arms by drilling out the spot welds. I made some new spring plates and had them welded on to the lower arms so they lined up with the bump stops. Much easier than it sounds as long as you are reasonably handy with a hacksaw and know a friendly welder.
I suspect it may well fail the IVA if the bump stops don't line up as well as affecting the correct operation of the springs.
Peter and Robin, first of all, thanks for the advice it is so reassuring to have people like you out there willing to help.
I have ordered two new handbrake cables and will mod them.
I will definitely have to correct the bumpstop alignment. Because the trailing arms are nicely powder coated I think I might cut the top stud off and have it welded to a plate which I can bolt into rivnuts set into the chassis. I am leaving it for now so I can get all the welding bits done in one hit. John
Because the trailing arms are nicely powder coated I think I might cut the top stud off and have it welded to a plate which I can bolt into rivnuts set into the chassis. I am leaving it for now so I can get all the welding bits done in one hit. John
I thought about doing it this way but was concerned that rivnuts may not be strong enough. There could be a lot of force on the bump stop and if they are not 100% alligned than there will be some sideways as well as upwards force.
Robin, I have considered that but I am pretty confident that lined up properly with 4 say, 8mm rivnuts it should be ok.
OK another problem. You may recall that I had problems screwing the bush carriers into the new upper wishbones because the threads were imperfect. Well, it seems I have the same issue with the lower wishbones. The threads for the lower ball joint are terrible and the ball joint simply wont screw in. After a couple of threads it just seizes. Its not cross threaded just stiff. I cleaned the smaller ones up with a tap but goodness knows how to clean these up by the looks of it they are well rough. Any ideas? - John
I had the same problem. Take a look at them closely. Mine were just full of powder coat that was relatively easy to clean out using the tip of a needle file. After that I just greased the threads on the ball joint and carefully eased it in and out to clean any remaining muck that the file couldn't deal with.
If the threads really are poor you may be able to clean them up using a special thread file. Not used one myself but they are frequently used when restoring older cars where there are no spare parts available and you have no choice but to clean up and re-use what you have.
I thought about doing it this way but was concerned that rivnuts may not be strong enough. There could be a lot of force on the bump stop and if they are not 100% alligned than there will be some sideways as well as upwards force.
But maybe I am just a bit over cautious :-)
Cheers
Robin
I'm with Robin on this one.
Please don't take any offence, but I think the rivnuts could shake lose with all the vibration from the suspension.
If it's a sideways alignment issue, you can get some movement by resetting the wishbone bushes with some thread bar and nuts, etc.
Personally, unless its really really bad, I would leave it and only fix it if it becomes a problem.
...peter
Hi Guys. Peter, no offence taken at all, quite the opposite-its the kind of debate I need! OK I am persuaded away from the rivnut idea. I think I need them to line up. its way out, probably 35mm.
two options then. Cut and re-weld the top stud - not easy without turning the chassis over or moving the bottom plate a la Robin.
Robin, you made up new bottom plates but could the old ones be re-used? I have some spot weld drills. Shame though its going to screw the silver powder coating.
There is no way I can clean up the thread on the lower wishbone, it is not just powder coating, the thread is poor. I will borrow an M34 x 1.5 tap from an engineering firm we use, nothing is easy but this is shoddy.
Another two week delay now whilst I have to go on my travels again so more soon! - John
Robin, you made up new bottom plates but could the old ones be re-used? I have some spot weld drills.
1. I had to use a small cold chisel as well as the spot weld drill. They were somewhat bent by the time they came off. You may be more lucky!
2. I took the opportunity to make the lower part of the bump stop adjustable using a large nut into which is screwed a short bolt packed out to a suitable height with washers. Without this there was the danger of my springs binding before the bump stops touched.
Shame about the threads for the ball joints but if you have access to the correct size tap that is the best way to sort it.
Ok back in circulation again after yet another foreign trip.
Can anyone confirm that the thread on the Metro ball joints IS 34x1.5 before I go and find a tap?
I have measured it but just doubting because its an odd size....
Ok back in circulation again after yet another foreign trip.
Can anyone confirm that the thread on the Metro ball joints IS 34x1.5 before I go and find a tap?
I have measured it but just doubting because its an odd size....
Thanks - John
Hi John,
I'm not sure if anyone has had to re-tap their wishbone bushes so I don't know what the metro ball joint thread would be.
I'd give Marlin a call and ask Mark or Kevin, as they tap the welded in boss that goes in the top of the suspension upright.
I hit on the bright idea of using a smaller tap of the same pitch (M10x1.5) to try to clean up the threads. Good idea and if it were just powdercoat it would have worked. I am pretty sure that it is weld spatter, its tough and I cant shift it. Because I am away again for 3 weeks from next week I am inclined to send it back to Marlin for them to sort since they caused it....
I hit on the bright idea of using a smaller tap of the same pitch (M10x1.5) to try to clean up the threads. Good idea and if it were just powdercoat it would have worked. I am pretty sure that it is weld spatter, its tough and I cant shift it. Because I am away again for 3 weeks from next week I am inclined to send it back to Marlin for them to sort since they caused it....
Yeah, probably cheaper than buying a huge 34mm tap!
Yes that would be expensive! I could have borrowed one but its Marlins problem. Talked to Terry and no problem, just send it back. Ok so that's one dam unblocked, should be able to complete the front suspension and steering then.
What is holding up progress with the rear end is the misaligned bumps tops. I am really tempted to go with coilovers despite the expense. Oh decisions....
On another note I am going to mock up my fuel tank sump tomorrow. I intend to copy Mikes idea of hiding it behind the diff but I might make it a bit bigger. I would like 5l as a reserve and anti surge capacity ideally. Then it's just one hp pump needed!
Good to see that maybe Terry ( Marlin ) is more proactive in sorting out customers problems now. Having pi**ed off so many people, maybe she is getting the message.
Its a pity the tank wasn't a lot bigger, always have to keep an eye on mileage as my fuel consumption is on the high side.
I have no idea what my fuel consumption will be yet! I must admit the tank does look a little small. The reason for the sump is primarily to avoid using a "swirl pot" and the attendant low pressure setup. The theory is that the sump will provide protection against fuel starvation on braking/cornering thus eliminating the need for the swirl pot. I am considering a dual parallel HP fuel pump setup (overkill though) and just a simple LP return line to tank.
I am also wondering if I (or one of you genii) can come up with a "running on reserve" light system so when the main tank finally empties a light on the dash comes on. Thats why I would like a larger volume sump - so that I have some chance of refilling before running out!
I am also wondering if I (or one of you genii) can come up with a "running on reserve" light system so when the main tank finally empties a light on the dash comes on. Thats why I would like a larger volume sump - so that I have some chance of refilling before running out!
John
You don't really need a warning light................calibrate your fuel gauge and when it says " Empty" you'll be into your reserve, and its time to fill up!
You're a giving away your occupational habits - ie Company car driver - we all run the fuel down to empty (and now days with computer data for 'Miles remaining' even go minus! before we'll grudgingly stop to fill up again!
All you need to do is fill up when you drop below 1/4 tank
Agree with Mike in respect of running a modern car right beyond the zero figure right into the negative figure.
But having the old gauges from the original donor (which I will change one day ) I discovered to my cost that they are notoriously inaccurate.
Which meant pushing it the last mile home.
Will not make that mistake again. Admittedly the mistake was made when I first had it so I now know roughly how much I have at all stages of the gauge.
Knowing the way you guys work, most of you have gizmo's gallore. You just like fiddling.
I am just looking at buying the fuel hose and pump. I am thinking to run 8mm HP from tank to engine and 8mm LP return back to tank. (no swirl pot - I will put a sump in the tank so just one HP pump)
Questions:
- I know I need to get the correct spec HP hose, I would prefer flexi to copper, but does it have to be steel braided or will normal flexi rubber or whatever be ok down the transmission tunnel?
- What models of HP pump have you used for the M20 2.5 engine? I am thinking of pressure/flow rate required?
I am just looking at buying the fuel hose and pump. I am thinking to run 8mm HP from tank to engine and 8mm LP return back to tank. (no swirl pot - I will put a sump in the tank so just one HP pump)
Questions:
- I know I need to get the correct spec HP hose, I would prefer flexi to copper, but does it have to be steel braided or will normal flexi rubber or whatever be ok down the transmission tunnel?
- What models of HP pump have you used for the M20 2.5 engine? I am thinking of pressure/flow rate required?
Thanks
John
John
Are you sure 8mm feed to the HP pump is sufficient?
Sytec advised me to run 12mm from tank to HP pump (via a 12mm filter) to ensure it is never starved of fuel - highly damaging to HP pumps.
 IMG_0052 by oldpropuk, on Flickr[/IMG]
 IMG_0048 by oldpropuk, on Flickr[/IMG]
 IMG_0049 by oldpropuk, on Flickr[/IMG]
 IMG_0607[1] by oldpropuk, on Flickr[/IMG]
 IMG_0051 by oldpropuk, on Flickr[/IMG]

