MadaboutKitcars

This is a read-only archive of the old Madabout Kitcars forum. New posts and replies are no longer possible, but every thread is still here to browse and read.

Mister Towed's Tai Chi build

20 Sep 2012, 11:39am
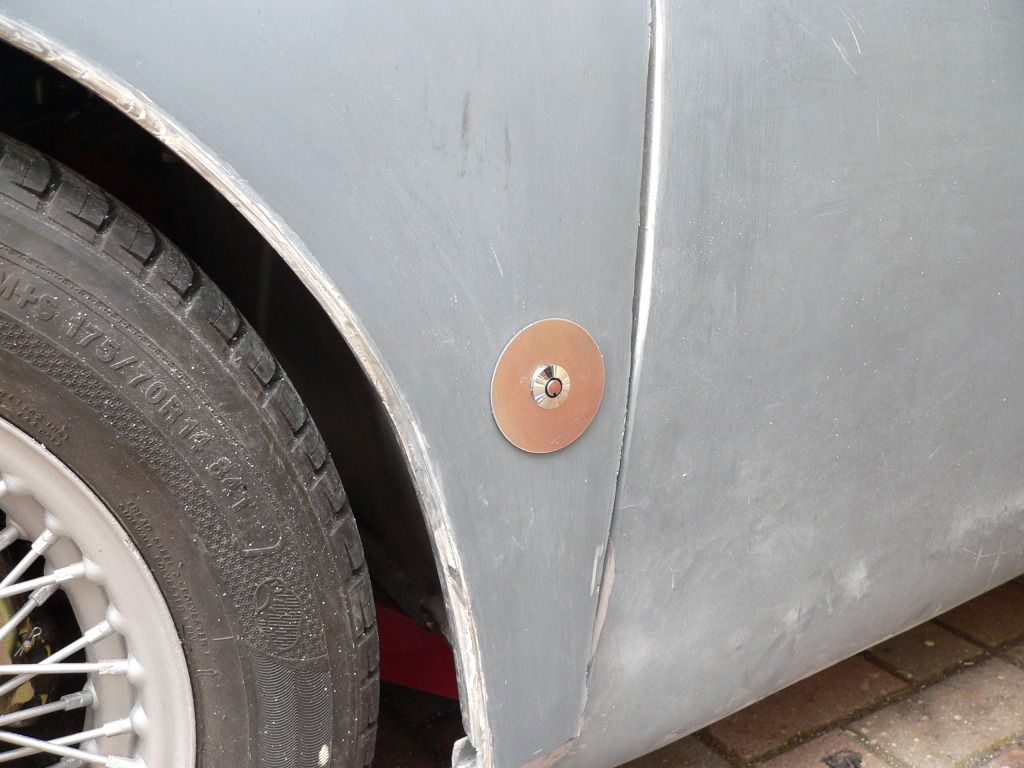
And, after a lazy early morning typing a considered reply to a critical post I finally got on with my bonnet. These pictures show the nearside, locking bonnet pin installed. Very straightforward to fit and my concerns about clearance behind the wheelarch part of the bonnet were unfounded - there's about a four inch gap to the side of the bulkhead, which means any of this type of bonnet pin will fit, no problem.


After I took these pictures I noticed that the bottom corner of the bonnet, where it drops down onto the 'sill' panel was standing about half an inch proud of the body and looked rather odd. I toyed with the idea of moving the locking pins down, but I don't think there's room :eusa_think: . A couple of thicknesses of self-adhesive sponge stuck inside the bonnet just above the fastener caused the panel to curve in at the bottom far enough to bring it within acceptable limits. :)

Anyway, quick bite of lunch and it'll be time to do the other side. :hungry:
20 Sep 2012, 11:53am
I think your adaptation of the 'Norfolk Scoop' needs more attention as I'm sure even keeping within the speed limits it will lift up and obscure your vision! ( more tape possibly!!) Bonnet fitting is looking good on the other hand.
20 Sep 2012, 12:59pm
Ahh, yes, the scoop is a work in progress that hasn't yet progressed very far. The sticky tape is, of course, an attempt to disguise the shape in a BMW concept car stylee -


Thinking about it, if Micha were to cover a Sammio entirely in such bits of sticky tape camouflage, he might be able to smuggle it through the registration process without anybody recognising it for what it is...
20 Sep 2012, 5:03pm
Mister Towed - I followed TriTone's build and ordered those locking pins for the top of my bonnet.

TriTone also used a spring loaded catch for the bottom of the 'bonnet to bulk head' join.
I think this will help get around any tendency for the bonnet to stick out a bit.

The other alternative is the "hockey stick" bracing that some other builds have used to hold the shape.

Either way, as always, seeing how you do it, helps me, so thanks.

And with each photo it looks closer being finished. :cool:

Cheers, Paul. :)
21 Sep 2012, 8:45am
Paul L wrote:
Mister Towed - I followed TriTone's build and ordered those locking pins for the top of my bonnet.

TriTone also used a spring loaded catch for the bottom of the 'bonnet to bulk head' join.
I think this will help get around any tendency for the bonnet to stick out a bit.

The other alternative is the "hockey stick" bracing that some other builds have used to hold the shape.

Either way, as always, seeing how you do it, helps me, so thanks.

And with each photo it looks closer being finished. :cool:

Cheers, Paul. :)


Interestingly, I initially put the locking pins on top of the bonnet, but due to them being on a curved panel I couldn't get both of them to line up and lock at the same time, so I swapped them round with the sliding pin ones I'd bought for the sides.

I rather like the look of the sliding pins on top of the bonnet though, and the only thing I'm not too sure about with the locking ones at the sides is the rather large escutcheon plates, which draw the eye a bit too much for my liking. I'll replace them with a couple of small washers methinks.

I've had time to sleep on the issue of the rear corners of the bonnet that kick out below the locking pins. Although the sponge pads minimise this, they still protrude about a cm, which is too much imho. I'm not too keen on any solution that requires the panel to be forced into place after paint, as I think it'll cause the finish to crack.

The plan in my head this morning is to cut some fine slits along the 'rolled' edge of the wheelarch (not sure if that's the right term for the bit I'm thinking about), then bend the panel to fit and fibreglass the slits together in their desired place. That will effect a permanent solution to the problem.

I'm sorry if that sounds a bit confusing but it sort of makes sense to me and I'll post some pics once I've done it. That won't be today I'm afraid as I've got family visiting.

There is a voice in my head though which keeps repeating the phrase must build sammio. MUST BUILD SAMMIO. [SIZE="4"]MUST BUILD SAMMIO...[/SIZE] :madgrin:
21 Sep 2012, 9:04am
I've been thinking along the lines of alignment pins guided into holes for the bottom edge. No visible signs on the outside.

Bonnet pins, not for me thanks. Every other Corsa round here has a set (or a fake set). They don't look too bad on the Sammio though.
21 Sep 2012, 9:22am
MoriniMan wrote:
I've been thinking along the lines of alignment pins guided into holes for the bottom edge. No visible signs on the outside.

Bonnet pins, not for me thanks. Every other Corsa round here has a set (or a fake set). They don't look too bad on the Sammio though.


I know what you mean about the Corsas. I did see a young chap driving a white Reliant three wheeler van with a massive pair of stainless tail-bombs sticking out the back the other day though, which did make me smile. :)

As for the alignment pins at the bottom edge, the only reason I haven't put mine down that far is that the space is very limited. The body doesn't go straight down in relation to the bulkhead, it's at an angle so the gap between the front edge of the body and the edge of the bulkhead narrows away to almost nothing at the bottom. That would still leave the issue of having to flex the panel into place and the paint cracking problems that would arise.

The pins on top of the bonnet are there to stop the bonnet lifting at speed. A number of finished cars have suffered this problem. Great value though Gary's mouldings are, they're not the thickest panels and the bonnet isn't a particularly stiff structure. I've thought about bonding in a strengthening 'rib' across the inside of mine, but I feel it's going to need a little flexibility in order to close without fouling the sides of the bulkhead.

Of course, one of the great things about the Sammio brand is that no two cars need ever be alike, there are infinite possbilities at every stage of the build so good luck with your chosen solution to the bonnet closing challenge. I look forward to seeing the results.
21 Sep 2012, 11:43am
I've now done the rounds of the local trimmers and taken a look at the quality of their works-in-progress.

I also got lumbered with having to spend eight hours on foot patrol at a modest country show during the summer, which included a very well attended classic car concourse d'elegance. Of course, it was necessary for me to interrogate the classic car owners regarding the roadworthiness of their vehicles, who did the trimming etc, and I got a number of positive recommendations for one local trimmer, plus some negative ones for another (it can be hard work this Policing lark...).

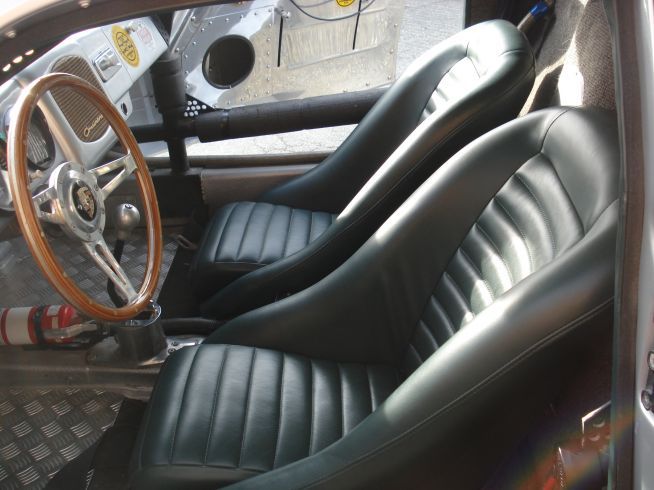
So, decision made, I delivered my seat shells to Brockwells in King's Lynn this morning, together with a request to make them look like the Porsche seats in this picture -


They're doing them in black leather for me at an all in price of... No, I think I'll wait until they're done then ask everyone to guess how much they cost.

Two weeks to wait then... :eyebrows:
22 Sep 2012, 3:58pm
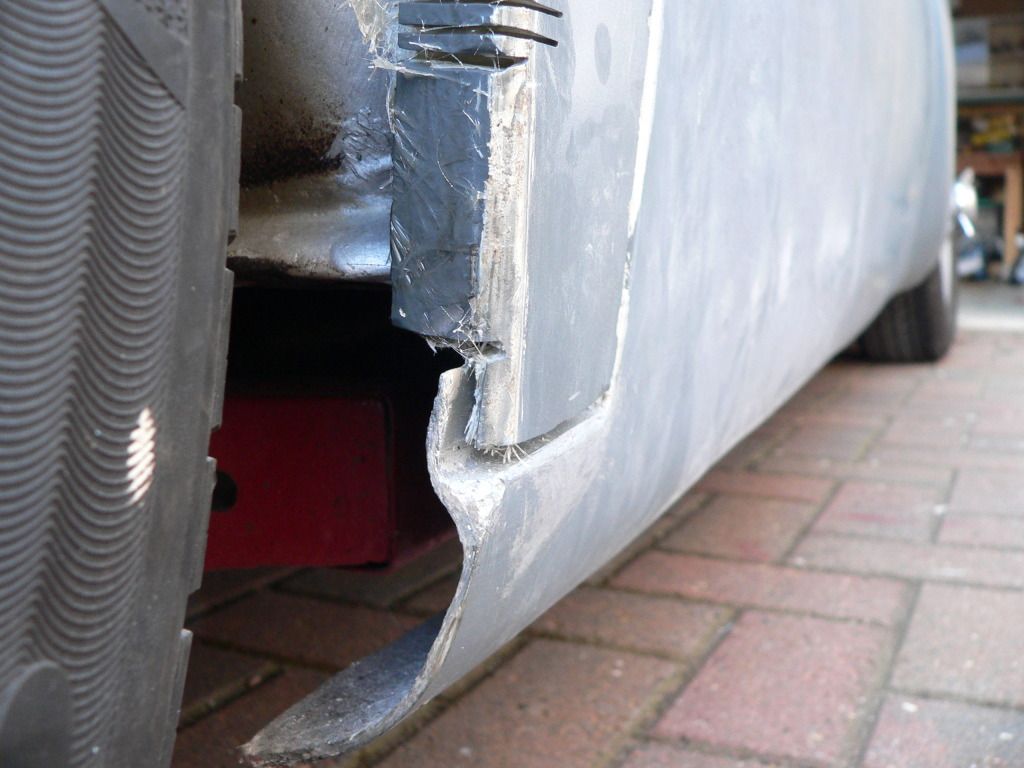
I've attacked the issue of the bottom rear edges of the bonnet not lining up with the body today, as they were still sticking out about 10mm on both sides. Looking at the mouldings, it appears the problem is that the bonnet is a flat panel at that point, but the body curves inwards away from it.

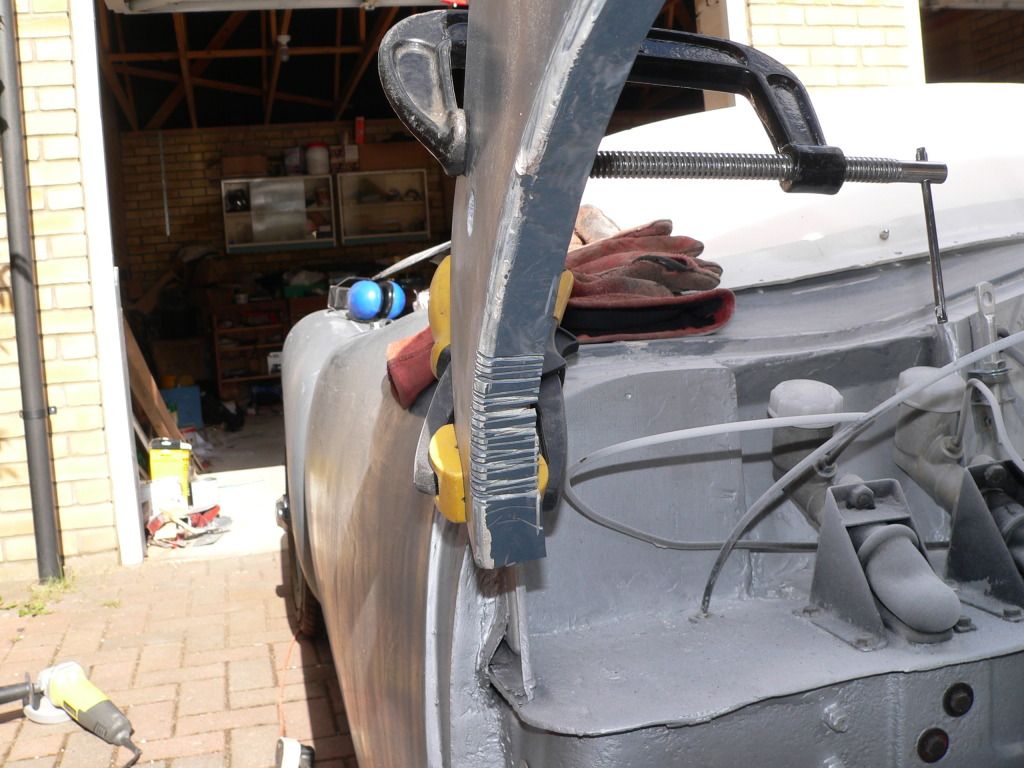
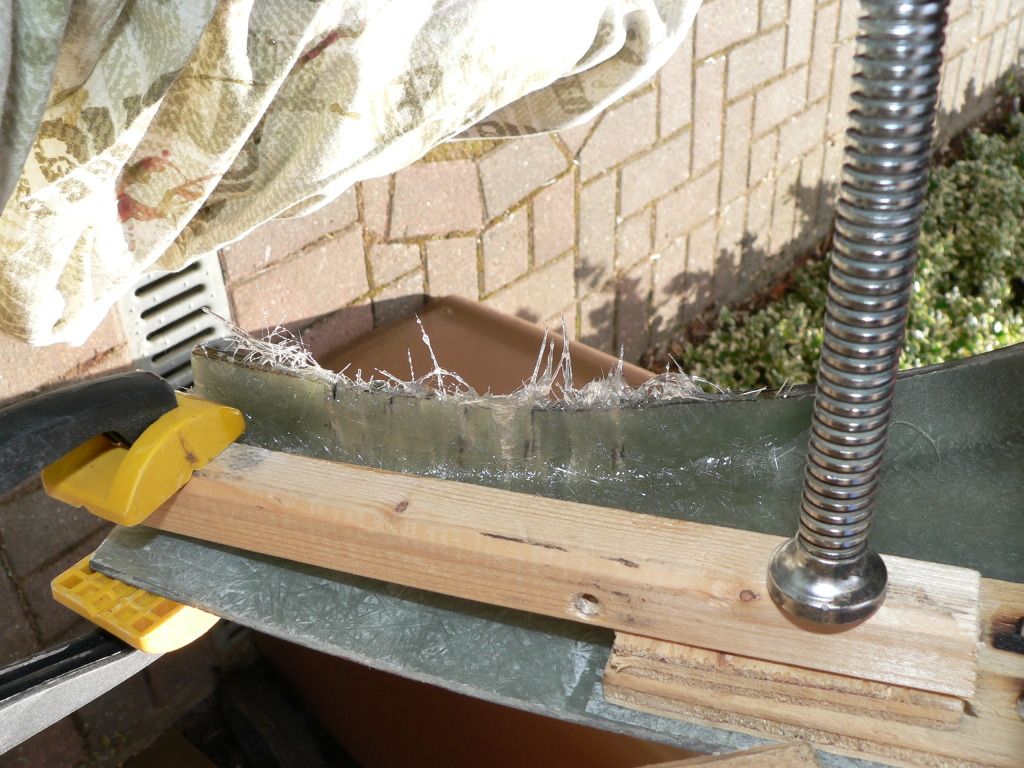
My solution was to cut a series of slits in the rolled edges, leaving it looking like a comb. Then I clamped some wood in place to hold the panel in a curve with the 'teeth' all closer together.


Once I was happy that I'd got the desired curve on both sides I applied strips of fibreglass to the inside edges and left it to set.


A couple of hours later, and, with the clamps removed... Success!


It's curved the bottom edges in by exactly the right amount. The bonnet now fits flush with the body all the way round. Phew.

Happy with that I decided to make a start on the 'Norfolk Scoop' that's needed to clear my engine and ancilliaries -


That's still very much a work in progress, but I think you can see the basic idea. More tomorrow, weather permitting...
22 Sep 2012, 6:53pm
That bonnet fit is really neat. Idea carefully logged and stolen. Thank you.
23 Sep 2012, 9:25am
Loved your solution to the bonnet base and yes we did need to see a picture of it following you description of it.

Scoop is looking very good
23 Sep 2012, 1:46pm
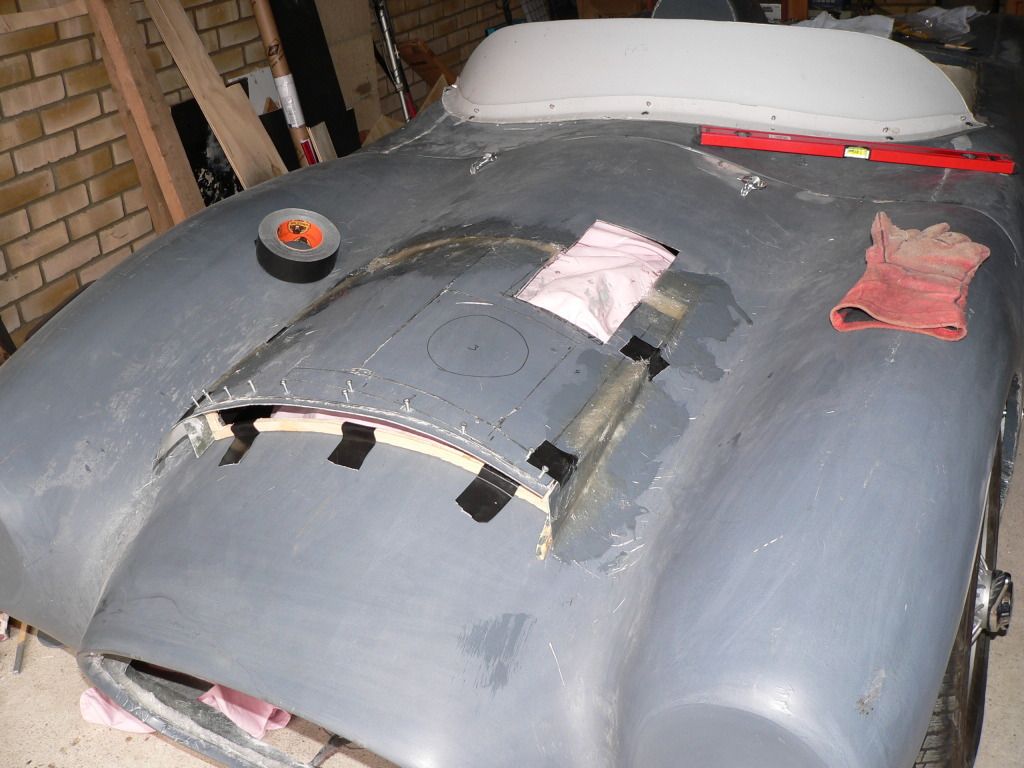
A little more progress on the scoop this morning, I've cut panels for the sides and 'glassed the thing in place over the hole in the bonnet -


I'm going to leave it to set overnight now as it's pi$$ing down and freezing cold. I'll start tidying it up and sort out the 'part two' scoop that's going to cover the hole that's still left tomorrow.

I fear it's going to take an awful lot of work to make it look anywhere near as good as Mike Hughes' very professional looking one on his V8 special. :sick:
23 Sep 2012, 1:49pm
Thats looking scooper dooper:-)
23 Sep 2012, 2:55pm
Great job on the bottom edges of your bonnet, it seems to have worked a treat.

I'm sure your two stage bonnet scoop will blend in nicely when it is all finally painted.

Cheers, Paul. :)

PS
Do you have any issues with the outside temperature when fibreglassing?
23 Sep 2012, 4:23pm
Paul L wrote:

Do you have any issues with the outside temperature when fibreglassing?


Only in summer - with a 2% catalyst ratio during the hot weather the resin was starting to set off while I was still stirring it. Now it's colder I've got about fifteen minutes working time and about two hours until it sets solid.

I'm very pleased with the way the bottom corners of the bonnet have turned out. They now fit perfectly without any risk of cracking the paint once it's done, and it only took a couple of hours work. If you don't want to shorten them and build up the lower part of the body I can recommend it as a permanent solution to a problem most builders seem to have had.
23 Sep 2012, 6:47pm
seats

Mr Towed I looked back on your thread to see where you had purchased your bucket seats from, I am sure you posted the contact by I can't seem to find it could you let us know as it may be something that can be used on the G46 rear foot-well.
23 Sep 2012, 6:50pm
1% or 2%

Mister Towed wrote:
Only in summer - with a 2% catalyst ratio during the hot weather the resin was starting to set off while I was still stirring it. Now it's colder I've got about fifteen minutes working time and about two hours until it sets solid.

I'm very pleased with the way the bottom corners of the bonnet have turned out. They now fit perfectly without any risk of cracking the paint once it's done, and it only took a couple of hours work. If you don't want to shorten them and build up the lower part of the body I can recommend it as a permanent solution to a problem most builders seem to have had.


Did my first bit of fibre-glassing for about 20 years today used 1% catalyst ratio and had not realised how cold it was in the garage, hoping will go off before next weekend!
23 Sep 2012, 6:53pm
Charman.tech wrote:
Mr Towed I looked back on your thread to see where you had purchased your bucket seats from, I am sure you posted the contact by I can't seem to find it could you let us know as it may be something that can be used on the G46 rear foot-well.


Here you go -

http://www.ebay.co.uk/itm/Dax-AC-Cobra-427-Fibreglass-Seat-Shell-/130625517895?pt=UK_CarsParts_Vehicles_CarParts_SM&hash=item1e69e33947

They seem to have put the price up a bit, I paid £109 for a pair including delivery.

Can't give you the exact dimensions at the mo' as they're at the trimmers having bits of deceased bovine stuck to them with boiled down dobbin, but they will fit the Spyder cockpit with a flat floor without protruding, so they should fit the G46. Anyone know if the cockpits are different depths?
23 Sep 2012, 8:17pm
Mister Towed wrote:
Here you go -

http://www.ebay.co.uk/itm/Dax-AC-Cobra-427-Fibreglass-Seat-Shell-/130625517895?pt=UK_CarsParts_Vehicles_CarParts_SM&hash=item1e69e33947

They seem to have put the price up a bit, I paid £109 for a pair including delivery.

Can't give you the exact dimensions at the mo' as they're at the trimmers having bits of deceased bovine stuck to them with boiled down dobbin, but they will fit the Spyder cockpit with a flat floor without protruding, so they should fit the G46. Anyone know if the cockpits are different depths?


Thanks Mr T
24 Sep 2012, 2:41pm
Took one look at my scoop this morning and just knew it wasn't right. It looked ok from the front, but standing behind the car it was obvious that one side was at a different angle to the other. I also wasn't keen on the amount of fibreglass stuck to the top of the bonnet that would take an age to get smooth for painting.

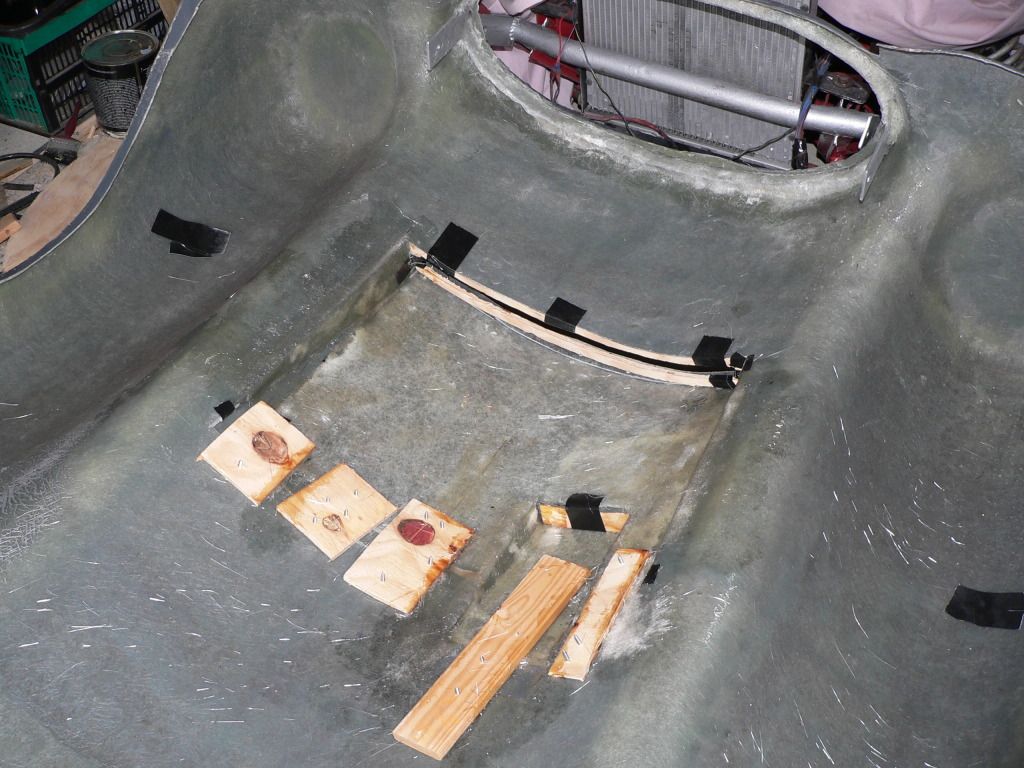
So, I cut it out and altered it to make it symmetrical, adding the secondary scoop that gives clearance for my remote radiator cap for good measure, then 'glassed it all in place from the inside -


It's currently sitting in the garage while I wait for the resin to set, then we'll see what it looks like from outside. Should be a lot straighter and a lot neater...
24 Sep 2012, 3:12pm
Better to get it right than spend the next ten years thinking, "Bugger, I knew I should have changed it.
24 Sep 2012, 3:32pm
Agreed, if you're not happy with it then fix it until you are!

I know that i was much happier after the weeks i spent playing with my bulge...


(sorry, couldn't resist!)
24 Sep 2012, 3:39pm
T's got an extra bulge... so he should keep an eye on it!
24 Sep 2012, 3:42pm
Thanks for the encouragement guys, you're absolutely right. I'm going to keep this car for a very long time so I want it to be just as good as I can get it.

The scoops look neater from inside already so I'm a lot happier without even turning the bonnet back over. The resin should've set after dinner so I'm going to crack on with it then, mainly because I'm back to work in the morning so there'll be no progress tomorrow. :ballchain:
24 Sep 2012, 6:09pm
Ahh, bonnet scoops are looking a bit more respectable now -


Still quite a lot of work required to blend them into the bonnet fully but at least I've got them straight this time. :target: