MadaboutKitcars

This is a read-only archive of the old Madabout Kitcars forum. New posts and replies are no longer possible, but every thread is still here to browse and read.

Royale Sabre - Take two!

2 Mar 2024, 7:36pm
Amir Manzoori wrote:
Hi Peter, as always, carrying out everything in the best way possible. Just a question, have you considered having your original hood frame modified so that you don't have to leave your seat to open the top. Instead you unlock the two screen locks, lift and drop it back behind the seats, and to close it, just the revers of that? Just an idea.
Keep up the fantastic work.


Hi Amir, no I hadn't considered modifying the frame, opting to keep to John Barlow's design to keep it simple.
I did see something about this in your recent article in the owners magazine but the picture wasn't clear enough to see what you had done.
Maybe something to consider for my future projects :icon_smile:
cheers, Peter
2 Mar 2024, 7:52pm
MartinClan wrote:
Looking forward to seeing the hood!
The last piece of the puzzle?
That rear fog light looks very nice. I don't suppose you remember where it was from?
Cheers, Robin


The hood is the last big piece but I still have a few other things to do before I would say it's finished :eyebrows:

The reversing and fog lights come from ebay like these....

g8AAOSwslJcpIwO&itmprp=enc%3AAQAIAAAA0N4iWA73qYJ9X56GcsC2VCaex1wEoKNeMP98JyGQC%2BjFcsX5ZKXWKbITAn%2FGac6zt5Rd%2BcJRLFNC1nBpt40YKfdFPunyD0e%2Bqsf4vce3MtoKP7RdkxU4TrbRMlGzUC4iA3cQAYGaAs9E003hWglg15QOoXuSbjkX%2ByXHrvQodpzbWgrzOln%2FIAYzEsPlFlRTxWL2MwwRYLKFMuaL1RVhu6CG6zW2o5%2B2TPJewbPvekVRzlGcIv%2FHVBXc6%2BeiMcwPwtwXdjQfUUQgdYtPCPASTc4%3D%7Ctkp%3ABk9SR86N94rAYw" rel="nofollow noopener" target="_blank">https://www.ebay.co.uk/itm/232996587465?itmmeta=01HR0AXRV1258Q7YRXQN1RY867&hash=item363fadc7c9:g:pg8AAOSwslJcpIwO&itmprp=enc%3AAQAIAAAA0N4iWA73qYJ9X56GcsC2VCaex1wEoKNeMP98JyGQC%2BjFcsX5ZKXWKbITAn%2FGac6zt5Rd%2BcJRLFNC1nBpt40YKfdFPunyD0e%2Bqsf4vce3MtoKP7RdkxU4TrbRMlGzUC4iA3cQAYGaAs9E003hWglg15QOoXuSbjkX%2ByXHrvQodpzbWgrzOln%2FIAYzEsPlFlRTxWL2MwwRYLKFMuaL1RVhu6CG6zW2o5%2B2TPJewbPvekVRzlGcIv%2FHVBXc6%2BeiMcwPwtwXdjQfUUQgdYtPCPASTc4%3D%7Ctkp%3ABk9SR86N94rAYw

Lots of sellers selling the same lamps so check the prices if you fancy buying some.
Of course, they are not 'E' or 'F' marked but they do have 'old school' glass lenses ad look nice!
Made of 'Chinese' stainless steel so not sure how long they will last?

cheers, Peter
19 Mar 2024, 9:02pm
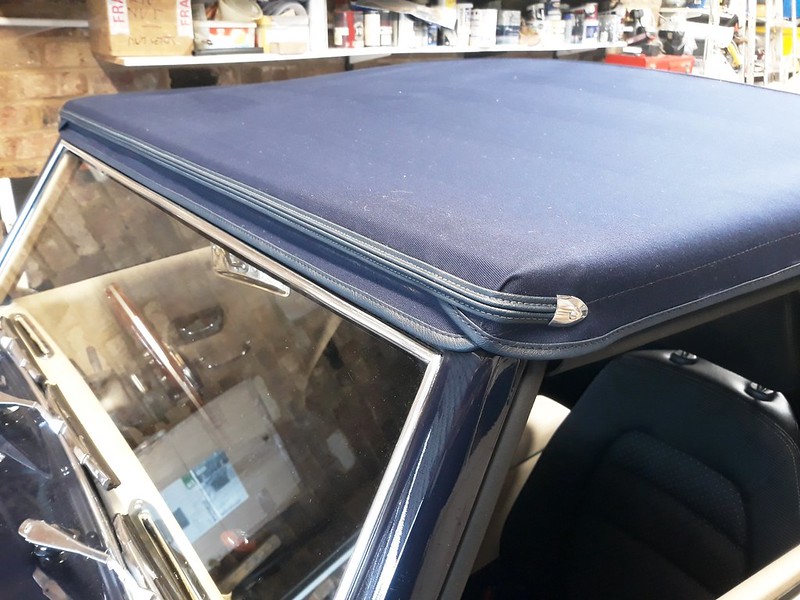
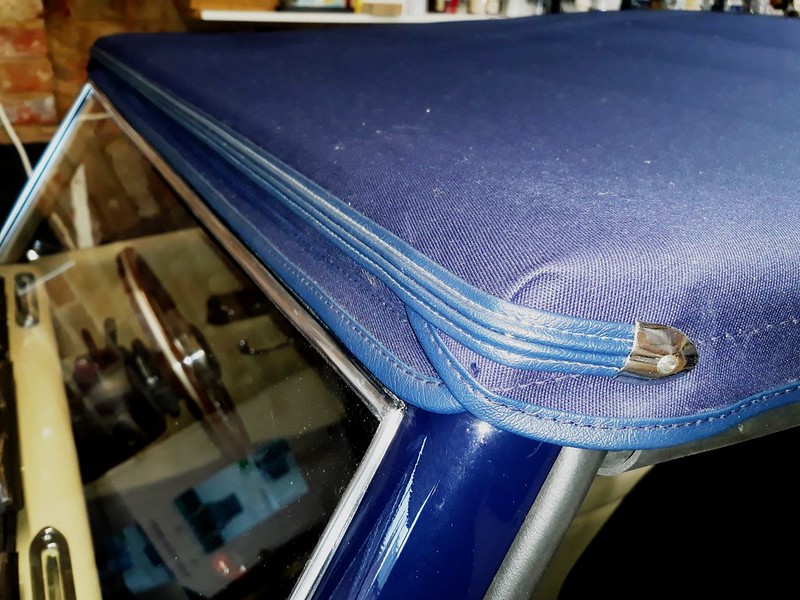
I picked up my car from the trimmers this morning. I have to say that I am absolutely delighted with the result. Dave Joy at Hukes Car trimmers has done a fabulous job, a real craftsman! :first:

New hood by Sabrebuilder, on Flickr

New hood by Sabrebuilder, on Flickr

Details of front rail and hidem banding. Extra 'flap' above the windscreen to stop any water ingress.

New hood by Sabrebuilder, on Flickr

Latching handles. Dave made up a new piece of internal trim to cover the rail. Looks fantastic and a major improvement.

New hood by Sabrebuilder, on Flickr

New hood by Sabrebuilder, on Flickr

New hood by Sabrebuilder, on Flickr

Next job, when time permits, is to fit some nice real leather seats :eusa_dance::eusa_dance:

....peter
20 Mar 2024, 10:15pm
Looks very nice :)
18 Apr 2024, 9:13pm
New seats

The somewhat scruffy MX5 seats were always a temporary measure to get me through the IVA. My original plan was to have these seats recovered so I was on the look out for another pair. The plan was to get another pair to use while mine were being professionally recovered. Recovering costs in leather by my trimmer, who did my hood, was estimated to be about

FORUM PLAYING UP AGAIN!! I'LL TRY AGAIN TOMMOROW>>>>>
19 Apr 2024, 7:29pm
New Seats

Okay, so let's try that again...........................

.............................................................................................................................................

The somewhat scruffy MX5 seats were always a temporary measure to get me through the IVA. My original plan was to have these seats recovered so I was on the look out for another pair. The plan was to get another pair to use while mine were being professionally recovered. Recovering costs in leather by my trimmer who did my hood, was estimated to be about GBP2k in leather and about GBP1k in vinyl.
Whilst looking for another set, a pair of cream leather MX5 seats came up on ebay for GBP300. They looked to be in good condition in the pictures so I snapped them up. When they arrived I found they were in nearly perfect condition, just a bit dirty.
This picture is one of the leather MX5 seats. In remarkably good condition but slightly the wrong shade of cream/beige. I tried one in the car but it didn't match the cream vinyl and looked awful.

New leather seats by Sabrebuilder, on Flickr

Due to the 'new' leather seats being the wrong shade of cream I decided to have a go at re-colouring them. There are companies that do this professionally but I thought I would have a go myself.
I found a company called Carbusonic that offered to provide a leather coating colour matched to my vinyl dashboard surround. You first have to thoroughly degrease the leather with their specialised prep fluid and then sand with 600 grade abrasive paper. Then three coats of the leather coating. You can use a hair drier the dry the coats to speed up the process. This picture shows the head rest half done. Top part is coated and lower part is the original leather.

New leather seats by Sabrebuilder, on Flickr

This is the passenger seat after two coats.

New leather seats by Sabrebuilder, on Flickr

Close up after three coats.

New leather seats by Sabrebuilder, on Flickr

The leather coating covers the small cracks in the leather but follows the natural gran and makes them look like new. It surpassed my expectations.

New leather seats by Sabrebuilder, on Flickr

The company that makes the leather coating recommends you use sponge brushes. I was sceptical as I had never used these before but they worked really well. Easy to use and left no streaks or brush marks. Each seat took about 1 day including preparation. The prep solution cost GBP22 and the colour matched coating cost GBP34. So with the brushes and sandpaper about GBP65 for two seats.

New leather seats by Sabrebuilder, on Flickr

And here is the first seat fitted.

New leather seats by Sabrebuilder, on Flickr

Came out much better than expected so I'm delighted! :eusa_dance:
19 Apr 2024, 10:39pm
Good job, they look nice, I've been considering MX5 seats for the Sportster as the ones I have are not the best seats, even if they look the part.
27 Apr 2024, 6:37pm
Patrick wrote:
Good job, they look nice, I've been considering MX5 seats for the Sportster as the ones I have are not the best seats, even if they look the part.


The Mx5 seats are very comfortable and I think Robin (martinclan) had them in his Sportster.
27 Apr 2024, 7:59pm
A grand day out and other things.....

Last Sunday was Drive it Day so it seemed like a good excuse to go for a drive in the Sabre. I joined a local group on a little drive to a rather nice cafe and farm shop. It was an eclectic group of cars that turned up.

Drive it Day - 24.04,2024 by Sabrebuilder, on Flickr

Drive it Day - 24.04,2024 by Sabrebuilder, on Flickr

It was a bright sunny day but rather cold. We wrapped up well and started with the hood down. First problem was the heater was not working! I was thinking the worse, had the heater valve failed, was there an air lock but later I found it was just the heater flap in the wrong position :loco::der:
After refreshments were taken we headed home taking the scenic route. This time with the hood up. This was the first time I have driven my car with the hood up. I was concerned it might feel claustrophobic but not all, it felt bright and airy with excellent visibility. This time we were snug and warm and eventually had to turn the heater off!
We stopped at the shops on the way back so here is the obligatory car park shot....

The obligatory car park shot. by Sabrebuilder, on Flickr

We arrived home safely having thoroughly enjoyed our first day out.:eusa_dance:

Of course, there is some feedback and small list of things to do. One of the most over-riding things to address is the Sierra diff ratio is much too high and needs changing to a lower ratio. And the front suspension is too firm which means that speed bumps are met with a thump from the big tyres.
But the most immediate thing that needed to be addressed is the rear ride height was too low. Something was scrapping on the ground when going over speed bumps or when exiting a pot hole.
On returning to my garage I investigated and found that the rear silencer had been hitting the ground. Indeed, I had lost one of my nice chromium plated exhaust tips.

Ride height too low by Sabrebuilder, on Flickr

I looked at raising the exhaust pipe and this is not possible due to the size of the BMW silencer and the spare wheel well. Neither of these I wanted to change. Looking back at the discussions between builders in the early years when there were many more builders there was debate over whether Sierra or Granada rear springs should be fitted. Some opting for Sierra springs whist others fitted Granada springs. I have had a set of Granada springs in my loft for many years so decided to fit these to raise the rear of the car.
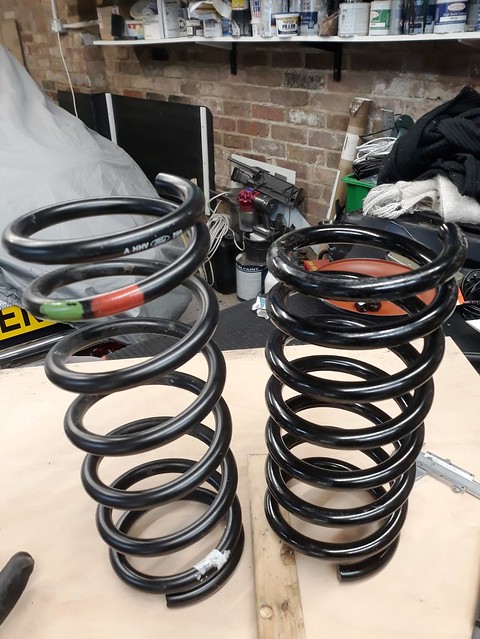
Ride height too low by Sabrebuilder, on Flickr

The Granada springs are about 30mm taller but slightly thinner wire diameter.

The procedure for removing the rear springs is in the Sierra Haynes manual. The most tedious part is disconnecting the drive shaft along with the inherent risk of rounding off one of the bolt heads but thankfully all were okay.

Ride height too low by Sabrebuilder, on Flickr

Fitting the new springs was a bit of a challenge as the exhaust was preventing one of the wishbones dropping fully. So I compressed the spring with my spring compressors and tied it with some rope.

Ride height too low by Sabrebuilder, on Flickr

Ride height too low by Sabrebuilder, on Flickr

Here is the spring tied compressed which allowed easy fitting. You can see the gap at the top of the spring. I raised the rear wishbone before untying the ropes.

The result is I now have an additional 70mm clearance at the back but I expect the springs to settle a little with time.

One other small issue was a known problem whereby the rear handbrake caliper spring was rubbing on the body tub. I relieved it a few millimetres with a flap wheel.

Rear caliper rubbing on body tub. by Sabrebuilder, on Flickr

Pleased with progress I had a cup of tea...........

New Seats by Sabrebuilder, on Flickr

Next I will trialling some new springs for the front suspension...........


..............peter
27 Apr 2024, 8:31pm
Excellent - glad you are using it :-)
9 Jun 2024, 7:38pm
Clutch woes.....

About four weeks ago we were returning home from a day out when about three miles from home, my clutch pedal went to the floor and I couldn't change gear. A quick inspection showed no sign of hydraulic fluid leaking so there was no option but to call the recovery truck.

Clutch Master Cylinder failure by Sabrebuilder, on Flickr

I had fitted a new clutch slave cylinder when I built the car but used an old master cylinder from a 2001 car so suspicion immediately fell on the master cylinder. Also, the clutch reservoir fluid had darkened with suspended black particles further adding suspicion on the master cylinder.

Clutch Master Cylinder failure by Sabrebuilder, on Flickr

So I set about replacing the master cylinder which also meant removing the slave cylinder to bleed the system. Not something I'd wish to repeat!!

New Clutch Master cylinder fitting - May 2024 by Sabrebuilder, on Flickr

Access to the bolts that hold the master cylinder to the pedal box is quite a stretch. I had to remove one of the m8 pedal box bolts to allow the furthest bolt to be moved out of the way.

After bleeding the system everything seemed back to normal. Except that on the next day out the same thing happened but this time I managed to limp home.
Inspection of the old master cylinder showed no sign of failure so my focus turned again to the slave cylinder. There was no leaking of fluid but after I removed the slave and took it apart all became clear.

Clutch Slave inspection by Sabrebuilder, on Flickr

The clutch slave cylinder bought new in 2016 showed severe corrosion i.e. rust at the bottom of the cylinder bore.

Clutch Slave inspection by Sabrebuilder, on Flickr

The piston seal has clearly been damaged by the corrosion in the bore.

Clutch Slave inspection by Sabrebuilder, on Flickr

Impressed by the quality of the original e46 BMW master cylinder I noticed it was made by a company called FTE. I had not heard of this brand before but it appears to be part of Valeo. I decided to invest in an FTE slave cylinder because it is made of aluminium alloy and appears to be anodised. Hopefully this one will not rust.

New FTE clutch slave cylinder by Sabrebuilder, on Flickr

Different construction to the Febi one. The metal fixing disc that holds the end seal keeps the pushrod central ensuring the rod engages with the clutch release fork correctly.

New FTE clutch slave cylinder by Sabrebuilder, on Flickr

New FTE clutch slave cylinder by Sabrebuilder, on Flickr

Now fitted and appears to be okay :eusa_dance:

New FTE clutch slave cylinder by Sabrebuilder, on Flickr

An unusual failure due to my extended build schedule plus a rather damp and cold garage!


.......peter
22 Jun 2024, 10:23am
Spotted a Royale Sabre this morning in Shardlow/ Cavendish bridge area [outskirts of Derby] that appeared to be similar colours . didn't manage to catch reg number - any ideas whose?
24 Jun 2024, 9:13pm
AlanHogg wrote:
Spotted a Royale Sabre this morning in Shardlow/ Cavendish bridge area [outskirts of Derby] that appeared to be similar colours . didn't manage to catch reg number - any ideas whose?


I'm aware of 3 or maybe 4 Sabres on the road with the same colour scheme as mine. It's a popular colour combination amongst us Royales :nod:
26 Jul 2024, 3:16pm
Tinkering and trialing....

I'm still tinkering and making small uprades to my Sabre....

Robin (aka Martinclan) and I attended the Luton Festival of transport and the Harpenden Classics on the Common.
Here are a couple of photo's of us a Luton which was not a very warm day so the hood is up. Robin doesn't have a hood so he just has to grin....
Harpenden was much warmer but I forgot to take a picture this year :doh:

Luton Festival of Transport - 2024 by Sabrebuilder, on Flickr

Luton Festival of Transport - 2024 by Sabrebuilder, on Flickr

After Luton I was determined to soften my front suspension. My original springs were 300lb and far too stiff. I then fitted some 250lb springs which were much better. Encouraged by the improved ride and handling of changing the front springs from 300lb down to 250lb, I decided to go one step softer and have fitted these 225lb springs.

Front Springs by Sabrebuilder, on Flickr

I set the ride height at 1/3 bump and 2/3 rebound as recommended on a suspension website. You can see the black Sharpie marker pen mark on the piston rod which helped me set them up. Initially I set the dampers to their softest setting. After some further road testing I then set the dampers to +5 clicks which is approx mid setting for these Gaz dampers. Whilst changing the damper setting I also raised the spring seat by two rotations which is approx. 6mm as the car was a little low at the front.
I need to do some longer drives but for now I am happy that it feels much better and the steering feels normal again. My test drive takes me to a local village which has speed humps along its high street. I can now take these at 25mph without any crashing or 'slapping' of the tyres.

I have also upgraded my rear number plate lights. The original number plate lights came with my kit were plastic coated chrome. They were good because they were 'E' marked and had a recessed fixing screw so they were nice and IVA compliant but they never really polished up like real chrome plating on metal.

Original number plate light by Sabrebuilder, on Flickr

The new reproduction Lucas number plate lights. Chrome plated metal (?) and glass lens but internals not as good quality as original Lucas parts. The chrome plating polishes up nice a shiny.

New number plate light by Sabrebuilder, on Flickr

Lastly, my winter project will be to change my diff ratio from 3.91 to 3,64 as 3.91 is too high.

Until next update.....

....peter

Lastly
8 Feb 2025, 9:41pm
Winter Project

peterux wrote:

Lastly, my winter project will be to change my diff ratio from 3.91 to 3,64 as 3.91 is too high.

Well, my winter project has been underway since mid November but with Christmas and other things it's been slow burner with just doing a bit whenever I've had the time and inclination.
First job was the remove the rear silincer and section of the exhaust to get access to the diff and the rear propshaft connection bolts. As usual I take reference shots to remind me how things go back together again.

New 3.64 Diff fitting by Sabrebuilder, on Flickr

Then it's the rather tedious job of disconnecting both drive shafts. Disconnecting the propshaft was less traumatic than expected as there is just enough room behind the rear chassis cross-member to get a socket on the bolts.

New 3.64 Diff fitting by Sabrebuilder, on Flickr

I had already loosened the slip joint at the front of the propshaft to allow the propshaft flange to be moved forward.
When I disconnected the propshaft, I found there was very light surface rust where moisture had crept in between the two flanges. I cleaned the rust off with some 3in1 oil and fine wet and dry paper. I then put a smear of oil on the face of both flanges before refitting.

Access to the rear diff mount bolts is behind the carpet and access panel in the boot. Unless you have 6 foot long arms it's a two man job to remove these bolts.

New 3.64 Diff fitting by Sabrebuilder, on Flickr

Then it was just a case of supporting the diff and removing the remaining five bolts. I bought a secondhand motorcycle lift off ebay and which worked perfectly without any back strain or cursing. The four wheeled trolly was from the centre aisle of Aldi for a mere 9.99GBP.
It was then just a case of wheeling the replacement diff into position and raising it to the correct height.

New 3.64 Diff fitting by Sabrebuilder, on Flickr

Before fitting, I had given the replacement diff a complete clean out and inspection before giving it a fresh coat of paint and refilling with fresh oil.

New 3.64 Diff fitting by Sabrebuilder, on Flickr

Propshaft re-connected and bolts re-tightened to the correct torque.

New 3.64 Diff fitting by Sabrebuilder, on Flickr

Now I just need to put it all back together again! :icon_lol:

Road testing will be when weather permits!


...peter
10 Feb 2025, 12:55am
Nicely done
10 Feb 2025, 9:56am
Did I see this lovely car at Classics on the Common, Harpenden, back in July?
10 Feb 2025, 4:27pm
Biggles wrote:
Did I see this lovely car at Classics on the Common, Harpenden, back in July?


Yes, I was there. And planning to be there this year as it's one of my local shows. Say hello if you see me.
10 Feb 2025, 11:41pm
Will do!
12 Mar 2025, 7:11pm
Exhaust improvements....

A quick update while this website is up.......

After swapping out my diff I finished off by re-installing the rear section of the exhaust that had been removed for access. After bolting it all up, I ran the engine to check for exhaust leaks. I was very surprised to find a small hole in one of the joiners. I could also see witness marks where the pipe had been scrapping on speed bumps.

2025 exhaust modification by Sabrebuilder, on Flickr

Initially I planned to just replace the rusted joiner but checking with a straight edge I could see that this is a low point of the exhaust and it didn't need to be this low so I decided to replace this whole section.

2025 exhaust modification by Sabrebuilder, on Flickr

When I took it apart, I was shocked to see how bad the rust was.

2025 exhaust modification by Sabrebuilder, on Flickr

I cut the old pipes back with an angle grinder slitting disc. The original BMW exhaust is made of stainless steel so no rust at all despite being 30 years old!

2025 exhaust modification by Sabrebuilder, on Flickr

I used a pair of stainless steel flexible pipes to replace the section removed and had to make some spacers to match the bore sizes.

2025 exhaust modification by Sabrebuilder, on Flickr

Because I used flexible pipes I had to add an additional hanger to support the front of the back box silencer.

2025 exhaust modification by Sabrebuilder, on Flickr

This new bracket for the extra hanger was bolted to the spare wheel well. I used two bolts with one at the top of the well where the GRP is stonger.

2025 exhaust modification by Sabrebuilder, on Flickr

The bolt at the top clears the spare wheel tyre.

2025 exhaust modification by Sabrebuilder, on Flickr

The bolt at the bottom was countersunk into a thick square washer and covered with a piece of rubber backed carpet.

2025 exhaust modification by Sabrebuilder, on Flickr

All back together and a much better solution.

2025 exhaust modification by Sabrebuilder, on Flickr

2025 exhaust modification by Sabrebuilder, on Flickr

This shot shows that these pipes are no longer the lowest point in the system.

Now ready for road testing when the weather improves.

....peter
15 Apr 2025, 7:48pm
Heater control

I finally got around to connecting the heater contol cables to the heater flaps. The hot/cold flap lever is extreemly difficult to reach in the drivers footwell and even more difficult to see. I had to remove the drivers seat to be able to reach under the dashboard and steering column. This is the outer sheath clamp and screw which is just reachable.

Heater contol cables by Sabrebuilder, on Flickr

The inner core is wrapped around the lever. I was concerned that it looked like it may 'pop off' so I glued an m6 nut over the spigot.

Heater contol cables by Sabrebuilder, on Flickr

The cabin/demister control cable was much easier to reach as it is at the rear of the heater box.

Heater contol cables by Sabrebuilder, on Flickr

So a little job that I have been putting off for years is finally done!
17 May 2025, 8:36pm
[SIZE=14px]Okay so this is my first major update since the forum has been updated so let's see how it goes...................
---------------------------------------------------------------------------------------------------------------------------------

Finding the right rear springs for my Sabre has been a bit challenging. I started with Sierra HD springs which gave the car a good looking stance but caused problems with ground clearance. I then changed them to some genuine standard Ford Granada springs which sorted the ground clearance issues but jacked up the rear of the car too much and looked all wrong. I'm told that Granada aftermarket lowering springs are the best solution but these are rather expensive for a trial and could be an expensive mistake if not right.
So, I thought I would use the Sierra springs with some spacers above the spring seat. I decided to have a go at making some polyurethane spacers to sit above the rear spring seats. My rear spring seats are already polyurethane so this seemed the obvious choice.
I started by making a wooden buck from 12mm MDF.[/SIZE]


Spring seat spacers by Sabrebuilder, on Flickr


I then painted and waxed the buck and placed it in a moulding frame. I didn't order enough mould making silicone so the cardboard curved corners are just to reduce the amount of silicone required.

Spring seat spacers by Sabrebuilder, on Flickr

I then mixed and poured the mould making silicone. The two screws are there to help extraction.

Spring seat spacers by Sabrebuilder, on Flickr

This is the mould after removing the buck.

Spring seat spacers by Sabrebuilder, on Flickr

I chose 80 shore polyurethane casting rubber.from drw plastics on ebay.Spring seat spacers by Sabrebuilder, on Flickr

After mixing the polyurethane two parts and some orange pigment I poured the first spacer and left to set.

Spring seat spacers by Sabrebuilder, on Flickr

Here is the first spacer out of the mould.

Spring seat spacers by Sabrebuilder, on Flickr

My next problem was that I had needed to compress the Granada springs to fit them so I had to find a way of compressing them in situ to get them out. So i bought the smallest spring compressors I could find off Amazon.

Spring seat spacers by Sabrebuilder, on Flickr

I then shortened the compressor tools to fit in situ.

Spring seat spacers by Sabrebuilder, on Flickr

Here's how the spring compressor tools work.

Spring seat spacers by Sabrebuilder, on Flickr

It was then a case of replacing the Sierra HD springs with the new spacer above the spring seat. Because of the extra spacer I still had to compress the spring before fitting.

Spring seat spacers by Sabrebuilder, on Flickr

The good news was the spacer had the desired effect of raising the rear of the car but the bad news was that the 12mm spacers I had made raised the rear to the same level as the Granada springs. Doh!

I then had to repeat the whole process but with 7mm spacers. This had the desired effect and road testing is underway.

Spring seat spacers by Sabrebuilder, on Flickr

Here's a photo of my Sabre with the Sierra springs and 7mm spcers above the spring seat.

Royale Sabre E5PFE at Garden Centre 11 05 2025 by Sabrebuilder, on Flickr

Finally, I now need to check the camber.

phew...............


..............peter


17 May 2025, 10:22pm
Great ingenuity. Such a lovely profile.
22 May 2025, 12:44pm
nice work :)