MadaboutKitcars

This is a read-only archive of the old Madabout Kitcars forum. New posts and replies are no longer possible, but every thread is still here to browse and read.

Royale Sabre - Take two!

14 Jul 2023, 8:06am
Great news!

Many congrats Peter! Lovely car.

Regards, Mick
14 Jul 2023, 2:04pm
Congratulations Peter, a job very well done and I for one, love what I have witnessed since the first photo of the car on the flatbed. Incidentally, it was the photos of your striped car that got me hooked onto Royale Sabre and I have enjoyed every minute of rebuilding and driving my car. I am sure that is what you will be doing, having built such a beauty.
14 Jul 2023, 2:57pm
It looks brilliant! I've just caught up with your story...Amazing!

Manic
17 Jul 2023, 3:05pm
Dear Peter,
In my last post I forgot to say if you need the "R" badges, I have plenty that I can provide you with as my present. Just let me know..
23 Jul 2023, 8:42am
Many thanks

Many thanks to everyone for posting your kind messages....

Paul - thanks for posting the 'before and after' pictures, it certainly looks a bit different now!

Dpaz - I think it is pronounced Say-ber just like the sword :fencing:

Amir - thanks again. I didn't know that it was my car that inspired you to get a Royale. And now you have two. And think I'm okay for badges as I had some made myself sometime ago but I'll get back to you as I may not have one for my new steering wheel.

Mick and Manic (Paul) - many thanks
23 Jul 2023, 9:14am
IVA Corrections

For completeness on this thread I thought I ought to document the list of issues raised at my IVA test and how I resolved them. It may just help someone else get through their IVA. Whilst the IVA manual is a comprehensive document in black and white, many areas are open to interpretation by the inspector and I also think it depends a bit on what catches his eye on the day of the test. He started by asking me when the Sabre was produced and when I said '1994' he said some something like 'oh dear, we are going to have some issues with this' so I think this set his frame of mind.

The test follows a sequence of tests that starts with the exhaust emissions. The first run failed so he manually ran the engine at about 2000-3000 revs whist watching the CO2 and HC results on his test equipment. He ran it for about 5 minutes to warm up the CAT. After that it passed with flying colours and he was impressed by the results.
He then got into the car and checked all the interior controls, steering, wipers, seat belts, etc. He was looking for any sharp edges but couldnt find any.
He then checked the height of the seat belt mounting height and visibility through the windscreen with a contraption called 'Nigel'. It is a contraption consisting of a stand that sits on the seats and has strings and spirit levels for checking various dimensions. Everything passed. I have a very early Sabre where the seat belt shoulder mount is too low to meet the IVA requirement. To get round this I have modified the mounting point to be slightly higher by raising the diagonal bar that runs back to the chassis. I also have some well used MX5 seats that I deliberately didn't get reupholstered that are mounted as low as possible to the floor. There is no carpet under the seats to get them as low as possible.
I have documented the seat belt modification before but here is a picture of how I raised the support point.

Seatbelt support by Sabrebuilder, on Flickr

(I am going to pause now as I dont want loose all that I have written due to the dodgy forum software)
23 Jul 2023, 10:05am
IVA Corrections (Part 2)

(Okay, so Part 1 posted okay, I had to leave out apostrophes so apologies for the grammar)

So after checking the interior, he then checked all the exterior. I had put little covers over the ends of the bonnet hinge, seat belt mounting, and modified the boot handle so that it had no sharp edges. I had even put some clear tubing over the windscreen wiper arms which brought a smile but he said this was not necessary. He then measured the dimensions and position of all the lights and checked visibility from the front and rear of the car. No issues on where raised on the exterior but he had noticed that there was a lot of play between between the brake pedal and the master cylinder which meant the brake lights were permanently on as the pedal had dropped and the on the Sabre the brake light switch is on the pedal. This was my first issue that had to be corrected before the final 'official test' and I agreed that this was serious and needed investigation and correction as clearly something was amiss.

Once back home I checked all the obvious things but did not find anything. I removed the master cylinder and found there was a small narrowing of the internal bore and concluded that the brake pedal push rod had been resting on the ledge when I first installed it. During the drive to the test station the push rod had settled in the bottom of the piston bore thus creating the gap.

Here is a picture of the piston bore and the original pushrod which was mushroom shaped.

IVA Corrections by Sabrebuilder, on Flickr

IVA Corrections by Sabrebuilder, on Flickr

So I re-shaped the end of the push rod so that this will not happen again. I then had to re-install the master cylinder, adjust the push rod and bleed the brakes.

Here is the re-shaped push rod end......

IVA Corrections by Sabrebuilder, on Flickr

(I am going to pause again due to the forum software...)
23 Jul 2023, 10:52am
IVA corrections (Part 3)

(okay, so Part 2 posted okay, so I'll carry on..........)

Following the external checks I was asked drive the car on to the ramp and remain in the car. He then raised the car on the ramp and I stayed in the car to operate the controls. Moving the steering from lock to lock, with and without the engine running he was under the car inspecting for anything untoward.
Following this he showed me the following list of issues....
1. He wasn't happy about the front flexible brake pipes claiming they touched the chassis or suspension when I turned the steering.
Here is a picture of my front flexible brake hose before modification.

IVA Corrections by Sabrebuilder, on Flickr

To resolve this I put an extra small bracket attached to the chassis to hold the hose in position and away from anything.

IVA Corrections by Sabrebuilder, on Flickr

IVA Corrections by Sabrebuilder, on Flickr

2. The next issue was a 'p' clip with a missing fixing screw. Easily fixed.
3. He then pointed out a wiring grommet that had popped out when fitting the carpets, again easily fixed in place with some RTV silicone sealant.
4. Next, he pointed out that the exhaust was a little too close to one of the fuel hoses.

This is a picture of the hose and exhaust pipe during installation....

IVA Corrections by Sabrebuilder, on Flickr

(The fuel hose in this picture is middle right)

To resolve this I bought some heat shield and fabricated it to fit above the exhaust pipe.

IVA Corrections by Sabrebuilder, on Flickr

5. He also thought the fuel tank was bit close to the exhaust silencer. Had this been the only issue I think I would have challenged him on this point because the silencer box does not get very hot, the fuel tank is steel and there is a two inch gap between the two. But by this time there was no point in arguing . To resolve this issue I attached a sheet of self adhesive heat shield to the fuel tank.

IVA Corrections by Sabrebuilder, on Flickr

6. He then pointed out that he thought there should be grommets on the rear light wires where they pass through the GRP bodywork even though the wires are sheathed in PVC sleeving.

IVA Corrections by Sabrebuilder, on Flickr

I didnt feel this was necessary but he agreed a blob of RTV silicon would be a satisfactory solution.

7. The last issue was found while he was road testing the car. Following the tests on the ramp he checked the speedo on the rollers (which passed) and drove the car outside to check the mirrors and noise. The mirrors passed and he didnt measure the noise as he could tell it would pass. He then drove the car round the test station to check a dynamic brake test and check the steering self centering. Whilst driving the car round in circles on full lock he could hear one of the tyres rubbing on the underside of the front wing. I eventually resolved this issue but putting steering limiters inside the steering rack gaiters. However, at the 'official' second test this was not re-checked :der:

That's all the issues and corrections. As mentioned above at the 'official' test all these items were passed and the brake test conducted.

I hope this may be of some help to other builders for some of the things to look out for.

I have now got quite a long list of post IVA modifications to do to get my Sabre finished.

................peter
9 Aug 2023, 9:05pm
Congratulations! What a gorgeous car. Here is hoping we have an Indian summer so you can really get out and enjoy it!
Btw, 11 or so years for the build is a mere bagatelle - I am at the ten year mark now collecting bits for my Westfield eleven build and I haven’t even started it!
21 Aug 2023, 8:31pm
Biggles wrote:
Congratulations! What a gorgeous car. Here is hoping we have an Indian summer so you can really get out and enjoy it!
Btw, 11 or so years for the build is a mere bagatelle - I am at the ten year mark now collecting bits for my Westfield eleven build and I haven’t even started it!


Thanks, Biggles. Better get on with that build or you'll be too old to get in and out of an Eleven :heh:
21 Aug 2023, 8:47pm
Registered

I finally got my Royale Sabre registered with the DVLA .:eusa_dance:
BUT not without a couple of issues....
My first application was rejected because they wanted a receipt for the chassis from the original manufacturer. I bought the kit as an unfinished project and it didnt come with the original receipt from 1994.
I had made sure I got a receipt from the guy I bought it from proving I owned the chassis and bodywork, etc. But I was told by the DVLA that they couldnt accept what they called a third party'receipt.
Luckily the Royale Owners club keep a register of all known Royale cars and they were happy to provide a Certificate of Authenticity confirming that my chassis was manufactured by the Royale Motor Company in 1994. I sent this back with a letter explaining that the Royale Motor Company ceased trading in 2001 and that the original receipt was lost.
This did the trick and they have issued me a V5 with an age related plate.:eusa_dance:

The second issue is the DVLA have mistyped the VIN on the V5 :party:

(sorry for the lack of apostrophes but they screw up the forum software)
22 Aug 2023, 1:57pm
peterux wrote:
Thanks, Biggles. Better get on with that build or you'll be too old to get in and out of an Eleven :heh:


You,ve seen me then! :heh:
22 Aug 2023, 4:46pm
Ready to have fun with your beautiful Royale Sabre

Congratulations, you have registered it and it is time you had some fun with your gorgeous car, you really deserve it. Good luck.
24 Aug 2023, 8:09pm
Congrats great news, well done :)
24 Aug 2023, 8:32pm
peterux wrote:
I finally got my Royale Sabre registered with the DVLA .:eusa_dance:
BUT not without a couple of issues....
My first application was rejected because they wanted a receipt for the chassis from the original manufacturer. I bought the kit as an unfinished project and it didn't come with the original receipt from 1994.
I had made sure I got a receipt from the guy I bought it from proving I owned the chassis and bodywork, etc. But I was told by the DVLA that they couldnt accept what they called a third party'receipt.
Luckily the Royale Owners club keep a register of all known Royale cars and they were happy to provide a Certificate of Authenticity confirming that my chassis was manufactured by the Royale Motor Company in 1994. I sent this back with a letter explaining that the Royale Motor Company ceased trading in 2001 and that the original receipt was lost.
This did the trick and they have issued me a V5 with an age related plate.:eusa_dance:

The second issue is the DVLA have mistyped the VIN on the V5 :party:

(sorry for the lack of apostrophes but they screw up the forum software)


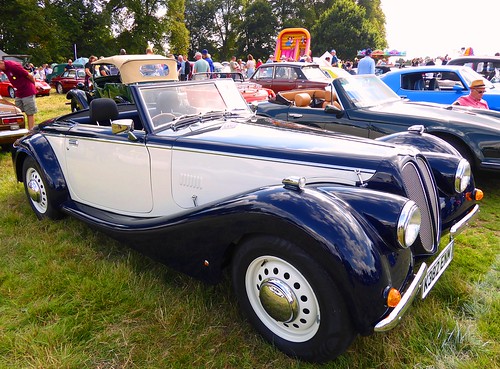
The DVLA made a mistake on my Formosa registration despite a visit from their inspector. The colour remained white on the V5 but it had been changed to green on the application. They also retained it as a 4 seater rather than updating it to 2 seater. The reason behind the visit was partly because I'd entered barchetta on the body style rather than convertible, barchetta meaning open top with no provision for a roof. So in the end, the revised V5 still had the Scimitar "coupe" body style entered ! There was an issue with the receipt from Formosa because they wanted one on headed paper !
25 Aug 2023, 4:18am
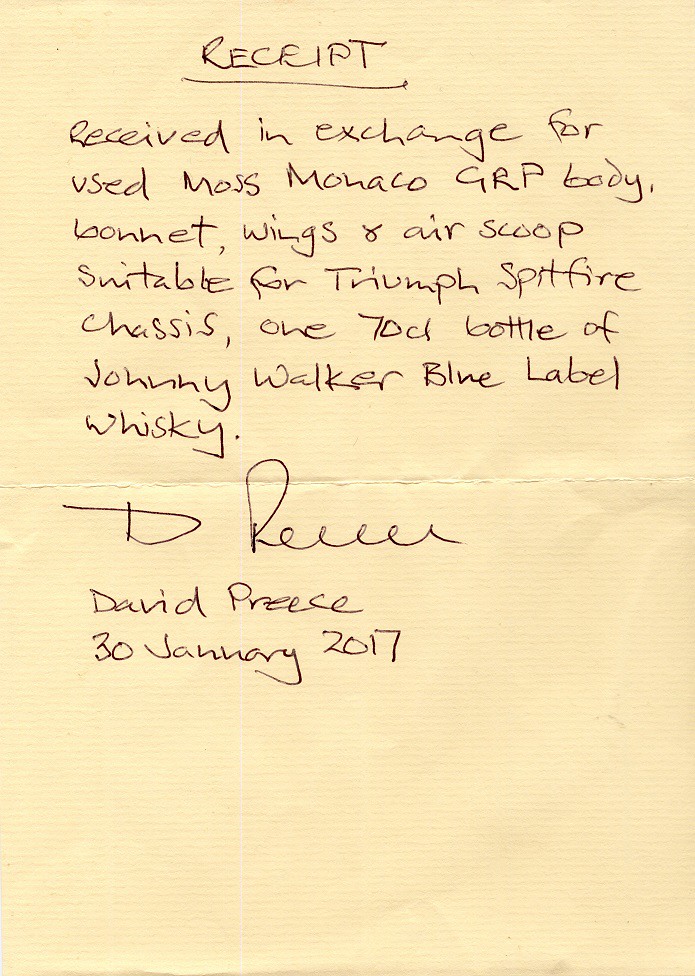
Receipt

DVLA accepted this receipt without comment, although it is only for a second hand body. When it was in the spray shop, the proprietor told me that other punters asked if it was an aircraft, rather than a 'little boat'.


Happy Days!

Regards, Mick
25 Aug 2023, 5:52pm
Yes, it does mean "little boat" as well, not sure why or when it was adopted for automotive use. Probably the same toff / person who started using the word "paddock" rather than "pits" in posh motor racing !
1 Oct 2023, 4:25pm
Not a lot of car news as I've been catching up on some overdue DIY and gardening :juggle:

But I did manage to get to my first show which was my local Classis Cars and village fete.

Redbourn Classics Motor Show 2023 by Sabrebuilder, on Flickr

I've removed some of the IVA stuff like the hideous Fog and reversing lamps but not yet got around to fitting the new ones.

Post IVA mods by Sabrebuilder, on Flickr

I've also fitted a new steering wheel.........

New Steering wheel by Sabrebuilder, on Flickr

I thought making the horn button work was going to be a bit of a challenge but I found that the horn ring connector from the old Ford steering wheel just unclipped and clipped straight back into the aftermarket steering wheel boss.

New Steering wheel by Sabrebuilder, on Flickr

I've also been re-fitting the hood frame in preparation for the new hood being made at a local trimmer. Difficult to photograph but here I'm aligning the hood frame with the passenger door glass.

Hood fitting by Sabrebuilder, on Flickr

That's all for now............
..................peter
12 Dec 2023, 8:01pm
Enamelled Bonnet Badge

I have had an enamelled bonnet badge made by Pamela David Enamels, It was handmade from brass before being chromium plated and glass enamelled. Fantastic quality!

Enamelled Bonnet Badge by Sabrebuilder, on Flickr

The bonnet badge was commissioned by a ROC member and was designed to fit the Bentley flying wings surround. It fitted perfectly!

Enamelled Bonnet Badge by Sabrebuilder, on Flickr

New enamelled bonnet badge fitted.

Enamelled Bonnet Badge by Sabrebuilder, on Flickr

Very pleased!!:eusa_dance:
10 Feb 2024, 9:39pm
Hood frame preparation

Time for a small update.......

Since the New Year, I've been focussing my efforts on fitting a badge bar with driving lights and preparing the hood frame before the new hood is fitted in the spring. More on the badge bar when I have some decent photos so this update is about the hood frame.
The wooden battens that form the hood windscreen rail were very rotten from being left out in all weathers for many years so had to be remade.
Following the instructions in the Royale build manual I started by cutting two battens according to the dimensions given. These are then screwed together either side of a steel spine.

Hood header rail by Sabrebuilder, on Flickr

You then have to make two cut outs in the lower baton for the Triumph hood catches.

Hood header rail by Sabrebuilder, on Flickr

Trial fitting the hood catch

Hood header rail by Sabrebuilder, on Flickr

Having screwed the two batons together you then have to plane a 15 degree slope to the top piece of wood and then chamfer the lower baton at 55 degrees. (Marked with a pencil line.)

Hood header rail by Sabrebuilder, on Flickr
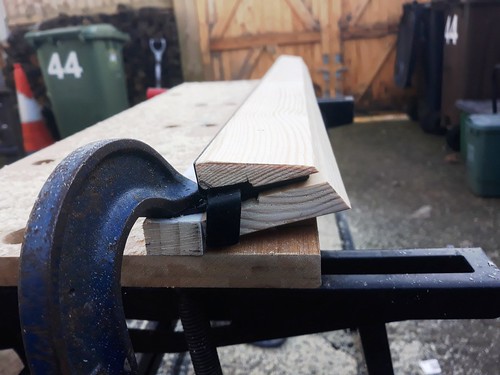
Lower baton now chamfered.

Hood header rail by Sabrebuilder, on Flickr

The front corners and top ends are then rounded.

Hood header rail by Sabrebuilder, on Flickr
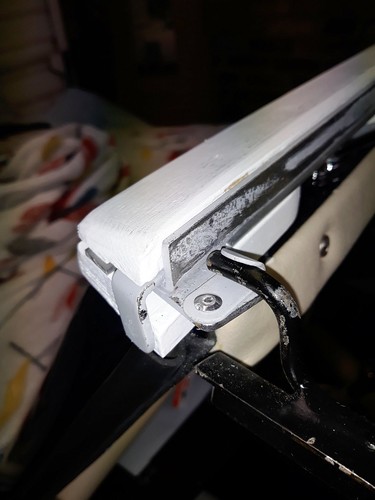
The next picture shows how the hood side rails are located on the cant rail. My timber battens are thinner than specified so I added a 2mm thick aluminium strip between the battens and the steel spine. (photo taken before final paint preparation.)

Detail of hood side support by Sabrebuilder, on Flickr

I then dismantled the frame for painting. Whilst preparing the hood hoops for a fresh coat of paint I discovered they were very rusty beneath the black Hammerite that I put on about 11 years ago. They had clearly suffered more under the leaking hood than I first thought and I suspect they were not particularly well painted when first built.
I decided they needed to be stripped back to bare metal. This is one of the hoops after stripping, sanding and having been treated with Rustin's rust converter.

Hood hoops stripped for re-painting by Sabrebuilder, on Flickr

I then applied the first coat of primer.
I'm trying out "Direct to metal" Epoxy primer. Apparently, this creates a barrier that prevents moisture from reaching the metal surface, thereby reducing the risk of rust formation. They also claim it forms a strong bond with the metal surface, which helps prevent the paint or coating from peeling or flaking off over time.
It went on very nicely and dried to a pleasing smooth finish.

Hood hoops primed by Sabrebuilder, on Flickr

Following the application of primer I will be finishing the hoops in Midnight Blue to match the bodywork.

...............peter
13 Feb 2024, 1:26pm
Looking great!
Who would have known that the header rail is so complicated.

Cheers, Robin
14 Feb 2024, 2:47pm
MartinClan wrote:
Looking great!
Who would have known that the header rail is so complicated.

Cheers, Robin


:nod: yes, John Barlow was quite specific how he expected his cars to be built!
29 Feb 2024, 5:07pm
Potpourri

A little 'potpourri' of updates from my garage..........

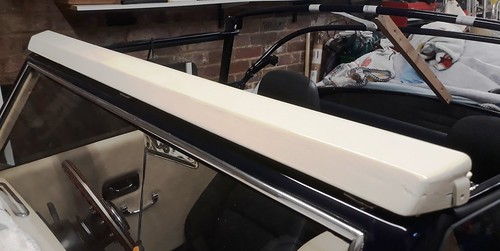
I've finished off the hood header rail and given it a few coats of paint.

Hood frame assembly by Sabrebuilder, on Flickr

Hood frame assembly by Sabrebuilder, on Flickr

I've also fitted the 'side arms' and the window seals.

Hood frame assembly by Sabrebuilder, on Flickr

Bit of an optical illusion as the side arm is actually parallel with the top of the window.

I've also finished fitting the new reversing and fog lamps. Here is a picture of the fog lamp which is not very exciting!

Fog Lamp by Sabrebuilder, on Flickr

And I've changed the side lights to LED as the originals were very dim. Not very obvious but here is a before and after shot. Nearside changed to LED and offside is the original bulb.

LED sidelights by Sabrebuilder, on Flickr

Well, that's all for now.
Hopefully, I'm off to the trimmers next week to have the new hood made and fitted.

.............peter
1 Mar 2024, 11:05am
Hi Peter, as always, carrying out everything in the best way possible. Just a question, have you considered having your original hood frame modified so that you don't have to leave your seat to open the top. Instead you unlock the two screen locks, lift and drop it back behind the seats, and to close it, just the revers of that? Just an idea.
Keep up the fantastic work.
1 Mar 2024, 6:24pm
Looking forward to seeing the hood!
The last piece of the puzzle?
That rear fog light looks very nice. I don't suppose you remember where it was from?
Cheers, Robin