This is a read-only archive of the old Madabout Kitcars forum. New posts and replies are no longer possible, but every thread is still here to browse and read.
You got a bargain there Mac, looks like a good machine.
I looked at the video, but it told me there was a problem. so I never got to see it in action!
Like Paul said, if you go back over my thread of when I did my seats. it may save you some hassle, or give you a better idea of how to etc. Good luck with the seats.
Top tip, buy lots of the right needles and thread!
Scottie, I read your seat posts with great interest. Im hoping the machine should be good for what I want and have a plan rattling around in my head. lets see.....
hot muggy day in the workshop but made good progress.
started by glassing the bonnet chop form the inside.
3 and some places 4 layers of 300gsm chop strand matting. I know some people use heavier but I have always found that multiple lighter layers give a stronger more integrated composite that a couple of layers of heavy matting.
Whilst the first bit of glasswork was kicking I removed the chassis part of the tilt frame and made a start on version 3 sub version x....
The chassis brackets are over long as I had run out of 3mm pate so had to re use the ones from version 1 &2.
I don't want to touch anything with a welder this time until I can trial fit the bonnet so moved back to glassing the bonnet. didn't take loads of pics as you have all seen enough Fibreglass layup pics on this forum by now!
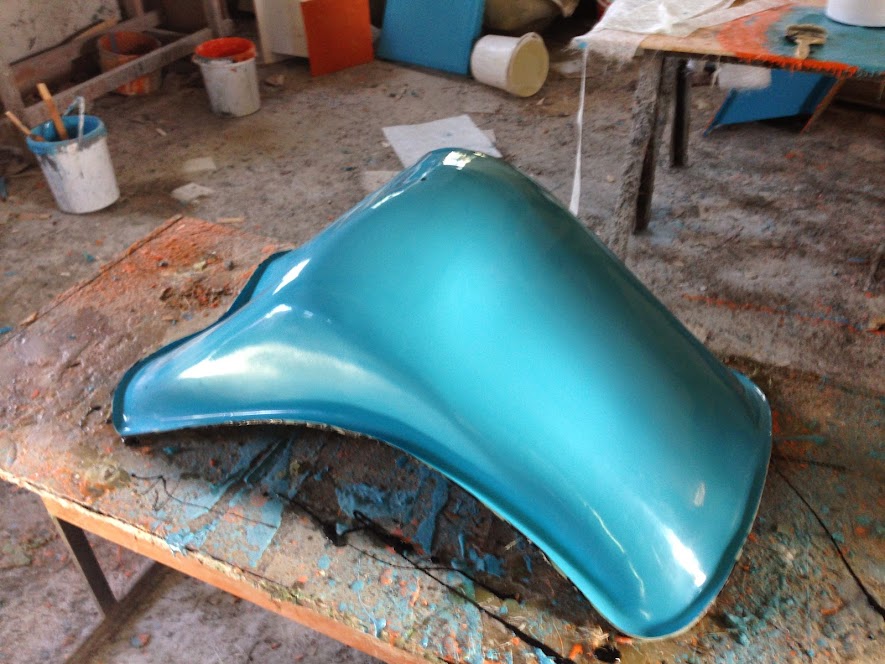
But once I had ground back the outer repair and again used 4 layers of 300gsm starting at approx. 1/2" wide ending up at 3" wide and then knocked it all back with 80 grit I was left with this.
Still a bit of work to do but the main structural rigidity is now back.
A shot of the finished repair for you composite nerds showing the finished repair flush with the original gel coat. just needs a skim of the green stuff and it will be good to go.
need to get moving on the seats now that I have bought the sewing machine and I cant do that until I have the mould for the shell done and 2 shells out of it. To that end I spent an hour rubbing out the runs in the primer and using some 1k stopper to touch up any major imperfections. remember these are going to be covered so the odd ding here and there wont make a difference. After having trouble last time with the primer I bought a cheap inline regulator last week and it paid dividends as it allowed me to throttle back my airline pressure which in turn allowed me to reduce the paint flow and I ended up with a nice finish that should be plenty good enough to take a mould from.
Paul, if your reading this this paint finish is straight from the gun using the Jawel truck coat I told you about...
And its about 6 years old! last used to paint our 7.5 ton race truck back in the day!
I used Jawel paint on mine. Can't fault it, even I managed to get a respectable finish as a complete novice sprayer using very cheap guns and a low powered compressor. Very helpful customer service dept when I contacted them for advice too.
Didn't get as much done today as I had hoped but made good progress on the bonnet reshape.
Finished off glassing up the cuts after removing the steel reinforcing ring.
started off with this, a light skim of fibreglight, and a sand back with 120 grit left it good enough for a skim of finish filler.
a good going over with 120 followed by 240 grit left it pretty much done.
Next I had a look at the wheel arch lip. The bonnets are still made using the old Sammio moulds which are to be frank totally rubbish in both their design and execution. End result is you end up with a rolled protruding edge to the wheel arch lip.
A good going over with 120 grit though left it smooth. Problem is that to get it this good the fibreglass has gone very thin in places so will need reinforcing at some stage.
Only smoothed out the Drivers side as the passenger side will have to be shut n cut.
Moved back to the nose are and tackled the underneath where the cut had been.
Then moved on to bonnet hinge Mk 418....
Not my neatest welds but in my defence I was lying on my side whilst doing them which wasn't helping.
A day of 2 projects today...
Project 1
Sorting the bonnet Part 537
Time to stop faffing, the bonnet doesn't cover the wheels and the lights are at different heights from floor and and and and you get the picture. First job is to fix the bonnet position. I love Cleco's.
As is usual with the Ribble / Sammio mark I faffed for an hour with the tape measure then threw it in the corner of the workshop and got stuck in
At least the drivers side wheel in now almost covered, a little flaring of the arch and it should be fine.
Another major advantage is that the centre of both headlamp plinths now sit pretty much exactly 50cm off the floor on both sides.
A total fluke but dropping the drivers side to align the lights also seems to have equalled out the front of both front wheel arches.
You can see here that the drivers side has dropped down about 2 inches.
I didn't take any pics but did get it pretty much all glassed up again so apart from a bit of filler work I think the bonnet is pretty much there which means that I'm getting close to primer!!
Duratec ST150 soon to be sporting a Duratec 2.3 Cylinder head forged pistons and rods and a TTS Rotrex supercharger kit. Its the new setup for the Tiger GTA as both Dave and I are tired of building and want to do some more serious driving. The original plan to use the T4 Volvo 1.9 with a roots type blower would have been a nice project but would have eaten weeks of time in development that neither of us really have. By going this route its a know quantity that has been done before so should not present too many engineering issues. 400BHp in 600 kg = 666bhp per tonne! hope that's not a sign.....
Bloody hell Mac! With that much power you'll be doing doughnuts
every time you pull away from the lights if you're not careful!
Stay at home in the rain..........
Nice work on the bonnet Viatron, the split has sorted three issues out in one go which is good.
The thought with the tape measure is exactly what i think also, i spent a couple of hours trying to figure out where exactly the problems are with the body but then gave up and took the plunge with a marker pen and cutting disc then used my eye instead but once you start to look closely at the misalignment of the body it becomes an obsession a little tweak here and a little tweak there.
Keep up the good work, your threads show some major work to be done with the body which is great as it gives all others the heads up on what to do.
Well not much progress as my heart wasn't really in it today. We lost our Dog on Thursday Night after a 6 month battle with Cancer. He was 18 1/2 and was the perfect family dog and although he looked tough as nails he had a heart of gold. At least he went peacefully at home with all the family present and the vet to make his passing painless. Have to admit I cried like a baby :-(
Spent a few hours in the workshop today but mostly pottered around tidying up. did get the bonnet re clecoed into place and the first round of FG filler applied so at least it was something.
Sorry to hear about your pet dog, they do become one of the family and are a great miss but as scottie says time is the healer as we as myself and the family know.
Right,
Been AWOl for a while as I came down with Flu and being as I'm immunologically compromised it gave me a right kicking! Ebola paa!
So the news in no particular order.
The Alfa 156 developed a worrying bottom end rattle and much as I love it to drive there is no way I'm going to spend £1800 on an Autolusso Engine Rebuild on a 05 plate Alfa worth pennies so had a hunt around and am now driving a new mid life crisis car, A Fiest St150 in Colarado Red, an unloved example but basically all there and straight and got it for £2k less than book initial impressions are favourable it goes like a scalded rat!
Ill be splitting this post up to avoid losing it all when I press the wrong button so scroll down for the part II
And the part you have all been waiting for.
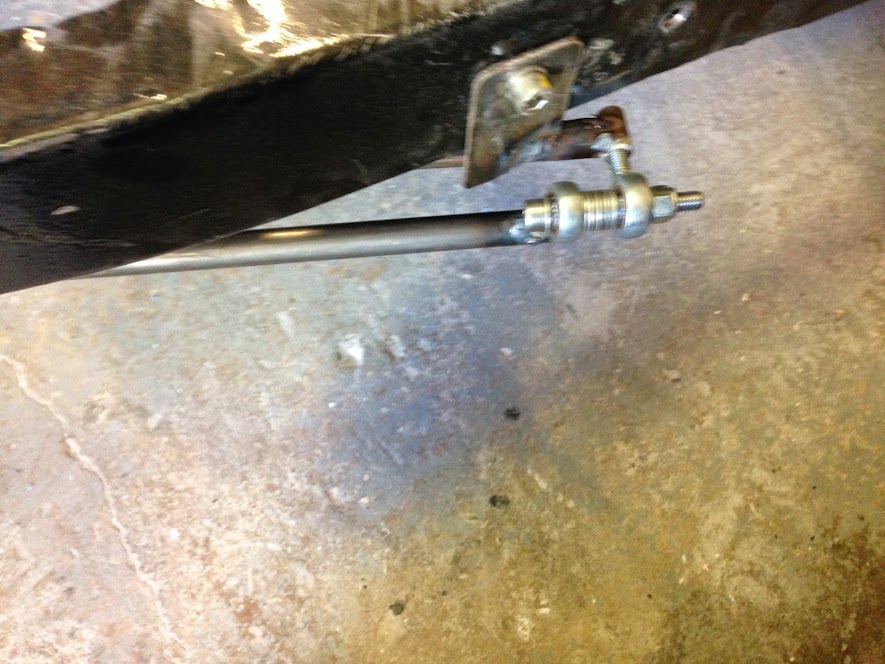
Finally got back onto the bonnet tilt mechanism today and got the hinged part done.
by using 2 spherical joints I have about 2" of adjustment for and aft and about another 2" of adjustment left and right by removing washers from one side and adding to the other.
In the picture below you can see it tucks all the way back under the front chassis rail if required
And all the way up in the other direction
hopefully I will get some shop time tomorrow and will now make a start joining the hinge to the oval steel hoop in the nose.