MadaboutKitcars

This is a read-only archive of the old Madabout Kitcars forum. New posts and replies are no longer possible, but every thread is still here to browse and read.

Royale Sabre - Take two!

7 Feb 2022, 8:24pm
Let's try again..........

Well after Christmas and the new year I took a short break from car building to carry out some important home improvements. Still got lots to do but my New Year resolution is to 'finish' my Sabre this year, so I better crack on ......

So, I was back in the garage this week tackling something I wasn't really happy with last year.....
Whilst browsing the internet over Christmas I came across these motorised door lock mechanisms. There are multiple sellers on ebay but this set cost me just j
7 Feb 2022, 8:31pm
peterux wrote:
Well after Christmas and the new year I took a short break from car building to carry out some important home improvements. Still got lots to do but my New Year resolution is to 'finish' my Sabre this year, so I better crack on ......

So, I was back in the garage this week tackling something I wasn't really happy with last year.....
Whilst browsing the internet over Christmas I came across these motorised door lock mechanisms. There are multiple sellers on ebay but this set cost me just j


Nope still not working..............:nono:
7 Feb 2022, 8:55pm
Hi Peter

Are you copying and pasting the content from somewhere else or typing directly?

Is it cutting off on a certain character?

Cheers, John
7 Feb 2022, 10:40pm
I've had the same problems too ! Simply cuts me off sometimes and can't edit or add anything.
8 Feb 2022, 12:19am
It would seem that there is an issue with some characters, the GBP sign being one of them.

No idea why at the moment as I haven't made any changes.

Please refrain from using the pound sign for now whilst I investigate.

Probably also worth copying and pasting any wording you have to notepad before submitting.
8 Feb 2022, 9:06am
JG wrote:
Hi Peter

Are you copying and pasting the content from somewhere else or typing directly?

Is it cutting off on a certain character?

Cheers, John

I normally draft my updates in the comments sections of Flickr where I store my pictures. I then cut and paste into your site with some editing, etc. I've being doing it like this for years without a problem.

But your right about the pound symbol as that is exactly where it is truncating.

I will try again.....

thanks, Peter
8 Feb 2022, 9:10am
I'm back.........

(Ok, trying again without the pound sign)

---------------------------------------------------------------------------

Well after Christmas and the new year I took a short break from car building to carry out some important home improvements. Still got lots to do but my New Year resolution is to 'finish' my Sabre this year, so I better crack on ......

So, I was back in the garage this week tackling something I wasn't really happy with last year.....
Whilst browsing the internet over Christmas I came across these motorised door lock mechanisms. There are multiple sellers on ebay but this set cost me just 12.95GBpounds including postage which I thought was a bargain and worth a punt.

Remote door locks by Sabrebuilder, on Flickr

And for an additional 11.36GBpounds, I could add this remote control box and two rather nice control fobs. The box has a number of features including flashing the side indicators when you lock or unlock.

Remote door locks by Sabrebuilder, on Flickr

They have been sitting on the shelf for a while so it was time to try them out and see if they work.
They are pleasingly well made and came with clear wiring instructions and have a good strong action. They were easily fitted in the Sabre's door and work perfectly.

Remote door locks by Sabrebuilder, on Flickr

I now have the other door to do and to fit the interconnecting wiring. I also need to find suitable locations for the control boxes.

I've also tested my windscreen washers and wipers against the requirements in the IVA manual.
Bizarrely, you have to simulate the washer jets being blocked and check that the washer pump doesn't fail!
The wipers are required to have two speeds.
One has to be at least 45 cycles per minute. The second has to be between 10 and 55 cycles per minute and at least 15 cycles per minute different to the first. :juggle::der:
Mine passed, phew!

So a good start to the year and next week I'll be fitting the locks to the second door....

....peter

--------------------------------------------------------------------------------------------
Post posting note: well that worked fine, thanks John
9 Feb 2022, 9:56am
I do like the look of those remote fobs. I'm using the same actuators for the locks in my Speedster's doors but I was going to wire them into a couple of hidden switches in the interior. Having now seen your control box and fobs I think I might just have to go down that route instead :)

Keep up the good work!
11 Feb 2022, 1:34pm
Mister Towed wrote:
I do like the look of those remote fobs. I'm using the same actuators for the locks in my Speedster's doors but I was going to wire them into a couple of hidden switches in the interior. Having now seen your control box and fobs I think I might just have to go down that route instead :)

Keep up the good work!


Yes, the ones I got are nicely made and not too bulky. This is the ebayer I got them from but he seems to have raised his prices a little since I got mine.
https://www.ebay.co.uk/itm/154653518796
11 Feb 2022, 6:23pm
I liked it so much I've ordered one, so thanks for the tip :)
15 Feb 2022, 5:20pm
Inching forward.....

I've now completed the installation of the second remote door lock.

But...
I had noticed that the coolant level in my reservoir had been dropping slightly and initially I thought it must have been an air lock in the heater that had cleared. But then it dropped again so time to investigate and I found coolant around and below the radiator cap. I ran the engine up to temperature and sure enough it was leaking from the radiator cap, especially after you switch the engine off as it cooled down.
Upon investigation the metal spring under the rubber seal has lost it's springiness so it is not making a good seal under pressure. It appears that the temperature has annealed the spring which is not good as I have only run the engine about a dozen times.
The faulty cap on the right is made by Aeroline and is to be avoided. I've replaced it with a Quinton Hazell cap and hope this one lasts longer.

Faulty Radiator cap by Sabrebuilder, on Flickr

Another little job......
I've never heard of anyone failing their IVA on wiper arms but these stainless steel blades and arms do have some quite sharp edges so I've covered them with a short piece of clear PVC hose. 5 minute job to avoid a potential issue.

Wiper arm cover by Sabrebuilder, on Flickr

Next up, I'm making some panels which will cover the ECU that is mounted in the passenger footwell. These will be sealed and covered in carpet.
Here's the first panel.....

Under dash panelling by Sabrebuilder, on Flickr

Until next update.............

.............peter
3 Mar 2022, 8:40pm
Cooling off again........

Further pondering on my radiator cap problem I reached the conclusion to eliminate this type of cap as they are not really designed for this application. The flat valveless caps were designed to be used low pressure overflow tanks and not pressurised systems like mine.
I have reverted back to a design I successfully used on my Marlin Sportster.

Revised Coolant design by Sabrebuilder, on Flickr

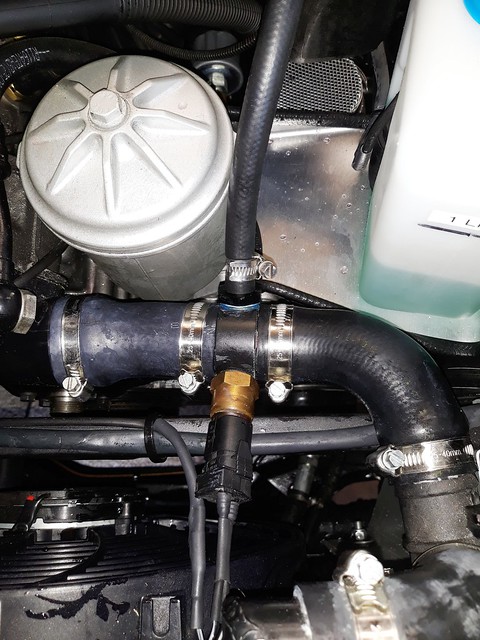
The small bore coolant pipe now goes from a take off from the top radiator hose to the header tank. The BMW coolant sensor pipe had a spare port lending it to the new design. Unfortunately, it initially clashed with the oil filter casing so I had the move it to the right by 20mm. This meant sacrificing another new BMW top hose.

Revised Coolant design by Sabrebuilder, on Flickr

I put a couple of rivnuts into intake manifold's webs to support the small hose clips.

Revised Coolant design by Sabrebuilder, on Flickr

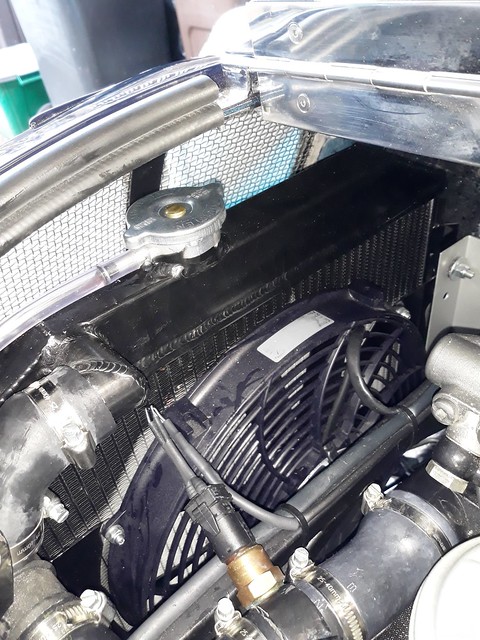
The 'flat' valveless radiator cap has now been swapped for a traditional 20 psi rad cap.

Revised Coolant design by Sabrebuilder, on Flickr

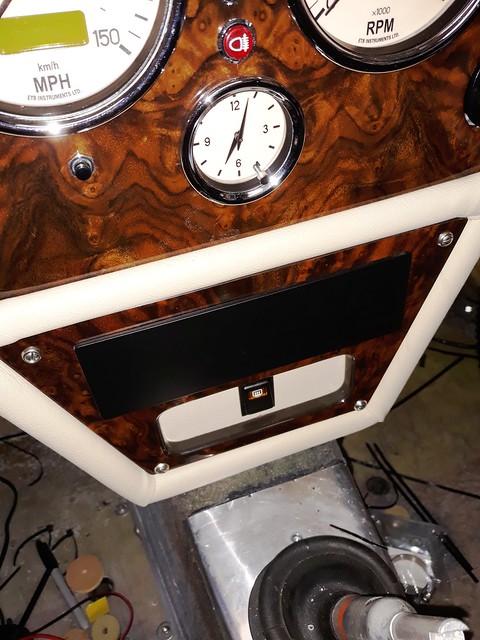
I've also fitted the radio/heater part of the dashboard.

Heater/Radio fascia by Sabrebuilder, on Flickr

The radio and heater controls will be fitted after the IVA test. For now there is a single switch that controls the heater control valve to switch the hot coolant going through the heater.

that's all for now..............

.........peter
12 Mar 2022, 10:25pm
Something different...

This week, I fancied tackling something a bit different so I thought I'd have a go at fixing the hub caps to my wheels.

I'm getting near to the point of getting a set of tyres for my wheels and thought it would be easier to fit the mounting studs for the hub caps before the tyres are fitted. It's much easier to put the bare wheels on the bench for drilling holes, etc without the bulk of the tyres.

I decided to use grease nipples for the mounting studs which is an idea I am copying from other builders.
I chose these 45 degree grease nipples to mount the hub caps to the wheel. I chose these as they have a good shape to match the edge profile of the hub caps and a deeper shoulder than the standard grease nipples.

Hub Cap fitting by Sabrebuilder, on Flickr


It looked like the tips would unscrew but that turned out not to be the case. I initially tried hack sawing the tips off but this left a nasty scar across the body. I then found drilling them out left a nice clean finish which I filled with a blob of epoxy resin to stop any rusting.

I marked out the positions and then drilled and taped a m6 threaded hole. I did a dry run on a sheet of steel to get the positions right. After trial fitting the nipples, I screwed them in with Loctite threadlock and finished of with paint on the back to seal.

Hub Cap fitting by Sabrebuilder, on Flickr

Here's the first one fitted. A nice tight fit and unlikely to fall off.

Hub Cap fitting by Sabrebuilder, on Flickr

The hub caps are for a Singer Super 12. I need to make or find a suitable tool for removing the cap without scratching the wheel's paint finish.

Well that's one done and I now need to do the other 4 wheels......

Next week I've got some new gates to fit so next update in about 2 weeks, hopefully :lol:


....peter
12 Mar 2022, 11:15pm
peterux wrote:

The hub caps are for a Singer Super 12. I need to make or find a suitable tool for removing the cap without scratching the wheel's paint finish.

....peter


Maybe bicycle plastic tyre lever(s) used (in preference to steel ones) for removing tyres from aluminium cycle rims!
13 Mar 2022, 8:36am
Mitchelkitman wrote:
Maybe bicycle plastic tyre lever(s) used (in preference to steel ones) for removing tyres from aluminium cycle rims!


Great idea, I'll try one, thanks.
EDIT: I've tried one now and it works a treat.
13 Mar 2022, 3:13pm
Good to see the continuing high standard of workmanship.

Just a suggestion gleaned from my Classic car. If you lift the pry lever to remove the hub cap then any scuffing will be from the tip of the tool, so on the paint that is hidden under the cap when it is refitted. If you push down on the lever then any scuffing will probably be visible.
13 Mar 2022, 6:23pm
peterux wrote:
Great idea, I'll try one, thanks.
EDIT: I've tried one now and it works a treat.


I'm pleased at the success. The old-style tyre levers aren't entirely redundant as they are good for opening paint tins...... the lids of which seem to get thinner every time I buy a new tin!
4 Apr 2022, 6:37pm
Well, the gates are fitted but not a lot of progress on my Sabre but here are some bits and pieces I've done.

Going back to the door lock electronics, once you've connected all the wires up, there ends up with quite a jungle of wires between the two door locking control modules so I have mounted them on this small panel and hard wired the connections between the two.

Remote door locking control by Sabrebuilder, on Flickr

The small one is for the door locks and the larger one is for the remote radio fobs. With hindsight I should have mounted the fuses further downstream where they will be more accessible, so I'll probably end up changing that. The panel is just a piece of thin plywood that has been coated in exterior stain to seal it.

You can't see it, but the control panel sits out of harms way here between the inner and out door sills here.........

Remote door locking control by Sabrebuilder, on Flickr

I had some more bits chromium plated as the original plating was either worn, tarnished or in poor condition. Technically, I didn't need to get the door stays chromed but it was cheaper than zinc plating for just those two bits. The hood locking escutcheons weren't plated at all originally.

Chromed parts by Sabrebuilder, on Flickr

I've loosely fitted the door lock striker. To be adjusted when the door is fitted.

Door lock striker by Sabrebuilder, on Flickr

For those who may be interested, this is the back of the door lock striker showing how the bracket is fixed to the chassis 'B' post.

Door lock striker by Sabrebuilder, on Flickr

That's all for now..................

................peter
5 Apr 2022, 8:09am
Looking good, Peter, I now have a similar control box for the locks on my Speedster so thanks for the tip.

If you don't mind me asking, how much did it cost to have your small parts chromed? (ooh-er, missus...)

I've been watching classic car restoration programmes like Car SOS and Vintage Voltage and they typically pay around a grand to have a couple of bumpers prepped and chromed. I know it's a complex process but that sounds awfully expensive to me.
5 Apr 2022, 4:22pm
Mister Towed wrote:

If you don't mind me asking, how much did it cost to have your small parts chromed? (ooh-er, missus...)


No I don't mind you asking. The collection of small parts (shown above) cost me 140 GB pounds plus VAT. The door parts were previously zinc plated but had rusted so it must have been poor. The bar at the bottom is the chrome strip off the boot and is about 2 foot long. It sounds expensive but these parts had to be stripped and then polished before the chrome plating. The quote process is interesting as the guy stares at the parts and then does some mental arithmetic before coming up with the price.
Previously, I had two quarter bumpers (that had rusted badly) and four light plinths re-plated and that cost 260 GB pounds plus VAT.

Bling by Sabrebuilder, on Flickr

I've been very pleased with the quality of both jobs.
6 Apr 2022, 8:29am
peterux wrote:

Bling by Sabrebuilder, on Flickr

I've been very pleased with the quality of both jobs.


They do look immaculate!
Cheers, Robin
6 Apr 2022, 1:22pm
Thanks for the update and they do look fantastic.

That's a lot less than I thought it would be based on what the professional telly restorers usually get charged. I have a Mk2 Spitfire waiting in the wings for a rebuild and its bumpers are original and rare but quite pitted, so I'll be looking to have them stripped and chromed when the time comes. Hopefully that will be cheaper than an aftermarket set of stainless steel bumpers (about 800gbp) and look much more authentic.
6 Apr 2022, 6:46pm
Years ago... It must have been about 1985 I attended a Classic car show in London (Earl's court?). Anyway, there were lots of gadgets there. I recall an automatic battery (2 xAA ) dipping mirror, and more pertinently a liquid chrome that could be applied with a cloth! I was (as you'd expect) highly sceptical - I offered the guy a 2p coin, and he coated half of one side. It looked good and 'chromey' to my eyes at the time, maybe it was more like nickel? but it looked good. I kept the coin in my pocket for several months, and it still looked good, never tarnished. I put water on it etc, and it stayed good. The liquid (which I don't recall being a ridiculous price at the time) could now prove useful. Brass or copper bumpers on a DIY basis, and coated with 'chrome'. Did the product disappeared?
19 May 2022, 6:30pm
Here's a clue....

Here's a clue why there has been no updates lately..........:laugh::laugh::laugh:

My other project by Sabrebuilder, on Flickr

New art studio for my wife.
20 May 2022, 8:03am
you got stuck on the roof? that's rough, the weather's been miserable. glad to see they keep bringing you tea at least :)