This is a read-only archive of the old Madabout Kitcars forum. New posts and replies are no longer possible, but every thread is still here to browse and read.
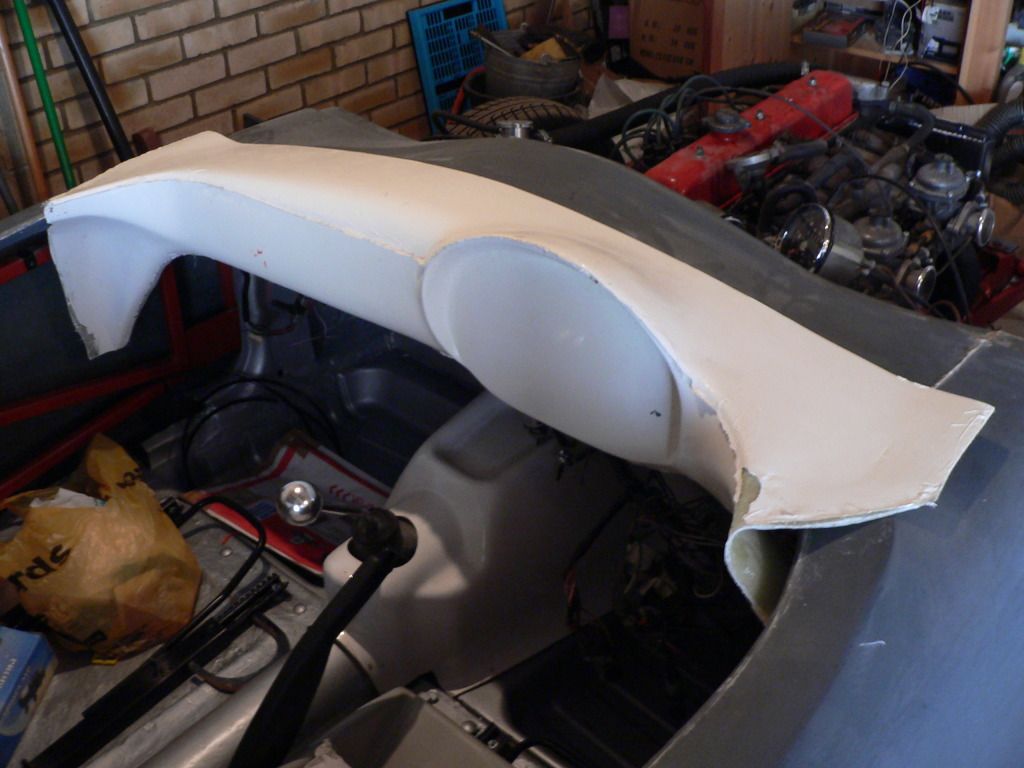
Towed , glad it arrived in one piece....I moulded as much as I could at the time ....it might be easier to fit than you think , width isn't too far away from memory and theres enough spare top , sides etc. to blend it in ....worst case scenario , if you can't use the whole thing , is you have a really nice instrument pod to graft in !
I'm sure it won't come to that and the rolled dash could look great in your car ....another different look .......not so easy for me to do another one now though ....
To be honest Gary, I thought I was only going to get the instrument binnacle. I wasn't actually expecting the whole, roll top dash!
I think it looks great and I'm sure I'll get it to fit. There'll be a bit of a rethink on one or two details - I was going to have a switch panel with a push button start but that won't look right on the curved dash so a key it will be. I'll also be putting the wireless out of sight under the dash rather than mounted on it like I was going to, again because it won't sit right on the curved panel. By the way, I managed to source a modern, double din head unit that's styled like a 50's radiogram. Watch this space...
After some observations were made about my seat belts not being IVA compliant I've been idly looking at the implications of having to put your car through said test.
I was vaguely aware that it's a sort of super MOT and that it cost something in the order of £450 with a similarly eye watering retest fee when your car fails. I'd also seen ads in the Kit Car press by companies offering IVA preparation services.
So, how much does it actually cost to get your kit car to pass the IVA test? Well, I decided to have a bit of a trawl around the rest of the madabout-kitcars.com website and immediately found an excellent link on the subject by Speedster builder 'bonerp' -
I was gobsmacked. He was quoted £1,800 to get his speedster through the test! And if that's not bad enough, he actually ended up paying over three times that sum. Five and a half grand for an MOT! Outrageous.
And once it finally passed, what did bonerp have to do to get the car the way he actually wanted it in the first place? That's right, ditch the padded steering wheel and the modern, e-marked tail lights, cut out the panel mounted fuel filler, move it back under the hood where it belongs on a Speedster, and fill, prep and paint the hole left in the wing. Basically, he paid another company a substantial wedge of cash to get rid of most of the modern crap foisted on his lovely fifties style sports racer by the Nanny State.
Gary J, you're a genius. I had always planned to build a Speedster myself, which would inevitably have needed to go through the IVA. I can't thank you enough for saving me from such a frustrating waste of money.
And if you happen to read this bonerp, well done for seeing it through to the end. Your car looks stunning.
Of course some production cars do have the belts mounted to the seat. It solves a lot of problems cuased my different height passengers. If the seat structure and mounting hardware is it up to it, then why not?
I've been helping out a bloke in New Maldon who's been building a Pembleton. My input is because it's battery powered and I've been advising him on the parts and installation. He's just gone through IVA. I tried to persuade him to see if he couldn't lighten it so it was less than 400Kg (less batteries) because it would then have qualified as a Heavy Quadricycle and come under the simpler and cheaper MSVA regulations.
It nearly passed!. There are only a few fairly minor bits and pieces that need sorting so there should be no trouble with the re-test (£90). It was only originally built with the SVA test in mind.
The problems usually come with long builds where the regulations have changed along the way. If you keep the regulations in mind as you built there shouldn't bee too many issues. There are workarounds for most things.
Of course some production cars do have the belts mounted to the seat. It solves a lot of problems cuased my different height passengers. If the seat structure and mounting hardware is it up to it, then why not?
I've been helping out a bloke in New Maldon who's been building a Pembleton. My input is because it's battery powered and I've been advising him on the parts and installation.
Hi MoriniMan and thanks for the vote of confidence in my seat belt arrangement.
I've been fascinated by the whole electric car thing since seeing the marvellously ridiculous Datsun 1200 drag car whooping big V8's on the strip -
Once I've finished my Sammio I've promised my wife I'll never build another kit car, but if I did, it'd probably be a Cordite with a warp motor and zero emissions...
I do have to admit that i read up extensively on the IVA during my failed Lambo project (i even downloaded and read the full test doc at one point!) and while i completely agree with why the test is there 'in principle' i was stunned by a lot of the completely OTT health-n-safety gone mad bits n bobs!
When i fitted my seat belts i admit that i went a bit OTT, but that was largely due to 2 things:
1) I wanted to take my sons in the car and so i want them to be as safe as possible.
2) I'd never fitted seat belts before and so the guidance in the IVA regs and how they'd been implemented on the lo-cost forums showed me what i needed to do
I've been fascinated by the whole electric car thing since seeing the marvellously ridiculous Datsun 1200 drag car whooping big V8's on the strip -
I've driven it
It wasn't quite as fast as it is now and I wasn't racing!
From 1996 - 1999 I was chief mechanic (well, only mechanic) for an electric race team for 5 weeks each year. The car, a Porsche 914 was prepped in San Mateo California and then transported to the Firbird race circuit South of Phoenix Arizona. The last year I was pulling over 135mph along one of the runways at the former Alameda Airforce base during testing. The UK Bluebird LSR car achieved less than that in its first couple of years and the car I was driving was road legal!
That's a fascinating EV website. I only wish I understood half the technical terms used.
When I was a schoolboy in the sixties I was told that the oil would run out by the year 2000 and that we'd all have electric, flying cars. Come on electronics geniuses of the world, I don't want another generation of bloody i-phone but where's my flying electric car?
I am just mulling over where, how and which to fit....I had thought of a steel spreader plate bolted and bonded to the back of the ply, which in turn is bonded to the body and frame.......my thinking is that in an impact that managed to rip that out, I would have probably eaten the engine and gearbox, decapitated myself as I slid under the lorry, or got squished when I turned it over?
Never used to wear a seatbelt until I realized you could go round corners faster with one on!
Funnily enough that's my reasoning too - if the impact is severe enough to rip the seat off its mountings then the seat belt ain't going to save me. I'm going to add spreader plates under my 12mm ply sandwiched in fibreglass floors though, mainly to appease the MOT guy.
Not much progress over the last few days I'm afraid as I've been fighting off a flu bug that's knocked me out since last Friday night. Feeling a lot better today though and thoroughly fed up with daytime telly I decided to help the recuperative process by venturing out into the garage for an hour.
Plan was to take a look at the fit of the 550 dash in the Spyder body and have a think about the relationship between the dash and the flyscreen.
As luck would have it the 550 dash fits perfectly width wise and it would't be too hard to blend it in exactly as it is -
If I did that though the instrument pod would be too far offset for my liking. In the next picture, the bit of black tape to the right marks where the steering column would come out if I hadn't removed it, while the left hand square of tape marks the centre of the gauge pod -
As you can see, I need to move the pod outboard by 2 1/2" to centre the steering wheel over it. I plan to do this by removing the ends of the 550 dash, banding the centre of the dash to move the pod and then blending in the ends using the curved bits from the original Spyder dash. Simple.
After a bit of consideration I also thought it a good idea to fit the wind deflector to give a reference for blending in the dash, as it was designed to fit the Spyder body whereas the 550 dash wasn't.
Hmm, wind deflector designed to fit the Spyder body you say? First go involved measuring, marking, measuring again etc, before starting to drill and screw the wind deflector base onto the bulkhead. About two thirds of the way round it became obvious that a ruddy great mismatch was opening up at one end that no amount of force was going to close up without breaking something -
After a substantial amount of head scratching I decided to forget the measuring idea and resort to the more traditional Sammio builder's method of trial and error. After self tapping one end down where it looked to be 'about right' I bent the other end round to match and screwed that down too. Popping a self tapper somewhere near the middle to pull it into shape I then walked round the car and checked to see if it looked right. A couple of adjustments later, I ended up moving one screw about 5mm, and it looked pretty good to me -
That's me exhausted now though, so I'll carry on with it tomorrow. I think it's going to look pretty good though.
Are you blending-in screen surround? I would think its quite a nice part of the build as you can actually see the changes.
Yes, I'll probably be bonding the screen base to the body and then smoothing it in for a couple of reasons: 1/ it's under a fair bit of stress when it's pulled into shape so it'll stop any fasteners pulling out; and b/ the moulding of the base is, ahem, not great (it actually looks like I made it, which I didn't) and the best way I can see to make it look as if it was made by a time served craftsman is to use loads of filler and then sand it down smooth, which will be easier with it mounted on the car.
Looking at the way the 550 dash fits I might also cut the dash top to sandwich under the base of the screen rather than butt up to it. That should give it a more seamless look. Just a question of getting on with it now...
Be carefull if intending to blend the screen surround. I screwed it down and bonded it so it was secure enough but decided to blend it into the body with filler which looks great but as soon as somebody caught the screen when climbing in it cracked the paint on the edge of the surround.
Its one of those little bits that I would do differently next time around.
Be carefull if intending to blend the screen surround. I screwed it down and bonded it so it was secure enough but decided to blend it into the body with filler which looks great but as soon as somebody caught the screen when climbing in it cracked the paint on the edge of the surround.
Its one of those little bits that I would do differently next time around.
Thanks for the tip. I'm planning to run a full layer of bonding paste under the frame base, do you think that will stop it cracking?
Thanks for the tip. I'm planning to run a full layer of bonding paste under the frame base, do you think that will stop it cracking?
No, that is what I did. I think it would have to be blended in using something that could flex to avoid cracking but don't think that would paint too well. An option could be to blend in the surround but put something that could flex between surround and screen to absorb any knocks. Don't know of it would work but you could try it before blending the surround in by putting it in place and giving the screen a gentle wiggle to see if there is any movement at the corner of the screen base.
Ahh, now I get it. Guess I'll have to spend a few hours dressing the edges of the screen base so it doesn't look like such a Friday afternoon job then.
Spent a couple of hours tinkering with the dashboard today. First cut it down at the ends and cut the holes for the gauges so I could see if there were going to be any clearance issues -
I needed to cut a little of the original edge off the top of the body and was prepared to modify the frame to clear the backs of the instruments where necessary. As it happens, I was able to trial fit all three main gauges and the oil pressure gauge in suitable positions without having to chop the frame about -
The angle of the GT6 speedo is determined by the frame fouling the threaded mounting rod on the back with it upright. I'm not worried about that though as with it the way it is the driver has a clear view of the 30 to 70mph range. The Vitesse rev counter fits at any angle but I rather like it with the red line uppermost, while the Herald fuel/temperature gauge can clearly be seen by the driver and contains the useful warning lights for the indicators and main beam. I'm not too sure about the oil pressure gauge where it is though. I may move it under the dash and leave a smooth centre panel.
I'm hoping to have the other end lined up, the gap filled and the whole thing bonded down by close of play tomorrow -
Once that's done I'll be ready to bond the body down. Scary...
towed, i think if you replaced your oil, to a matching smiths clock like your rev&speedo, and maybe add an amp meter and water meter next to it you get great look. i love the dash pod and clocks looks like a "healey dash"
Yes, I'd have liked the rev counter in the middle. Unfortunately, there's nowhere near enough clearance to put either the rev counter or speedo there. If you take a look at the first picture you'll see that the brace for the steering column is directly behind the centre hole. I could probably have modified the frame to get the rev counter there, but it would have been a bit of a nightmare job and could have weakened the structure.
I'm quite happy to have the temperature gauge as the most prominent instrument anyway seeing as how I've built my own cooling system...
Additionally, as Jeremy Clarkson pointed out on Top Gear recently when declaring Lancia as the most successful manufacturer of sporting cars, in the world, Porsche put their rev counter right in front of the driver. Lancia put the oil pressure gauge right in front of their driver...
ah that makes me the most succesfull sammio builder then " clarkson" cuz ive put my oil pressure right in front my eyes tooo..." just luck i reckon ha ha"