This is a read-only archive of the old Madabout Kitcars forum. New posts and replies are no longer possible, but every thread is still here to browse and read.
Hi Peter, though I don't make too many comments, I am watching every step you are taking and I honestly have nothing but admiration for you. It is a pleasure seeing your posts, as every step you take I can't think of a better on. Keep up the good work.
Hi Peter, though I don't make too many comments, I am watching every step you are taking and I honestly have nothing but admiration for you. It is a pleasure seeing your posts, as every step you take I can't think of a better on. Keep up the good work.
Thanks, Amir. Glad you and all watches are enjoying my updates.
I'm currently working on the interior and specifically I'm making a centre console with an armrest to fit between the seats and hide the ugly Ford handbrake. It's taking a lot of time as it's evolving rather being designed and built. I'll post some pictures when its complete.
Hi Peter, just a little note to wish you and family well and hope none of you have been effected in any way and reason for your absent is that you are busy with the interior.
All the best.
Hi Peter, just a little note to wish you and family well and hope none of you have been effected in any way and reason for your absent is that you are busy with the interior.
All the best.
Hi Amir,
thank you for your concern and yes, we are all safe and well. The lack of updates is due to too many other non-car related projects :-)
No real progress since my last update but I hope to back working on my Sabre in the Autumn.
All the best, Peter
It is that time of the year, even though it is not anything we have experienced before, we can always wish one another all the very best for the future.
Have a wonderful Christmas and may you be blessed with a new year filled with all the good things you wish for.
Quite right, Amir - a very Merry Christmas to you, and to Peter, and all that are following this epic build blog! Here's hoping for better and a chance to take to the road in 2021! Ivan :-)
Dear Peter,
I hope 2021 started well for you and yours.
Below is a request from Barry Evans of R.O.C management, and as this was the only way I can get in touch with you I am forwarding it to you and hope it is ok;
Hi Amir,
Trusting you and your family are keeping well and safe.
As you will be aware I am trying to obtain as much information As I can to record for prosperity and accurate history of the Club and it’s cars.
I see that you are friendly with Madaboutkitcars Peter who is painstakingly building a BMW powered Sabre. Is he a club member? Is there any chance you could ask him to contact me as we would like his chassis number, which I am now able to accurately decipher. This will help Peter to accurately create the 17 digit VIN which will be required for IVA. The numbers will retain the history of his Sabre.
Many thanks,
Barrie
01332 792738
07814 621376
Let's hope, for all our sakes, this pandemic becomes history soon.
Dear Peter,
I hope 2021 started well for you and yours.
Below is a request from Barry Evans of R.O.C management, and as this was the only way I can get in touch with you I am forwarding it to you and hope it is ok;
Hi Amir,
yes, I and my family are all thankfully well but I'm still struggling to find time in the garage :-)
(But I will be back soon, promise :eusa_liar
Yes, I am a ROC member so I had already sent Barrie details of my Sabre. But, I didn't mention to him that I am 'Peterux' so he didn't tie the two together. I've now dropped him a note to explain who I am.
Thanks for letting me know.
Looking forward to seeing you back with the build and glad all is well.
Please stay safe.
Thanks, Amir.
But I think you have raised a good point that there may be others that follow my build thread who may have a Royale that they are building or restoring and who are not members of the owners club.
If there is anyone lurking here who owns a Royale car, then please supply details of your car to Barrie. (contact details above)
Well, after far too long, I managed to find a couple of hours in my garage this week. My last update was last May in the middle of the first lockdown when I was working on a centre console/arm rest which is still not complete.
The reason for the lack of progress was due to having an extension built on our cottage which was done by a builder but inevitably lead to a string of other jobs, like decorating, lighting, curtain rails and, not least, re-laying the patio. Despite three lockdowns, I've still not found much time to work my Sabre.
So back in the garage, the first job I've tackled is remounting the rear fog and reversing lamps. I had mounted these using the rather flimsy adjustable brackets that they came with. But they seemed to move every time I walked past the car which I was not happy about. Not wishing to fail the IVA test on something silly like this, I decided to sort this out and I have removed them and re-mounted them on some more substantial fixed brackets. I have also fitted the rear reflectors whilst I had the bumper off the car.(Nothing worth photographing)
I'm now working on the upper seat belt mounting points. My car was designed and manufactured in 1994 which was well before SVA/IVA and the seat belt mounting points are too low to meet the current requirements. One advantage of a 'somewhat protracted build schedule' means I've had lots of time to mull this kind of problem over and I think I have come up with an elegant solution. I'll take some photo's when it's finished.
Eagerly waiting to see your master piece which I am sure is going to be the best of it's kind. Going by what you have done on your sabre, I am sure the extension and decoration of the house must be first class too.
Good luck with everything.
Thanks Amir and Mr. Towed.
--------------------------------------------------------
This week I've addressed a long standing issue that I've been aware off ever since I first got my Sabre.
As I said above, my car is a very early one manufactured in 1994, well before the SVA now replaced by the IVA test.
This is the diagram from the IVA manual that shows how to check the height of the upper anchorage point for the seat belts. The minimum height from the reference point 'R' is 450mm in the text. And as you can see the seat type and mounting height is also important.
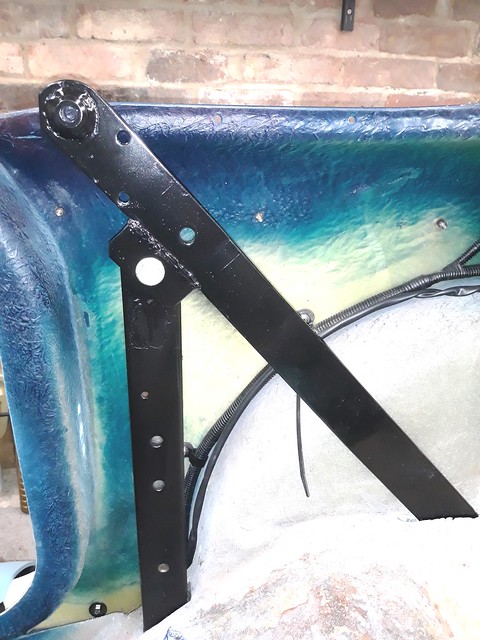
This is the view of the Sabre's upper anchorage point as designed in 1994. The upright is welded to the chassis. The diagonal brace takes the seat belt upper mounting and the hood frame.
On later Sabre's the seat belt mounting point is welded into the top of the vertical 'B' post. The post is longer making this point higher and the post is mounted more inboard so the diagonal is flat and bolted to the outside edge of the post.
Photo courtesy of Stewart Arnott Later Sabre chassis by Sabrebuilder, on Flickr
I could have had the chassis reworked as this type of welding was way beyond my capability. Instead, I've raised the seatbelt mounting by welding a small plate to the diagonal and re-drilling the mounting hole in this plate. (The folding hood frame will need to be modified but that shouldn't be too difficult.) The plate is the same thickness as the original diagonal brace and I welded it on both sides to make it as strong as possible. In an accident, the weld will be mostly under compression.
I also plan to rework the interior trim so that it covers the diagonal upper edge.
The IVA examiners have a special measurement tool with string and spirit levels. I improvised with a piece of timber mounted between the seatbelts. The top surface of the timber is the 'effective anchorage point'.
Peter - I assume the cardboard was set in position for the measurement?
(And just left laying flat in the photo.)
In which case, I think you have designed a way of matching the IVA measurement.
Not sure if I've posted this link before, or even if it covers seat belt mounting.
But it has a lot of practical demonstrations of the test and how to pass.
Finally, the new welded plate is quite short (relative to the length of the original mounting bar).
So, I'd be tempted to bolt a cross brace bar between the two original pieces to form a triangle just in case.
(Assuming it wouldn't be in the way of any other fitting.)
Peter - I assume the cardboard was set in position for the measurement?
(And just left laying flat in the photo.)
............
I'd be tempted to bolt a cross brace bar between the two original pieces to form a triangle just in case.
(Assuming it wouldn't be in the way of any other fitting.)
Good luck, Paul.
Hi Paul,
many thanks for your feedback and the BIVA link. I haven't read the whole thread yet (25 pages!!) but the description of the IVA test and failure points are always good learning points.
The photo's have 'flattened' my spacer piece. It is actually a box with six sides that lifts the ruler off the seat by the required amount. It just looks flat in the photo's.
I also like your idea of a cross brace. I'm not sure it's needed but I think it will be relatively simple to add so I'll take a look next time I'm in the garage.
cheers, Peter
I'm not finished with the seatbelt mountings, but happy that I now have a solution I have moved on to the Dashboard Surround.
This is something that I've been putting off for a long time whilst considering whether to leave it as it is or try and change it.
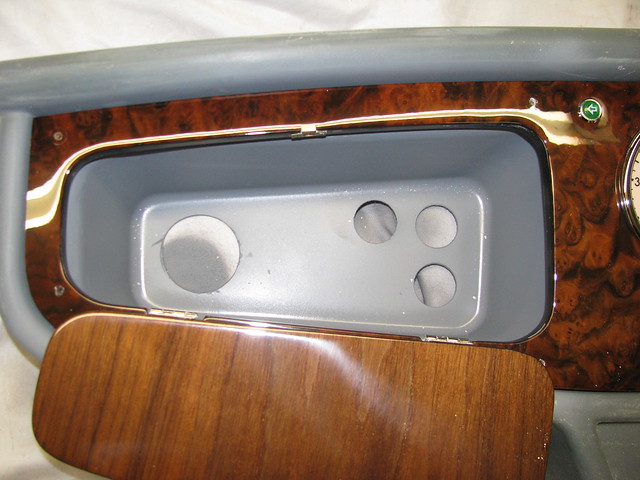
From a distance, the leather covered dash surround looked smart but close up it was poorly finished and starting to come loose.
Dash surround by Sabrebuilder, on Flickr
But close up it didn't look so good.
This is an example of the finishing that could have been done neater, This is the passenger side top of the surround and was visible when the door was open.
Removing the leather cover was easy with just my fingers as the 25 year old evo-stick adhesive had gone brittle and crumbly. Of course, it then took me a few hours removing the old glue with adhesive cleaner.
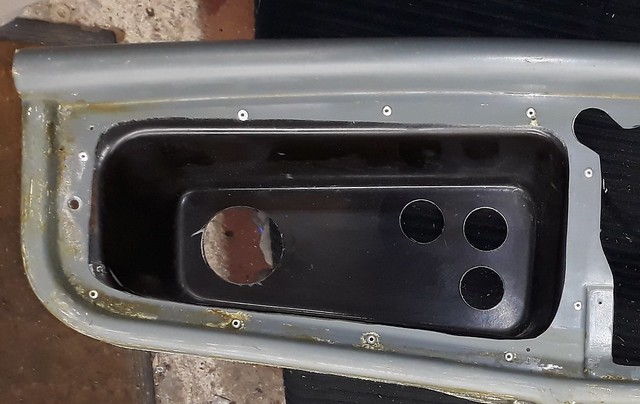
This picture is the surround after I had cleaned it up and started filling the gaps around the glovebox.
The connection from the heater box to the built in de-mister vents in the surround is via this small steel pipe. The original builder had glued these in with clear silicone and after +24 years they were less than secure. The pipes were slightly rusty so I removed them for a coat of paint. I plan to re-fix them with PU adhesive.
Before re-covering the surround I had to try and make it IVA compliant.
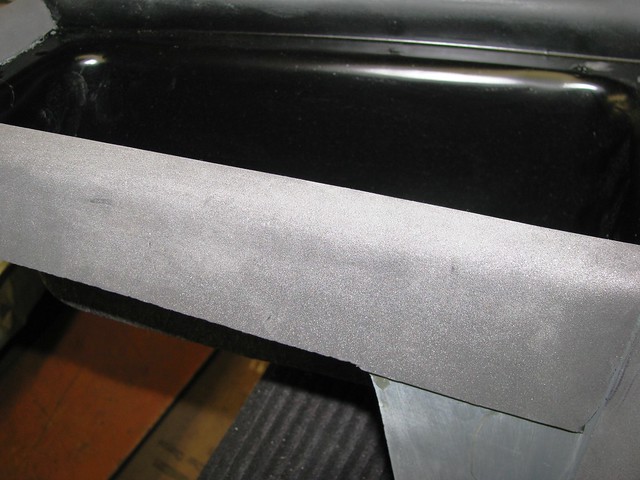
The IVA standard requires that the lower edge of the dashboard is either greater than 19mm radius or greater than 5mm with padding that can be depressed with your thumb. The bottom edge of the Sabre dashboard surround is about 10mm radius so I have covered it in a layer of EVA foam. I'm hoping that this will be enough!!
Technically, I only needed to pad the lower edge of the surround but that would give the lower edge a different profile to the rest of the surround so I covered all edges to keep it looking consistent.
Skipping back a couple of weeks, Paul made this comment about my upper seatbelt mounting point..........
Paul L wrote:
Finally, the new welded plate is quite short (relative to the length of the original mounting bar).
So, I'd be tempted to bolt a cross brace bar between the two original pieces to form a triangle just in case.
(Assuming it wouldn't be in the way of any other fitting.)
Good luck, Paul.
I've had a look at Paul's suggestion but I don't think it would add much strength because the upright, diagonal and the chassis are already effectively
a large triangle.
However, it did prompt a new idea........
I've added a 6mm thick plate across the welded extension plate. This 'locks' in position the original diagonal to the upright support. This makes an extremely strong arrangement and the extra plate would stop the diagonal tearing away from the welded piece in an accident.


 IVA seatbelt height by Sabrebuilder, on Flickr
 Hood frame and rear brace by Sabrebuilder, on Flickr
 Later Sabre chassis by Sabrebuilder, on Flickr
 Modified seatbelt diagonal by Sabrebuilder, on Flickr
 Seatbelt height measurement by Sabrebuilder, on Flickr
 IVA distance piece by Sabrebuilder, on Flickr
 Seatbelt height measurement by Sabrebuilder, on Flickr
 Seatbelt height measurement by Sabrebuilder, on Flickr
 Seatbelt height measurement by Sabrebuilder, on Flickr

 Dash surround by Sabrebuilder, on Flickr
 Dash surround by Sabrebuilder, on Flickr
 Glovebox by Sabrebuilder, on Flickr
 Dash surround by Sabrebuilder, on Flickr
 Glovebox by Sabrebuilder, on Flickr
 Glovebox by Sabrebuilder, on Flickr
 Glovebox by Sabrebuilder, on Flickr
 Glovebox by Sabrebuilder, on Flickr
 Footwell lights by Sabrebuilder, on Flickr
 Footwell lights by Sabrebuilder, on Flickr
 Demister vent hose connection by Sabrebuilder, on Flickr
 Lower dashboard treatment by Sabrebuilder, on Flickr
 Dash surround by Sabrebuilder, on Flickr
 Seatbelt support by Sabrebuilder, on Flickr
 Seatbelt support by Sabrebuilder, on Flickr
 Seatbelt support by Sabrebuilder, on Flickr