This is a read-only archive of the old Madabout Kitcars forum. New posts and replies are no longer possible, but every thread is still here to browse and read.
Agreed. All that shiny aluminium in a dark coloured engine bay will look so good. As for sound, if it's half as shiver inducing as the Fraser Imps I used to watch at Brands Hatch in the 60s I'll be well pleased. Tuning? I'm tracking twin 1.25" Strombergs and an Imp Sport cam...
Regards, Mick
Don't forget Imp engines were fitted on a slant. You may find the carbs are at the wrong angle if on an upright engine.
Cheers Robin
As I am a bit of an anorak I bought a copy of the Haynes manual for the Talbot Sunbeam - just to find out a little more about the engine and drive train. I discovered a couple of interesting facts.
1. It uses an early form of electronic ignition for which you need the little electronic module that goes with the distributor. Not a disaster but just as well to be aware of it.
2. The axle ratio is 4.1 or something close. Don't remember exactly and the manual isn't to hand. Not suprising considering the small CC of the engine. The problem is that the 1.8 Marina uses 3.7ish. I am using larger, 15", wheels so unless I change the diff ratio this delightful engine is going to be no good for me. Back to the old B series it seems.
Cheers, Robin
On Monday my no. three son kindly drove me to Bristle (krek spelling) to collect the aforementioned engine and 'box. The vendor threw in (not literally) the rack, cross member, steering column, radiator and a few other related bits and pieces from the deceased Talbot Sunbeam.
The newness of my ratchet straps is very evident. Their predecessors, which had lasted almost 20 years, went away securing a Vespa I sold to a guy who brought a van to collect it, but only bungees for tying it down ...
That's a standard Marina 1.3 axle , the 10cwt van is the preferred choice for trialing , but now rare as rocking horse p--
An internet search revealed that, as the housing is rusty and therefore steel, it has the 4.11. Lower ratio (so higher geared) diffs have alloy housings. I've bought it, with a hefty 'postage' fee, so time will tell. It's scheduled to arrive next Thursday.
Ever since my 4.1 axle arrived, I've been nagging my offspring to move their stuff out of the cave, so that I could move the Marlin in from the landing strip. At long last my daughter and her partner got weaving a few days ago and took a full car load to the tip. Hooray! They left the cave untidier than before, but today I was able to rearrange and condense the remaining stuff (and my son's single bed, which one of these years he might do something about) into a compact area, releasing enough space for the car .
I'd promised the 1800cc B Series engine to my long standing Westfield XI owning friend for his MGA - a straight swap for its 1600cc lump, so I decided to lug the crane from my shed into the cave first. I then charged the Marlin's battery (which, amazingly, had kept plenty over the three months since disconnection) so that I could pump up its tyres to facilitate pushing to its new home. As soon as my pal down the road has time, this will be done and work can commence.
I've missed project work to the extent that I've actually done some gardening (AKA jungle clearance) in the interim. Amazing!
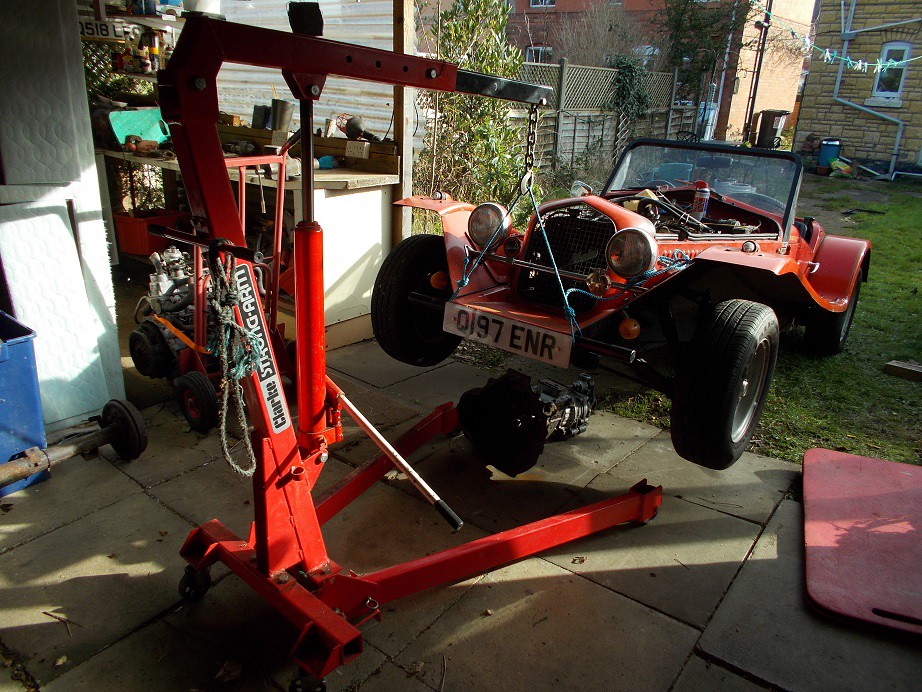
Last week, in the newly negotiable cave, I applied myself to taking out the B lump. Carbs and manifold off; exhaust manifold unbolted and tied out of the way; rocker box cover off and lifting lugs bolted on; starter motor off; bell housing supported with loop of furry rope and unbolted and, finally, engine mounting brackets unbolted. Hooray! Time to start cranking my Machine Mart crane, whose jib, even on its last extension hole, is never quite long enough. I think its designer only thought in terms of transverse FWD installations . Anyway, after lots of angle of engine dangle adjustments and raising and lowering of gearbox I was almost there, except for the thermostat housing snagging on the nose cone. Off with that (no thermostat fitted!) and with about a millimetre to spare at each end the lump swung free
I wheeled the now much lighter car back and positioned my trusty 20+ year old Machine Mart trolley under the mill and lowered away to loud splintering noises. Oops, I should have stored it in the dry! I found an old length of kitchen worktop, sawed it to size, screwed on the stepped sump support block and transferred the castors. No splintering this time. Ratchet strap, wheel to the back of the cave, stow folded crane alongside and push car back.
I'm so pleased to have actually done something positive towards the project, that I wandered down there in the rain a few times over the weekend for a smugathon. Happy days!
The B series is a heavy old lump. I found it easier to drop the engine out underneath lifting the car to clear it. The B series engine must make up a large percentage of the Marlin's overall weight. Without it, and the wheels, I could lift up the front by hand. Your lightweight climax engine should make it fly!
This morning I set about removing the exhaust and gearbox. I first craned the front end up and put axle stands under the frame rails The exhaust took little time or effort, the 'box a couple of hours and plenty of head scratching. Taking the overdrive gear stick out needed the carpet fitted over the tunnel peeling back, the gaiter turning inside out, the bayonet retaining cup releasing, and the overdrive wires disconnecting. I passed a loop of rope through the hole in the tunnel around the overdrive unit, stuck a screwdriver through it and took off the rear rubber mounting from below. I then lowered the bell housing to the floor, moved the car back the few necessary inches for the UJ to clear the cross member and gently lowered the back end. I could then roll the crane/car combination back sufficiently to lift out the 'box. Job done.
I shall advertise the overdrive unit unless anyone on here is interested.
Is it a standard MGB overdrive box? I only ask because the pundits on the Marlin Owners forum seemed to think that wouldn't fit as the tunnel is too narrrow.
And I would be interested in seeing a picture of the exhaust if possible. Mainly the bit from the manifold down. Mine was so rusted therough it wasn't even worth keeping as a template...
Thanks for the pictures. Have you any idea as to the condition of the gearbox? (I guess the answer is no....) And how much were you thinking of asking for it?
Cheers, Robin
PS - Good luck with the bird boxes. I have never had any luck persuading anything at all to nest in mine. However they do seem to like my neighbours ugly Leylandi hedge!
The gearbox internals are all in a box, this is how it came. If you're interested in it c/w o/d make me an offer in a PM please. It would be collect from Gloucester.
PS - Good luck with the bird boxes. I have never had any luck persuading anything at all to nest in mine. However they do seem to like my neighbours ugly Leylandi hedge!
Yesterday, after having work in the cold and windy cave interrupted by the succession of storms, I mounted the completed sparrow hotel on my back wall, and blocked the swift nest entrances pending their return from Botswana in early May.
Today I replaced the top half of the corrugated cave window which Eunice had ripped out, and added a 3x3 central leg to the slightly bowed work bench in anticipation of plonking the engine, and subsequently the gearbox, on it for cleaning etc. Once I'm happy that the jobs which might prove difficult with them in situ are done, I'll bolt them together and offer them up, at which time the real work can begin. Roll on spring and summer!
Today, at long last, my no. three son removed his single bed from the cave, allowing me access to my daughter's stuff stowed behind it. A couple of hours of sorting out, organising and re-stowing of said items had the newly swept cave fit for purpose again. Hurrah! The six weeks since my last post haven't been entirely wasted, as I made yet another twin swift nest box from the ply left over from the sparrow hotel. This I mounted with help (it's a two ladder job) last week.
Also in the interim, on a whim, I bought a Dutton Phaeton II minus engine and 'box as it was such a bargain and the front landing strip was looking lonely. Whilst pondering what the hell I was going to do with yet another kit car, I hit on the idea of passing on the Marlin and putting the 'Climax' engine and 'box in the Phaeton instead, which I'm certain is quite a bit lighter. It has the integral front wings and headlights which make it, to my eyes, quite ugly. These I would cut off, patch the holes with ally sheet, and fit Lotus Seven flared wings (I have access to a pair) and headlights on stalks to complete the look.
The question is, should I pursue my original plan or the new one? As my very first kit was a Phaeton II, and I've built a Marlin once already, I'm leaning heavily to the Lotus Seven-ish option.
Also in the interim, on a whim, I bought a Dutton Phaeton II minus engine and 'box as it was such a bargain and the front landing strip was looking lonely. Whilst pondering what the hell I was going to do with yet another kit car, I hit on the idea of passing on the Marlin and putting the 'Climax' engine and 'box in the Phaeton instead, which I'm certain is quite a bit lighter. It has the integral front wings and headlights which make it, to my eyes, quite ugly. These I would cut off, patch the holes with ally sheet, and fit Lotus Seven flared wings (I have access to a pair) and headlights on stalks to complete the look.
The question is, should I pursue my original plan or the new one? As my very first kit was a Phaeton II, and I've built a Marlin once already, I'm leaning heavily to the Lotus Seven-ish option.
Regards, Mick
My first kit was also a Dutton Phaeton, and my second a Marlin Roadster. In my view there is no comparison. The Dutton (in my experience) was poorly made and flimsy compared with the Marlin. I may have been unlucky but absolutely nothing fitted on my Dutton and one of my outstanding memories was the steering column support which was a single exhaust clamp and flimsy welded strip. Which needless to say broke at the most inconvinient moment.... In its defence it was very light and it was the first kit I built (I knew nothing....).
But given the choice I know which I would build again.
[FONT="Comic Sans MS"]Absolutely. I remember one of their competitors (Jago?) had the rather snide advert tagline: 'Built Up To A Standard, Not Down To A Price.'
I bought it new, there were bits of MIG wire sticking out of many of the welds and the GRP panels were pretty flimsy, especially the flared front wings. I'd gone for the 'Ex mould, suitable for spraying' option which saved a few quid and got sidescreens, hood and tonneau all for
[FONT="Comic Sans MS"]Absolutely. I remember one of their competitors (Jago?) had the rather snide advert tagline: 'Built Up To A Standard, Not Down To A Price.'
I bought it new, there were bits of MIG wire sticking out of many of the welds and the GRP panels were pretty flimsy, especially the flared front wings. I'd gone for the 'Ex mould, suitable for spraying' option which saved a few quid and got sidescreens, hood and tonneau all for
[FONT="Comic Sans MS"]Absolutely. I remember one of their competitors (Jago?) had the rather snide advert tagline: 'Built Up To A Standard, Not Down To A Price.'
I bought it new, there were bits of MIG wire sticking out of many of the welds and the GRP panels were pretty flimsy, especially the flared front wings. I'd gone for the 'Ex mould, suitable for spraying' option which saved a few quid and got sidescreens, hood and tonneau all for
[FONT="Comic Sans MS"]Absolutely. I remember one of their competitors (Jago?) had the rather snide advert tagline: 'Built Up To A Standard, Not Down To A Price.'
I bought it new, there were bits of MIG wire sticking out of many of the welds and the GRP panels were pretty flimsy, especially the flared front wings. I'd gone for the 'Ex mould, suitable for spraying' option which saved a few quid and got sidescreens, hood and tonneau all for
[FONT="Comic Sans MS"]Absolutely. I remember one of their competitors (Jago?) had the rather snide advert tagline: 'Built Up To A Standard, Not Down To A Price.'
I bought it new, there were bits of MIG wire sticking out of many of the welds and the GRP panels were pretty flimsy, especially the flared front wings. I'd gone for the 'Ex mould, suitable for spraying' option which saved a few quid and got sidescreens, hood and tonneau all for
My first kit was also a Dutton Phaeton, and my second a Marlin Roadster. In my view there is no comparison. The Dutton (in my experience) was poorly made.... in its defence it was very light and it was the first kit I built (I knew nothing....).
But given the choice I know which I would build again.
Thanks for that Robin, and in principle I agree, but in this instance, as I'm determined to use the 'Coventry Climax' engine, I shall pass on the Marlin. My plan for the Phaeton is as my post of 18 April, which would result in a similar look to the one on the left in this iconic picture as Team Dutton pass between the pits and main grandstand at Le Mans in '88 (I'm on the right).
I bought a Machine Mart stand for the engine this week as my previous plan of working on it on the bench was simply too iffy. Once I've finished with the Gunk and Autosol I'll post a picture.
I'll be listing the Marlin on Ebay later today: seven day auction with a 99p start and a mystery, but easily reached, reserve.


 ...
... .
.