This is a read-only archive of the old Madabout Kitcars forum. New posts and replies are no longer possible, but every thread is still here to browse and read.
A lot of thought going in to this at an early stage,
Can only be a good thing, I think people's expectations are higher now regarding kits, when you look at how straight the DNA and MEV products are now they have set the bar high.
Plus, IMHO if the quality is good the price asked will be achievable, I know you are not going to be asking a kings ransom for this any way but it all helps.
Like the idea of a raised edge around the cockpit, it will also help if the customer wants to fit a flat tonneau style cover and may stop some water blowing in.
Gary - Even if I have my tongue in my cheek at times, I hope I am still being seen as positive/constructive about this new project.
So I just want to echo some of Jeff's key points.
Jeff H wrote:
… A lot of thought going in to this at an early stage … Can only be a good thing …
I think people's expectations are higher now regarding kits … if the quality is good the price asked will be achievable …
Personally, I believe that thinking about how the kit will actually be built is probably more important than how it looks.
As the cost of the kit itself and all the other parts used pales in comparison to the value of the builder's time.
These days, you have a choice of a something like a Tribute Kobra that can be completed in a few short months.
Paul , THANK YOU FOR THE INTEREST ....I really don't have all the answers yet ..but I can tell you that the car is , as you say , a different build style to the glue-on kits ...I am not totally intending to offer this as a full on kit ..but a bodyshell that fits a Herald or Vitesse chassis that I have come up with the answers to build into a car ...leaving the builder , once again , to put their own spin on it ...I am not offering a replica of anything that has to be built in a specific way ..but , in the same way that Hot Rod bodies are supplied , it will be a case of ''here's your body , it fits this , I have built one like this , but you are free to go whichever route you like ...''
That was the original concept for the S*mmio , but I think some people expected more from it ...
Its a car that is built in the ethos of the old Specials of 50/60 years ago , with a Hot Rod aptitude ..
Touching on your comments about degree of difficulty in build above ...yes , it has more work to do than a S*mmio in some ways ..The Cobra you quoted is a quick build , but some glue-ons are still quite labour intensive ..thats why people like Nubodi charge the fees they charge ..its just different types of jobs ..
I will be able to offer a fully refurbished , fully roadworthy one of these for less than a Nubodi turnkey that isn't fully refurbed underneath ...but thats the different nature of the donors and build styles ...
Most people will , I suspect , strip their donor chassis right down to build the car ...bolting the towers back on on the opposite side , fitting an alternative , supplied gearbox mount , an alternative prop and an extra link in the steering , if required ( I think the stock column may slide back enough anyway ) is going to add virtually no extra time to the re-assembly than a refurbed S*mmio ...likewise , radiator re-positioning etc. is going to be no more involved than a S*mmio build ...extra work will be door hanging , minimized by quality gaps - hopefully ..boot hanging ....possibly pin and latch ..dunno yet ...thats about it ...
The intention is to offer a floorpan that comprises of 2 pans joined by a tunnel with rear bulkhead attached and they will be glued to the cut down front pans that have been shifted back 8'' ... you prep the chassis , fit the rear framework for the fuel tank , fit the floorpan , attach the 2 side rails to the rear frame and relocated bulkhead ..so a moonbuggy with a floor and rear bulkhead , if you like .. the body then gets stretched slightly at the sills , lifted over the frame and locates at bulkhead and rear bulkhead , the sides are pulled in to touch the rear bulkhead and floorpan and bonded on using appropriate glue like stikall or similar or can be fibreglassed in place ...so this process and the lack of having to line the cockpit with ply etc ..will save time in other areas of the build .... so its swings and roundabouts really ...
Its probably important to add that this bodyshell option is going to be marketed in a slightly different way ...what I mean by that , is that the S*mmio was/is a cheap option ..you got what you paid for , a bodyshell and frame that , with a bit of effort , became a pretty little car for not a lot of money , when compared with similar styled vehicles to the S*mmio etc. .....ie . The higher spec. Porsche 550 / Cobra's , D and C types . MEV etc...
Keeping it cheap meant I needed to bang out lots of units to attempt to stay afloat ...quantity over quality quickly became the situation ..especially as moulds and tooling got tired and there was no reserves to amend that situation ...having experienced bodies from early and later batches ... The first 20-30 were definitely better .
This time , I am not looking to sell lots of units ...so a slightly harder build ( I don't think it is really ) is possibly going to put a few people off ..add to that the bodyshell and framework with floorpans etc. is expected to be around the £2500-3000 mark , primarily down to a higher spec body ..all visible framework will be tig welded round tube etc. ..and I will lose some budget builders there too ...but I am not looking at getting so busy it gets messy again ...so it works for me ..the S*mmio , Miglia and A352 are still a viable option for anyone on a lesser budget .
I wouldn't be too bothered if I only sold a few packages and just built a few cars to retail alongside those sales ...
I would like to think the value of these cars , built correctly , will sit somewhere between high end S*mmio/Miglia sales and decent Cobra / Chesil figures .....I think I can build a turnkey in that range , so hopefully its achievable by most folk .
Don't take all the fun out of building a one off car I like a bit of head scratching just built a cycle kart out off a lawn mower no tax no lnsuranc no registration lots of racing in France
A bit more achieved this week ...I know its not incredibly interesting at this stage but I'm trying to document the build as I go ..and this is as good a place as any to put it on record .....
The dashboard and scuttle area has been moved back about an inch and a half ...I wasn't happy with the long cockpit and want to give the car ''lots of front '' , so this move allows me to bring the bonnet line back a similar amount ...it also means a better position regarding the bulkhead and a stronger platform for the screen... The dash and scuttle are being shaped up using Porsche 356 panels ...
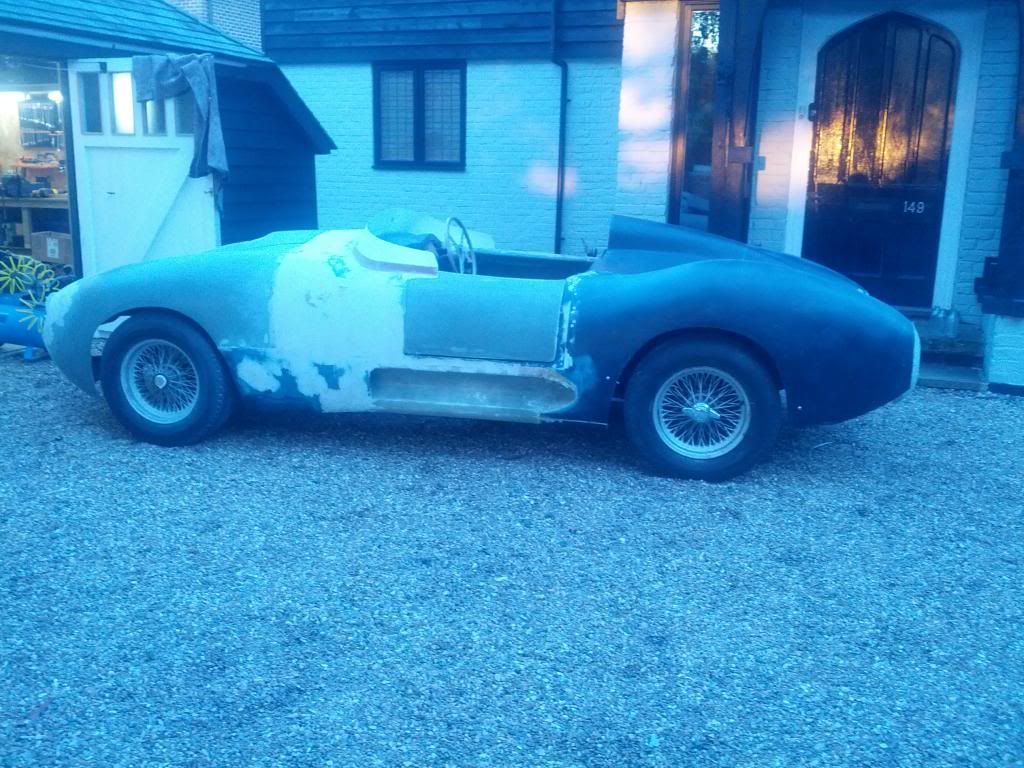
These two pics just show the drivers side starting to be matched up to the passenger side with foam and filler etc... Also a front on pic showing the new line of the scuttle from side to side , if you look at the rear door shuts on either side , it shows the width addition and altered curve to the body quite well ..pass. side is nearly shaped ..drivers side shows original shut and the foam block in the process of being shaped, glued to the outside edge ... ...some blending still to be done ..but we are getting closer to starting on the front end ..which I am really looking forward to ....
I have also started to cut the new bonnet line and lower front wing section ...A piece of Mistral front vent kindly donated by Tributes scrap pile has been tweaked slightly and grafted in to break up this area .....Luckily the other side was in Chris's pile too , so hopefully get that fitted tomorrow ...the front of the Miglia wing is very upright , the curve from the body flattens out as the panel travels forward to the front arch ...possibly as a result of stretching the Cordite panels to fit the Spartan chassis in the early stages of Miglia development.....we have exaggerated the curve along the body and need to do the same on the front wing ..the front arch is due to be reshaped too .... its getting a flatter top line , similar to the rear and a tapered rear edge that will kind of , follow the line of the vent ....so a combination of filling out and re-shaping should 'plump' up that area a bit ...
The new working title for the project at this stage is FORMOSA 120 ..But that might change ...I don't think Spyder is right for this particular bodyshell ...
Hi Gary, given the italian influence, i looked up Janus in italian and this came up with Giano, company name ie.Giano Sportscars?, suggested name for the model Sportiva or Italia.
the Giano stands for god of opening/movement has a twin head design if you look this up.
The new working title for the project at this stage is FORMOSA 120 ..But that might change ...I don't think Spyder is right for this particular bodyshell ...
Looking good Gary,
My suggestion for the name is "Formosa Finale"
It may not be a S&""!@ but its a fitting evoloution/conclusion to the bloodline
Your last set of photos look just like our G46 which as some may remember we moved the bulk head back 200mm (8 inches) to get that long bonnet and front wing.
... Your last set of photos look just like our G46 which as some may remember we moved the bulk head back 200mm (8 inches) to get that long bonnet and front wing...
As if by magic.
Funnily enough, I also see similarities with some of the ideas I used on my car (e.g. wider body shell to cover the rear wheels).
Having said that, I stole, sorry, borrowed, many of my better ideas from other builders.
So whilst the G-46 had a front wing section something like this new project, the Spyder and Cordite didn't.
I'm sure christinedmc's #47 was first builder I saw convert the Spyder bonnet into this style.
( Photo Cropped from a Jerome Wassenaar original, as all of Michiel's build photos have disappeared. )
So I just followed him and others (e.g. Mac & Swifty).
I guess I just really want this project to incorporate all the high points of previous builds, a Bestofa Centoventi if you will.
Gary - The cuts in the body shell for the door openings look "deep" in the photo above.
Are the sides of the body shell cutouts at the rear set at an angle to allow "deep" doors to swing open?
Gary - The cuts in the body shell for the door openings look "deep" in the photo above.
Paul , the doorshuts are deep because you are looking at a buck and not a bodyshell ....the buck is being readied to be moulded to create a body in the best way we can...therefore things like shuts will be moulded with more material than required and the bodies will be trimmed back afterwards ....
Thats what Glan intends to do Molleur ..thank you .
Glan has 40 years experience in mould and pattern making , hes talking about locating pins on the moulds which is fairly standard on better moulds , so they don't 'step' out of line on joins ...but also putting 'wedge pockets' in so you have an area you can prise the moulds apart without risk to the mould in the way forcing wooden wedges down gaps can cause - thats new territory for me and I've been around moulds for 30 years myself .. ......
Its possibly a bit unfair showing his incomplete work sometimes ...we have got to create lots of detail yet , seperate headrest not integral like before , with option of having one or not available ...bootlid insert to be made , some lighting options being discussed , also talking about an extra mould to create a LHD dash as well...I'm really keen to get on with the bonnet area , but Glan wants the whole body tub sorted pretty much before we move forward , literally !!
I respect his approach to the job and we are talking about doing the bonnet area possibly over Xmas , New Year ..with a view to moulding it in January / February , so I can get on with the framework whilst Glan creates the cockpit insert ....
Sounds like an excellent plan!
It appears that a really fine production mold will be the result.
I have never used wedge pockets either, good idea though!
Roughly 51 years for me.
I once was sent to Taiwan (for an English yacht builder) to resolve a problem with mold flanges. The Chinese were tearing them up.
Problem solved with a roll of packing tape. They were vacuum bagging a 102 ft. hull and draw knives were in use to remove the tacky tape. Put some packing tape on the newly repaired mold flanges, and instructed them to put the tacky tape on top of the easily removed packing tape. Solved in 15 minutes!