MadaboutKitcars

This is a read-only archive of the old Madabout Kitcars forum. New posts and replies are no longer possible, but every thread is still here to browse and read.

Another Cordite Is Born ...

31 May 2013, 6:04am
Cheers Mac.

Although it would help if I knew/used technical terms like "spreader plate" rather than "green square". :icon_wink:
1 Jun 2013, 1:30pm
Quick Question...
I'll do a proper report later on, but I have hit a problem that I want to check with you all.

I did test fit by seat belt mounting brackets to see if I could fit the petrol tank.

The brackets will "tuck in" a bit when the ends are cut at angles to match the frame...


But even if I repositioned them a lot closer, there is no way the tank will fit. :icon_sad:


So I think I will need to mount the tank before I weld the brackets in...


Obviously this means the petrol tank can not be removed without major surgery.

Is this going to be a problem?

Cheers, Paul. :)

PS
I've got other stuff to be getting on with, so I'll be back later.
1 Jun 2013, 8:42pm
I'll come back to the petrol tank issue above in a minute.
In the mean time here is how my day went...

Saturday:
I'd ordered some Eye Bolts for the 3 point racing harness I am going to fit...


I knew they were the right size for the backing plates that I'd bought.
But when they arrived it dawned on me I wasn't sure if they would fit the existing Spitfire "holes".
So first job of the day was to test they were a matching thread & they were...


The second job of the day was trying to find the missing seat belt plate.
So half of the contents of the Summerhouse ended up in the garden...


But the good news was I found the plate and could move on to my next "search".
I knew I had a set of three funnels put to one side as they would come in handy.
Despite going through all the remaining boxes in the Summerhouse I could not find them.
I then tried the utility room & the storage area in the loft where other bits live, but nothing.
Then I got the sinking feeling that there were in the shed.
Sure enough, after pulling yet more stuff out I found them & could now empty the petrol tank.

I used an old tight as a filter (with my wife's blessing as they had a ladder in them)...


This was then shoved in one of the new jerry cans that I'd bought recently.
( I'll use the 2nd one to get fresh petrol when I try to re-start the engine. )


The big funnel didn't work very well, so I switched to a medium one.
But the tights were doing their job & I needed to move them around often...


I've already posted the photos of me trying to fit the tank with the seat belt brackets in place.
It has now occurred to me that having metal in front of the tank isn't really an issue.
The traditional Sammio / Ribble "getting started" guide expected the rear cockpit to be sealed.
So even if you hadn't got any metal in the way, the petrol tank is effectively boxed in anyway.

Therefore I feel happier that my approach will work for this build.
I am also planning to have some access to the fuel lines from the "boot".
I will also have an access panel to get at the fuel gauge sensor if required too.

More on the petrol tank later, as it was time to work out where the "side" seat belt plates would go.
There was a lot of beard scratching going on to come up with something that I could make work.
In the end I've opted for another of my over engineered solutions that will look like this...


I have to take a notch out of the box section where it meets another frame rail at an angle...


The brackets will go in behind the door cut out section of the frame...


I will add one last piece of box section to join the bracket to the frame in another stop too.
But for now, I have cleaned up both the box section, plate, & frame work ready for welding.

Here are the brackets for both the driver and passenger side...


Note two things:
- I've recycled the box section I cut off the frame last week
- The brackets are different sizes as the door cut outs are not in the same place. :rolleyes:

As part of my test fitting, I tried the 3 point harness for size.
I clamped up the rear bracket as best I could until I cut the ends to match the frame...


This allowed the shoulder straps to sit nicely over the seat...


I then climbed on board to see if I could "buckle up"...


Even though the adjuster brackets are at my shoulder they actually seem fine.
I guess the restrictions of a racing harness is going to take some getting use to anyway.

The final job of the day was to prepare the petrol tank for painting.
I've left if out in the sun all day to get rid of any remaining petrol vapours.

This was before...


This was during the sanding down stage...


And then it was time to apply a coat of Kurust...


Then it was time to tidy up and put everything away for the night.
I have done all the grinding I need to do on the side belt brackets.
So hopefully I can get welding first thing in the morning as it isn't to noisy.

Until then, take care, Paul. :)
1 Jun 2013, 11:04pm
Paul L wrote:
Quick Question...
I'll do a proper report later on, but I have hit a problem that I want to check with you all.

I did test fit by seat belt mounting brackets to see if I could fit the petrol tank.

The brackets will "tuck in" a bit when the ends are cut at angles to match the frame...


But even if I repositioned them a lot closer, there is no way the tank will fit. :icon_sad:


So I think I will need to mount the tank before I weld the brackets in...


Obviously this means the petrol tank can not be removed without major surgery.

Is this going to be a problem?

Cheers, Paul. :)

PS
I've got other stuff to be getting on with, so I'll be back later.


I'm quite proud to say that the new (RIBBLE) frame for the Navigator and Pilot have been designed around the fuel tank making it easier to install/uninstall! :biggrin:
1 Jun 2013, 11:46pm
Actually lad, the tank access is the same as the previous frames but what Paul is doing is to fabricate a strong point for a three point harness. I'm currently looking at ways to do just that on the new frame and I hope Paul doesn't mind if I say I'm watching progress on his mounts with interest to learn the best ways to standardise on them. I was warned at Stoneleigh about having the centre mount too low so as to prevent submarining so I may have the hard points high on that bulkhead , centred on the lowered floor span.
2 Jun 2013, 12:40am
Nice progress Paul L. Inspiring us (me) that haven't (hasn't) a clue!

Don't get too hung up on technical terms, the engineers out there can figure out what you mean - the rest of us (me) just think a widget is a gewgaw, unless its a thingymabob.

I'm on the St Albans side of Watford, not too far from you - we share the same weather..but looking forward to seeing your progression
2 Jun 2013, 5:32am
Andy P's got a point about the seat belt mounts being a bit low - if you mount them that low they might not restrain you properly. Additionally, if you've got the adjusters on top of your shoulders they're likely to become very uncomfortable and difficult to adjust. I'd think about raising them up as high as I could get them myself.

All part of the fun of Sammio ownership! :peace:
2 Jun 2013, 6:25am
Thinking out loud. Hows about a 'bolt in' structure going across the bulkhead carrying both left and right seat belt mounts. That way it can be as beefy as you like and should the time come to replace the tank you could dismount the lot. In practice though, if you have given the tank a good looking over and protected it, the most likely servicing would be just the sender or at a pinch the bottom seal which would be a simple access job anyway. I know sods law applies but how many fuel tanks have you had to change on any other car?
2 Jun 2013, 8:38am
Thanks chaps. :cool:

I'll do some proper replies later on, as it is a big hectic here at the moment.

Mind you, I've already got the first coat of paint on the bottom half of the petrol tank, so it is a good kind of hectic.

I should be able to move the rear panel brackets up a bit higher & I'll have a look at that next.

But first I need to do the supermarket run, or there will be no car building for me today!

Cheers, Paul. :)
2 Jun 2013, 6:43pm
OK, going back a bit to start with the previous replies (which I really appreciate).

AndyP85 - I am really looking forward to seeing the Navigator MkII. :cool:

AndyP57 - I am sure if these brackets are built into the frame design they would be neater / simpler.
I guess one issue would be that some customers might prefer normal seat belts compared to harnesses.
So maybe the bolt in option would allow you to cater for both, as the side mounts would be common?

Nike 55 - Cheers Nigel, we should meet up one of these days for a Sammio group therapy session. :icon_wink:

Mister Towed - Thanks, I will go with a higher position, see new photos below.

- - - - - - - - - - - - - - - - - - - - - -

Sunday - Part 1:
This has turned out to be quite a packed day, so here goes...

Started the morning with some domestic chores before heading out into the back garden.
I didn't trust the clouds forming last night, so I had thrown a cover over the frame...


But the first job was to get the first coat of paint on the petrol tank.
The Kurust had left its usual coat of dark blue / black everywhere...


I started on the bottom of the tank...


Using a not so high tech prop to keep it at the right angle...


Then it was off to Sainsbury's, except that my car was as dead as a dodo.
No time to worry about that now (I take the train to work) so I used my wife's.

Then it was back into the garden to have another look at the position of the rear seat belt bracket.

This was the highest I could get the existing bracket to fit without a complete redesign...
( Note the cardboard template is in the original position )


I put the seat & harness into place for a quick check and this was a no go.
Even though the bracket will be further back when fitted, the eye bolt will foul the seat back...


So I tried this as Option 2, which is a bit lower, but still higher than before...


This gives better clearance to the back of the seat...


And the straps are lower too, so that should leave the strap, not the adjuster, over my shoulder...


Question Is that going to be high enough?
( Looking back at these photos again, it does look like I could edge it up a bit more. )

Then it was time to start constructing the side seat belt mounting brackets.
So it was back to clamping things together...


But no sooner had I started and the rest of the family wanted to go out for lunch.
They have first call on my time, so after a quick change we went down the pub.
I was on my best behaviour and didn't drink as I knew power tools were waiting for me.

I'll be back with Part 2 in a minute...
2 Jun 2013, 6:48pm
Sunday - Part 2:
The first job after lunch was to flip the petrol tank over and paint the top side...


Thankfully this paint becomes touch dry quite quickly.
But it still needs 24 hours before you can put a second coat on.

So while I had the paint brush out, I gave the rear section of the rear frame a coat too.
This was mainly to cover the parts where the tank will bolt in.


Then it was back to welding...


I am building these is a slightly different order to allow me to make sure they fit.
So the plate itself when in next...


To avoid over heating the welder, I am leaving sections to finish off another day.
As long as everything is held in place for now, I will keep going.

Next it was time to set up another workshop picnic area around the frame...


Then I clamped the first part of the bracket to the frame...


This is the rear view where the bracket crosses the original frame...


Which is why I had cut out a notch to let it sit better / get welded in...


Once that the first welds were done, the clamps could go...


And the top section could be added...


At this point I could take the measurement I needed to cut this out...


And clamp it in place...


Once that was welded in, I could move everything over and go through the whole process again on the driver's side. :rolleyes:

Eventually I was left with my two over engineered brackets in place...


This was around 6pm, so to avoid disturbing my neighbours anymore I called it a night.
Only took 20 minutes to pack away this time.

Mind you I need to go back out later on to cover the frame for the night.
Plus I will move the petrol tank into the Summerhouse, as I've left that in the evening sun...


It is hard to believe just how much work had gone into those brackets.
( And I still got to finish welding all the sides / edges! )

Plus I am sure someone who knew what they were doing could find an easier solution.
But this option does allows me a lot of tolerance for my "beginner" welding.

As always, I still expect to get more done than is possible.
But this is definitely a step in the right direction for me.

Until next time, take care, Paul. :)
2 Jun 2013, 8:18pm
Nice work Paul, personally fabrication is what i get the best satisfaction from. Just one point i noticed, second picture down, the rear uprights of the frame have open ends, you may want to consider either welding a cap on to seal them or alternatively drill a hole in the bottom otherwise they will fill with water over time (presuming you will ever drive it in the rain :-)) and rust away from the inside out.
I have a few slack days this week so am hoping to make some progress on mine and if the gods are with me might even get the engine fired.
9 Jun 2013, 5:54pm
Viatron - Cheers Mac.
Although ironically I picked the Cordite over the Spyder as it was supposed to require less fabrication. :rolleyes:
Still, this way I have learnt to weld (to a fashion) and there is certainly a sense of satisfaction in making stuff. :cool:
The only downside is the time it takes, as this is all new stuff to me and I am very slow at the moment.

I have made caps for the ends of the frame (see part of the following updates).
Is there anything else I need to consider in terms of preventing rain / water ingress / damage?
For example, did the "rubber rings" between chassis & body shell also help keep water out?

- - - - - - - - - - - - - - - - - - - - - -

Making Hay While the Sun Shines - Part 1
It was been an odd sort of a week for me as I had a few days off work ill in the middle of it. :icon_sad:
But I was able to take advantage of the nice weather before & after this short forced break.
So although I haven't been updating my build thread, there has been some progress to report.

I've grouped the work done over the last week, or so, into a few simple headings.
But due to the forum limit on photos per post, this will take a few posts to cover everything.

Petrol Tank:
With the first coat of paint dry, I gave the bottom of the tank its second coat...


When that was dry, I flipped it over and gave the top half of the tank its 2nd coat...


In addition, I gave the rear frame work where it was going to be bolted in a 2nd coat...


Eventually, it was time to bolt the petrol tank back into its final resting place...


I used extra washers on the driver's side to stop the petrol tank fouling against the frame.
( As obviously the frame work supporting the petrol tank isn't square. :rolleyes: )
I even remembered to stick a bit of protective foam into the narrow gap between the two...


- - - - - - - - - - - - - - - - - - - - - -

Lowered Floor Pans:
The first signs of light surface rusting were beginning to appear on my bare metal floors.
As I had finished welding up the pin holes in the passenger side, that was first to be treated.
I rubbed down the underside surface & tidied up the edges were I had cut the floor to fit the frame.
Then the underside got a light coating of etch primer...


As this primer is "weldable" I used it to highlight the pin holes in the driver's side floor.
This made the repair work a lot quick as I didn't have to keep holding the floor up to the light.


I then welded over all the holes & cleaned up the welds a bit.
I was careful to leave the welds "proud" of the surface as most of the holes were from "over enthusiastic" grinding.
Then the underside of the driver's floor was primed too...


Before I primed the "top" sides I wanted to mark up & trim the sides nearest the hand brake panel.

I'd already started this at one end of the driver's floor to match the curved frame...


But the passenger side was untouched (note primer marking some more pin holes to fix)...


Thankfully my jigsaw behaved itself this time & trimming the edges was much easier...


Given the fact I had a few "off cut" from the floors, I decided to add some metal to the driver's side.
I'd already welded in an extra bit of box section to the frame support the floor, as it didn't reach the frame at the back.
But I figured a couple of "extension" pieces would make the bonding / fibre glassing of the floor / body / etc. easier.

So after a bit of cutting and welding, I had this...


After I had finished welding the final pin holes in the passenger floor the "top" sides could be done.
I will use body filler over the welds on the inside edges to tidy them up before fitting the seats, but I've left this for now.

My eldest daughter offered to help, so she was roped into sanding one floor while I did the other...


She then sprayed the primer on, until it started running out & I had to squeeze the last bit out of the can...


Once I have done a final test fit of the frame, floors, seats & body shell, I will weld part of the floors to the frame.

- - - - - - - - - - - - - - - - - - - - - -

To be continued...
9 Jun 2013, 5:55pm
Making Hay While the Sun Shines - Part 2

Side Seat Belt Mounting Point Brackets:
In order to finish the welding of these brackets I had to turn the frame over into different positions.
Starting with the frame "upside down", which allowed me to weld the right way up...


I also worked away with the frame on it side like this (obviously I did both sides)...


The welder started cutting out, so I had to add a bit of external air cooling from a fan to help...


But eventually it was all welded up & I could give the bare metal a coat of primer.

The driver's side bracket (note frame is still upside down while petrol tank brackets were being painted black)...


And passenger side...


When this was all dry I was able to give them a first coat of black paint.
I temporarily fitted the eye bolts & masked them off to keep paint out of the threads.


With a second coat of paint these brackets are now done.


I know these brackets are OTT & some of my welding could be neater / better.
However, the overall effect is something very solid, that will do the job & not fail under load.

When I was test fitting the seat belts for the rear cockpit brackets I could use the side one...


- - - - - - - - - - - - - - - - - - - - - -

Frame End Caps:
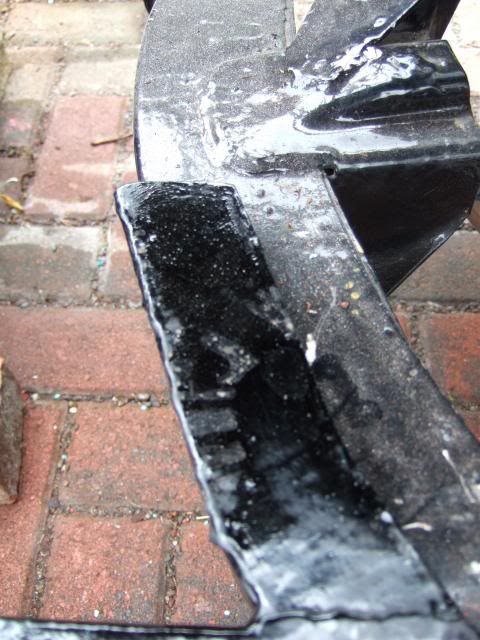
Another little job was following Viatron's suggestion to cap the open vertical frame rails...

Before:


I used an off cut from the floor pans to cut out two small metal sections...


By chance I had noticed something in one of the "holes" which dropped when I tried to take it out.
So I turned the whole frame upside down & poked around with a wooden skewer to remove 3 stones...
( The black everywhere is the waxoil I squirted inside the box section ages ago. )


Once I was happy there was nothing left inside, I welding the little sections into place...


After it had cooled now, it just needed a lick of black paint and it was job done...


- - - - - - - - - - - - - - - - - - - - - -

To be continued...
9 Jun 2013, 5:56pm
Making Hay While the Sun Shines - Part 3

Rear Seat Belt Mounting Point Brackets:
Just before I bolted the petrol tank in place I had another think about the rear cockpit brackets.

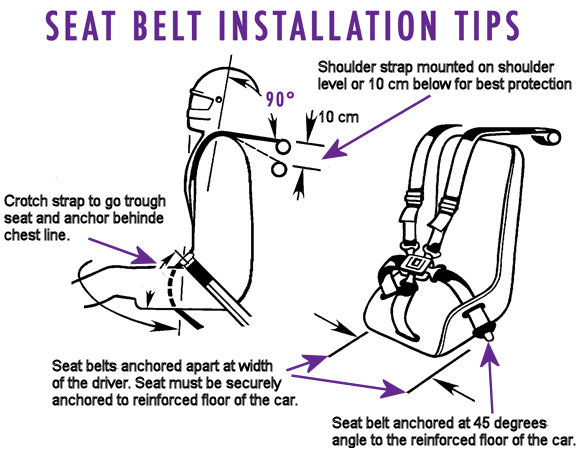
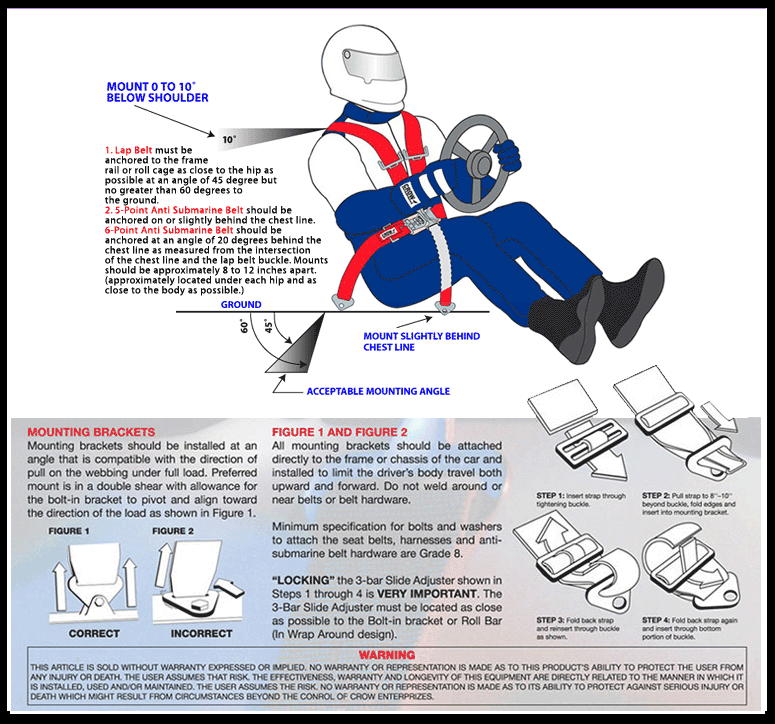
I had found a couple of diagrams which provided some guidance for fitting racing harnesses...


Which ties in with previous replies on here to get the brackets as high as possible.
So I had another go at finding a good home for the bracket I had already built...


In order to test this properly, I put the floors in & got a seat & belts out.
This time I remembered to remove the seat bolts so the seat would be at the right height.
I used some masking take to hold the seat bolt spacers & a washer in place...


But this layout didn't really work as I had the same problem as before with the seat getting in the way.
However, I did spot that I could use the frame rail behind the main cockpit one like this...


This inset the eye bolt & seat belt attachments just enough to clear...


The racing harness sits nicely on the seat...


The belt sits nicely on my shoulder & there is room behind too...


But I couldn't start welding until the petrol tank was bolted it.
After that, I covered the tank with a dust sheet to protect it from any stray welding / grinding sparks.

I also cut the bracket & I will reuse the box section on the right as extra support...


I then cleaned up all the areas of the frame I was planning to weld to...


Then I could get on with clamping the bracket to the frame & starting to weld...


As before, this involved rotating the frame through 360 degrees to get at each edge...


Eventually the passenger side bracket was done, with the off cut box section now in place...


And this is the view from the rear & you will see I have capped the box section as before...


Then it was "simply" a case of doing the whole thing again for the drivers side.
And this is what that the driver's side looked like after I had got around to painting it...


Overall the two brackets now sit like this...


Again, I know this is a seriously OTT solution, but they will do the job for me.

- - - - - - - - - - - - - - - - - - - - - -

To be continued...
9 Jun 2013, 5:59pm
Making Hay While the Sun Shines - Part 4

Spitfire Rear Arches & Floors:
I needed to move this section into my garden workshop, but first I wanted to lighten it a bit.
So after a sustained assault with a number of cutting discs, I went from this...


To this...


Which meant I could carry it through the house unaided (just as well as my wife was out).
So the garden picked up another strange ornament...


But I could then shift the Cordite bulkhead frame work over to the side of the body shell...


I then had an an epic sweeping up session to ensure there were no sharp metal fragments left.
The end result being I can give my wife back her parking space after almost 3 months...


There is still a bit of cutting to do before the rear arches can be fitted around the frame.
But that will be a series of jobs for next week.

- - - - - - - - - - - - - - - - - - - - - -

Confession - No.1:
After test fitting the seat, I went to put the seat bolts back in place & found one spacer missing.
It is bad enough when you drop something and can't find it on the garage floor.
But this was in the middle of the lawn and it was absolutely nowhere to be seen. :icon_sad:

So at the end of the day I had to rake the whole area in a desperate bid to find it...


Despite all this work, there was still no sign of it, so I checked the path at the side of the grass.
In amongst my rubbish pile was a bit of "old" masking tape with the spacer stuck in the middle. :frusty:

At least it is one less gardening chore to do. :rolleyes:

- - - - - - - - - - - - - - - - - - - - - -

Confession - No.2:
Tracksuit bottoms are never going to offer much protection against molten welding splatter.
These are the holes burnt straight through the inside lining...


I'll spare you the photo of the corresponding burns in my skin to the side of my left knee. :rolleyes:

- - - - - - - - - - - - - - - - - - - - - -

Right that is it, fair play if you have made it all the way to the end of this series of posts.
I will try to stick to my usual approach of little and often which is easier all round.

So until next time, take care, Paul. :)
9 Jun 2013, 6:40pm
Great work, your seat belt upper mounts are in a much more suitable place now.

Don't lose heart, just keep plugging away and you'll get there in the end Paul. I checked my donor's V5 today and found that I collected it on 25th March 2011. That's twenty six months ago and I'm still not quite finished. My original timescale was to complete it in nine months...
15 Jun 2013, 8:43am
Mister Towed - Seeing your car in silver is a true inspiration for the keep chipping away at it approach. :cool:

In terms of time lines, I am going to start running two separate ones from now on...
- My Cordite deposit & Spitfire donor date back to April 2012, so 14 months, or so, ago.
- But the final kit parts didn't arrive until March 2013, which is really just 3 months ago. :icon_wink:

Jokes aside, the floor were such a key part of the building jigsaw, lots of work couldn't start without them.

I can honestly say I have absolutely no idea how long I will need to finish this project.
I made great strides when time & weather lined up for me last week.
But this week had been poor weather & lots of other things going on.

With a bit of luck I will get a few small jobs done this weekend. :pray:

Cheers, Paul. :)
15 Jun 2013, 9:38am
Glad you find my progress inspiring Paul.

With mine it's been the endless tinkering and learning new skills that swallowed up the time - I'm now 26 months into my project - but the result is the car I'd always promised myself.

Keep plugging away and the finishing post will accelerate towards you before you realise what you've achieved. Once finished, you'll have a car you can be truly proud of. One that, when someone says 'Wow! What's that?' you can reply 'Oh, just something I built.' :whoo:
15 Jun 2013, 3:01pm
Flaming June?
I guess it was just too much to ask for the weather to string a couple of dry weeks together. :rolleyes:

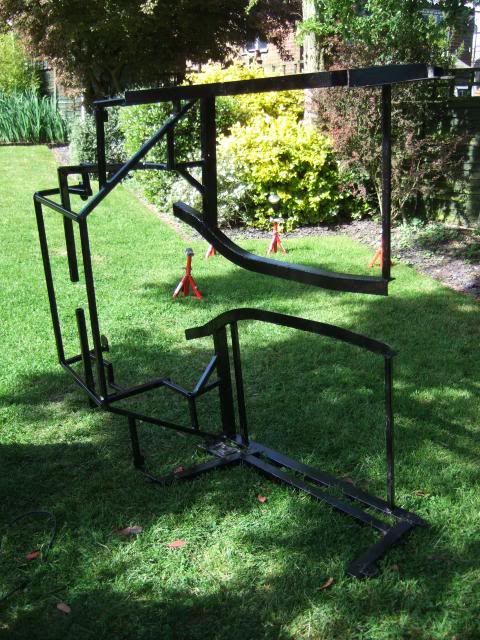
This is what my framework development workshop looks like at the moment...


And the photo doesn't really do justice to the noise that the rain lashing down is making.

So I'm guessing no work outside for me today. :icon_sad:

Father's Day:
I might push my luck a little tomorrow to arrange a family Cordite frame lifting session in the morning.
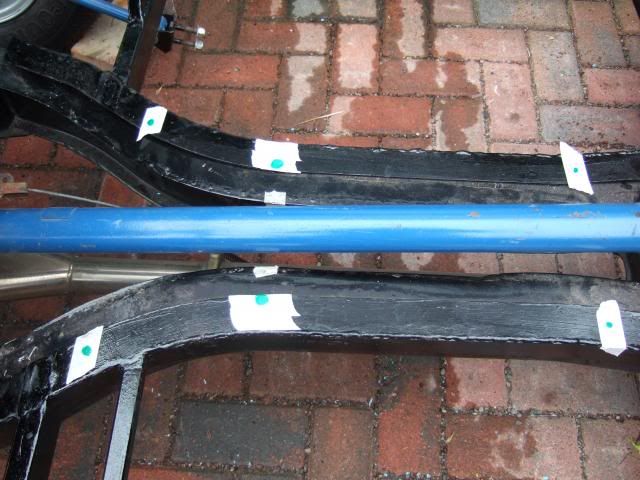
I've found the cardboard templates I made to locate the seat belt holes either side of the hand brake.
But I need to carry the frame through the house onto the front drive to mark it up when on the chassis.
If I just stick masking tape on the frame, I can mark it up & carry it straight back into the garden.
That way if the sun every returns I can drill the holes in the frame one evening after work.
As I realised that these holes are the key to me aligning the Spitfire rear wheel aches section.
( Holes in the hand brake panel line up with the holes in the Cordite frame / Spitfire chassis. )

Until then, take care, Paul. :)

Replies
Mr T - The more build threads I read, the more reasonable your build timeline seems.
As you often say, this is our hobby, not a full time job & we have other things going on in our lives too.
16 Jun 2013, 11:53am
Father's Day:
As explained yesterday, I knew I'd only get a chance to do one simple job today.
With my wife's help I did get the frame through the house to the front drive.
I then removed the Cordite body which is sitting over the Spitfire chassis & fitted the frame.

Using my cardboard template I was able to mark the position of the seat belt mounts...
( Not easy to see a black frame sitting on a black chassis. :rolleyes: )


While I was at it, I also marked up roughly where I will bolt the frame to the chassis...


( The holes for the seat belts will not really be used to keep the frame in place. )

I want to keep the rear frame mounting bolts inside the cockpit area.
Also the extreme ends of the frame do not sit on the chassis (& never have)...


I will just make sure there is a big bonding blob underneath this area when I am fitting it.

My poor wife then had to help me bring the frame back through the house into the garden.
I packed up everything at the front of the house & then had to mow the lawn.
This allowed me to put the frame back on the grass in a different place & re-cover it.
( As I am trying desperately hard not to kill the lawn while working on the frame. )

Right, I have got to go, cheers, Paul. :)
16 Jun 2013, 12:32pm
Paul, every job done is another step mate.
I was planning to use fathers day as a freebie to sit at the dining room table and strip my dcoe 45 ready for the major parts to go off for vapour blasting and ultrasonic cleaning as i solo babysat the grandaughter yesterday so couldnt get up the workshop.
No such luck! So far today, mown front lawn, mown rear lawns, cooked mushroom stroganof for dinner tonight, done laundry reay for london tomorrow, been shopping, removed bike and bike rack from the mondeo...and i still haven't finished......
16 Jun 2013, 2:04pm
A Ribble builder's work is never done.
16 Jun 2013, 4:27pm
But then i did get a good t-shirt for fathers day:
"Paddle faster, I hear banjos......"