MadaboutKitcars

This is a read-only archive of the old Madabout Kitcars forum. New posts and replies are no longer possible, but every thread is still here to browse and read.

Royale Sabre - Take two!

18 Dec 2019, 8:22pm
This week I've been mounting the windscreen washer bottle and preparing the seats.

But first, I cut the access hole in the nearside inner wing and then painted them.
I've painted the inner wings with a coat of primer followed by two coats of matt black enamel. I brush painted them as it was too cold to use spray paint outside and I was worried about getting overspray on the outside faces.

Inner Wings by Sabrebuilder, on Flickr

I then had to recover the mx5 seats from my garage loft.

Mx5 seats in the loft by Sabrebuilder, on Flickr

The seats were in the loft above the car and I found that my medium sized step ladders just fitted inside the Sabre's body tub enabling me to reach them.

Mx5 seats by Sabrebuilder, on Flickr

They needed a good hoovering once down!

The mx5 seat runner mounting points need to be modified to suit the flat floor of the Sabre. I've bent the ends parallel with the floor and removed the spikes. I will be trial fitting them next.

Mx5 seat runners by Sabrebuilder, on Flickr

Moving on to the windscreen washer bottle.
The washer bottle bracket became rather complex. It's mounted on the inner wing below the line of the outer wing so that the fixings don't show. I've fixed it with two m6 bolts and PU adhesive.

Washer Bottle Bracket by Sabrebuilder, on Flickr

And here it is fitted....just need to run the cable and hose to it.

Washer Bottle by Sabrebuilder, on Flickr

So next on to fitting the seats....oh, and Christmas, of course.:thumb:

...peter
18 Dec 2019, 10:40pm
peterux wrote:
oh, and Christmas, of course.:thumb:

Forget that, I try to do, it's always a disappointment, but great work as usual.
20 Dec 2019, 1:22pm
Looking good :)

Is that the alternator immediately below the new screen washer bottle? My aim when filling up the washer fluid in my car isnt the best, so do you think it's worth putting in some sort of shield to protect it? I believe alternators are one of the few things in an engine bay which dont take kindly to getting wet.
20 Dec 2019, 2:17pm
kon wrote:
I believe alternators are one of the few things in an engine bay which dont take kindly to getting wet.


Very true ask any MR2 owner, Toyota put a shroud over them, then put holes in the bonnet lid directly above, later ones had a plastic channel to try to get the rain away.
20 Dec 2019, 9:15pm
kon wrote:
Looking good :)

Is that the alternator immediately below the new screen washer bottle? My aim when filling up the washer fluid in my car isnt the best, so do you think it's worth putting in some sort of shield to protect it? I believe alternators are one of the few things in an engine bay which dont take kindly to getting wet.


Hi Kon,
that is a really good point that I had not thought about before. My thinking cap is firmly on to design a shield.
Thanks for the feedback......peter
18 Jan 2020, 9:16pm
First update for 2020.....

A very late Happy New Year to all builders and watchers!

Following the packing away of all the Christmas stuff I had some essential house maintenance to do, including fitting a new back gate. Before starting work again on the Sabre I decided have a tidy up in my garage and re-arrange some of my shelves, At least now I can walk around the car without tripping over or banging my knee on something.:thumb:

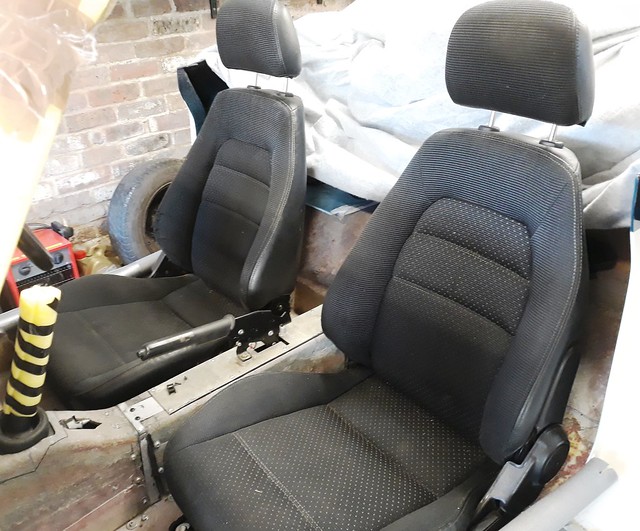
So the first real car job this year was to trial fit the mx5 seats.

Seats by Sabrebuilder, on Flickr

I'm delighted how well these fit and the resultant driving position is excellent. For me, the seats are a perfect height and with adjustable runners and seat back angle they should be easy to get a good driving position.
Of course, they will need to be re-trimmed when funds are available.
Since the Sabre's floor is GRP, I also need to fabricate some spreader plates to keep the IVA man happy.

So a good start to the year.........

....peter
22 Jan 2020, 7:24pm
A little update......

I needed to move the Sabre out the way to get something from my garage loft so having put the wheels back on I decided to 'drive' the car out of the garage......

On the move.... by Sabrebuilder, on Flickr
(click on picture for a short video)

:tea::high5::high5::high5:
22 Jan 2020, 8:11pm
Well done
23 Jan 2020, 8:29am
That must have been a real sense of achievement driving the car for the first time.
Well done and keep the updates coming. I had to laugh at the exhaust extension disappearing in the service door as you drove out!!!
23 Jan 2020, 8:35am
lol I missed that the first time around, also nice to see you're a Lewis Hamilton fan :-)
23 Jan 2020, 9:27pm
froggyman wrote:
That must have been a real sense of achievement driving the car for the first time.
Well done and keep the updates coming. I had to laugh at the exhaust extension disappearing in the service door as you drove out!!!


:laugh:thanks Froggy. I had not noticed that myself!
26 Jan 2020, 11:54am
Peter – Great news on the first drive. :cool:

I’ve sure that helps with motivation to finish the car off in time for the Summer (if not before).

Good luck, Paul. :)
28 Jan 2020, 3:49pm
Awesome stuff, looks great!
Took me 3 watches to realise what froggy was talking about.. got some funny looks when i spotted it! :icon_lol:
6 Feb 2020, 9:07pm
Lighting....

Thanks for all the positive feedback :yo:

--------------------------------------------------------------------------
This week I've made a start on the rear lights.........

Rear lights in-progress by Sabrebuilder, on Flickr

I'm using e-marked lights to avoid any risk with the IVA test. The upper chrome plinth nuts have to be fitted with your finger tips and a lot of patience. The fog and reverse lights have been fitted above the bumper to ensure they meet the IVA minimum height requirement. The fog light has to be mounted not less than 100mm from the brake light.
I've not yet decided where to fit the reflectors.....


....peter
9 Feb 2020, 10:55am
Always learning new things about my car

A little tale of how I never stop discovering things about my car....

With the fitting the rear lights progressing well my planning thoughts turned to the wings(still some way off but it doesn't hurt to plan ahead). Before fitting the front wings I decided to check that I had tightened all the front suspension to the correct torque as it's easier do this without the bodywork in the way.
The only nuts not tightened were the track rod ends (TRE) but no matter what I tried I couldn't get them to tighten to the correct torque?
I got a feeling of déjà vu when I tried to tighten up the nut as I had a similar problem when I built my Marlin Sportster but in that case it was a Metro ball joint into a BMW hub. But this was odd as it's a Ford Sierra TRE fitted to a Ford hub. In fact, it wouldn't tighten up because the nut had hit the shank of the taper before it was tight.
At first I thought about manufacturing tolerance issues with aftermarket parts but I was using old stock QH parts which in my limited experience were well made and the chance of getting any real Ford TRE's is nigh impossible. So I reverted to Google and stumbled across some Westfield Seven owners discussing TRE's for their cars. I discovered that Westfield used Sierra hubs and a Mk2 Escort rack and track rod ends. Then a thought crossed my mind, could it be my front hubs were manufactured for Westfield? They were new unused hubs when I bought them off ebay some years back but they had the Ford logo obliterated from the casting. So I bought some Escort TRE's to see if they had larger tapered shanks.

Here's a picture of the Sierra TRE showing the top of the tapered shank showing proud.

Sierra TRE by Sabrebuilder, on Flickr

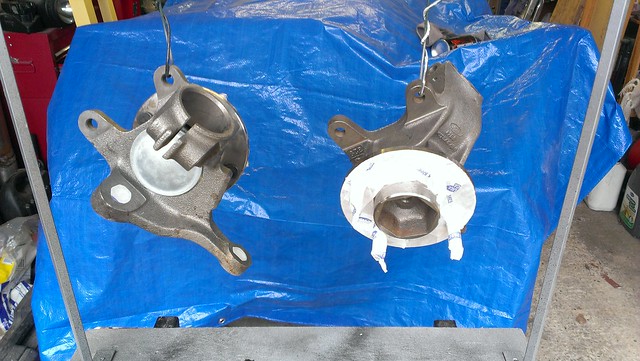
As a reminder, these were the hubs I bought.....(if you look closely at the one on the right you can see the Ford part number but the Ford logo has been removed from the oval)

New front hubs 1 by Sabrebuilder, on Flickr

The Escort TRE's arrived a few days later and I quickly popped one in a hub which confirmed they do indeed have slightly larger taper and they fit correctly. They also have the same thread to the tie rods so no issue there either. Measuring the diameter of the tapered shank is tricky but the Escort taper is about 0.77mm larger than the Sierra one at the based of the taper.

Here's a picture of the Escort Mk2 TRE taper.......

Escort Mk2 TRE by Sabrebuilder, on Flickr

These tightened up without any issues.:biggrin:

Problem solved!
17 Feb 2020, 7:37pm
Does my rear look good.........

After hours of fettling I've finally finished fitting the rear lights and bumper.

Rear Lights and Bumper by Sabrebuilder, on Flickr

To meet the IVA requirements the fog light is positioned more than 100mm from the brake light and I've added push-on PVC trim to cover the 'sharp' edges of the bumper. The stainless steel exhaust tips are genuine BMW accessories which look smart and have rounded edges. Reflectors are still to be added. I was really lucky to find the chromed badge plinth in the box of bits that came with the car.

Next up will be finishing off a few small jobs in the engine bay before the final fitting of the front inner wings.........

....peter
25 Feb 2020, 7:52pm
A little update......

Just a little clue of what I'm working on in the garage this week...........

Radiator grill by Sabrebuilder, on Flickr
29 Feb 2020, 9:35pm
kon wrote:
Looking good :)

Is that the alternator immediately below the new screen washer bottle? My aim when filling up the washer fluid in my car isnt the best, so do you think it's worth putting in some sort of shield to protect it? I believe alternators are one of the few things in an engine bay which dont take kindly to getting wet.


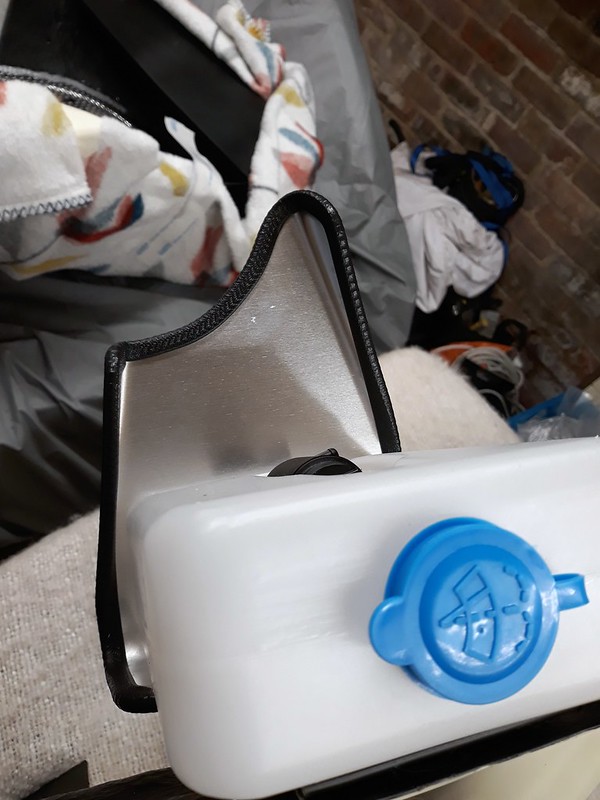
I got around to making a drip tray to stop any screen washer over-spill getting into the alternator.

Windscreen washer bottle drip tray by Sabrebuilder, on Flickr

The edges were turned up to stop any over-spill going off the side and to add stiffness.

Windscreen washer bottle drip tray by Sabrebuilder, on Flickr

And here it is in place....

Windscreen washer bottle drip tray by Sabrebuilder, on Flickr

(the last picture has made the shield look smaller due to perspective but it is actually wider than the bottle and slopes back towards the bottle)

Thanks again to Kon for pointing out this potential problem.:thumb:

...peter
1 Mar 2020, 3:39am
Well done!
1 Mar 2020, 6:35pm
Radiator Cowl Grill fitting

Thanks, Jack.

----------------------------------------------------------------------------

Over the last week or so I have been fitting the trim and grill to the radiator cowl so here is a summary of how I did it.........

I first fitted the chrome/plastic trim. This comes with an adhesive bead inside that is supposed to stop it coming off. On the day I fitted it, it was very cold in my garage so I put the trim in the tumble drier for a while to warm it up and make it easier to form round the bends. Plastic trim has a tendency to shrink over time so I cut the trim about 3mm oversize and then forced the last section in so that the joint is under compression.

Radiator cowl trim by Sabrebuilder, on Flickr

I then cut the grill to size. I have chosen a stainless steel mesh with a 5mm pitch. My tin snips could only manage one wire at a time so a slow process to get the right shape. I bought two pieces of mesh, each 200x400mm because that was cheaper than one large piece. I then polished the front side of the grill.

Radiator grill fitting by Sabrebuilder, on Flickr

Then I glued a length of rubber hose with PU18 adhesive to the cowl. The hose is just a gap filler to attach the grill to. (Note: I later discovered the PU18 softened the black 'schultz' coating my painter put on the inside of the cowl so I had to redo this stage after removing the schultz to get a good bond with the GRP. :drama: A messy job with white spirit but no harm was done)

Radiator grill fitting by Sabrebuilder, on Flickr

I then made up the centre clamping bar made from 1mm steel strip.

Radiator grill fitting by Sabrebuilder, on Flickr

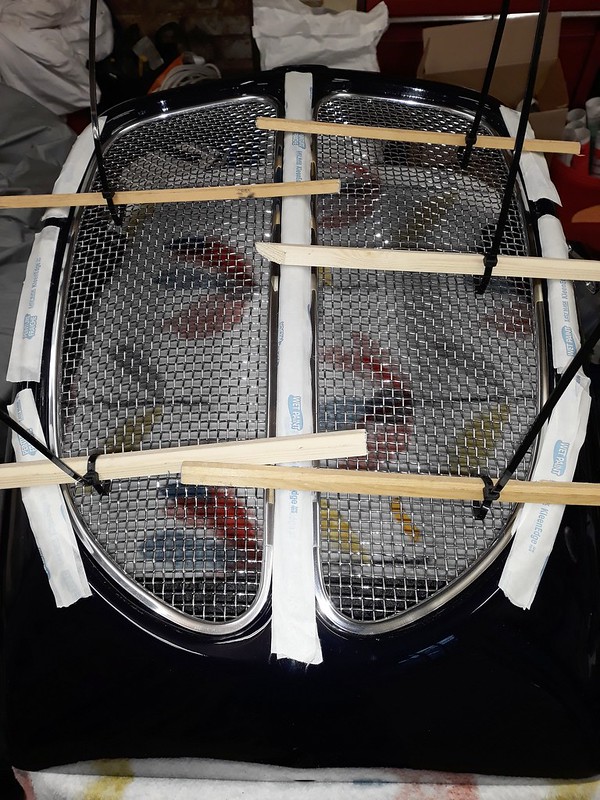
I then held the grill tightly in place with some wooden splints and cable ties......

Radiator grill fitting by Sabrebuilder, on Flickr

....before running a bead of adhesive along the grill above the rubber hose making sure it was pressed down to fill any gaps.

Radiator grill fitting by Sabrebuilder, on Flickr

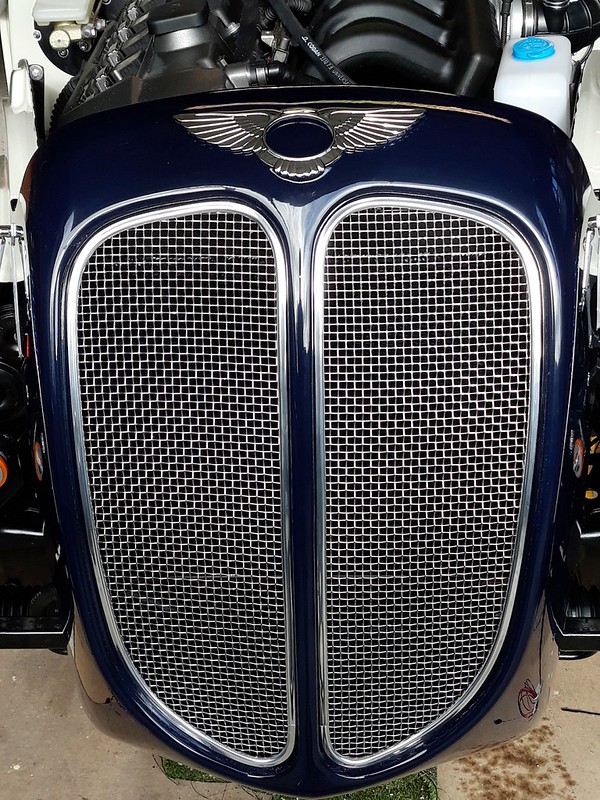
So here is the final result fitted to the car!

Radiator Grill final by Sabrebuilder, on Flickr

I'm very pleased with the result :drum:

Next up will probably be the bonnets.......

.....peter
1 Mar 2020, 8:58pm
Looking Great! Lovely finishing touches
1 Mar 2020, 11:37pm
Excellent job, perfect!
2 Mar 2020, 9:30am
Wow! That front looks awesome, excellent work :)
Nice splash-guard too.. sorry about the extra work :D
Cant wait to see this car in the flesh.
3 Mar 2020, 7:29pm
peterux wrote:
I'm very pleased with the result :drum:

And so you should be.
7 Mar 2020, 8:07am
Always love your attention to detail. :cool:

Your car is going to look great.

Good luck, Paul. :)