This is a read-only archive of the old Madabout Kitcars forum. New posts and replies are no longer possible, but every thread is still here to browse and read.
Some of us have used box section across the top of bulkhead and secured pedal box from above to stop flexing....
I'd say this is essential. The front of the firewall is made from thin guage steel so allows the pedal box to flex when you apply a significant force on the brake pedal. By fixing through the top of the bulk head you triangulate the fixing, which makes it so much stronger. Try to go as far back towards the driver as is possible for the maximum triangulation.
The section of the steel does not have to be particularly great. I found a 10mm flat bar has made a huge difference, provided it is taken to the sides of the fire wall where there is some stiffness to pic up from. I also had a space between the underside of the bulk head and the top of the pedal box, which has to be in-filled to achieve the stiffness required.
I think securing the pedal box from above would be a good idea. The locations on the "front" face of the box look well suited to rivnuts to me which would make things a lot easier. I have been reluctant to add strengthening as yet because I am really early in the build and I want to be sure that I won't impede anything else that might need fitting in the future. I will look through the forum for more direction.
Also, my newly cut access hatch will help if I decide on bolts not rivnuts. I have to confess to a bit of a fixation on rivnuts...!
Rivnuts are great for securing things that don't require much mechanical strength but I wouldn't personaly use them for anything critical. If you think about how the load is spread - the surface area of a nut and washer is much greater than the surface area that the "inside" squashed bit of a rivnut presents. Also rivnuts are made of a relatively soft metal to allow them to be set. It is possible to pull a rivnut right through a thin metal panel - especially if it hasn't been set quite right...
I agree with you in general but my thought was that the rivnuts in the front of the pedal box would not actually take much load if there were rigid top mountings too. the pedal force pushes the box into the bulkhead and tries to twist it downwards. The downwards bit is handled by the top mounting so the rivnuts should just be locating the box. Or have i missed something? John
Yes, I am sure you are correct. But still, most of us have found that the pedal box is a fairly flimsy arrangement and the less you have to rely on it rather than what it is bolted to the better! As I remember I used six M6 fixings on the vertical and a further 4 M8 on the top, 2 of which pass through the below mentioned tube.
I used a 25mm square tube bolted accross the entire top width of the bulkhead to strengthen the pedal box fixing which seem to have done the trick. If you get it in the right place it is also handy to support the closing plate for the fibreglass dash top.
I like the idea of the tube. One of my worries was that, because I dont have the bodywork, dash etc yet ("about" two months away from Marlin...) I am worried about making mods that might iterfere with what comes later!
I like the idea of the tube. One of my worries was that, because I dont have the bodywork, dash etc yet ("about" two months away from Marlin...) I am worried about making mods that might iterfere with what comes later!
Hi John,
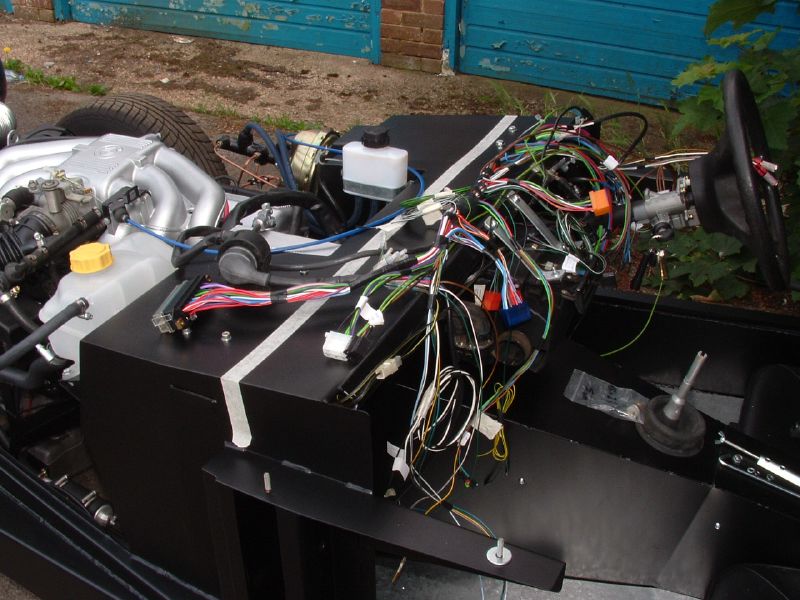
if you look at this picture you'll see a white line across the top of the 'monocoque' .... it is a piece of masking tape.
The front edge of the tape was aligned to the front edge of the scuttle. It lines up with the front edge of the door pillars.
If you look closely you can see my pedal box top mounts which are two M8 bolts that sit behind the scuttle closure plate.
I didn't add any extra support to my pedal box but I think you can put an extra bar across it that point without hindering anything else, if you think you need too?
I hope that helps.... as 2 Marlin months can be quite a long time
Peter, that is really useful as is the picture of the tube in place on Robin's website, between the two I think i can fathom it out. I was right to be cautious!
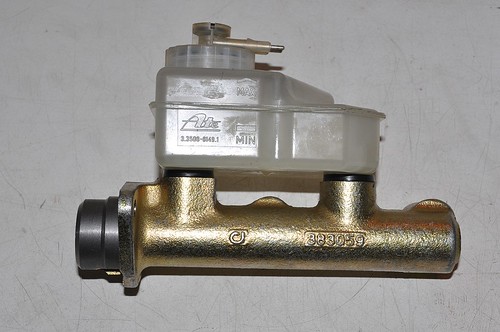
Has anyone tried to fit the BMW reservoir in the Ford master cylinder?
Hi Mike, my new ford M/C turned up today so I'm looking at this at the moment. it should fit and the holes line up plus the tubes seem the right size but it doesn't seem to want to go in. I'm going to study those pics you put up of the various ford reservoirs to see if there's some subtle reason
No matter what I tried, pushing the reservoir in, taking the seals out and puting them on the stems first, it wouldn't go on. The answer was to use the original BMW seals. Fits like a glove
No matter what I tried, pushing the reservoir in, taking the seals out and puting them on the stems first, it wouldn't go on. The answer was to use the original BMW seals. Fits like a glove
Yeah!
Well done. Problem solved, and very neatly too. Or is it..........???
Mmmmm.........on second thoughts, the master cylinder is at a gradient in the Ford, whereas it looks like the BMW reservoir is designed to be horizontal.
What does it look like when shown at an angle?
Mike
The hunt for the sierra/fiesta reservoir may be on after all. I wonder why marlin have it angled up in the first place. I guess because the chassis was sierra based for a while? one of many things that should have been updated with the switch to BMW (such as the build manual).
I finally managed to remove the Metro servo today after a 3 hour struggle. Even with an access panel in the bulkhead the nuts are almost inaccessible and as always the worst one to access was the rusty one!
I had a couple of raised eyebrows about build quality when I found that the spigot diameter of the master cylinder had been hand fettled on a grinding wheel to make it fit the servo hole. Vacuum seal was by silicone sealant only! Also the packing piece in the master cylinder piston hole was a ground down nyloc nut (see pics).
Master cylinder has 23 on cast boss not 22 as previously mentioned. My fulcrum bolt has its head welded to the brake pedal so I am stuck for now with using the same offset setup with the new clevis. I shall put a spacer between the legs to give it some support when the nut is tightened. I will also re-use the offset packing washers to keep the servo in line with this horrid compromise set up.
The servo holes in my pedal box are so near the bottom edge that I will have to extend the holes inwards and upwards, not downwards. There are also two D-shaped cut outs underneath for spanner access, so that area is further weakened already (see pics). As the 5mm pitch difference only equates to a 2.5mm offset I am sure there will still be clearance under the bonnet when the master cylinder is rotated to get the rigid brake pipes exiting sideways & downwards.
Mike. Regarding your comments about fitting large washers I am thinking that if the dual servo is more “powerful” than the old one, so less pedal “push” is required, there should actually be less load on the pedal box but there will be a greater force (from the servo) acting between the servo and the master cylinder? Peter.
Fitted the servo today, slight fettling of the holes as previously described.When i fitted the clevis, I had measured it's length in comparison to the metro, in my case 13 cm from mounting face to centre of clevis mounting hole, and locked it.When I squeezed into the footwell luck would have it that the clevis was sitting with the pedal in it's groove and mounting hole matched so slipped in the retainer...job done.What's even better is that I didn't need to change my pipes to the master cylinder as I was able to undo a few shallow curves from my initial set up to allow for the extra length of the set up! I have kept the m/c in the same position as I had in the metro system as I have a remote reservoir and this made the pipe fitting easier.SMOOTH........just to confirm, there doesn't need to be an air tight seal with the M/c and the servo? The ford m/c has that little NIC in it's mounting plate.
Another satisfied customer!
When will you be able to take it for a test drive, and report back?
Mike
jeremy wrote:
Fitted the servo today, slight fettling of the holes as previously described.When i fitted the clevis, I had measured it's length in comparison to the metro, in my case 13 cm from mounting face to centre of clevis mounting hole, and locked it.When I squeezed into the footwell luck would have it that the clevis was sitting with the pedal in it's groove and mounting hole matched so slipped in the retainer...job done.What's even better is that I didn't need to change my pipes to the master cylinder as I was able to undo a few shallow curves from my initial set up to allow for the extra length of the set up! I have kept the m/c in the same position as I had in the metro system as I have a remote reservoir and this made the pipe fitting easier.SMOOTH........just to confirm, there doesn't need to be an air tight seal with the M/c and the servo? The ford m/c has that little NIC in it's mounting plate.
just to confirm, there doesn't need to be an air tight seal with the M/c and the servo? The ford m/c has that little NIC in it's mounting plate.
Correct - no need for a seal. The servo is sealed internally, around the output rod. I have no rubber / gasket between the adaptor plate and the servo, or the master cylinder and adaptor, and it works just fine.
I hope to try a run quite soon......as long as my engine spluttering woes are cured,I have still to refit the injectors, and inlet manifold and keep my fingers crossed.Mike, I have sent you the throttle spring, should be with you tomorrow.
Has everyone received their servo, and has no issues with what they have received? Assuming there are no issues, it is probably time to remove the sticky thread.
Has everyone received their servo, and has no issues with what they have received? Assuming there are no issues, it is probably time to remove the sticky thread.
Mike
I'm good thanks, but the 'sticky' list is handy to help remember peoples real names!!
The hunt for the sierra/fiesta reservoir may be on after all. I wonder why marlin have it angled up in the first place. I guess because the chassis was sierra based for a while? one of many things that should have been updated with the switch to BMW (such as the build manual).
The installed BMW master cylinder is fitted at the same angle with the reservoir on it and it dosn't cause a issue.
The installed BMW master cylinder is fitted at the same angle with the reservoir on it and it dosn't cause a issue.
Worth checking what happens if you simulate fluid loss in each line in turn. I think when "level" the reservoirs are designed to retain enough fluid for the "non failed" line. The angle may prevent this and may also prevent the front chamber filling fully due to an air bubble? Also the low fluid float & switch if fitted will not be accurate? Just a thought. Peter.
Has everyone received their servo, and has no issues with what they have received? Assuming there are no issues, it is probably time to remove the sticky thread.
Mike
All received and fine thanks Mike. Installation temporarily delayed as I have just found a perished and leaking heater hose that goes to the bulk coolant tank which was hidden under the old servo. Still better to find it now rather than half way up the M5 methinks! Peter.