MadaboutKitcars

This is a read-only archive of the old Madabout Kitcars forum. New posts and replies are no longer possible, but every thread is still here to browse and read.

New Cordite Build, with a twist....

17 Feb 2014, 6:26pm
Well that's it then decision made! No Doors.
19 Feb 2014, 7:44am
Well it makes you wonder why cars (including 50's racers) have doors and people tend to use them as well, since not having them is far more ideal. Except the dukes of Hazard offcourse, they too hate doors.

No, sorry, I'm just kidding. I agree on what you are saying and Mac is right not starting this endeavor.

Michiel
19 Feb 2014, 9:15am
Take a look at the picture below, which is a good example of why doors are redundant on one of these cars -


My whole car isn't even as high as the window line on that Corsa, and a door wouldn't have been of any use whatsoever in getting in or out of the car in that space, it was far simpler just to step over the side.

Don't get me wrong, when I went to look at the Sammio demonstrator and talk to Gary J about my order I wanted him to add doors to the package, mainly because I had it in my head that cars should have doors.

Thankfully he talked me out of it by inviting me to climb aboard '66 and asking me if I thought doors would make it any easier to get in and out? I had to agree that they would be pretty useless.

If you already have doors as part of your package I'd consider fitting them as dummies - leave a gap around them but seal them in behind so they don't actually function. Best of both worlds?
19 Feb 2014, 9:29am
No doors in my package T I was going to take moulds of mine once they were done but someone else can have that pleasure now!
TTFN
Mac
23 Feb 2014, 2:17pm
Update 1 for Saturday 22nd Feb

Good day today.
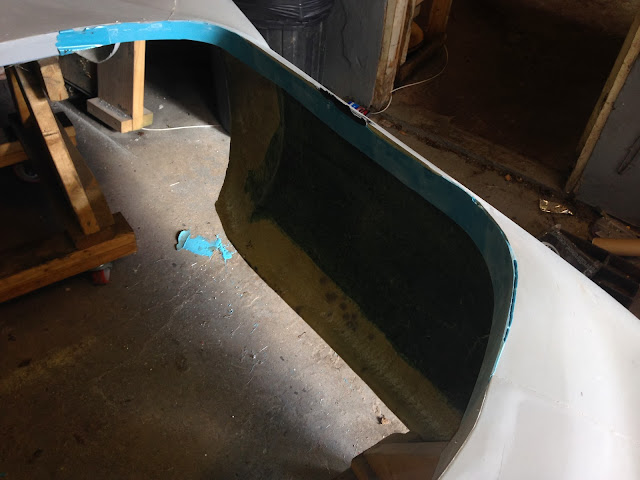
Sean the fibreglasser from next door managed to find time to slap some gel and fibreglass into the formers I fitted to the car to remake the cockpit side returns:


So I set about removing the Ali formers I had made, the 4 layers of release was did their job as once I had drilled out the rivets they just peeled off.


As you can see in the pics there was some flow through of the gel coat In places where the former didn't seal against the body but no great shakes.


20 minutes with the angry grinder had the returns trimmed and the overflowed gel coat removed.


As can be seen in the pics there were a couple of voided areas but have already ground them back and will make good with bridging filler.


The voids look worse than they actually are and wont be in issue.


You can just about make out the extent of the voids in the pic above, its the whitish areas in the blue gel coat, not very big at all.

Another update coming in a bit.
TTFN

Mac
23 Feb 2014, 2:28pm
Update 2 Saturday 22nd Feb

Once I had done as much as I could on the body I moved onto the electrics. I have decided that now I don't need to worry about doors I will get the electrics pretty much done and the car running in moon buggy format before fitting the body, this will hopefully mean that I wont have to spend time upside down with my head behind the dash trying to sort wiring issues.

Got the NoDiz fitted, it will eventually have an Ali plate to attach too but just cable tied it in place for now so I can work out the cable lengths.


Got all of the starting and charging wiring done and tested. Needs final tidying but will look much better once its all sleeved.


Managed to get the ignition switch all wired up and tested as well, the loom that I bought from Langys Rod Shop is a dream to work with and I haven't had to look at the instructions yet as everything is so clearly marked it all sort of falls into place.


Got the steering column remounted ready to do the wiring to it but realised I didn't have the right plugs as I want to make the column removable without having to cut wiring.


The best part of the day was when I turned the key first time and the engine turned over with no dramas and no escape of the dreaded loom smoke! The combination of the geared high torque starter and a small racing battery worked fine and spun it over very quickly even though the battery hasn't been charged in about 12 months...result!

TTFN

Mac
23 Feb 2014, 4:33pm
Next step is the first fire of the motor then. That's a biiiiiig step...
23 Feb 2014, 7:26pm
Yep, if the eBay twonk who is supposed to be supplying me a custom trigger wheel ever does, nearly 3 months now! Time to find someone else as I don't want the lack of a trigger wheel holding me up.
24 Feb 2014, 2:04pm
Mac - Great progress. :cool:

I'm looking forward to seeing you reach the moon rover stage.

As it will be a big target for me to follow.

Good luck, Paul. :)
3 Mar 2014, 3:08pm
Got some bits and pieces done on Saturday.
Welded in reinforcing bars now that the doors are shelved.


Also got the wiring sorted for the headlights and sidelights, horn, and ECU, bit of a head scratch on the horn until I realised it earthed via the column itself which wasn't connected yet!
3 Mar 2014, 3:11pm
quick visit to the workshop today.
Indicators wired up and Bluetooth connection with the ECU established and tested. Ordered some custom length plug leads. Just browsing now for the least few bits and bobs to finish the wiring. Found it very handy using a trailer board to test the rear lighting rather than faffing around with the actual lamp units themselves.
TTFN
Mac
4 Mar 2014, 10:21pm
Pooh shiny stuff, just had the nod that my badges are done,
7 Mar 2014, 7:04pm
Badges arrived today and very lovely they are too! I should hope so at the price!


Also took delivery of what I hope is the last of the electrical bits n bobs including a nice chromed rear fog light, not going to bother with a reversing lamp.


X3 pull switches, hazard, rear fog and map light


Combined Ignition and light switch


And the Weber TPS kit


Up the workshop tomorrow so hoping to get most of it wired in and tested.
TTFN
Mac
8 Mar 2014, 7:59pm
Good day in the workshop today.
First job was to fit the TPS to the Carb in readiness for the arrival of my trigger wheel which will mean engine startup...gulp!

Couple of issues I encountered were:
1. TPS is made to go on the right hand side of the carb, just where the throttle linkage is in the Weber supplied kit???
2. The main mounting bracket is supposed to screw to the body using 2 threaded holes in the casting, my carb only has 1!

Swapping the linkage wasn't to bad, had to bend the throttle adjustment stop 180 deg so it would work on the other side and will have to figure out how to fix the cable stop as its currently mounted using a nice cast mount point which is now on the wrong side, worst case scenario I will have to tig a block onto the manifold.

The missing mounting hole can be sorted with a strip of Ali from the trumpet retaining nut back to the mount, ill do it next time im up the workshop.
The almost finished article :-)


TPS mounted, you can see the nearest mounting hole is currently mounted to thin air


The throttle linkage now on the other side, the throttle arms on the right is only pointing up as I still need to work out mounting the end of the cable.


Next job was a bit of Ali fabrication


Can you guess what it is yet?


Its made of 5mm Ali plate and is the soon to patented combination mechanical fuel pump blanking plate / Ford Gen 2 coil pack mounting bracket. best your still none the wiser. At this stage I was hoping to Tig it up and get the coil pack mounted as I received my nice custom plug leads yesterday. Unfortunately some idiot forgot to turn off the gas at the cylinder last time he used the TIG and the bottle is empty so have ordered a new one and given the offender a good talking too, subtle hint is that I was alone today as Dave is currently on DIY duties allocated by his SWMBO.......

Moved onto the wiring again, got the rear loom all bound up in very fetching red spiral wrap and finally secured, Tick!
Nest I started to undo some of the work already done so I could use the lovely retro combined ignition / light switch. A couple of issues as its a simple on/off key switch with an accessories position but I found some natty little bus bars I had lying around and soon had the ignition switch working along with a nice little high amperage push button to start, all tested and signed off...Tick!
Next was the lighting which had me scratching my head as the switch uses the main feed into the switch for the ignition to power the lights but the loom has a separate fused supply for the headlights... 2nd bus bar fitted and the side and tail lights now work fine off the switch. ended up doing a bit of lateral thinking and used the headlight feed off the switch to trigger a relay so I could continue to use the loom fused power to the headlights via the column switch. By the end of the day I had power in all the right places at the right time without loss of loom smoke for
Sidelights
Headlamps Dipped
Headlamps Main Beam
Headlamp Flasher

Was enjoying myself so much I was interrupted by a call from home to ask where I was as I should left an hour earlier!

Hopefully will get some more workshop time next week as I am between projects, hopefully at Least 2 days so my aim for next week is to get the motor running...GULP!

TTFN

Mac
9 Mar 2014, 7:44pm
Mac - Sounds like you are getting lots of loose ends tidied up. :cool:

Hope all goes well with the engine restart.

Good luck, Paul. :)
10 Mar 2014, 8:18pm
Managed to get a few hours in and finished most of the wiring with the exception of the instrument cluster.
Rear Fog Light tick!
Hazard Warning Lights tick!
Wired up the front P700 headlamps with new H4 connectors, the headlamp bowls now have a nice pair of waterproof connectors on them, a 3 way for the headlights and a 2 way for the side lights. Went to try fitting the chrome headlamp rings and they seem about 1/2" too big?????? anyone else had this issue?
10 Mar 2014, 9:13pm
Not sure Tron, but got a feeling P700 lamps have a slightly different chrome surround. Think I saw it on a kit car supplier listing with two sizes of chrome trim. Worth a look.
Simon
11 Mar 2014, 8:25am
I used second hand Austin Mini chrome trims and they fitted just fine.
11 Mar 2014, 9:42am
Towed, what sort of gap do you have between the inner ring and the outer?
Mac
11 Mar 2014, 7:28pm
Hello Mac,

I have tripods (not original) and I use Mini rims. It was a good fit.

[IMG][/IMG]

Michiel
12 Mar 2014, 8:29am
Yep, same here, Lucas P700 replicas from ebay plus second hand classic Mini chrome trim rings = perfect fit -

12 Mar 2014, 11:42am
Had another look and I think the rims may be ok, the problem seems to be the fixing of the ring, they have a single screw but although the plastic back shells have a hole for the screw they don't have any other ay of locating the ring. I think im missing some clips? anyone remember what there's were like? even better anyone got any pictures of the retaining clips?
Mac
12 Mar 2014, 11:59am
Hi Mac,

I don“t think there are clips. When the plastic bucket is mounted. In the right position. And that is with the fixing screw downwards. Not totally 180 degrees downwards (as I did), but lets say 175 degrees. (this is because the headlamps are fixed in a rim and the lamp can not turn. That rim is screwed into the bucket. This means that the position of the bucket determins the position of the lamp. And with tripods you can not smugle without noticing that the lamps are turned a few degrees out of line.
You will notice that there is a very small edge on the above of the bucket. You can hook the rim behind it. At the underside you fix the rim with one screw.

Hope it helps and that my bad English is enough to explain these details.

Michiel
12 Mar 2014, 3:54pm
Michiel, thanks for taking the time to reply but my trim rings at the moment will only be held in place by a single screw and as they are not a tight fit im sure there must be a clip either missing on the trim ring or on the plastic bowl otherwise the ring will just be flapping around on a single screw with nothing keeping it secure 180 degrees from the single screw.

Anyone else?
Mac