This is a read-only archive of the old Madabout Kitcars forum. New posts and replies are no longer possible, but every thread is still here to browse and read.
Can you let me know where you got your stainless steel 90 degree bends from, and part numbers if you have them? Also, do you have more photos of how your anti glug breather is fitted? I am not sure how you dealt with the end not on the 90 degree pipe. Once I have got all the bits delivered, can I come up and you show me how it goes together?
If you hunt on my build thread you will see what adhesive I used. Make sure there is half a tank of petrol as you will need to leave it for a few days to go off.
Happy to help with the fitting.
My anti glug was just a piece of fuel line fitted to the existing with a bayonette conector (same as on the washer line and fitted to the new top elbow.
My anti glug was just a piece of fuel line fitted to the existing with a bayonette conector (same as on the washer line and fitted to the new top elbow.
Great, thanks. Where does the other end of the breather go? I didn't understand that bit.
I drilled a hole in the top stainless bend and fitted a rivnut. The rivnut acts as a nipple to push the vent pipe onto. I can fit one for you. Other end is just a push fit joiner to the existing pipe.
Top Bodge even if I must say so myself!
I presume your fuel caps have a 51mm flange to accept the fuel pipe.
My first set of wires were from an XJS, bolt-on MWS wheels. The chrome wasn't very good so I had them chrome powder coated. They look very good but I have the MK2 Jag that has perfect chrome wires on and although they look good, they aren't chrome.
I then got lucky with a set o 5 chrome bolt-ons, brand new never been fitted. Again they were meant to be from a Jag but it turned out they were for a 90's BMW. Would have been perfect but they stuck out about an inch too far. If the car hadn't been painted I would have widened the arches slightly.
Now I have obtained a set of Dayton chrome bolt-ons that came from an XJS again so I knew these would fit.........would they bugger
They hit the front callipers, 3mm spacers on the front and a bit of adjustment to the front callipers with the trusty angle grinder and they fit. Again I have used spiggot rings and wobble bolts.
They now sit very nicely, just got to take them for a road test.
3 advantages of the Dayton wires over the MWS wheels. They weigh about half as much so much easier to take on and off, the wheel centre is smaller so it looks more like a proper wire wheel, more spoke showing and the calliper shows through and finally the centre cap is a much smaller diameter which again looks much better.
I will post a picture when (if) we get any sun.
My first set of wires were from an XJS, bolt-on MWS wheels. The chrome wasn't very good so I had them chrome powder coated. They look very good but I have the MK2 Jag that has perfect chrome wires on and although they look good, they aren't chrome.
I then got lucky with a set o 5 chrome bolt-ons, brand new never been fitted. Again they were meant to be from a Jag but it turned out they were for a 90's BMW. Would have been perfect but they stuck out about an inch too far. If the car hadn't been painted I would have widened the arches slightly.
Now I have obtained a set of Dayton chrome bolt-ons that came from an XJS again so I knew these would fit.........would they bugger
They hit the front callipers, 3mm spacers on the front and a bit of adjustment to the front callipers with the trusty angle grinder and they fit. Again I have used spiggot rings and wobble bolts.
They now sit very nicely, just got to take them for a road test.
3 advantages of the Dayton wires over the MWS wheels. They weigh about half as much so much easier to take on and off, the wheel centre is smaller so it looks more like a proper wire wheel, more spoke showing and the calliper shows through and finally the centre cap is a much smaller diameter which again looks much better.
I will post a picture when (if) we get any sun.
Several sets of reasonable wires over here. Mostly for Camaro or Jag XJ. What sort of offset (ET) would be needed for a 250 SWB Tribute? They are all 5 on 4-3/4" PCD. Backspacing for these is unknown to me at the moment, but I think around 5 inches.
Sorry but I don't know the ET.
My first set were MWS off an XJS and the fit was perfect, just needed to fit spiggot rings and wobble bolts.
Second set was sold to me as Jaguar but turned out to be BMW fitment, didn't need spiggot rings and used standard bolts, however the ET must have been different as they were about an inch too wide, if the car hadn't just been painted I would have modified the arches.
My third set are Dayton, they came fitted on an XJS that had been imported from Florida. Presumed that as the previous MWS Jaguar whells fitted that these would too........wrong!
Rears fit fine but I had to use 3mm spacers on the front and grind the caliper body slightly.
So 3 sets and they all fit slightly differently.
If you were buying new I would suggest using proper knock offs with custom hubs. The hubs are expensive but the wheels are cheaper.
Sorry but I don't know the ET.
My first set were MWS off an XJS and the fit was perfect, just needed to fit spiggot rings and wobble bolts.
Second set was sold to me as Jaguar but turned out to be BMW fitment, didn't need spiggot rings and used standard bolts, however the ET must have been different as they were about an inch too wide, if the car hadn't just been painted I would have modified the arches.
My third set are Dayton, they came fitted on an XJS that had been imported from Florida. Presumed that as the previous MWS Jaguar whells fitted that these would too........wrong!
Rears fit fine but I had to use 3mm spacers on the front and grind the caliper body slightly.
o 3 sets and they all fit slightly differently.
If you were buying new I would suggest using proper knock offs with custom hubs. The hubs are expensive but the wheels are cheaper.
Thank you! Appreciate the quick answer. Just finished reading your old wheel thread too.
Its probably the MAF. Dont bother with a cheap aftermarket one, they dont last very long.
If it was a wheel sensor it usually brings on the ABS and traction control lights
If it was a camshaft or crankshaft sensor it would run rough or not at all.
Never had a cat go on these so unlikely
Before trying a MAF, check the inlet rubbers, these are prone to splitting and will give the same symptoms as a MAF going down. Single vanos have one rubber, double vanos have two rubbers. We have known the throttle bodies to stick slightly open due to lack of use also which cause the same problem.
This is tricky to get at to clean and lubricate but the cheapest option
If it was my car I would clean throttle body then replace the rubbers anyway. Then replace the MAF if the above did not cure it.
I have bought a second kit from Chris, this one is going to be built up with my son who has just finished Uni, or at least that was the idea. He has had a job interview up in Scotland so if he gets it the build will be tricky to say the least.
Not going to be a full build thread but just a few hints and tips also highlighting any changes in the kit from the last one which was a very early one.
First Impressions
Kit seems to be far more refined, the panels have a gloss finish apart from the doors. The doors are much better finished and look as if they will fit much better.
The bodyshell is considerably lighter than the first one so the bonnet should work fine on the standard bonnet rams.
My first kit was finished in white gelcoat which was mainly matt, it was an absolute pig to see how the sanding and finishing was going, the new one is in grey and is nice and shiny, this makes any ripples and imperfections much easy to see.
My son wants to keep his car on the road as much as possible so it is going to be built up on another donor which I am meant to be doing the Daytona on. The idea is to get it all fitted to my donor and then swapped over to his car.
The clams are in the back garden and we made a start on the bonnet. I made the mistake of the first build of filling the gaps on the bonnet mould lines before sanding them down. This was wrong as the bonnet just needed sanding down and no additional filler was needed.
We sanded down all the bonnet flash lines with 120 grit electric sanders, followed by a quick pass with 200 grit. I then used my polishing mop with some G6 compound to bring the shine back to the shell. This allows you to see any imperfections that need any extra work.
You can buy 5 meters of 120 grit velcro paper for £11 on eBay, as soon as it gets smooth replace the paper, it makes the job so much quicker. You can reuse the old paper later as it will the be more like 200 grit.
It took my son and myself an afternoon to sand down all the bonnet mould lines and then polish them. Almost no filler will be needed.
On the last shell I had it put in an over to check for air pockets, only found one. This time the shell has been sitting in the garden for 3 weeks as I have been away on holiday and because it has been so hot I will not bother with the oven.
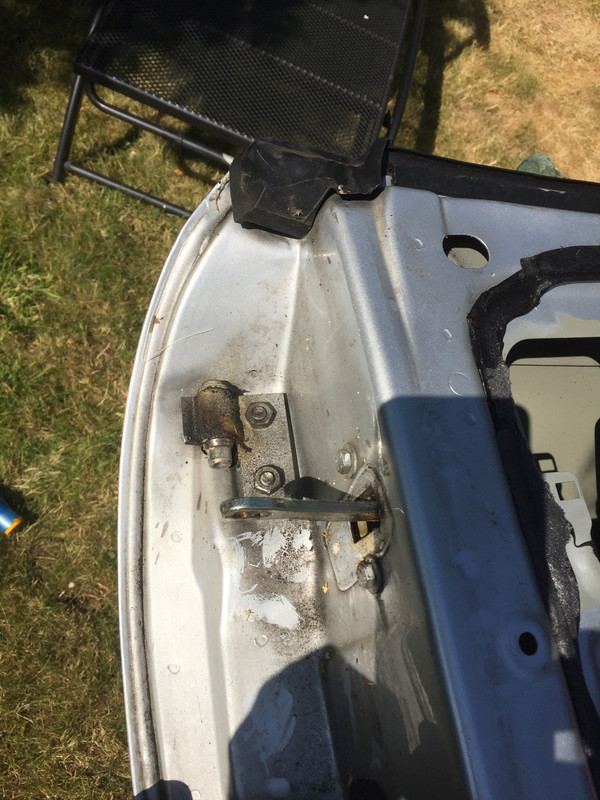
With the Z3 doors you will quite easily see that a small section of the front wing mounting bracket needs to be removed. About 3" at the door end. What is not so easily seen is that the leading edge of the door at the top will hit the bonnet hinge. With the bonnet open there looks like plenty of room but when the bonnet is closed the hinge moves backwards so that when the door is opened it hits the bonnet hinge but only when the bonnet is closed. I couldn't work out why the leading edge of my door kept on chipping.
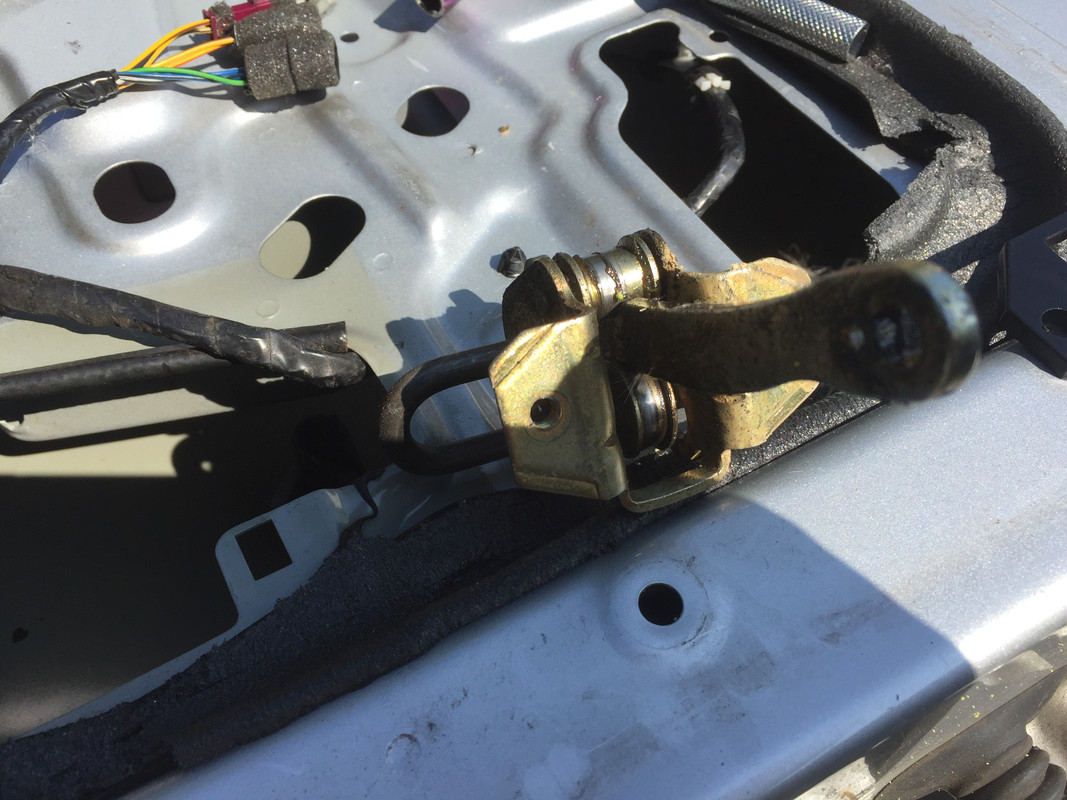
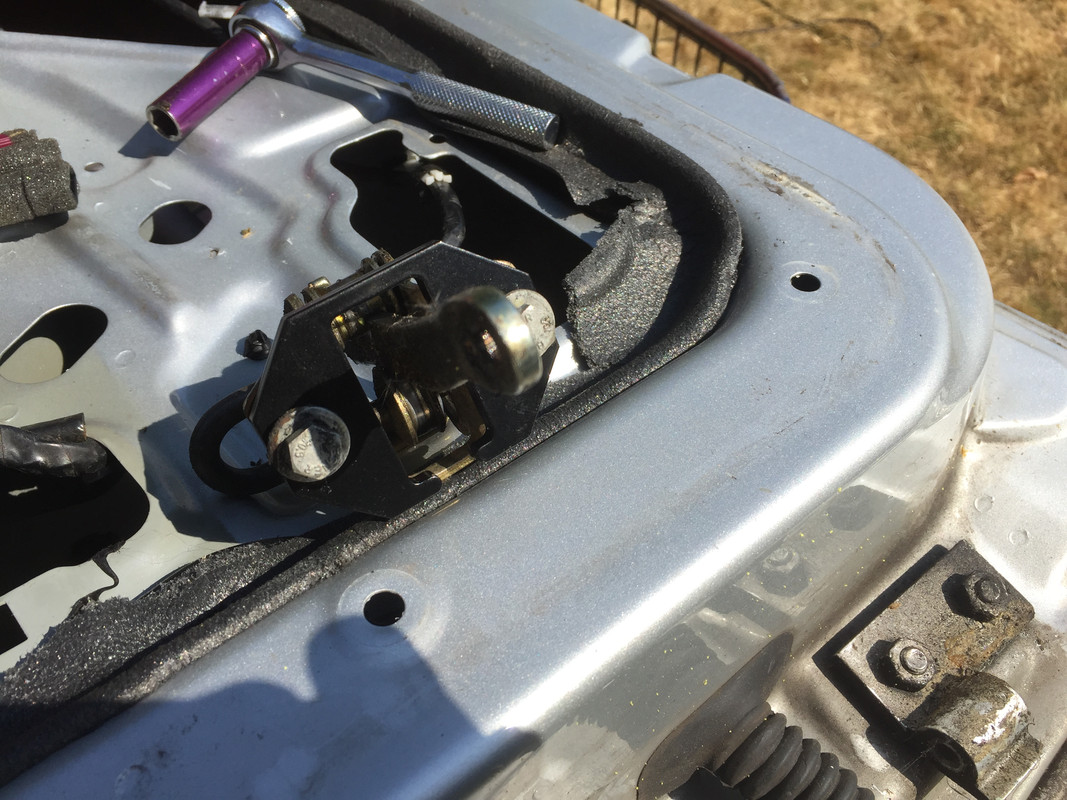
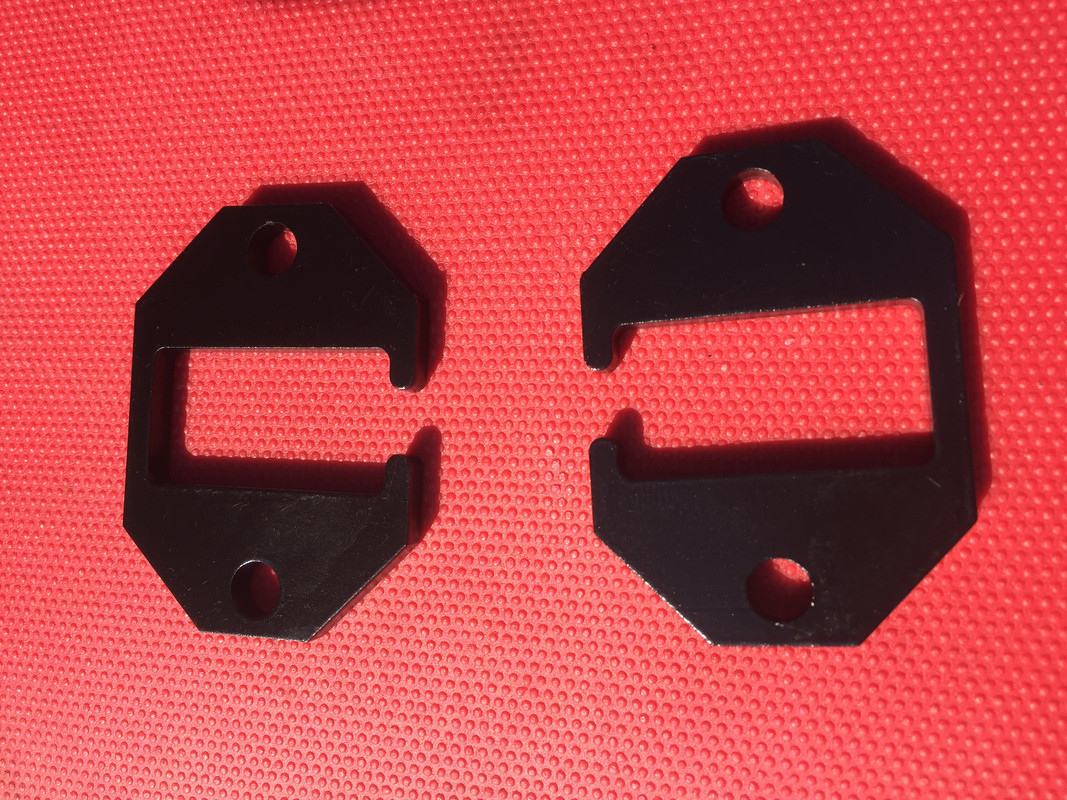
I fitted a hinge packer behind the check strap, this limits the door opening slightly stopping it from catching. You can of course make your own packers but I have seen some where the door opening is so limited that you have to squeeze in.
I have had some laser cut and powder coated for my new build, easy to fit, remove the pin that holds the check strap onto the car and then remove the 2 bolts holding the check strap on. Slide the packer in and bolt back up. A thin x-head screwdriver helps to align the holes. Simple and it works.
I have had a few of the packers made, if anyone wants a pair they are £14 inc UK P+P
I don't like the exposed boot hinges and Chris hates making the interior hinge bracket assembly, so I have come up with an alternative. Just hopes he remembers this when he prices up my wide body Z3gato bonneteep:
Lip and return made to take original Z3 boot hinge, it will have the struts attached but still mocking up.
Opens nicely without catching.
Fist fit, still needs fettling for the gaps but a job for another day as I'm losing the light.
Genius even if I must say so myself. I will also be cutting the rear panel as before to enlarge the boot area so that a full size spare wheel can be carried in
case of a puncture.
Nice one, good not to have the bar across the top of the boot. How robust is the fixing, and do you get lateral movement on the lid when closing. You don't want to be mashing the paint job there as well. ��
Yeah I did the same thing on my build, the gas springs do a good job of keeping the lid open in any position. Only drawback is that any rain water will run down into the boot...
Good point on the rain water, not that we get much here!
When the gas struts are fitted the boot won't open so far but a tray fitted under the rear lip could be fitted with a couple of drain holes.
Any pictures/info on your build?


 eep:
eep:

