MadaboutKitcars

This is a read-only archive of the old Madabout Kitcars forum. New posts and replies are no longer possible, but every thread is still here to browse and read.

New Cordite Build, with a twist....

21 Dec 2013, 5:38pm
Mac - Another nice job. :cool:

What are you using for the steering column switches?

I don't think it looks like my Spitfire one, but I can't really remember. :rolleyes:

Good luck & Merry Christmas, Paul. :)
21 Dec 2013, 7:29pm
Paul, indicators, dip / main beam / flash and the really long one on the left is for the overdrive but I may swivel the casing round to put that on the other side
Mac
22 Dec 2013, 9:28am
Paul L wrote:
Mac - Another nice job. :cool:

What are you using for the steering column switches?

I don't think it looks like my Spitfire one, but I can't really remember. :rolleyes:

Good luck & Merry Christmas, Paul. :)


Sorry Paul, on re reading i think i have misunderstood the question, all the switchgear is early spitfire, All new or NOS including the housings either side of the column. The look nice and period and are very simple switches.

Michiel, thanks.
22 Dec 2013, 1:42pm
Mac - That makes sense, as I have a two piece plastic cover for my column switches.
22 Dec 2013, 2:50pm
I do have some spare switches if you need them as i replaced all mine to avoid electrical gremlins.
28 Dec 2013, 12:54pm
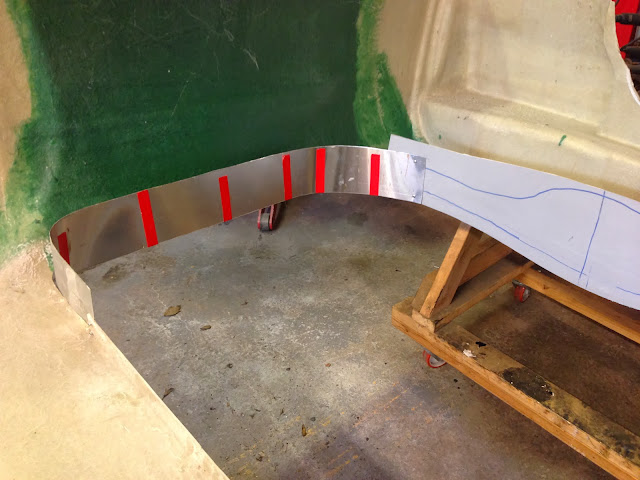
Well got a few hours in the workshop today, not really time to do much but thought I would sort out remaking the return flange on the cockpit after my widening exercise.
First I cut some strips of Ali sheet long enough and wide enough to cover the area that needs remaking


Next I applied 4 coats of release wax, I use this stuff as its served me well over the years


That's it for now, going to fix them in place now, back in a bit with more pics hopefully

TTFN

Mac
28 Dec 2013, 1:49pm
Well got the strips riveted in and the body upside down on trestles so its all ready to go when Sean next door does some laminating and has some leftovers.


A small gap in a few places but im sure a few drops of gel will seal them up,


By adjusting the tension on the Ali I have managed to get a nice flowing curve in both the front and back so hopefully any reworking afterwards should be minimal.

Well folks im off home to pack as we fly out on Tuesday so unless I get very very lucky and get up again on Monday (Doubtful) this will be my last update until early February, although I may post a couple of holiday pics just to gloat a bit......

TTFN

Mac
28 Dec 2013, 6:15pm
Have lovely holiday. Happy new year.
30 Dec 2013, 5:03pm
Mac - I'll add that release wax to my shopping list when I get to the fibre glassing stage.

Thanks also for showing how you repair the cut out section, as this is all new to me.

Enjoy your holiday, Paul. :)
30 Dec 2013, 9:04pm
Paul, no probs, unfortunately i wont have any pics of the layup process as Sean will do it for me whilst im away, basically its just a case of laying gel coat then fibreglass, once it goes off then peel the Ali away, sometimes a bit of heat on the back of the Ali makes life easier as it melts the wax a little but you then have to be rigerous in cleaning any way left on the fibreglass before painting etc.

Hope everyone has a good new year, ill be thinking of you as we jet off into the njight to warmer climes!

TTFN

Mac
8 Feb 2014, 7:05pm
Well I'm back, happy in one way as I get to get my hands covered in someone other than sand or tanning lotion...ie car grime! And royally ticked off that the bloody weather in this country is so god awful.
So today we decided to try and get thie steering sorted and on the whole were successfull.


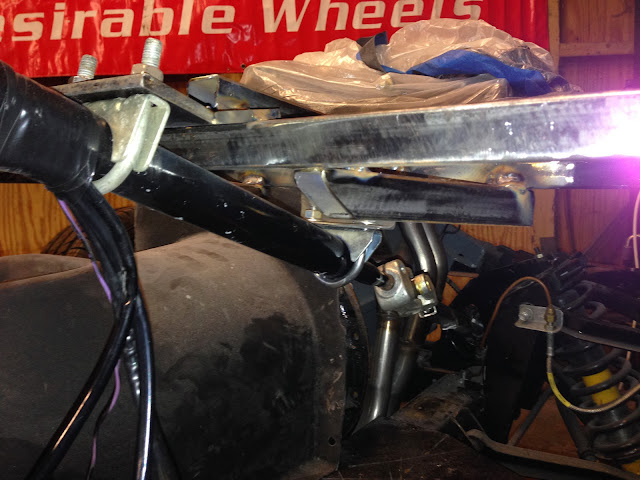
Basically another cross tube parallel with the front frame tube a brace front to rear on the top and two front to rear at an angle on the bottom. We bent a piece of 5mm plate buy cutting halve way through so we could bend it then welded the cut closed when the angle was correct.
Viewed from the front of the car, drivers side


Viewed from underneat


All painted up


The final angle from end of the column to the rack


Also replaced the fuel hose between the tank and the pump as the piece that was on there was too short really.

I have a bit of time before I'm fully back to work so hopefully will be making more progress next week. Going to try to get the last bits of the steering sorted, need to replace the box section currently joining the 2 splined ends with some bar stock and get a rose joint mount machined up to support it. Also hoping to get my fibreglass seat slit and widened, filled and painted ready to take a mould off it.
I was hoping that Sean next door would have done the cockpit returns for my whilst I was away but a key snafu put paid to that so will hopefully do that myself this week as well with the aim being to get the body mounted next weekend .

TTFN

Mac
9 Feb 2014, 4:32pm
Welcome back Mac.

Look forward to seeing your progress.

Good luck, Paul. :)
12 Feb 2014, 1:12pm
Cheers Paul, its nice to be back in the workshop but bloody horrible for the workshop not to be in Sri Lanka!

Bit of a flying visit to the workshop today decided to get the seats sorted. I bought this mini bucket seat shell off Ebay for not a lot, the arse portion is fine but the back is just to narrow for any normal shaped person..... so I marked out where I thought it needed cutting and set to with a grinder.


I have stretched the width of the back approx. 4 inches which will hopefully be plenty. I fixed its position using some 1mm ply but before screwing it in place covered it with packing tape so the fibreglass doesn't stick to it. I have just laid up some fibreglass that hopefully will go off in the next hour so may be updating this after I have some lunch with more pics

TTFN

Mac
12 Feb 2014, 2:58pm
Got the seat glassed up but will have to leave it till Saturday as its so bloody cold its taking forever to kick.


I haven't fully glassed it as I want to try it first just in case I need to slit it and stretch it a bit more.
Till Saturday
TTFN

Mac
15 Feb 2014, 6:22pm
Well today started out badly but ended ok. On arrival at the workshop there was no power to any of the sockets and e breaker wouldn't reset. I tried unplugging everything fom the sockets but still no joy, unfortunately we share our main ring with the unit next door and he wasn't in so we were unable to check if he had anything still plugged in...drat!

A bit of a lurk around though revealed that that part of our ring dissapeared into a derelict building next door to serve a single socket, as soon as I started loosening the face plate to have a look water started pouring out...bingo! Anyway we pulled the cable back through the wall and chopped it back and put another double socket on our side of the wall that we had lying around so a double win! Electrics fixed and another double socket in the workshop, you can't have too many sockets in the workshop!

Anyway that wasted pretty much half of the day but we did make some progress. Decided where to mount the fuse box and relay holder of the loom I bought from Langys Rod Shop,

If you can't picture it it's suspended upside down underneath the dash on the passenger side.


Ran the cable down the outside of the frame from front to rear using rivet on cable saddles every 6 inches or so.
[IMG]Jhttps://lh5.googleusercontent.com/-TFQoXB4rboc/Uv-quFwNs_I/AAAAAAAAF-k/8oAeIF8gBF4/s640/2014_%2525202_15_17_57.jpg[/IMG]

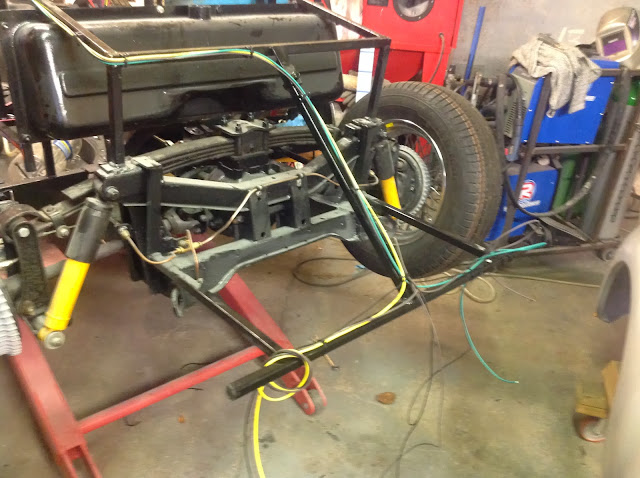


The cabling is cable tied in temporarily at the moment as I need to add a fuel pump feed to the rear and didn't have any cable heavy enough but it will not take long. The loom is very long so once in place I cut off the approx 4 foot of excess at the back leaving at least a foot longer than I think I will need. The front is even longer! I reckon it would stretch at least 4 foot beyond the headlamps if I wanted it too.

We also got the pedal box finally mounted in place, little bit of compromise required, it's about 3/4" further back than I would have liked but the external master cylinders were too close the the tyre for my liking, will still have to fit rack limiters to take about 1" out of the turning radius of the front wheels but I don't see that as a major issue.


We also finished running the fuel line front to rear and installed earths for the rear lights and actually terminated the wiring at the fuel gauge sensor.

No updates until next weekend unfortunately as I have a work project starting on Monday but will be back at it next Saturday.

On a slightly sad note I have decided that once finished she will be up for sale. Whilst away on holiday we purchased our retirement home, wasn't expecting to do it until next year but the right property came up at the right price. We want to replace the roof and needs must so I have agreed with SWMBO that my toy count will be decreased to pay for it and her sacrifice is that she will not be keeping the Navigator :-(
Related to this is the decision on whether or not to proceed with making and fitting doors, I want this to be finished to a high standard and if I was keeping it would definately fit doors but now it's more of a commercial decision I am not totally convinced that adding doors will add enough additional value considering the time and effort involved, anyone care to comment? What do you guys think?

So in short if anyone wants a fully built navigator let me know, it's not in paint yet so could be painted any colour you want! I will be romping ahead to try and get it finished in the next 2 or 3 months so it should be ready for the summer

TTFN

Mac
15 Feb 2014, 6:45pm
Shame you have to sell Mac :(

imho don't bother with doors, they won't add value and don't make it any easier to get in or out.

Good luck getting it finished.
15 Feb 2014, 7:42pm
Hello Mac,

Sorry to hear you have to let the car go. It's becomming so beautiful. It is going to get a happy buyer, that is for sure.

You ask if doors are worth the trouble. Difficult to say. They add a tremendous value. The car looks better, more professional and getting in and out is much easier. On the other hand, it's a really substantial job. You have to forget concealed hinges. Incredible amount of labour. Hinges on the outside are much easier and have allmost the same result. You have to strengthen the inside of the door panel in some way. If the plan is to take a large piece of plywood (or something else) and bond it in as a whole, then the doors will ask for lots of changes to that approach and add a lot of building time. But if you are planning another construction that could accept doors more easily, then the doors could be a good choice.
Are you selling the car in paint (then it is your call all the way) or are you selling without paint. In that case the new owner can make his own decission.

Regards,

Michiel
15 Feb 2014, 8:02pm
Mr T thanks for your thoughts, have too say this my thinking at the moment.

Michiel, I already have a plan for the doors that involves using the existing shell with aluminium shuts and a bonded in steel frame for the locks and hinges. It's not that it's a majorly difficult job, most jobs are easy if broken down into small manageable parts. The problem is the time involved and just the extra cost of fabricating the door shuts in Ali which I'm happy to have a go at but suspect will end up needing help from my tame fabricator mate who although may well do mates rates wont be free, it's really a cost benefit exercise.

I will get the body to the final primer stage then probably advertise with a paint job to the buyers liking included.

TTFN

Mac
15 Feb 2014, 9:30pm
Do you have an asking price?
15 Feb 2014, 10:28pm
Mac - First of all, congratulations on buying your retirement home. :cool:

I think the "no doors" option falls under the KISS approach, so it makes a lot of sense.

Having said that, even though I had abandoned my own doors, I was looking forward to seeing how you were going to do it.

Good luck either way, Paul. :)

PS
Wiring is looking good.
16 Feb 2014, 5:56pm
No roof, don't need doors. Unless your a svelt 8 stoner... i don't think there is an elegant way of getting in?
16 Feb 2014, 6:56pm
garyh wrote:
No roof, don't need doors. Unless your a svelt 8 stoner... i don't think there is an elegant way of getting in?


You just step in over the side and slide your legs under the steering wheel, it takes seconds and looks cool.

These cars are so low that if you have doors you'll just end up crawling out onto the pavement on your hands and knees in amongst the fag packets and dog turds. Much better to do the Le Mans thing and preserve your dignity.
16 Feb 2014, 7:58pm
My experience with kit car doors is based on my efforts on the G-46 :eusa_wall: :eusa_wall:
Enough said and never again :hurt:
17 Feb 2014, 12:18pm
The only doors I'd be thinking of whilst driving one of our cars is the front door to a Real Ale Pub ;-)

I agree, they make entry and egress more difficult and lessens the strength of the side where you would naturally want to support yourself getting in and out.