MadaboutKitcars

This is a read-only archive of the old Madabout Kitcars forum. New posts and replies are no longer possible, but every thread is still here to browse and read.

Another Cordite Is Born ...

21 Jun 2017, 6:13am
Roadster – Cheers Mark. :cool:

I’ve certainly tried to get the best finish possible given both the limited time available and my ‘facilities’.

I know the paint will be far from perfect, but I will be genuinely happy with a ‘half decent’ finish. :pray:

Once the paint is polished and the racing numbers added, there will be definitely be a trip to Norfolk and a movie sequel. :D

- - - - - - - - - - - - - - - - - - - - - - - - - - - - - - -

Possible Painting Breakthrough:
I was searching Google yesterday trying to find out how long to leave the BRG to harden before sanding/cutting/etc.

Note: I’d still be happy to hear some suggestions from anyone on here who knows the answer to that.

Anyway, a link to an old (2012) thread from Rods ‘n’ Sods about using synthetic paint popped up and I found this…

… also forgot to say, if a coat dries to the point its not tacky do not add another coat as it has now 'skinned'. if you apply more as it dries it shrinks and will crack the 'skin' on the previous coat giving a snakeskin look! ask me how i know


At which point, a light bulb went on.

It was definitely over 80 degrees in the Circus Tent when I was painting the boot lid yesterday.

I forgot to mention that I did try the ‘two brush’ canal boat painting trick for the first time and it was hopeless. :icon_sad:

I’d actually got the paint on pretty nicely using the first brush, as there were few visible brush marks. :cool:

But by the time I pulled the ‘dry’ brush through, it simply ruined the surface finish. :doh:

Which, in turn, lead me to adding more paint over the top.
( Something I’ve done to numerous areas previously whenever I spotted a thin patch. )

So I now believe that ‘operator error’ is the most likely cause for the paint reacting, rather than anything else.

I will certainly be very conscious of this when I start painting the painting the body shell and see if it makes a difference. :pray:

- - - - - - - - - - - - - - - - - - - - - - - - - - - - - - -

Neighbours
I also keep forgetting to mention some of the conversations I’ve been having with people passing by as I prep. the car.

Without doubt, the most common theme from any of my ‘regulars’ is along the lines of “What went wrong?”

As anyone who has seen me driving the car on the road can’t believe it is now on blocks looking a mess. :rolleyes:

One lady with a pram stopped for a chat yesterday and seemed unusually interested in what I was doing.

But when she said “My son still talks about the day he went for a drive in your car” the penny dropped.

As I’ve only really seen her son with his granny, not with his parents, but it did make me smile. :D

- - - - - - - - - - - - - - - - - - - - - - - - - - - - - - -

Anyway, I hope to be back later with another car update, cheers, Paul. :)
21 Jun 2017, 7:30am
I think leaving plenty of time between coats to dry is definitely the right approach ..this weather is a little against you , I feel as the paint will start to dry out as you apply it , but not dry enough to add to ..so it will drag a bit , if you aren't careful ...

I personally , wouldn't get too worked up about out getting 100% coverage with primer , either ...its annoying when it breaks through to the surface underneath , but a couple of little breakthroughs aren't going to matter too much ....you could spend forever chasing the primer and , seeing as how you are putting a brush applied top coat on , its not that crucial ...in my opinion ..

I think taking the weather into account , I would go for the several coats approach ...put a thinnish first coat on , not getting too stressed about it being patchy ...then cut the lawn or clean the driveway or something , come back to it after a good time of drying , put another coat on ..leave that to dry ....then another ...etc..etc... less chance of reaction , less chance of getting crazy runs that will need dealing with ...its a longer procedure , but its the way I would do it ... you could even lightly flat back between coats to take some of the elbow grease out of final polish ...... I know its frustrating , but you are sooo close now to having that 5 year itch scratched ...shame to rush the last stages ...
21 Jun 2017, 11:55am
Hi Paul, great progress, heat is good for the drying process but not the painting! A friends dad always painted his cars and motor scooters with Tecaloid coach paint and would allow the night dew to settle on his dry paintwork several times before cutting back and polishing. Be patient and I am sure you will be happy with the result.
21 Jun 2017, 2:36pm
Gary - Thanks for the detailed reply. :cool:

Unfortunately, I was already outside the house at the time you posted, so I only saw it after I'd painted the body shell. :rolleyes:

However, I did take a lot of comfort from the fact that you confirm it is probably madness to be even attempting to paint in this heat.

It is not so much that I am rushing the finishing stages, more that I have simply spent too long on this project already and I am out of time.

Especially as my daughters have now said they don't like the amount of time I spend on the car rather than with them. :icon_sad:

Although to put that into context, they are teenagers who also don't like what I wear, the music I listen to, the TV shows I watch, etc. etc. :icon_wink:

But all jokes aside, they have their A Levels and GCSEs next year and I want to spend more time supporting them.

- - - - - - - - - - - - - - - - - - - - - - - - - - - - - - -

Froggyman Cheers. :cool:

With the car parked on the driveway, I need to put the covers back before I go to bed this evening.
( Just so no one passing by gets tempted to do anything stupid. )

Thankfully, the paint will have had almost 12 hours in this heat by then, so it should be OK.

- - - - - - - - - - - - - - - - - - - - - - - - - - - - - - -

P-Day - Part 1

[Game of Thrones] Rain Is Coming [/House of Stark]

So despite today being predicted as the hottest day in June for 40 years, the thunder and lightening arrives tomorrow.

Which meant I had no time to lose and simply just had to make the best of it, there was no escape, it was Paint-Day. :eek:

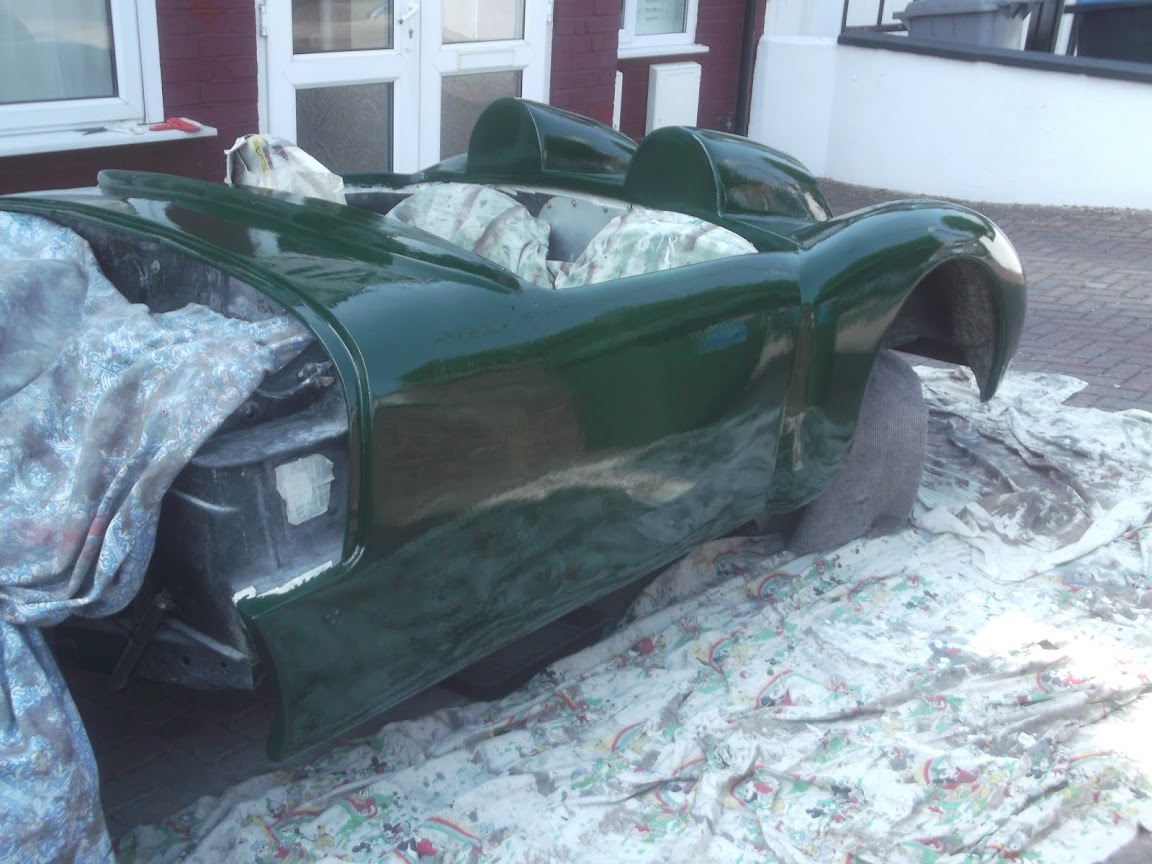
By 8.30am, I had sanded some high spots, brushed the dust off, used a tack cloth and some panel wipe.

Which left the body shell looking like this.


At this time of the morning, the sun hits the front of the driveway as it is still rising.


So I had to start in the rear corner on the driver's side and work my way out.

Just for added fun and games, across the road, my neighbour was having the finishing touches put on his new driveway.


Which equated to the noise of an angle grinder cutting up slabs and the risk of dust blowing over my fresh paint.

Still, no one said it would be easy!

I filtered the paint into a separate container, which was easier to carry around.


End of Part 1…
21 Jun 2017, 2:36pm
P-Day - Part 2
Without a doubt, this was my best application of the BRG to date. :cool:
( No big scaling effects, just the odd wrinkle here and there. )

As I tried very hard to avoid going back over any thin areas, or going back to runs after they formed.

There was always going to be an issue keeping a 'wet' edge due to both the heat and the size/shape of the body shell.

So to say I was very happy with this first coat would be a massive understatement. :D


I then had a few errands to run before I could head out to the Circus Tent and start sanding the bonnet.


Following Gary's earlier advice, I didn't lose any sleep over the odd 'bald' patch that appeared.

I then switched to a small, one inch, brush in an attempt to limit the amount of paint I was applying.

But by now, I was working in some serious heat and by the time I'd finished, I had to open the sides of the tent to avoid passing out. :eek:

So I wasn't actually too disappointed when a rash of "scales" appeared at various point all over the bonnet.


And even though it is hard to get a decent photo, the bracket for the rear view mirror screen is now BRG too.


Apart from packing things away for the night, that is all for today.

I'm meeting one of my mates later on for a pint and I think I have earned it.

So I will leave you with this shot of the body shell baking in the sunshine. :cool:


Take care, Paul. :)
21 Jun 2017, 3:15pm
50s BRG Racer Recreation

Hi Paul

That looks brilliant to me, and I'm sure that any minor imperfections can be polished out once it's hardened completely. Compared to the 'finish' I achieved with a brush on my Marlin Roadster, it's concours d'elegance!

Regards, Mick
21 Jun 2017, 3:55pm
good job paul
21 Jun 2017, 4:15pm
nice one Paul and that's just the first coat wow
21 Jun 2017, 5:09pm
Looking really good Paul
Today must have boosted your confidence on the final finish.
21 Jun 2017, 5:15pm
Nice work Paul, it's surprising what a difference a coat of paint can make.
21 Jun 2017, 5:24pm
Looking very good! Keep at her..
22 Jun 2017, 6:00am
Mick, Phil, Deggsy, Roadster, Mr T & Molleur – Thank you gentlemen. :cool:

The last photo I posted certainly makes the finish look much better that it actually is.

As, to quote an American forum I use, it really is more of a 50/50 finish.
( i.e. It looks good at either 50 feet or 50 mph. :icon_wink: )

However, the photo gives me hope that I will be flat/cut/polish the paint into a nice finish eventually. :pray:

I was pretty impressed with the way the original etch primer hid the construction scars and tied the car together.

But it does seem that the BRG represents a significant jump towards the finish line for my project. :cool:

With thunder and lightning due here shortly, I’ll see what I can do later on when that had passed.

Cheers, Paul. :)
22 Jun 2017, 7:10am
Paul,
Looking very good :) 50/50 is all we need in the end
Dave
22 Jun 2017, 9:15am
Well done Paul, the car is already looking like a proper job.
22 Jun 2017, 2:39pm
Looking Good :rockon:
22 Jun 2017, 4:40pm
Dave P - With a big of luck I will be able to achieve a sub 10/10 by the time I'm finished. :pray:

Barber & Micky1Mo - Cheers chaps. :cool:

- - - - - - - - - - - - - - - - - - - - - - - - - - - - - - -

Slow Progress
In the end, the rain never came, but it has been threatening on and off all day.

So I stuck to working in the tent where I tackled the paint problems on the bonnet.

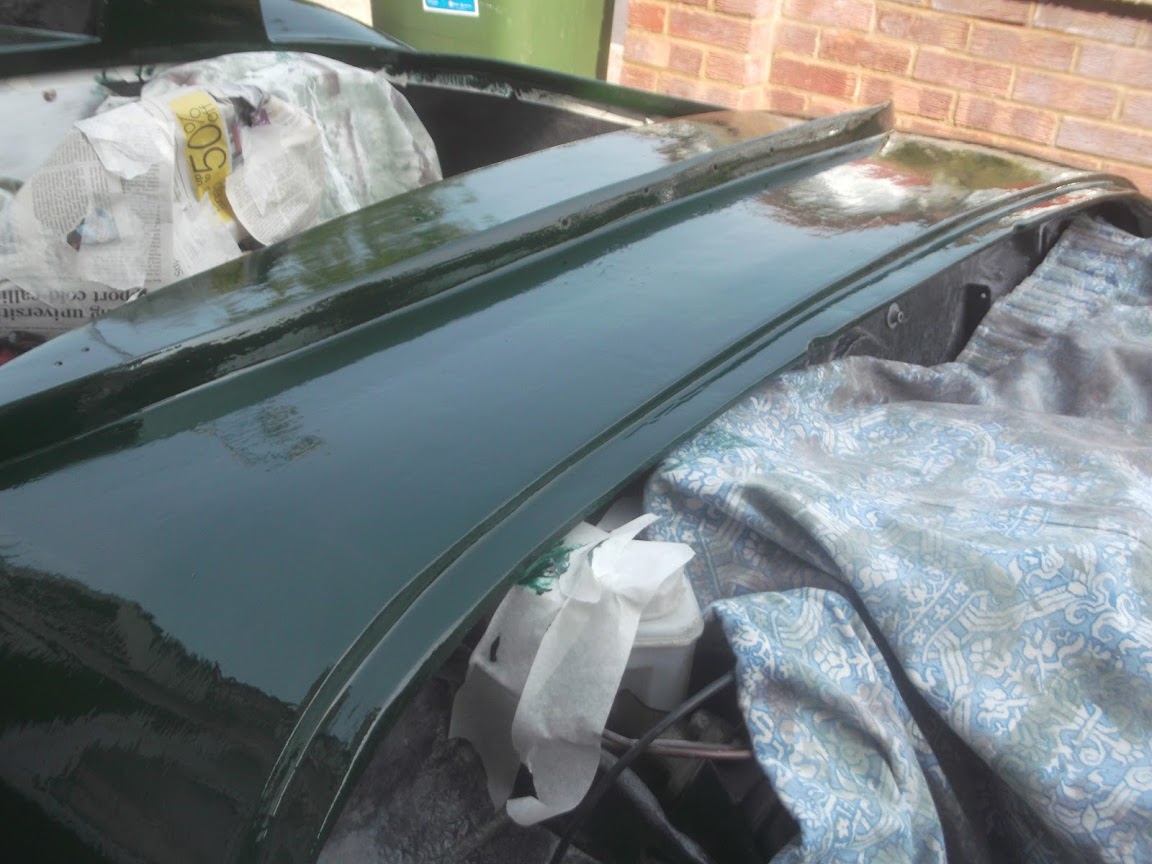
These ranged from bigger cracks like these.


To collections of very small wrinkles.


In the end, I flatted back the whole bonnet and the boot lid, although reflections in the photos confuse the issue a bit.


Now if this was an episode of Sin City Motors, I would be saying what great patina the 'hood' had and simply be clear coating it! :icon_wink:


But I will save the 'survivor' option as a last resort if I can't a half decent shiny paint job.

Thankfully, the massive drop in temperature between yesterday and today really helped the paint go on. :cool:


Unfortunately, a few blemishes did appear, but just a tiny fraction compared to yesterday.

Hopefully, I will be able to fix any issues with the body shell tomorrow.

So, until then, take care, Paul. :)
22 Jun 2017, 7:49pm
THE WEATHER WAS DEFINITELY ON YOUR SIDE TODAY ...Glad to see you are flatting back between coats ...and don't forget , when it comes to minor blemishes ....that's what period decals were invented for !!
22 Jun 2017, 9:25pm
Better and better each round!
23 Jun 2017, 5:43am
Gary – At the rate I’m playing ‘Whack-a-mole’ with minor blemishes, I’m going to need a lot of stickers! :icon_wink:


- - - - - - - - - - - - - - - - - - - - - - - - - - - - - - -

Molleur – Even though it is frustrating to be fixing these paint problems, I know most of the car is slowly getting there. :cool:

- - - - - - - - - - - - - - - - - - - - - - - - - - - - - - -

Deadlines My Ar$e:
Well, as Mr T pointed out, today marks 5 years since the kit arrived on the back of a lorry.

So, even though the day is still young, I can safely predict that I will not be back on the road by midnight. :rolleyes:

Although I am starting to feel slightly under pressure now as we have a tree surgeon booked for 8th July.
( Which means the Circus Tent can’t be sitting in the middle of the garden when the chainsaws arrive. :eek: )

Therefore, at the very least, I need to bonnet to be reattached to car by the 7th of July.

Which would actually mark two months and one day from when I first started sanding/filling/sanding.

I guess a lot will depend on what I find when I take the covers off the body shell later. :pray:

Cheers, Paul. :)
23 Jun 2017, 5:16pm
Struggling…
When I put the covers on the body shell late on Wednesday night the paint felt very solid to the touch.

But I guess because it remained pretty hot overnight the foam pads I added to my wooden tonneau cover left a mark.


An inspection of the body shell revealed a few areas where I didn't put enough paint on.


Thankfully, there was not a single area with any major paint cracking.

Unfortunately, there were lots of areas with small scale ripples.


Now the idea behind using this truck coat paint was great in theory…

Apply a single thick coat and then flat/cut/polish into a great shine.

I could see this in action on one of the aero humps, where some gentle rubbing with 400 grit gave me this.


Not in strict time order, but when this area was wiped down it was as smooth as it looked. :cool:


However, in practise the rest of the car is very lumpy and looks like this after some hard sanding down. :rolleyes:


It does get better if you throw more effort at it.


Apart from the areas which go straight through to the undercoat. :icon_sad:

So by the time I'd wiped the whole car down it was looking very old indeed.


By the end of the sanding session I'd also managed to wear away a small section of my little finger.
( Obviously rubbing paint dust into the open wound was bound to help the healing process. :rolleyes: )


End of Part 1…
23 Jun 2017, 5:19pm
Friday - Part 2:
As soon as I started painting the body shell, the sun suddenly appeared and the temperature rose. :rolleyes:


So whilst this may look good from a distance, another rash of ripples has already appeared in the fresh paint. :rant:

Then it was back to the tent, where I decided to go back a step on a few areas that had reacted badly again.

So the bonnet and the boot lid were given a mixed of high build primer and patches of BRG.


Getting trapped in this Groundhog Day of 'repair and repaint' is pretty soul destroying really.

The only crumb of comfort I had was the reflection from the bonnet bulge. :cool:


This shows that it is certainly possible to get a shiny finish.

However, I am now having serious doubts about what level of finish I can achieve for the car as a whole.

But I'll worry about that another day, take care, Paul. :)
23 Jun 2017, 6:13pm
Paul, what are you cleaning your brushes in, wondering if that might be causing the reaction. Some of the rippling is reminiscent of laying on the paint a bit too thick, but I'm certainly no expert in this field.

John
24 Jun 2017, 6:38am
JG - Hi John,

I've used different brushes for each paint layer and both cleaned them in thinners and used brand new ones.
( To check if the cleaning process was the problem. )

I think is probably a combination of the outside temperature and its impact on paint thickness .

As yesterday the driveway was hotter than the tent and the problems are on the body shell.

Whereas, the other day the tent was hotter than the drive and the problems were on the bonnet.

So I will try one last time to fix and repaint the body shell in the shade / low heat.

Or I will adopting a 'survivor' look to get me back on the road. :rolleyes:

Cheers, Paul. :)
24 Jun 2017, 5:33pm
Last Chance Saloon:
I spent the morning taking my eldest daughter to her first university open day.
( Well, technically, she went around with my wife as, obviously, I am too embarrassing to be seen with. :rolleyes: )

However, jokes aside, this does signal the beginning of the end for the time I have available to finishing painting the car.

So the car is going back on the road one way, or the other, in the next couple of weeks.

If the paint is a mess then I will just have to live with it until I get another chance to fix it, which may be late 2018! :eek:

The good news is that there wasn't a single wrinkle on the bonnet. :cool:

So that got a second coat of high build primer in an attempt to even up the paint thickness.

It also got some more patches of BRG, again to build up some of the areas that had major cracking.


Note: You can also see where I added an extra layer of BRG along the rear edge of the bonnet.
( As I figured that is going to be a high wear area. )

There was just one small wrinkle on the boot lid, where I know I went back and added some extra paint. :doh:

So that also got a mixture of primer and BRG.


I started off in one corner of the body shell...


As it really looked and felt like it was going to rain any minute.


Eventually, I had sanded down all the wrinkles and a few other rough spots as well.


However, I am going to wait for the morning before attempting to add the next layer of BRG.
( When it will be both cooler and leave me longer with the covers off for the paint to dry. )

I then put some dust sheets under the tonneau "feet" to stop the foam sticking to the paint.


All I need now is a bit of luck with the weather / paint so that I can end tomorrow with everything painted and no wrinkles to be seen. :pray:

Until then, take care, Paul. :)
24 Jun 2017, 9:08pm
Hopefully tomorrow is a dry , cooler day ..today in Dorset would have been perfect conditions for painting outside ...

I think you are making good ground ...I actually like the rubbed through , grey spots look ...but I know thats not the plan ..but if weather and time beats you this time around , its still a good looking car to cruise around in with the battle scars ...you will get no less a positive reaction ..I guarantee it ...