This is a read-only archive of the old Madabout Kitcars forum. New posts and replies are no longer possible, but every thread is still here to browse and read.
BTW. does anybody know why there is a attachment from the frame to the chassis missing in the middle? Is this deliberate, for some reason unknown to me, or just a case of not being bothered to weld it on?
Thanks Paul. Yeah, the frame was not really up to standard when it arrived, so I guess any improvement to it is beneficial. I think I'll just add the missing attachment points.
Here are some photos to show progress I made lately. I could work on and off on the car, so not loads done but I'm another step closer.
First, after delaying it for a long time, I decided to make dollies to be able to move the car easier within the garage, mainly to be able to approach both sides of the car due to the lack of space.
Great little things, I wish I made them earlier
I also bought a bead roller to make flanges on joining panels. The panels are attached/rivetted to each other, so they will be flush fitted. Those panels that will be removable are bolted together.
For those I have used aluminium rivnuts and bolts.
I might add some beads onto the panels, but I'm not sure about that yet.
Using cleco pins makes it possible to finish the job on the bench.
I will install these panels permanently after I've bonded the body onto the subframe, so I have better access to bond and fibreglass the body to the frame where needed.
I will also install the back compartment after bonding the body and I have already fabricated those panels too.
I have also used thermal/silencing aluminium matting on the bulkhead, prop shaft and the gearbox cover. This also serves as a separation between steel and aluminium.
Last but not least!
I will soon start work on re-routing the exhaust. I decided to go for Cherry Bomb - can't wait to hear the sound of it!
Thanks, I'm slowly chipping away at it. It's going slow but I'm another step further.
It seems that I'm the only Miglia builder posting the updates regularly (not very often but regularly)...it would be nice to see more people posting their updates, if anybody else is building a Miglia that is.
Thanks Deni, life has gotten in the way a bit, but more reason i dont post here is it is so complecated to post pictures. I am working on body and doors at present, (doors dont fit, so ive had to do some drastic cuts, and have not reskinned the doors yet) and once i glue the body on i will finish the doors. I have new seats to go in, but wont put them in until i have finished with fibreglass and sanding.
The windscreen is more of a joke than the doors regarding fit, so i will get some of those glass ones on hinges. Then seatbelts and its done.
My engineer has done several inspections and will come back when it is finished. Not when I think its finished but an engineers version of finished!
I've even fillled, sanded and painted teh rear of the car with rattlecans to motivate me, and i will do that to the whole car prior to inspection and rego, then get proper paint when its on the road.
been at this since 2013 so will be good to get it done.
Nice to hear you're close to the finish line. Sorry to hear you're having problems with fitting the doors and the windscreen - I'm not at that stage yet, but I already know I'll have an issue with the bonnet and door fit, but I'll cross that bridge later...
I'm nearly done with all fabrication, so to finally have a moon buggy, I will also need the help of a car mechanic with starting the car, testing that my brake line installation was good and the wiring.
After that I will put the body on and that would be a milestone for me!
By the way, I like the rattle can painting approach, I might do the same when the time comes
Can I ask please, what bonding paste you have used to bond the body to the subframe?
Hi mate, good to hear youre at that stage. I have the original starter motor and its fine when warm and primed, but it disengages whenever the engine half catches, so pretty irritating to try start sometimes, Thinking of getting a modern one but trying to only spend needed money. these cars are mechanically very simple. get a service kit with points etc and you should be good unless theres some surprises like stuck pistons, or diz problems (mine had been reasembled wrong, and did not have its bob weights fitted)
I asked my engineer about body attachment, as i have heard you chaps talk about "bonding paste" whatever that is. His suggestion was selleys "sika-bond foamfix +" which is an expanding adhesive that he said would be good, and would absorb shock, and would expand to pretty much all the metal frame (straight) to fibreglass (curved). Rather than put paste or glue on and drop the body over, I have measured and chocked and measured and re-measured (and have one more remeasure to do now i see that the left tail ligghts look a smidge lower than the right) and have bolted the body on prior to using the foam glue.
For the bolts, i have drilled through the body in 2 points a side by the bonnet, 2 or 3 across the dash, 3 places in the door sills, three places in the back just behind the seats, two at the rear near the tank, and 2 on each side, with stainless m5 countersunk hex bolts, and tapped into the metal bodysubframe.
these bolt threads I covered in moly grease so the glue wont grab them, so i can then glue it up without the stress of sitting the body on wrong. the countersunk heads look ok too, but they may get removed and filled - not sure.
Thank you for the info mate, it's very helpful. I was also planning to use a few screws or bolts here and there as a positional reference points but I wasn't sure, so thanks for mentioning it.
Expanding foam sounds interesting - didn't think of it as an option. I will have to research a bit more about it, but the fact that it will expand and fill all the gaps seems really effective.
Yeah, I can't wait to reach this stage and I will try my best to reach it as soon as possible.
Good luck with your build and keep us posted mate, it would be nice to hear about your build progress.
Cheers, D.
P.S. If you would be interested or want to post some photos, there is explanation on how to do it now in my blog, since the things changed on this website. I had a problem with posting the photos too, so Paul L kindly posted the explanation and since then I'm able to post the pics again. It's on page 13 by the way.
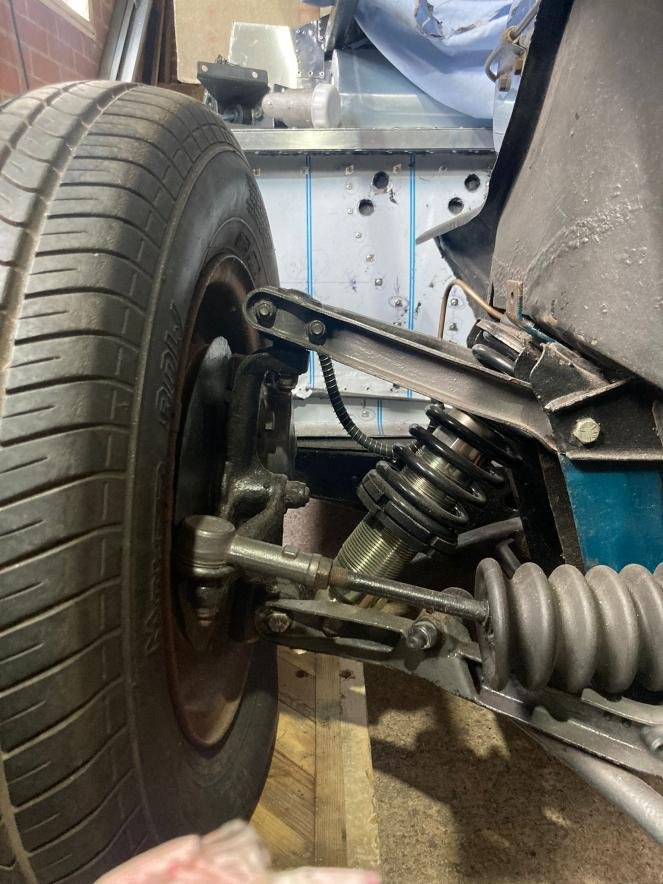
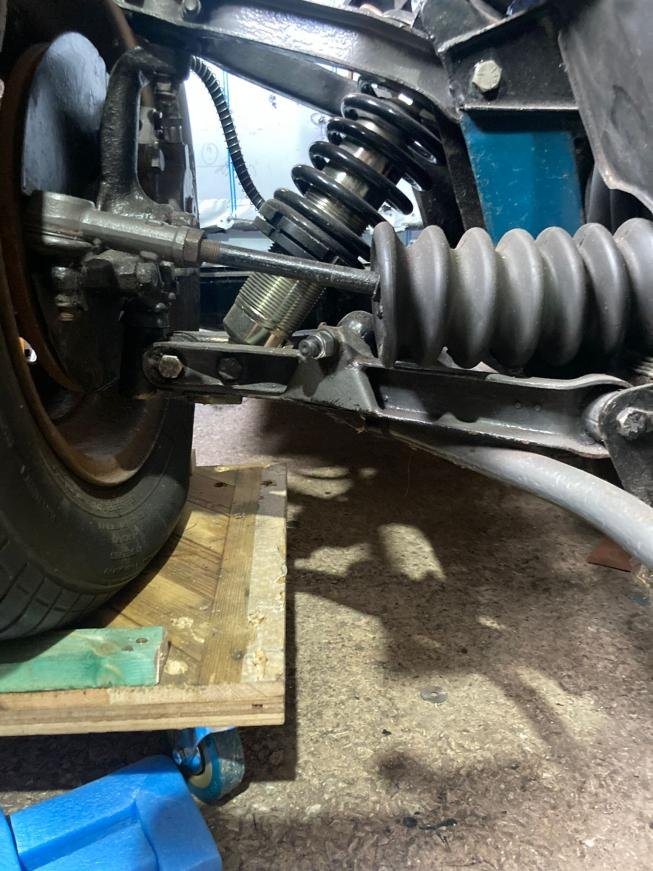
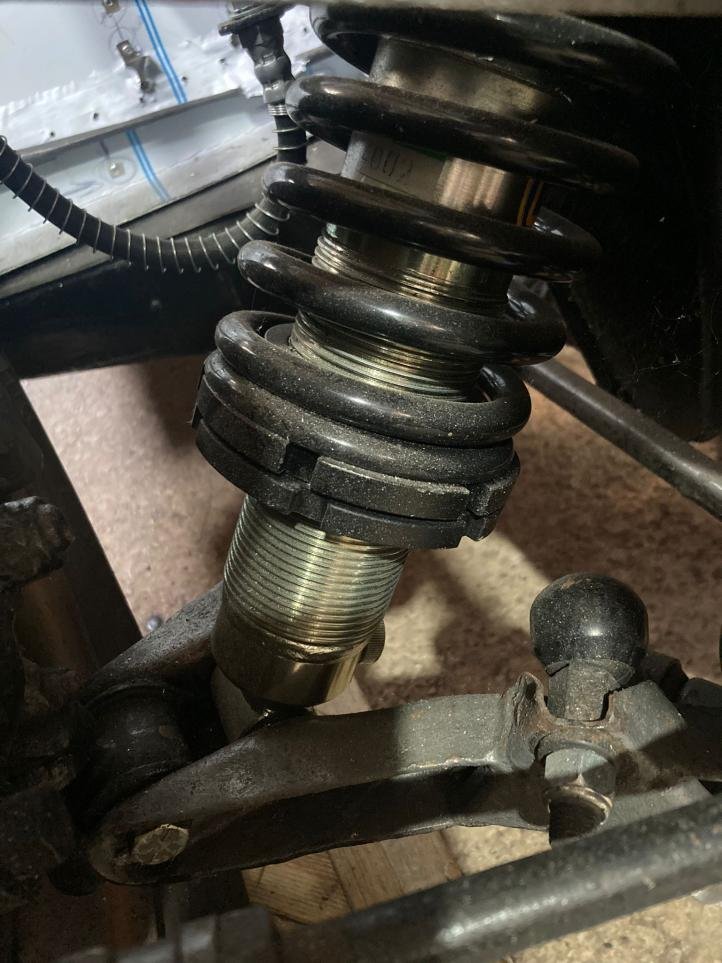
Just wanted to check, I have recently fitted GAZ adjustable shock absorbers with shorter springs. I have expected the wishbones and the steering rack to change their angle, but I am not sure if this much change is ok (please see photos).
Any comments will be appreciated.
Cheers, D
P.S. Sorry, but I don't have clue why the images have rotated and I don't have a clue how to fix this either.