MadaboutKitcars

This is a read-only archive of the old Madabout Kitcars forum. New posts and replies are no longer possible, but every thread is still here to browse and read.

A Triumph Swordfish 1500 - On The Road

11 Feb 2019, 8:11am
Sunday Sewing:
There was a bit of drizzle as I nipped out to check the gear lever gaiter, so I had to be quick.


The good news is the top of the gaiter will slip over the gear knob as required.

The bad news is that the shape/design of neck below the top join could have been better.

Still, this check allowed me to add a second 'slot' for another zip tie around the neck.


Then I could join the two sides together below this opening.


To give me gaiter MkII.


By now, the rain had stopped, so I started the engine while I did the next round of test fitting.


Slowly, but surely, I was finally getting there.


But I realised the alloy plate needed to be opened up a bit.


But the real beard scratching came as I tried to work out how to join the bottom of the gaiter to this base.

As the cone shaped leather did not want to pull neatly into a square shape at the bottom.
( I'm sure there is a square peg and round hole joke in here somewhere. :rolleyes: )

In the end, I went back to how I used to make witches' hats for my daughters.

As these would start out as a cone on top, with flaps, that was then joined to the separate brim.


So I needed a leather 'brim' for the bottom of my gaiter.


End of Part 1…
11 Feb 2019, 8:13am
Sunday - Part 2:
Which would fix to the bottom of the alloy plate like so.


Then the cut 'tabs' could be pushed through and join the main cone on the sunny side.


Then I went around each tab and punched sewing holes between each tab and the corresponding line in the cone.


So far, so good.

Unfortunately, shortly after this, it all went horribly wrong. :icon_sad:

Even though I pinned the tabs to the cone on the outside, I was planning to join them on the inside.

Therefore, I removed all the pins, separated the two pieces and set about sewing them together.

At which point I realised I had not left any alignment marks to put the two pieces back in the same position. :doh:

After three failed attempts to line up the holes by loosely sewing them together I had to admit defeat. :icon_sad:

So after wasting a LOT of time, I decided I would have to join the tabs on the outside and trim them back with finished.

It then took ages to sew everything together making sure that I kept an even join all the way around.

By the time I was finished, it was getting late and I was pretty tired, but rather than stop I carried on.

Which inevitably lead to Mistake No.2...

I cut the tabs short with no problems, so I thought I would cut them shorter still…

At which point I accidentally cut through some of the stitches, which then started to unravel. :frusty:

By now I was raging at my own incompetence and set about fixing my mistakes.

This involved punching more sewing holes, pulling the cut stitches out and knotting them off and restitching sections.

I also cut tabs out of the bottom of the cone and joined them to the flat base too.

Given the mess I made of the tabs, I will add one final extra row of stitching for safety.

But for now, this is where I've got to.


Until next time, take care, Paul. :)
12 Feb 2019, 8:00pm
Slow Progress:
Finished the extra layer of stitching joining the two pieces of leather for the gear lever gaitor.
( Note: The big stitches on the outside were just to hold the flaps in place. )


Cut out the inner layer of alloy that will sandwich the leather into place.


Used my original cardboard template to roughly lay out where the rivets would go.


Removed the fixing bracket that currently holds the rubber gear lever gaiter in place.


So I could use that to drill holes in both alloy panels.


I then double checked that the holes aligned across both layers in the car.
( This was 'after', just to show the two layers. )


I then fine tuned the holes and started scuffing up the alloy with sandpaper.
( Done on the right, to be done on the left. )


I then trimmed the edges of the 'brim' after comparing the two layers.


End of Part 1…
12 Feb 2019, 8:02pm
Part 2:
I then used my four clamps to keep all four fixing holes aligned.


Before working my way around one rivet at a time.


With each hole drilled needing to be filed down and then sanded before the rivet went it.
( Hence the whole scuffed alloy look, as there was a lot of filing marks. )

Eventually, I had 12 rivets in place.


Note: I may need to grind back the rivet that is currently overhanging. :doh:

Note also that my original design was for just two rivets a side, but I decided to add an extra one at the last minute.

Unfortunately, this resulted in me making a bit of a mess of the spacing on the driver's side. :rolleyes:


Normally, I would have started on the passenger side, so that any mistakes wouldn't be seen from my seat. :icon_wink:

But there is no way I am spending any more time on this.

All that remains to do now, is a final test fit and a hammering of the outside edge of the top alloy layer.

However, that will have to wait until I have some daylight to play with.

So until then, take care, Paul. :)
13 Feb 2019, 10:06pm
Frustrating times...
I did a very quick test fit of the gear lever gaiter base.


Before grinding off the edge of this rivet.
( Old white towel protecting the leather from sparks. )


The string was replaced by a couple of cable ties.


Unfortunately, the inside of one fell out when I tried to use it. :rolleyes:


So it was a long trip from the front driveway to the bottom of the garden to get another one.

Apologies, but by now the sun was setting and as the light faded, the photos got worse.

The next problem was that the second zip tie was too high to properly grip the wider part of the lever.
( So would slip off above it. )


This left me with two ties around the thinnest part of the lever and a big hole.


So I went back inside and returned with a needle and thread.


Which has now closed the big gap and would be simple enough to remove if required.


After bolting the alloy base into place and hammering the edges, I was left with this.


Overall, I am a little frustrated with the final design, as I made a few mistakes along the way.

It is certainly better than no gaiter, but I think there may well be a MkIII version arriving in the Summer. :rolleyes:

But adding alloy panels to the cockpit wall will be a higher priority than re-doing this job.

Plus I still need to make another leather gaiter, with alloy base, for the hand brake lever.


End of Part 1…
13 Feb 2019, 10:06pm
Part 2:
Thankfully, I had better luck with the passenger headrest. :cool:


The reflections in the photo make it look like there is a 'step' in the face of the foam, but there isn't.


I was left with just one slight winkle in the bottom edge that wouldn't go away.


I used less tacks this time, which makes the rear side look a bit better.


So now I have both headrests ready to go.


I just had time to double check that all the fir trees lined up with the markings on the aero humps.

Thankfully they all did.


While I was looking at where the headrests were going to go, it dawned on me that there was something else to align with.

As, rather than keep looking at the body shell angles, I could use the top of the seat that the headrest is meant to match. :doh:


By now, the light was gone and I needed the flash, but the head rest position I settled on does align with the seat. :cool:

So when I get the chance I will drill the holes and fix the headrests into position.

But until then, take care, Paul. :)
15 Feb 2019, 6:34am
Sunshine helps…
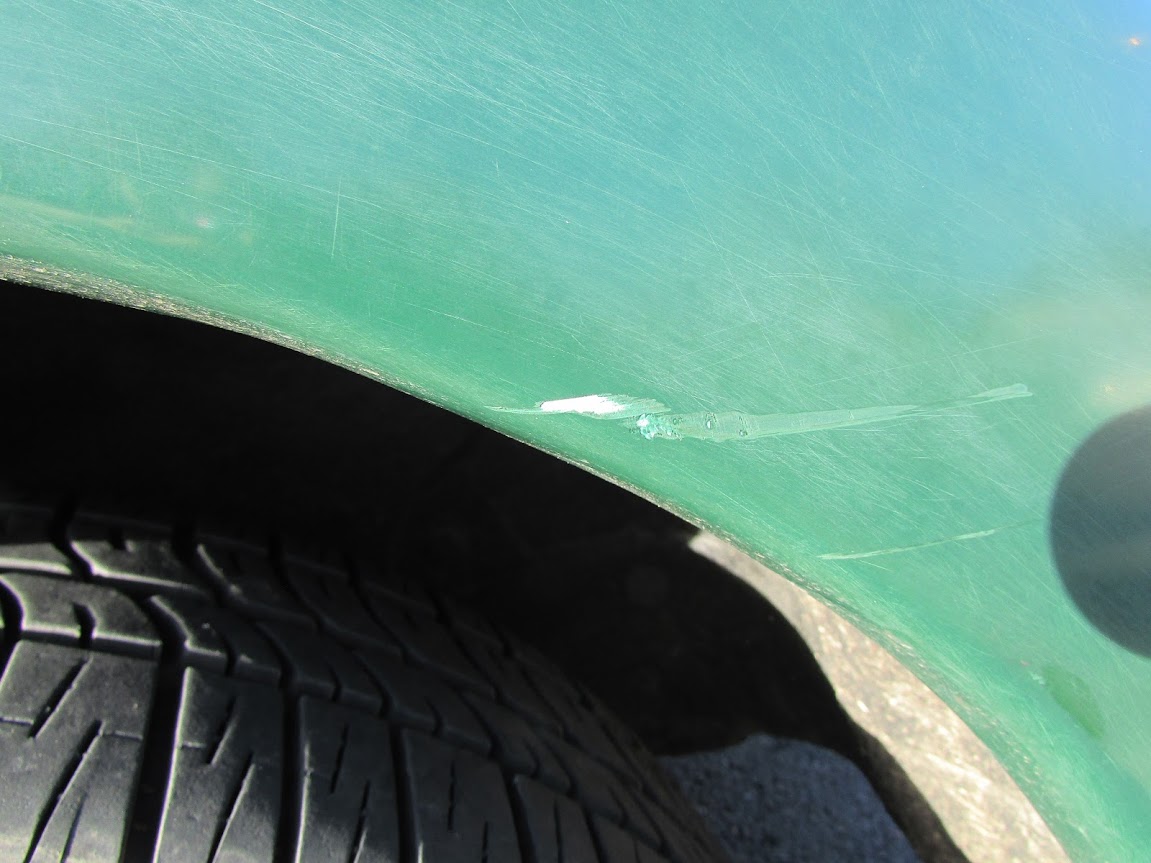
Before I get on to yesterday's jobs, I found two scrapes on the rear passenger wheel arch. :icon_sad:


I have no idea when this happened, but I can only assume it was while I had left the car in a car park somewhere.

Anyway, I took some better photos of the gear lever gaiter.


I think I'll reserve final judgement on this until after I have added alloy panels to the cockpit walls.

In order to reduce the mess from drilling the holes in the aero humps I covered the seats and used a hoover for the 'swarf'.


No problems with the holes, or fitting the headrests.


The problems came with the optical illusion that putting a straight edge near a curve causes. :rolleyes:

If you are looking completely square on, the bottom edge looks pretty horizontal.


But as soon as you move to one side, the green of the body shell makes the headrest look really tilted.
( There is a slight tilt going on, but nothing like as big as it looks. )


The further back you stand, the worse the angles appear to get.
( Note: I'd moved the car to a flat surface for the photo, as my sloping drive doesn't help. )


The difficulty I had pulling the leather tight in one corner of the passenger headrest isn't helping either.

Deep down, I know this is an issue I was always going to struggle to resolve, as the alternative was an 'odd' shaped headrest.

Which, in turn, would still have highlighted the different heights of the body shell lip along the rear cockpit wall.
( Plus, the bottom edge would have been too low and fouled against my shoulders/neck. )

Therefore, I really have to ignore the urge to obsess about this and just accept it for what it is.

Which leads me back to the reference to sunshine in the title of this post…

As yesterday, was the first chance I had to go for a decent drive since the engine was fixed.

Thankfully, there is something about driving a car like this when the sun is shining that is really special.

The sunshine also seemed to lift the mood of both other drivers and pedestrians too.
( As I got a lot of positive comments, waves, thumbs up, hooting of horns, etc. )

Which just confirms that whilst I see every detailed fault, most people only see the overall picture. :cool:


Until next time, take care, Paul. :)

PS
At some point I really must clean the car, as there is a layer of white 'crud' everywhere. :rolleyes:
15 Feb 2019, 1:33pm
Looks good Paul. Most will never notice small details, but simply the overall appearance of the car.
No worries! Well done.
16 Feb 2019, 8:15am
Well done Paul. The "Do as much as possible yourself" approach is very satisfying, as well as frustrating. I can see why some cars have round head pads though. I have been learning welding, and so far have been lucky enough that my work so far has little visibility. "Robust but ugly" would sum it up. But I am getting better, and moving along the curve, so have just bought a used MIG welder off fleabay so I can improve on thinner material. I have just found a further use for the leather I bought for the failed moccasin project - I have bought some of those super strong mini magnets, and together with an old steel ruler, will make a wall mounted kitchen knife rack that does not risk dropping super sharp knives on you - no stitching, no welding required, haha.
16 Feb 2019, 8:40am
Molleur - Thanks Jack. :cool:

Sometimes it is hard to see the wood from the trees, see post below.

- - - - - - - - - - - - - - - - - - - - - - - - - - - - - - -

It's all relative…
Earlier I posted this photo of my scuttle under construction on CJ's Build thread.


And previously, I've posted this photo of McLaren's workshop.


Which is a simple reminder that I am not a professional car builder and don't have professional facilities.

Therefore I should not be surprised/upset/frustrated when my DIY efforts fall below professional standards. :rolleyes:

I was also watching something about the 1966 Ford vs Ferrari LeMans race recently.

While the final race prep area for the beautiful Ferrari P3s was not quite up to McLaren standards…


These cars were still build by professionals.

Although they were still happy to simply tape up the headlights. :icon_wink:


Which leads me to this little video clip I also watched the other day.

The whole home built / steam punk look of the car is what makes it special for me. :cool:

https://www.youtube.com/watch?v=W9QMa7AUD-4

Although I am not convinced that the metal point at the rear would be considered a safety feature! :eek:

Anyway, that is a long winded way of saying that my whole Hillbilly Frankenstein build was always going to be rough and ready.

So I will still have a go at making the following:
- Side mirror plinths
- Handbrake gaiter
- Cockpit wall alloy panels

With the hope that the overall impression will be that of an old race car still on the road, despite its hard life.

Cheers, Paul. :)
16 Feb 2019, 8:43am
Barber - Sorry I missed your reply while I was typing the above, but thanks. :cool:

By chance I had covered the satisfying/frustrating angle you mentioned.

Also, I think 'robust but ugly' covers a lot of my work too. :icon_wink:

But, jokes aside, it is amazing what you can learn to do if you give it a go.

My welding was certainly better at the end of the build compared to the start.

But that scuttle photo really reminded me just how much my fibreglass skills improved with practise.

So good luck with your own build, I know I can't wait to see what it will look like.

Cheers, Paul. :)
16 Feb 2019, 11:55am
Surely the point of car building is to do as much as you can yourself.
I loved the 4 wheel, Morgan, totally bonkers with no back brakes! Whats the chance of an IVA? Obviously too old to need an MOT.
17 Feb 2019, 7:45am
Dpaz - Whilst I've tried to do as much as I can, there is certainly more than one way to skin a cat.

And I've got no problem with people approaching things in a very different way to me.

E.g. I could afford a professional paint job, however I really wanted to paint the car myself.

This DIY approach left me with two things:
- An amateur paint finish. :rolleyes:
- Money available for professional engine work instead. :cool:

So if someone does their own engine, but gets someone else to paint the car, it is all the same really.

- - - - - - - - - - - - - - - - - - - - - - - - - - - - - - -

Saturday Start…
I've decided to take a break from leather & sewing and switch to metal & welding.

Which means it is time to make my first side mirror plinth, so the cover was peeled back.


And the passenger side mirror was removed.


I knocked up a quick cardboard template to work out the angles of the two mounting plates.


Once again, the sloping driveway was causing a few problems, so I will need to get the car on flat ground to finalised this.

In the meantime, I started on the bottom mounting plate, marking it up like so.
( Yes, one of the lines is wonky. )


The extra space to the right of the base gasket will provide space for one of the supporting tubes to be welded.

Once this was cut out and the holes were drilled, I tidied up the edges and test fitted it.


The first issue is the curve of the body shell vs. the flat of the plate.


So it was back to my hi-tech metal working area just outside the Summerhouse. :icon_wink:


After hammering one edge, I use the thin edge of the wood for the other edge.


I then worked over any small odd bends using my mate's panel hammer and my own lump hammer acting as an anvil.


Which gave me this curve, as seen from the inside.


Or along the edge.


End of Part 1…
17 Feb 2019, 7:48am
Saturday - Part 2:
The fit at the rear edge needed to be flatter in the middle.


But the front edge was a long way off.


This was because at this point, the body shell curves both top to bottom AND front to back.

So I decided it would make sense to relocate my metal working equipment.


To the side of the car.


But, before I did the final round of hammering, I rounded off the corners of the base plate.


Then I could hammer, test and repeat until I had a good fit on all four edges. :cool:


Note: I will be using a thin layer of rubber under the plate when it is finally fitted.

Too many other things to do today to progress any further with this, but it is nice to have started.

Until next time, take care, Paul. :)

PS
When searching for the LeMans photos I posted the other day, this popped up.


An artist's impression of what a DB5 drift car would look like if crossed with a WWII Spitfire. :cool:

Details here: http://gtspirit.com/2015/10/11/classic-aston-martin-db5-becomes-devilish-drifter/
18 Feb 2019, 7:48am
Sunday
Around 11am I was able to get out for a decent drive, just over 2 hours and 66 miles, which also took me past 3,000 miles. :cool:

Despite the sun in the sky, a lot of the roads were still damp in places, so I exercised some caution.

Engine was running nicely and confirmed I prefer 3rd gear twisty sections to overdrive motorway ones.
( Especially as it was particularly blustery during my short blast down the M1. )

Didn't stop for photos until I reached Sainsbury's on the way home.

So no decent photos, but I didn't manage to get one with a shopping trolley in the background. :rolleyes:


Despite the fact I haven't got around to cleaning the car, it still got a good reaction out and about.

Also, there were quite a few cars with their roofs down, making the most of the sun, although it wasn't particularly warm.

- - - - - - - - - - - - - - - - - - - - - - - - - - - - - - -

It was late afternoon before I got a chance to make a little more progress on the side mirror plinth.

I use the plastic mirror base to mark up some sheet steel.


Then turned it around to give me a guide to extending the 'short' edge.


To give me something like this.


I also marked up the base plate for the driver's side while I was at it.


After some cutting and grinding I had these pieces.


The mirror would then attach to the top plate like so.


This gives a neat join at one end, or it will when I've finished grinding it to shape.


But there will be an overlap at the other end, with the edge protected by the mirror itself.


This overlap is where the supporting tube will be welded into position.


End of Part 1…
18 Feb 2019, 7:50am
Sunday - Part 2:
Then it was time to take the dust sheet off my welder and get some practise in.

So I just cleaned up two of the small scrap pieces left over after cutting out the top plate.

I was very happy to see my first three welds in a very long time all achieved good penetration on the underside. :cool:


I then tried to weld some tube that is wider than I need to the next piece of strap.

Thankfully, this was a great reminder that I need to remember I am not an expert welder.

As where there wasn't enough steel metal to play with around the base of the tube I simply burned through.

Plus I'd forgotten that welding outdoors required a wind break on blustery days to stop the gas being blown away.

So not my finest work. :rolleyes:


But please see previous 'robust, but ugly' comment, as this mess still survived the 'hit it with a hammer' test.

So I will try to get some more welding practise in when I get the chance, as that was it for the day.

Until next time, take care, Paul. :)
19 Feb 2019, 5:48pm
Tinkering Tuesday
I couldn't think of a way to set up, and then fix, the distance between the two side mirror plinth plates.

As they need to be set up on the car, but taken back to the Summerhouse for welding.

After a lot of beard scratching I used some sections of builders band like so.
( Previously used to hold fibreglass sections together. )


The four bands were then bolted to the car like so.


I packed some essentials for on route adjustments...


Before setting off for a short drive around the block to see what I could see.

After a couple of tweaks to the mirror position I was able to a pretty decent view. :cool:


Note:
This photo was taken from a driver's eye POV and you can see the wall behind where I parked in the mirror.

Unfortunately, with the sun setting in the background I had to use the flash, but I hope you can see there is a slight inward angle.


As a rough guide, the mirror is now raised approximately 6cm.


Obviously, all these wonky brackets will be removed once I've welded the first two cross bracing tubes into place.


But that is a job for another day.

- - - - - - - - - - - - - - - - - - - - - - - - - - - - - - -

My current car cover is now completely shot and leaking all over the place. :icon_sad:


So a new one has replaced it today.


Quite by chance, my wooden tonneau cover just sneaks in under the headrests.


Once I've finished the side mirror plinths, I will sort out getting a proper tonneau cover made.

Until next time, take care, Paul. :)
20 Feb 2019, 5:54pm
Windy Wednesday
Unfortunately, today's title was supposed to be 'Welding Wednesday', but the wind caused havoc. :icon_sad:

It all started well enough, as I removed the mirror and bolted the builder's band to the two plates.


I then used strips of cardboard to give me the rough angles for the support pillars.


Before cutting sections of steel tube to match.


I then spend ages with my angle grinder fine tuning the fit.

After all the surfaces were cleaned up it was time to start welding, but that was when the gusts of wind arrived.

Which left me with some rubbish welds in places. :icon_evil:


But rather than sitting around feeling sorry for myself, I decided to press on.

So the final pillar was cut, shaped, cleaned and welded into place.
(Sorry for the blurred photo as the sun had set by now. )


I then removed the builders band and was left with this.


The only good news is the bottom middle weld shows the machine setting were correct when there was no wind.

Actually, the other bit of good news is that this whole structure is rock solid. :cool:

And this will only get better when I clean it all up again and finish the welding.
( As the builder's band was in the way and I couldn't reach all the edges. )

I might I have mentioned this once or twice before, but this really is a top tip…

Never, ever think it is a good idea to build a car outside!

:icon_wink:

With a bit of luck, by the time this is all finished and painted it will look like a pit lane modification.

Until next time, take care, Paul. :)
21 Feb 2019, 12:32pm
Bonus Thursday
I had the morning to myself today, so got a bit more done.

I put my solar powered welding helmet on the garden path where the sun could reach it.

But I should have spotted the omen when a cloud covered the sun when I went to take the photo. :rolleyes:


I cleaned up the mirror plinth and started the second round of welding.

First weld was perfect and I may have said to myself, at least there is no wind today.

At which point a gust slammed the open Summerhouse door into my head, just as I started the second weld. :frusty:

So once again it was a bit of pot luck on the weld quality.

The good news is that there are enough good welds to hold the whole thing together strongly.

And after a bit of a clean up I was left with this.


This view shows that the middle pillar is set at a different angle to the other two.
( Which do not align completely, due to the tilt in the top plate. )


I then covered the clothes line with an old towel to protect it from the etch primer.


First coat on.


I know the welding looks rough, but I think that helps create that pit lane modification look.

Alternatively, I might just put a quick skim of filler around the top and bottom of the pillars for a smooth look. :rolleyes:

But I'll worry about that another day, cheers, Paul. :)
21 Feb 2019, 6:14pm
PS
After taking the plinth off the line, I've just added a bit of filler to smooth out the messy welding.

Photos tomorrow.
21 Feb 2019, 7:26pm
Not wanting to teach Granny to suck eggs but if you only have odd bits to weld, use flux cored wire. With the right size nozzle, it works well in my gas/Mig welder outside. For a lot of welding, it works well but it is more expensive than Mig with a big bottle.
22 Feb 2019, 6:56pm
Dpaz - Don't worry, all tips welcome here thanks. :cool:

It certainly hadn't dawned on me about the benefits of 'no gas' when welding outside.

- - - - - - - - - - - - - - - - - - - - - - - - - - - - - - -

Friday Morning

[Dick Van Dyke]
Cor blimey Mary Poppins, it's a real pea souper.
[/Dick Van Dyke]


The Wembley arch is in there somewhere.

A trip to the Summerhouse revealed the mess I had made with the filler. :rolleyes:


After a lot of sanding down I had this.


Which included this softened end sections on the top plate.


As soon as the etch primer went on I realised the filler wasn't quite as smooth as I thought in places.


- - - - - - - - - - - - - - - - - - - - - - - - - - - - - - -

Friday Afternoon

Managed to rack up another 60+ mile trip, but spent far too long stuck in traffic.

I also ended up on some muddy single track roads at one point, making the car even dirtier than usual.

Still, I tried to grab a few photos as the sun was setting.


Until next time, take care, Paul. :)
22 Feb 2019, 7:00pm
Headrests look good too!
22 Feb 2019, 8:42pm
With what you're doing with weld and filler that finish is normal. Rub it down and dust it with primer, do it again till its right. Then it will be really good. I would leave it like it is until it drove me mad, then I would do it right, usually, sometimes! Onwards and upwards!
24 Feb 2019, 7:28am
Molleur - Cheers. :cool:

The funny thing is, now the head rests are fitted I have switched from construction mode to driving mode.

And when driving the car, I've already forgotten the optical illusion issues and don't even notice it.

- - - - - - - - - - - - - - - - - - - - - - - - - - - - - - -

Dpaz - See below, but I've already picked the "leave it as it is" option. :icon_wink:

- - - - - - - - - - - - - - - - - - - - - - - - - - - - - - -

Saturday
Made a start painting the mirror plinth black. :cool:


Then my wife and I headed off for an Italian meal to celebrate a friend's birthday.

Excuse the poor mobile phone camera photo, but I was facing a model of Lucky's 250 Testarossa.


Cheers, Paul. :)