MadaboutKitcars

This is a read-only archive of the old Madabout Kitcars forum. New posts and replies are no longer possible, but every thread is still here to browse and read.

Build progress

20 Jul 2007, 6:27pm
I did a lot of sitting in it playing with the steering wheel :D

Main thing is its not overly noticeable from the outside :)
22 Jul 2007, 7:57pm
Front bumper installation - just like the back the front does not fit so we made some spacers.


Spacer installed, with the spacer in the bumpers fit very snugly!


Headlights, spotlights and indicators mounted. The driver side is wired up.


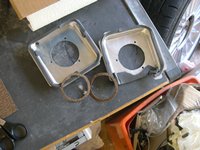
Done a load of small things as well like zip tying cables in the engine bay, extra paint in the battery box to protect it, hole cut for brake fluid level sensor, lots of polishing on the headlights, spot lights and indicators.
23 Jul 2007, 10:33pm
bumpers

Hi Patrick,you build is looking superb. I noticed you put spacers for the bumpers;mine are a little wobbly when put in also,what did you use as a spacer?Cheers.
24 Jul 2007, 7:02am
They are 1mm ali - used a bodywork hammer to shape them round the bumper, it is painted beth sides but if they corrode it's not the end of the world as they'll stay in there pretty tight!

Closer to the back is a smaller spacer and then right at the front a bigger one. The mounting bolt hole is drilled a tapped right through the spacer :)
24 Jul 2007, 1:39pm
Spacer are positioned as seen below...
26 Jul 2007, 8:57pm
Patrick wrote:
Front bumper installation - just like the back the front does not fit so we made some spacers.


Spacer installed, with the spacer in the bumpers fit very snugly!

[.


Patrick/Rich,
good idea with the ali spacers. My chassis tubes have weld seems inside which makes alignment more difficult. Marlin suggest you use masking tape and silicon sealant - very messy!

Getting to the fixing bolts at the rear with the body tub on is really difficult. I'm thinking of drilling some holes in the bodywork for a socket extension bar? Any other ideas?

Peter
26 Jul 2007, 9:34pm
I know what you mean they are PITA to get to at the back. What we did was weld a bolt to the top of chassis rail then you just need to stick a bolt in the bottom and do it up. Still not easy to get to with muffler in the way. A ratchet spanner with a bendy end is a useful tool to do those up.

We used insulating tape on the rear which was not overly successful so the plan is to do those with ali as well.
29 Jul 2007, 6:55pm
All the lights are now working! Blew the 7.5amp fuses though. The current on the high beams + spots peaks at 11amps (possible spikes higher) so 15amp fuses are going in for those. We'll see how it behaves with those.


A smallish job we've been putting off for a long time. The 6 branch manifold gets quite close to the brake master cylinder and pipes so we've put in a shield to try and reduce the amount of heat around it. Keep brake fluid cooler can only be a good thing!


--------------------------

Big thanks to Mike at Car Audio Direct.com for sending this pack of Damplifer out so quickly so we could do this over the weekend! Sound deadening such as Damplifier or Dynamat is used in the car audio industry to reduce rattly panels. On the plus side this stuff will dampen vibrations through the floor as well as heat shield it.


3 sheets plus half a sheet of Dynamat we had left over from a bulk pack covers both floors, the lower half of the firewall and part of the side of the transmission tunnel. Which should be enough to protect our feet from heat.


Also added extra bolts to the seat runner brackets that go through the brackets, floor and chassis.


More dashboard work - installed the switches around the steering wheel - yes those holes on the right are in the wrong place! - oops :) Luckily the whole dash will be covered so its not and issue.


Bottom to top: Main light switch (from the E30), fog light, interior light, speedo LCD switch button.


The main light switch is the one from the donor E30. You can spin the button to change the brightness of the dash lighting.


Installation is made easy by using part of the E30 dashboard screwed to the back of the Sportster dash.


Glove box attached to the dash, had to chop a load off the scuttle so it would fit in nicely.


Finally the beginning of an initial template for the boot floor.

30 Jul 2007, 8:48pm
Did a bit of measuring today on the seats. Using a block 116mm x 56mm high measuring in a straight line up to the harness holes (very roughly) seems higher than the 450mm required for the SVA test.

Based on the instructions that came with the harnesses installation should run from the back to the seats then down the sides without interruption so it will not need the bar between the turrets - the harnesses are already high enough to comply with the SVA regs.

Will do a more detailed measurement at some other point but I'm happy that it will be fine for SVA :)
4 Aug 2007, 10:25pm
It was a busy day today, we installed the glove box lock and then proceeded to start covering the dash!


Its not very late so better pictures to come tomorrow once a few more things are cleaned up!
5 Aug 2007, 5:54am
That looks fantastic Patrick. Well done.
5 Aug 2007, 4:29pm
Thanks :) lots of credit goes to Richard as well :)

I was doing a bit of a count up of stuff left to do:

The nose cone needs holes making inside it, brakes need bleeding, under dash wiring needs cleaning up, speedo needs to be adjusted, the carpets need cutting to size and fitting, a boot floor needs to be made, various bright work attaching, find a way of make the exhaust pipes pass SVA (sharp edge), seat belts fitting, boot lid (interior) making, the whole car checking for sharp edges and made SVA safe, tracking, hand brake adjustment, emissions testing, need to test how loud it is see if it will pass SVA, rear lights need brackets to hold then in + wiring.

And probably more I've not thought of!
5 Aug 2007, 4:56pm
As promised here are some better pictures of the dashboard taken in the light:


And some better pictures of the heater speed control:


And the back of the dashboard - by redoing the sponge part we were able to scretch the vinyl over the back and glue to the dash. This means there will be no bumps or gaps between the scuttle and the dash / trim.


Finally some body work, cutting out the holes on the nose cone , these are quite big but the bigger the holes the more cold air can flow in to cool the engine.:


and on the next page:


Holes are now rounded out and the grille placed behind - grille still needs to be cut down and mounted.


All it needs is the spotlights remounting, grill mouting and the front end will be complete.
5 Aug 2007, 9:42pm
Patrick one little tip dont mount the grill in place permanently until you have had the front panel sprayed its a right pain to mask it off properly.
5 Aug 2007, 9:44pm
Thanks Stuart - what did you use to mount yours? I was thinking maybe chassis sealer :)
5 Aug 2007, 9:46pm
Mine is fixed into place with fibreglass but a good sealer would probably do the job
5 Aug 2007, 9:58pm
Cool dashboard, well done.

:thumb:
6 Aug 2007, 7:54am
Stuart wrote:
Mine is fixed into place with fibreglass but a good sealer would probably do the job


So sealer, but not too much till its painted :)

peterux wrote:
Cool dashboard, well done.

:thumb:


Thanks Peter was a long day on Saturday getting it there. Richard ended up doing the sponge round the out side as I'd had enough of the vinyl!
9 Aug 2007, 7:07pm
Tip for mounting the grill in the nose cone.

Put blobs of boby filler or alraldite in strategic places on the inside of the nose cone.

Hold the grill in place using some temporary means - should not be touching the blobs of filler.

Cover some self tapping screws of a suitable size in grease or something non stick.

"Screw" self tappers thru grill into blobs of filler before it sets.

When the filler has set you should still be able to remove the screws and hence remove the grill.

TTFN

Robin
10 Aug 2007, 1:14pm
Thanks Robin :)

Cleaning up and finishing the internal wiring, a much bigger and time consuming task that you would think!


and on the next gallery page:

Dash wiring, bit of custom wiring on speedo and rev counter - the light bulbs are wiring for always on, so we've take of the tags that wiring internally and attached wires directly to the bulb holder. Now those dim along with the rest of the dash when the light switch is twisted.


Dash installed


Glove box now housing the fuse box which is lockable.


Mirrors - these are chrome bullet mirror which will be replaced with cheapo Halfords ones for the test - these won't pass SVA.


Shot over the bonnet at the mirrors

10 Aug 2007, 9:05pm
I have a new rule for kitcar building.
Small jobs always take about 10 times longer than you plan!

Good progress Patrick and Rich, looks like you'll be off to see the SVA man soon?:D
17 Aug 2007, 10:57am
Yeah, I started looking at the paper work this week - I hate forms :lalala: :)

After creating a template for bracket for holding the rear lights 4 more were made as the final products:


Each pod needed to be individually tuned to fit the shape of the fibreglass to ensure that the LED ring was held in tightly and that the inner lighter protrude the correct amount.


Brackets and lights installed on a wing and the wiring sorted.


And installed on the car:


And we have light! The final layout is: rings for brakes, red for rear light, and clear for indicators.


Also added this snazzy button holder under the dash:

19 Aug 2007, 1:08pm
The front of the car is now completely together:


Max checks out the car:


And although it's not really complete and the weathers not great today, couldn't resist taking some photos with the front all put together:

19 Aug 2007, 5:41pm
A set of brackets to attached the number plate to. These are held on with body sealer. Will do these again when the cone is off for painting with fibreglass.


Been over the whole of the front of the car looking for possible SVA fails and covering them


The exhaust tip radius' have been giving us nightmares. Got this idea while talking to someone at work, its a bar that comes out from body work so that the exhaust tips don't fall within the 30° cone test for edges. No idea if this actually will mean the fall outside of the test but we shall see!


Not see in any of the phones, more toe in added. The steering rack bolted in properly with nylocs and lots of measuring for the boot floor!
19 Aug 2007, 6:24pm
Looking at your pictures i see you have cable tied brake hoses to suspension arm. Now im not 100% sure but the SVA says that brake hoses must not foul any part of bodywork or suspension so tieing them to suspension may be a failure!
The number plate brackets may well be a failure too leave them off until you have done SVA.
Your front indicators look as if they are mounted in the marlin bumper as i did mine which im sure dosnt bring them within the 400mm from the outside edge of the front wheel you may need to make some brackets up for these to get through the test.

Stuart