MadaboutKitcars

This is a read-only archive of the old Madabout Kitcars forum. New posts and replies are no longer possible, but every thread is still here to browse and read.

Another Cordite Is Born ...

6 Aug 2016, 6:37pm
Saturday - Part 2:
Which left the front end looking like this.


While the etch primer was out, I added some around the seat fixing holes on the driver's side.
( I left the bolts in the bottom of the seat and these rubbed against the paint. )


Then I added some 'normal' filler to parts of the cockpit wall on the passenger side.

Before:


After:


While that was setting, I started sanding down the filler on the cockpit walls on the driver's side.

Which included this blob which I had previously added when I was doing those blobs around the grille area.


Sanding this was as easy as it got.


As the sides were seriously hard work, especially as I was often leaning in from outside, with my head upside down. :rolleyes:

Still, it was worth it, as a vaguely smooth surface finally started to emerge.


End of Part 2…
6 Aug 2016, 6:38pm
Saturday - Part 3:
Which is a little easier to see when the etch primer is on.


Note: The interior was always going to be Spartan / 'rough & ready', so this is smooth enough.

I had also tidied up any stray bits of filler / resin from the driver's hump, so that was etch primed too.
( Note: I quite like this photo, as the body shell / cockpit shape is really getting there. :cool: )


By the time I got the passenger side the driveway was in direct sunlight and I got very hot.

I must remember to add a French Foreign Legion extension to the back of my cap to protect my neck.
( As I think this is how the sun really got to me the last time. :icon_sad: )

In addition to the sanding been very hard work, I had a slight mishap with the belt sander. :rolleyes:

Look closely and you will see the small hole /air pocket under the cockpit lip.


So I added some fibreglass filler to fill that it in.


I also fixed a very small hole I spotted on the driver's side (after the primer went on).


There was also a bit of tidying up to do on a section of the passenger wall while I was at it.


Apart from those areas getting remedial filler work, the rest of the previous filler is almost ready.


But by now, I was starting to feel a bit cooked and decided not to push my luck any further.

So I quickly added some filler over the bottom middle section of the rear cockpit wall...


Before putting the covers on and calling it a day as far as the car was concerned.

But after a shower to remove all the dust, I was back on duty in the garden as we had a small family BBQ for the 4 of us. :cool:

Until next time, take care, Paul. :)

PS
First thing this morning, I found one of these in my spare wiring box in the Summer House.


So at some point I can use this to take the power for the oil pressure gauge from the back of the fuel gauge.
( As per Mick O'Malley's suggestion. )
8 Aug 2016, 4:38pm
Sunday - No car time available.

- - - - - - - - - - - - - - - - - - - - - - - - - - - - - - -

Monday - Part 1:
Spend the morning with one of my daughters, including a trip to see the new Jason Bourne film. :cool:

So it was late afternoon before I got a chance to make a bit more progress…

I started with a bit of sewing as I added a Legionnaire's "flap" to the back of one of my work caps.


Although, as it turned out, the sun was not exactly beating down today. :rolleyes:

Still, all the sanding work kept me warm as I worked my way around the back of the cockpit.

Repair on driver's side.


Centre section.


Passenger side.


Then it was time for some etch primer.


End of Part 1…
8 Aug 2016, 4:39pm
Monday - Part 2:
I still have to sand down the filler on the front sections of the cockpit walls.

But at least the rear section is now ready for a coat of Tetroseal.


As before, there is now a nice contrast between the external body shell and the internal cockpit. :cool:


Unfortunately, at this point, the sky was turning dark, so I didn't want to push my luck.


The good news is that I am slowly working my way around the cockpit and it will be good enough for an MOT.

Until next time, take care, Paul. :)
9 Aug 2016, 5:03pm
Tuesday - Part 1:
Used a lot of dust sheets in a vain attempt to keep the filler dust at bay.


Then spent ages sanding down the front sections of the cockpit walls on both sides.


For now, I have just left the join between the front footwells and the lowered floor pans.
( At some point, I will cover this join with some aluminium sheet. )


Then I added some newspaper to protect the dash.


And covered the wing mirror fixing too.


Before the etch primer went on, starting with the driver's side.


And then the passenger side.


While that was drying, I added some masking tape to the rear cockpit edge.


Which wraps around to meet the cockpit wall like so.


End of Part 1…
9 Aug 2016, 5:04pm
Tuesday - Part 2:
At this point, the dark clouds appeared to be gathering.


But I took a chance and started painting Tetroseal along the middle section of the rear wall.


As the weather was still holding, I worked my way around to the driver's side.


After another check on the sky, the passenger corner was done.


At which point I had to stop anyway to switch to some gardening chores. :rolleyes:

But I was very happy to be leaving the cockpit looking like this. :cool:


Note:
While the filler looks rough in places when it is in primer, it all blends in nicely under the textured paint.

So until next time, take care, Paul. :)
9 Aug 2016, 8:12pm
Looking great there Paul as ever. I think you should buy shares in filler, etch primer and sand-paper suppliers :)

Dave
9 Aug 2016, 9:38pm
Does the Tetrosyl dry hard, so that you can paint over it? I've used something similar in the past that gave a great finish, but remained slightly tacky. Thanks.
10 Aug 2016, 6:58am
DaveP - Thanks. :cool:

I should also have bought some industrial quantities of "elbow grease" while I was at it. :icon_wink:

- - - - - - - - - - - - - - - - - - - - - - - - - - - - - - -

Triumph Special - Thankfully, the Tetroseal does dry to a hard finish, that is not tacky to the touch.

Although, if the underside is anything to go by, because the finish is rough, it will not stay looking "fresh" for long. :rolleyes:

So this cockpit will soon look a bit more "lived in".

- - - - - - - - - - - - - - - - - - - - - - - - - - - - - - -

Wednesday Update:
Off to a "real work" meeting this morning, but I hope to get a bit more painting done later today. :pray:

Cheers, Paul. :)
10 Aug 2016, 7:04am
Thanks for that, I'll have to look out for some. It looks ideal for the under boot area on my Triumph.
10 Aug 2016, 6:20pm
Triumph Special - Just be aware that using Tetroseal is like painting with shoe polish! :rolleyes:

I also treat brushes as an expendable item, rather than make any attempt to clean them.
( Sealing the brush in a plastic bag will usually give me a couple of days use. )

- - - - - - - - - - - - - - - - - - - - - - - - - - - - - - -

Very Early Morning:
Sometime after 6am this morning, the noise coming from the flat roof section of our loft conversion was ridiculous.

Now normally, when birds land on the flat roof it sounds like they are wearing hobnailed boots, but this was much worse.

So I ended up climbing out of the Velux window and up the sloping side of the roof at the front to see WTF was going on.

Two big crows and a seagull flew off leaving two mini nan breads (or something similar) which they were slowly pecking their way through.

So I got rid of those and carefully climbed back into our room and it is much harder getting back in, than getting out in the first place.

Either way, not the start to the day I was expecting! :eek:

- - - - - - - - - - - - - - - - - - - - - - - - - - - - - - -

Painting Myself Into A Corner:
It was just starting to spit rain as I walked home from the train station. :icon_sad:

But thankfully, this quickly blew over and I could get back outside to apply some more Tetroseal.

Although, as more areas got covered, it became quite tricky to manoeuvre myself around the cockpit without putting my hands down.
( As the Tetroseal gets onto my gloves and the last thing I wanted was paint on the primer. )

Passenger side first.


Followed by driver's side (excuse the poor photo).


Where I finished off the floor while leaning in from outside the car, which didn't do my back any favours. :rolleyes:


Then I peeled off the masking tape and the contrast between the body shell & cockpit really stands out. :cool:


Obviously, I am very happy with that and this is all I need for the MOT.

- - - - - - - - - - - - - - - - - - - - - - - - - - - - - - -

After a bit of digging, I finally found this old photo of DonnySoutherner's cockpit on his Cordite.


This was after Micky1Mo had got the car through its first MOT, so clearly a luxury cockpit interior is not required.

[color="red"]Question:[/color]
Does anyone know what the rules are regarding handbrake and gear lever covers?

Are they essential for an MOT, or just a "nice to have" item?

- - - - - - - - - - - - - - - - - - - - - - - - - - - - - - -

That's all for today and at some point I need to sort out the wiring so the dash can be put back into place.

Wiring Jobs:
- Oil pressure gauge
- Heater fan switch
- Front side lights

Until next time, take care, Paul. :)
10 Aug 2016, 8:24pm
Good work Paul
Im pretty sure that the covers are not required for MOT
12 Aug 2016, 6:03pm
Roadster - Thanks. :cool:

I had a quick look at the MOT rules and it didn't mention them specifically.
( Having said that, I will probably make some kind of gear lever cover. )

- - - - - - - - - - - - - - - - - - - - - - - - - - - - - - -

Looking Back:
Seeing the rear cockpit finally painted black the other day was another huge milestone for me. :cool:


As, thankfully, there is no way of telling just how much hard work has gone into what you can see now.

DonnySoutherner was the first person to re-use old Spitfire rear wheel arches in his build.

Then AndyP57 recycled an old Spitfire hand brake panel into one of his builds.

But I think I am the only person to use a complete rear arches / hand brake panel "combo" in their builds.

Mind you, just getting these two big pieces of my internal framework structure "jigsaw" from the garden to the driveway was hard work. :rolleyes:


And getting them to slot together to form a singe piece was not easy either.

Among other things, I had to modify the arches to fit around the framework.


And then modify the framework to fit around the arches.


Further work was needed to permanently join them together & then allow the body shell to sit nicely over the top.

Plus the floors had to be welded into place and an extension to the framework added to so it could be joined to the Spitfire bulkhead.

Then the plywood panels had to be put together as another collection of jigsaw pieces.

Actually…

Thinking about it…

It is probably best not to think about the number of hours that have gone into this build. :icon_wink:

- - - - - - - - - - - - - - - - - - - - - - - - - - - - - - -

I've been doing some "real" work for the last couple of days, but hope to spend some time on the car over the weekend. :pray:

Until then, take care, Paul. :)
12 Aug 2016, 9:10pm
Triumph Dolomites and Toledos had a neat and unobtrusive rubber gator beneath the trim/carpet one. They cost pence from Rimmers and would suit your application well.
12 Aug 2016, 10:19pm
Good suggestion Triumph

I always like using cv gaiters, cheap and available at most parts store
13 Aug 2016, 3:01pm
Triumph Special & Roadster - Cheers chaps, I'll look into that handbrake gaiter option after the MOT. :cool:

- - - - - - - - - - - - - - - - - - - - - - - - - - - - - - -

Struggling Saturday - Part 1:
First job of the day was to re-fit the access panel to the rear cockpit wall.


I think it makes a good contrast against the black. :cool:


Next up was fitting the seat belt eye bolts for my 3 point harness on the driver's side:

- Rear cockpit wall behind seat.


- Original Spitfire seat belt mount along hand brake panel.


- Side cockpit wall.


With a matching set for the passenger side too.


Then it was time to tackle the wiring…

For the oil pressure gauge, I made an earth strap…


And a "piggy back" power lead.


Which was used to share the power from the fuel gauge.


Before I had to start crawling upside down into the footwells again.

It took me ages to reconnect all the small parts I had removed when I though the whole dash had to come out. :icon_sad:

I then set up a new earthling point for the oil pressure gauge & the loom in general.
( Previously I used the mounting point for the wooden dash as my earthing point. )


You will just have to take me word for it that the gauge is now wired up at the dash end.


I still need to connect the wire to the sensor switch on the engine, but I'll come back to that later.

End of Part 1…
13 Aug 2016, 3:03pm
Struggling Saturday - Part 2:
Then I could finally put the two wooden dash sections back into position, along with the steering column cover.


With the dash back in place, I could fit the driver's aero screen. :cool:


Then I removed the bolts from the bottom of the driver's seat, so it wouldn't scrape the newly painted floor.

Then for a bit of extra protection, I put my "butchered" yoga mat underneath.


It is fair to say that at this point things were going well, so it was time to start the engine.

As this was last fired up in July before I had to disconnect the choke level when I was trying to remove the dash.

With the choke cable now re-attached and some "fresh" petrol poured into the tank for luck, I turned the key…

And absolutely nothing happened. :icon_sad:

I checked the battery & that was OK and the horn works.

I checked under the dash to make sure I hadn't pulled a wire out during my earlier work, that all seemed fine.

I did fine one problem in the engine bay, where an ignition coil connector was broken.


So I wired in a temporary solution for now...


But still no sign of life when I turn the ignition key. :rant:

By this point I wasn't feeling great, so decided to call it quits and come back another day to find the fault.
( This is the 3rd time this has happened, so there must be a simple explanation somewhere. :pray: )

But before I went indoors, I pushed the car into the sunshine on my driveway for a few photos. :cool:


Please ignore how dusty the front footwells are, I will be sorting them out once all the wiring is fixed.

Anyway, I'm now off to lie down for a bit, so until next time, take care, Paul. :)

PS
Warts & All:
This is what happens when you combine 'not enough masking tape' with 'a lazy brush stroke'. :rolleyes:


Still, at least that is an easy fix for another day.
13 Aug 2016, 5:03pm
Well done Paul
Its no longer a project - its officially a car.
Im sure the starter issue is something simple.
13 Aug 2016, 9:22pm
Lucas starter solenoids are hopeless. Mine kept stranding me at petrol stations with the same symptoms you describe - nothing on turning the key even though everything's new and connected properly. Only reliable solution is to fit mechanically actuated solenoid, I used Series 1 Landy item, but this should do the job - http://www.ebay.co.uk/itm/MANUAL-PUSH-BUTTON-STARTER-MOTOR-SOLENOID-REPLACES-LUCAS-SRB316-76702-12V-2ST-/231811821832?hash=item35f90fb108:g:f1IAAOSwX~dWlTM6
14 Aug 2016, 6:10am
Roadster - Cheers, I really like the way the car is finally coming together. :cool:

I just need to keep ticking off the last few jobs before it will be ready for an MOT.

- - - - - - - - - - - - - - - - - - - - - - - - - - - -

Mr T - Thanks for the link. :cool:
( I do remember you fitting this in your car, as I hadn't seen one before. )

Unfortunately, my ignition problem starts before I get to the solenoid stage, i.e. the first turn of the key.

The battery is fully charged, but the ignition light doesn't come on. :icon_sad:

Later today I will try to by-pass the battery cut off switch, in case there is a problem with that.

- - - - - - - - - - - - - - - - - - - - - - - - - - - -

Cheers, Paul. :)
14 Aug 2016, 8:39am
Looks great Paul. Love the black interior against the grey body. And the aero screens with the rear view mirror having its own screen look brilliant.

You're getting there !

Dave
14 Aug 2016, 9:19am
Still great work going on here I see :)

The cockpit looks like it's been lines in a purpose built rubber lining which looks great but hides all the work and hours that have gone into it :(

Keep up the great work and you'll be rolling soon enough :)
14 Aug 2016, 2:28pm
DaveP - Thanks. :cool:

The matching aero screen for the rear view mirror was one of those ideas that started out as a dodgy sketch...


But it has turned out a lot better in reality.

- - - - - - - - - - - - - - - - - - - - - - - - - - - - - - -

WelshOne - Cheers. :cool:

Don't forget I am actively trying to hide all the hours had have gone into this build.

It is supposed to look like a 50 years old race car under going a rolling restoration after I found it languishing in a barn. :icon_wink:

- - - - - - - - - - - - - - - - - - - - - - - - - - - - - - -

The Weakest Link:
After quite a frustration session of trial and error, I think I have found my problem…

I started by by-passing the cut off switch and as if by magic the ignition light came on & the engine started.

Unfortunately, it then promptly died again leaving me once again with no power.

Lots more fiddling around with wires later and for no apparent reason, the ignition light came on when the cut off switch was in use normally & not by-passed.

Again the engine fired up straight away and this time it ran for a little while before dying.

I pulled out all the fuses, cleaned the terminals and re-fitted them.


This seemed to do the trick as everything was now working, including the front side lights.


Whilst I was happy to see these come on, I was frustrated at the way I've butchered the front loom looking for the fault. :icon_sad:

The other thing that I have discovered recently is that the I don't have the right sensor fitted for the oil pressure gauge. :rolleyes:

So I simply reconnected the oil warning light wire to the oil warning light sensor.


Which means I now have both lights coming on with the ignition key.


Feeling very happy with myself, I wheeled the car out for some celebratory photos…


Then with the car safely back on the drive and the engine running, I just wiggled the loom behind the fuse box…
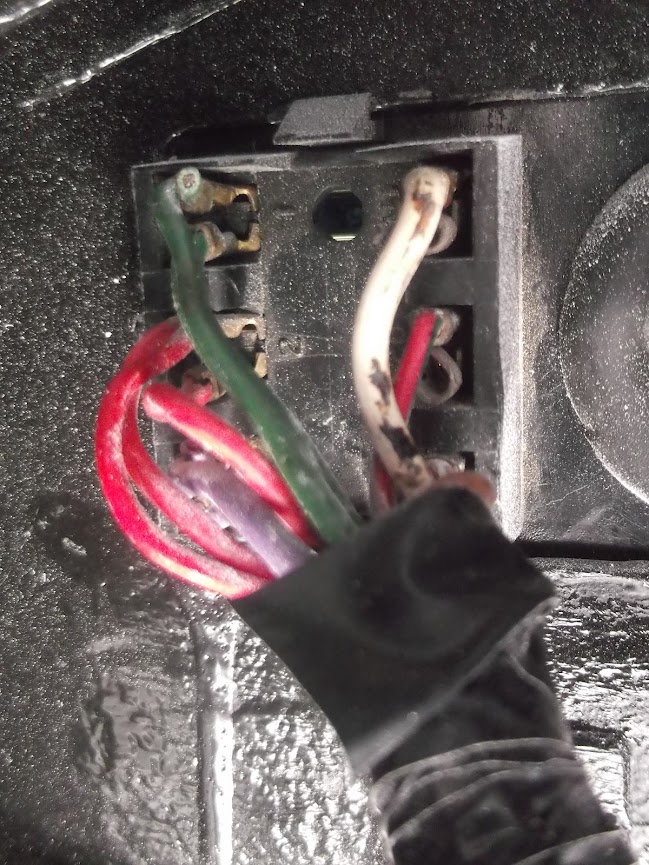


At which point the engine instantly died.

BINGO!

Now I have had a modern blade type fuse box on my Ebay watch list for years as I didn't think the glass fuses were a good idea.

So I've now ordered the fuse box, some fuses and some new "piggyback" terminals to rewire everything.

Thankfully, I can fit the new box inside the passenger footwell somewhere within the current lengths of the wiring. :cool:

Now a good rule of thumb for car building is…

"Quit while you're ahead!" :icon_twisted:

Actually, the truth is the next job is cleaning up the underside of the passenger cockpit panels and I couldn't face it.
( I am still feeling a little run down. )

But I still feel very happy that if I fix the fuses I will be good to go. :pray:

Until next time, take care, Paul. :)
14 Aug 2016, 4:13pm
Well done Paul, intermittent faults on anything are a pain in the *ss to find so a good job done. Hopefully the new fusebox will be easy for you to fit and will sort it for good. Car is looking great now and really coming together as you add more finishing touches.
14 Aug 2016, 5:52pm
Hi paul ,the car looks truly great a credit to you for all the hours you have put in ,Pete.