This is a read-only archive of the old Madabout Kitcars forum. New posts and replies are no longer possible, but every thread is still here to browse and read.
Ended up spending most of the day on sofa after having missed the opening times of metal supermarket and hampshire hose due to silly traffic on the M3.
Anyway spent a little time finishing off bolting the tub up to the suspension towers - stop things flapping about.
Also setup the up the front camber. No idea what to use so I've got 1.25 negative on both sides. The main thing is that they are now the same. Also made everything SVA friendly with those black tube things.
The bonnet now has all 40 bolts, cup washers, washers and nyloc's in place. Some need to come out again as they need a bit more work with the sinker tool.
Rubber is place round the rear wings - good tip for putting holes in the rubber. Use a socket piece that's the size hole you want to use. Place it on the rubber, put in a vice. Close it up quite tight and pull the rubber of the socket bit. Now you have a nice hole in the rubber!
Exhaust is now higher up and the reverse, fog and number plate lights are wired up and working!
And the first pictures to go into the interior gallery:
First custom piece on the interior taking shape
...can you guess what it is yet?
One finished indicator stalk!
And now in the car:
The indicator stalk as been modified so that it sits further forward to clear the dash This was achieved by bend it straight then putting a new bend in further towards the end of the stalk. The original plastic piece would not fit, but this turn out much nicer than the original anyway!
Thanks Peter I'm hoping to get the bonnet latches soon which will finish that off nicely!
As for the wings it's the edge trim (bottom right - for up to 4.5mm panels) http://www.nfauto.co.uk/download/trim_page.pdf from CBS It's a right pain to get on - I used a screw driver to open it up a bit and a body work hammer to get it on. On the plus side I hope its strong enough for SVA without need to glue it on!
Just need to do the rest of the car at some point.
...nope the, the vinyl covered sponge for the dash is completely the wrong shape. It was the wrong shape before stretching the dash and after it was even further out.
The bolts as per the Marlin item are glued in the metal. We've used fibre glass filler, the bolt heads have extra cuts in them for the fibres to rest in. The original Marlin sponge glued on to the new metal.
The inside edge of the metal is now trimmed out to the shape of the sponge and mounted on the scuttle. The sponge now follows the shape of the scuttle nicely. Dash and trim now in place. As you can see the gauges got very close to the trim so we've made some recesses to match the placement of the gauges.
A side shot of everything in place. The dash itself needs a bit more trimming down. The metal piece backing the sponge has a rolled edge which should cover the dash nicely.
...nope the, the vinyl covered sponge for the dash is completely the wrong shape. It was the wrong shape before stretching the dash and after it was even further out.
That's a shame, my combing was a reasonable fit after I stretched the scuttle a little bit? Surely they are all cut from a template?
Getting the holes in the right place is not so easy. I think the instuctions say to drill 10mm holes for 6mm screws!
The inside edge of the metal is now trimmed out to the shape of the sponge and mounted on the scuttle. The sponge now follows the shape of the scuttle nicely.
Good to see some pictures of this. Not having bought the trim kit - I wondered how Marlin made the curvy bit for the dash. Now I know...
This just keeps getting better. I thought a nice easy task this evening would be to add the sponge strips to the tops of the doors - nice and straight so nothing much to go wonky.
I was ooh so very wrong:
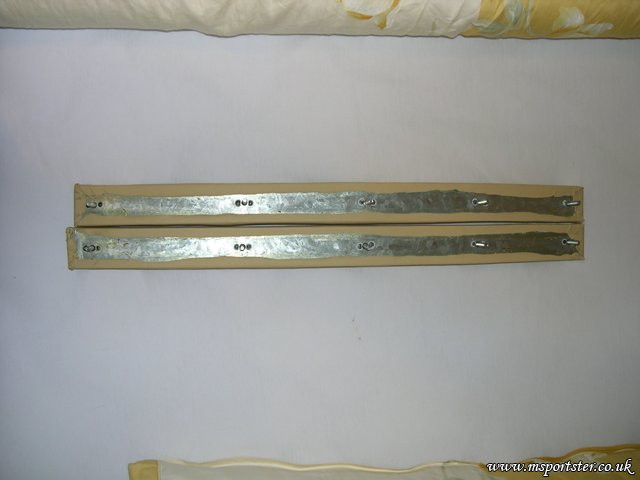
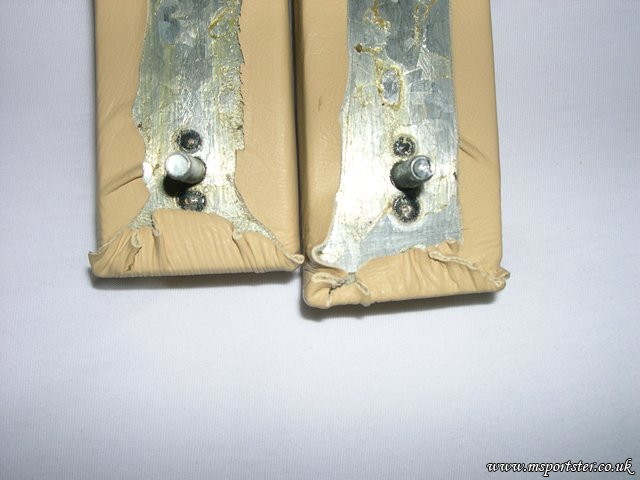
These are supposed to be the same length, the longer one is too big to fit properly
What happened during the construction is each end has a hard card board bit to keep the round shape. On one they are placed slightly over the backing metal, on the other at the ends.
There can not be any quality control at all at Marlin if this sort of thing gets shipped to customers.
I will also add that this is my second set as the first ones were the wrong colour. These also have a nice dimple that I thought would go away after a year in the loft due to bad packing. Its still there.
The quality of the trimming leaves a lot to be desired as well.
I won't be sending these back, I will fix myself.
It is just starting to irritate me the number of times during the building I've had to spend money / time / effort fixing things that should work / be correct out of the box!!
One is 64.5mm long and the other is 64.3mm.
The shorter one has that funny angle to the end.
I haven't checked, but I wonder if the doors are a diffrent size?
When I was mounting the lock striker plates, I noticed that the plates ended up on a different postion on the chassis. Each side of my chassis is certainly not identical? (and Patrick, your rear wings where diffrent lengths, weren't they?)
Perhaps Marlin has a plastic ruler and it depends on the weather on the day they make the bits?
As the website says........
"I am most impressed by the quality of the kit, as the manual says - 'if it does not go together easily, it is probably not assembled correctly' - so far Marlin have proved their point!"
Patrick, I think you should reject these and your wiggly bit and ask for a new complete set.
These are supposed to be the same length, the longer one is too big to fit properly
They look awful.... I have done quite a bit of trimming myself on previous cars and it really isn't that difficult with the right materials and some patience. I hope you are able to get it sorted OK.
Ended up pulling the vinyl off, cutting back the sponge, glueing the cardboard end piece back on and then pulling the vinyl back over.
Doesn't look any better but they are now the right length.
What I am going to do is SVA the car with these and then in time do the job properly.
Didn't have time for anything else as we replaced all the suspension, front wishbones, track rods and tie rods on my brothers car. That soaked up all of Saturday and a bug caught up with me sunday so I spend most of the time in a sofa!
First off the bonnet catches, a price item but look really nice and should go well with the rest of the bright work on the car. These are supposed to be SVA compliant, we shall see! (Got them from Marlin, better price the Europa)
Due to damaging one of the original brakes lines we had some new ones made, this time with a banjo connection for the calliper side. The problem with the original ones is that the cable comes out the top of the calliper and on full lock gets trapped between the wish bone and the front wing carrier. With the banjo its possible to angle the pipe so that there is no contact at any point in the movement of the wheels (there is a lock in place on the rack to reduce movement but experimenting showed that this is enough for slow speed manoeuvring)
Second bit of construction news, the air intake (which will be domed to create a low pressure area around the intake) now has a new much more flexible pipe than the one that came with the BMC making installation much easier:
Finally small bit of interior work. After fixing the sponge / piping for the doors we test fitted them - needs more work but getting there:
After nearly a whole measuring the bonnet catches are now install. They really finish the car of nicely.
Spent a few hours day creating a centre console out of the scrap bits left from making the metal backing for the dash sponge / piping. Not sure if this will be the final piece or not yet!
They pull into shape quite well, I've still got to trim the edges of the bonnet a bit now the catches are on. They should sit even better then. Not 100% happy with the shape, but I think it will be fine for SVA. After that we can fine tune. They don't pull down quite as far as I would have liked but is pretty good. They should look great on dark paint
I've been putting this one off for months, but today was finally the day that the floors went in!
Step 1 - measure out and drill 40 holes in one floor
Step 2 - drill 40 holes in the the floor of the other side.
Step 3 - drill 40 holes in the driver side
Step 4 - drill 40 holes in the passenger side after a trip to the DIY shop to get a new drill bit! Despite the extensive use of cutting compound the drill bits just get blunt after drilling 120 holes in hard steel!
Step 5 cover driver side with black goo from CBS and put 40 steel rivets in
Step 6 - repeat on the passenger side, then go and rest hands / arms...
And some more wiring, some more wiring added, the dash is now easy to remove if need by unplugging a few multi plugs.
After many hours of measuring, cutting, getting it wrong and making the holes bigger these steel square bars now fit! Only realising half way that the runners on the seat itself were not parallel! Problem solved though. Did the front holes first and then later the rear ones, which you can't get to very easily!
The steel bars will be drilled and bolted on the outsides through the chassis for extra strength.
Mine are not the same both sides. The way I did the drivers was rest seat so other half was comfortable at the seat forward. Then try with the seat slid back to see if I was comfortable.




 I'm hoping to get the bonnet latches soon which will finish that off nicely!