|
|
| Tribute Automotive Builds Discuss your Tribute kit build |

14th January 2017, 15:59
|
|
Senior Member
|
|
Join Date: Mar 2015
Posts: 395
|
|
I started modifying the inlet manifold the carb side was quite easy only a small amount of metal to take off but the head side ho boy in the end I used a stepper drill opening up the ports to 32mm then grind them flush.


When I removed the twin carbs I found out the manifold gasket was blowing in about half a dozed places probably why I couldn't tune them but being a stubborn git? I will press on with the single carb setup.
Once I now it is running properly I will sell the twin carb setup should be a nice buy for someone as it will come with stainless steel heat shield and filters.
 |
21st January 2017, 16:13
|
|
Senior Member
|
|
Join Date: Mar 2015
Posts: 395
|
|
This is my new carby setup a single 1.3/4 Su running but not properly yet I need a different needle and jet and having issues getting the right ones  in the mean time ill have to make a throttle bracket for it.
also started planning the flip up bonnet brackets.

I will update you on them later. |
22nd January 2017, 21:16
|
|
Senior Member
|
|
Join Date: Mar 2015
Posts: 395
|
|
Getting there slowly!
|
1st February 2017, 20:39
|
|
Senior Member
|
|
Join Date: Mar 2015
Posts: 395
|
|
Started making the brackets for the bonnet I have also got a pair of locost suspension arm bracket ends which will be the swivels unfortunately the bonnet is quarter mile away in a lockup so cant be finished until I get it into my garage.

I couldn't get the right needle for the 1. 3/4 su then this came up on eBay it cost £100 less than just the inlet manifold and linkage for my side draught weber so I bit the bullet and went for it just waiting for some stainless pipe and it will be done.

I've got a sneaky feeling I'll have to put a bonnet bulge in though 
Trouble is I bust my budget so I'll have to sell a few bits and pieces ho joy soon  |
2nd February 2017, 06:51
|
 |
Senior Member
|
|
Join Date: Jul 2011
Posts: 5,328
|
|
Keep up the good work and don't worry too much about adding the odd bulge or scoop. Racing cars of the period are often covered in them as the car was dynamically developed in the pits. At risk of getting into a silly 'I've found one with more scoops' arms race, I'd say the inspiration for my Spyder, the Lancia D24, probably has the most afterthought holes, scoops, flaps and bulges that I've come across -
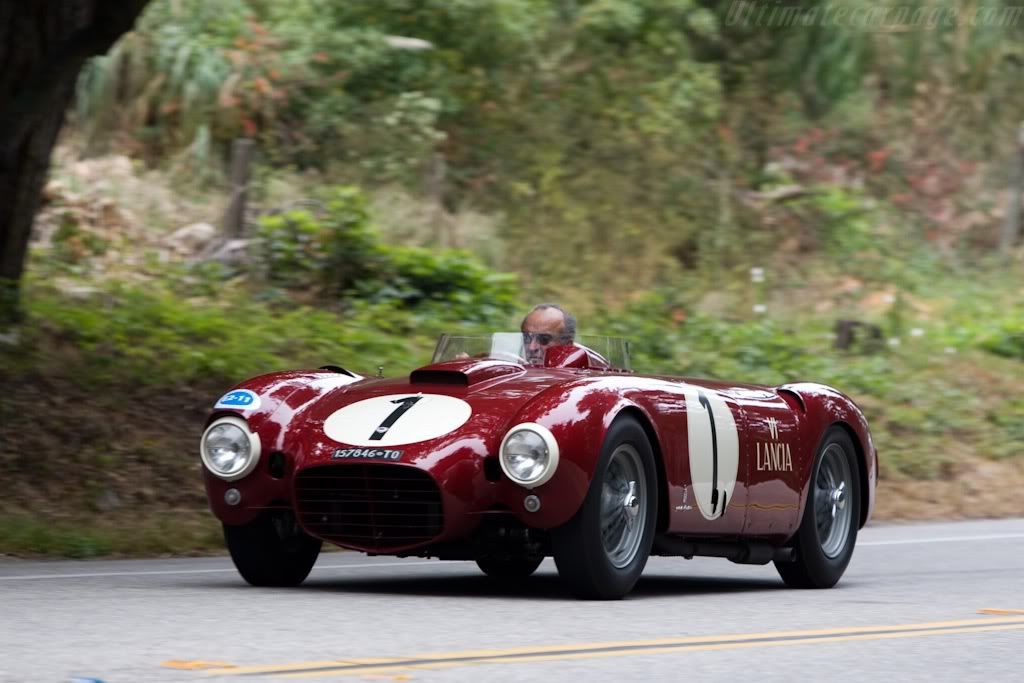
Period pictures also show that these cars often ran with a radiator blind, which looked suspiciously like half a dustbin lid, blanking off half the front grille, presumably for use in cold weather.
Looking round the 50's race cars at Goodwood, Snetterton etc., the bodywork and paint on the originals often really isn't very good. After all, they weren't intended as show quality cars, they were built to win races. |
2nd February 2017, 14:58
|
|
Senior Member
|
|
Join Date: Mar 2015
Posts: 395
|
|
Very true the odd bulge or intake here ant there adds a bit of character to the cars.
|
8th February 2017, 21:22
|
|
Senior Member
|
|
Join Date: Mar 2015
Posts: 395
|
|
Finished making the bonnet brackets today looks good but

as always with welding thing move due to the heat and where as it all fitted perfectly before I now have gaps which will have to be filled somehow before the bonnet can be bonded into place

I did think of cutting and welding again but that could make things worst??
I couldn't get a decent photo of the bonnet in place the garage is to small but It looks too high so a bit more suspension lowering may be needed (at a later date)
bye for now
Deggsy  |
16th February 2017, 16:26
|
|
Senior Member
|
|
Join Date: Mar 2015
Posts: 395
|
|
The bonnet is lined up and partially glassed into place lot's more glass fibre reinforcing to be added over the next few days, and a bonus there is enough clearance for the carb (just)

 |
4th March 2017, 16:54
|
|
Senior Member
|
|
Join Date: Mar 2015
Posts: 395
|
|
I managed to finish reinforcing the bonnet supports today it was done with a combination of fibreglass paste and 3" woven glass tape for added strength.

Not very pretty but it will look better after spraying with some body guard (I hope) |
4th March 2017, 17:53
|
|
Senior Member
|
|
Join Date: Jul 2011
Posts: 5,328
|
|
So long as it's strong enough does it really matter what it looks like?
|
4th March 2017, 18:03
|
|
Senior Member
|
|
Join Date: Mar 2015
Posts: 395
|
|
Only time will tell on that one Mr.T
|
4th March 2017, 20:18
|
 |
Senior Member
|
|
Join Date: Jan 2014
Location: Egham, Surrey
Posts: 1,780
|
|
I would use more csm and take it a lot further out to spread the load. A large bonnet like yours will act as a lever, just a strong gust of wind when in the upright position could cause cracks or failure. I would introduce some metal rod to stop any flexing.
|
4th March 2017, 21:51
|
|
Senior Member
|
|
Join Date: Mar 2015
Posts: 395
|
|
Thanks for the input I can still add some bracing rods by welding them to the bottom square bar if required more work again doh! You are right though just ignore my winging cheers. deggsy
|
5th March 2017, 05:49
|
|
Senior Member
|
|
Join Date: Jan 2014
Location: Egham, Surrey
Posts: 1,780
|
|
Sorry, I meant embed some metal rod in the GRP and spread the GRP further out to try and stiffen the area to prevent it cracking at a later date.
|
5th March 2017, 09:13
|
|
Senior Member
|
|
Join Date: Jul 2011
Posts: 5,328
|
|
Last edited by Mister Towed; 5th March 2017 at 09:18..
|
5th March 2017, 11:54
|
|
Senior Member
|
|
Join Date: Mar 2015
Posts: 395
|
|
Thanks for the info my setup is similar except the steel hoop is bonded into the bonnet it should work ok? but I can reinforce it if required.
|
6th March 2017, 10:16
|
|
Senior Member
|
|
Join Date: Mar 2015
Posts: 395
|
|
I bought a pair of long driveshaft's yesterday on eBay they are off a gt6 and will need a lot of work i.e. cleaning and the flanges are the too big and I will have to source longer tie rods but with the spacers they should bring the rear wheels out just right? When I get round to installing them I can take the top leaf out of the swing spring as well.
|
16th March 2017, 18:30
|
|
Senior Member
|
|
Join Date: Mar 2015
Posts: 395
|
|
After weeks of sanding the headlamp mounts well ok it was days or hours over lots of days I finally got them fitted, you can't see it in the photos but they look a bit squint I'm not cutting them back off after all my hard work so a bit of packing out will be required to align the headlamps.


It wont be seen so will be ok.
Now for the disaster as I have been unable to get the engine running smoothly
I borrowed my compression tester back of a friend of mine (he's had it for years) did a test and yuk piston one 100lbs two 106lbs three 130lbs four 140lbs did a wet test and they were all over 200 so ring or worn bores,  so if you'll excuse me I'm going to have a good scream in the corner. |
18th March 2017, 08:34
|
|
Senior Member
|
|
Join Date: Mar 2015
Posts: 395
|
|
Yahoo I finally got the engine running smoothly there was a problem with the linkages on the weber the secondary barrel was opening first and the primary just a little bit I reversed the setup now she's running fine even with pistons 1&2 being down a bit on pressure. result yes
|
18th March 2017, 14:21
|
|
Senior Member
|
|
Join Date: Mar 2015
Posts: 395
|
|
I have just finished making the bonnet prop it is made up of nine pieces not counting the bolts & nuts I could have made it simpler but this one has quite a bit of adjustment if required.

The reinforcing bar is 1m x25mm x4mm which is bonded in with glass paste then three layers of woven glass tape I might add more glass matting later (I ran out) for extra strength.  |
|
Currently Active Users Viewing This Thread: 1 (0 members and 1 guests)
|
|
|
| Thread Tools |
|
|
| Display Modes |
 Hybrid Mode Hybrid Mode
|
 Posting Rules
|
You may not post new threads
You may not post replies
You may not post attachments
You may not edit your posts
HTML code is Off
|
|
|
All times are GMT +0. The time now is 20:34.
|


